

Developing with Graphics
Deutsch · English · Español · Français · Italiano · Nederlands · Português · Slovenčina · Русский · 中文(中国) · 中文(台灣) · 日本語
This page describes the basic classes and techniques regarding drawing graphics with Lazarus. Other more specific topics are in separate articles.
Libraries
Graphics libraries - here you can see the main graphic libraries you can use to develop.
Introduction to the Graphics model of the LCL
The Lazarus Component Library (LCL) provides two kinds of drawing class: Native classes and non-native classes. Native graphics classes are the most traditional way of drawing graphics in the LCL and are also the most important one, while the non-native classes are complementary, but also very important. The native classes are mostly located in the unit Graphics of the LCL. These classes are: TBitmap, TCanvas, TFont, TBrush, TPen, TPortableNetworkGraphic, etc.
TCanvas is a class capable of executing drawings. It cannot exist alone and must either be attached to something visible (or at least which may possibly be visible), such as a visual control descending from TControl, or be attached to an off-screen buffer from a TRasterImage descendent (TBitmap is the most commonly used). TFont, TBrush and TPen describe how the drawing of various operations will be executed in the Canvas.
TRasterImage (usually used via its descendant TBitmap) is a memory area reserved for drawing graphics, but it is created for maximum compatibility with the native Canvas and therefore in LCL-Gtk2 in X11 it is located in the X11 server, which makes pixel access via the Pixels property extremely slow. In Windows it is very fast because Windows allows creating a locally allocated image which can receive drawings from a Windows Canvas.
Besides these there are also non-native drawing classes located in the units:
- graphtype: TRawImage is the storage and description of a memory area which contains an image.
- intfgraphics: TLazIntfImage is an image which attaches itself to a TRawImage and takes care of converting between TFPColor and the real pixel format of the TRawImage.
- lazcanvas: TLazCanvas is a non-native Canvas which can draw to an image in a TLazIntfImage.
The main difference between the native classes and the non-native ones is that the native ones do not perform exactly the same in all platforms, because the drawing is done by the underlying platform itself. The speed and also the exact final result of the image drawing can have differences. The non-native classes are guaranteed to perform exactly the same drawing in all platforms with a pixel level precision and they all perform reasonably fast in all platforms.
In the widgetset LCL-CustomDrawn the native classes are implemented using the non-native ones.
All of these classes will be better described in the sections below.
Working with TBitmap and other TGraphic descendents
The TBitmap object stores a bitmap where you can draw before showing it to the screen. When you create a bitmap, you must specify the height and width, otherwise it will be zero and nothing will be drawn. And in general all other TRasterImage descendents provide the same capabilities. One should use the one which matches the format desired for output/input from the disk or TBitmap in case disk operations will not be performed as well as for the Windows Bitmap (*.bmp) format.
Loading/Saving an image from/to the disk
To load an image from the disk use TGraphic.LoadFromFile and to save it to another disk file use TGraphic.SaveToFile. Use the appropriate TGraphic descendent which matches the format expected. See Developing_with_Graphics#Image_formats for a list of available image format classes.
var
  MyBitmap: TBitmap;
begin
  MyBitmap := TBitmap.Create;
  try
    // Load from disk
    MyBitmap.LoadFromFile(MyEdit.Text);

    // Here you can use MyBitmap.Canvas to read/write to/from the image

    // Write back to another disk file
    MyBitmap.SaveToFile(MyEdit2.Text);
  finally
    MyBitmap.Free;
  end;
end;
When using any other format the process is completely identical, just use the adequate class. For example, for PNG images:
var
  MyPNG: TPortableNetworkGraphic;
begin
  MyPNG := TPortableNetworkGraphic.Create;
  try
    // Load from disk
    MyPNG.LoadFromFile(MyEdit.Text);

    // Here you can use MyPNG.Canvas to read/write to/from the image

    // Write back to another disk file
    MyPNG.SaveToFile(MyEdit2.Text);
  finally
    MyPNG.Free;
  end;
end;
If you do not know beforehand the format of the image, use TPicture which will determine the format based in the file extension. Note that TPicture does not support all formats supported by Lazarus, as of Lazarus 0.9.31 it supports BMP, PNG, JPEG, Pixmap and PNM while Lazarus also supports ICNS and other formats:
var
  MyPicture: TPicture;
begin
  MyPicture := TPicture.Create;
  try
    // Load from disk
    MyPicture.LoadFromFile(MyEdit.Text);

    // Here you can use MyPicture.Graphic.Canvas to read/write to/from the image

    // Write back to another disk file
    MyPicture.SaveToFile(MyEdit2.Text);
  finally
    MyPicture.Free;
  end;
end;
The canvas of a form cannot be saved directly into a file and must fist be copied into an appropriate image. The following procedure copies a rectangle of the form's canvas into a .PNG file (which compresses text and graphs with good quality). If you wish to copy into a .JPG file (ideal for compressing photographs) instead of TPortableNetworkGraphic use tJPEGimage. If you wish to copy into a .BMP file (which does not compress the canvas) instead of TPortableNetworkGraphic use tBitmap:
procedure saveCanvasToPNGfile(fromCanvas:tCanvas;left,bottom,right,top:integer;toFileName:string); //left,bottom,right,top define the rectangle of the canvas to be save into disk
var rectangleFrom,rectangleTo: TRect;
    myImage: TPortableNetworkGraphic; //use tJPEGimage to create JPGfile, or tBitmap to create BMP file
begin
   rectangleFrom:=rect(left,bottom,right,top);
   rectangleTo:=rect(0,0,right-left+1,top-bottom+1);
   myImage:=tPortableNetworkGraphic.create;
   myImage.width:=right-left+1;
   myImage.height:=top-bottom+1;
   myImage.canvas.copyRect(rectangleTo,fromCanvas,rectangleFrom);
   myImage.SaveToFile(toFileName);
   myImage.free;
end;
Additional file formats for TImage
You can add additional file format support by adding the fcl-image fpread* and/or fpwrite* units to your uses clause. In this way, you can e.g. add support for TIFF for TImage
Indirect pixel access
Color for pixels can be simply read or written using TBitmap.Canvas.Pixels property. Access using Pixels property is generally slow as lot of internal management operations need to be done on each execution. This can be speed up little bit be enclosing access to Pixels with TBitmap BeginUpdate and EndUpdate.
Direct pixel access
To do directly access the pixels of bitmaps one can use:
- TBitmap.ScanLine - which needs to be enclosed in BeginUpdate and EndUpdate. It uses internally same assess as with RAWImage so access needs to respect internal color channels structure according TRAWImage.Description.
- TBitmap.RAWImage - allows to directly access bitmap internal memory. Color channels can be swapped for some platforms so ReadChannels and WriteChannels need to be used to convert pixel color to TColor or TFPColor correctly. Or pixel data can be accessed directly with respect to TRAWImage.Description.
- external libraries - see Graphics libraries
- use the Lazarus native TLazIntfImage.
- implement custom optimized bitmap structure. For a comparison of pixel access methods, see fast direct pixel access.
On some Lazarus widgetsets (notably LCL-Gtk2), the bitmap data is not stored in memory location which can be accessed by the application and in general the LCL native interfaces draw only through native Canvas routines, so each SetPixel / GetPixel operation involves a slow call to the native Canvas API. In LCL-CustomDrawn this is not the case since the bitmap is locally stored for all backends and SetPixel / GetPixel is fast. For obtaining a solution which works in all widgetsets one should use TLazIntfImage. As Lazarus is meant to be platform independent and work in gtk2. There is a GetDataLineStart function, equivalent to Scanline, but only available for memory images like TLazIntfImage which internally uses TRawImage.
Drawing color transparent bitmaps
Bitmap files (*.bmp) usually do not store any information about transparency. However, a feature, implemented already in Lazarus 0.9.11, is "color transparency": This means that one particular color is defined to be transparent and is not painted. This common trick is applied when the Transparent property of the bitmap instance is set to true. Usually the color in the bottom-left corner of the bitmap will be taken to be the transparent color unless the property TransparentColor is set to another color value.
The following example loads a bitmap from a resource named 'FOLDER_OPEN', selects a color to be transparent (clFuchsia) and then draws it to the form's Canvas in its OnPaint event. The assignment of the TransparentColor can be omitted if the bottom/left pixel does already contain the transparent color. In any case, it is highly recommended to change the Transparent property to true at the end of the assignment sequence.
procedure TForm1.FormPaint(Sender: TObject);
var
  bmp: TBitmap;
begin
  bmp := TBitmap.Create;
  try
    bmp.LoadFromResourceName(HINSTANCE, 'FOLDER_OPEN');
    bmp.TransparentColor := clFuchsia;
    bmp.Transparent := true;
    Canvas.Draw(8, 8, bmp);
  finally
    bmp.Free;
  end;
end;
Drawing alpha-channel transparent bitmaps
Descendants of TGraphic using a 32-bit-per-pixel pixelformat can have an "alpha" channel besides the normal red, green and blue color channels. This additional channel is used to provide transparency information in a gradual way. alpha=0 means "fully transparent", alpha=255 means "fully opaque", but any intermediate states are possible as well. bmp files usually do not come in this format, but the TPortableNetworkGraphic class (file extension: .png) is a very prominent example of an image format supporting an alpha channel by default. In the next code sample, we load a png file from the Lazarus images folder and draw it on the form in a transparent way:
procedure TForm1.FormPaint(Sender: TObject);
var
  png: TCustomBitmap;
begin
  png := TPortableNetworkGraphic.Create;
  try
    png.LoadFromFile(LazarusDir + 'images/actions/execute.png');
    Canvas.Draw(8, 8, png);
  finally
    png.Free;
  end;
end;
Note that the transparency-related settings discussed in the previous section are ignored this way.
Taking a screenshot of the screen
Since Lazarus 0.9.16 you can use LCL to take screenshots of the screen in a cross-platform way. The following example code does it:
uses Graphics, LCLIntf, LCLType;
  ...
var
  MyBitmap: TBitmap;
  ScreenDC: HDC;
begin
  MyBitmap := TBitmap.Create;
  ScreenDC := GetDC(0);
  MyBitmap.LoadFromDevice(ScreenDC);
  ReleaseDC(0, ScreenDC);
  ...
Taking a screen shot but excluding your application from the screenshot:
uses
  Graphics, LCLIntf, LCLType, ...;

procedure TForm1.Button1Click(Sender: TObject);
var
  ScreenDC: HDC;
  LocalBitmap: TBitmap;
begin
  Hide;
  Application.ProcessMessages;
  LocalBitmap := TBitmap.Create;
  ScreenDC := GetDC(0);
  try
    LocalBitmap.LoadFromDevice(ScreenDC);
    LocalBitmap.SaveToFile('screenshot.bmp');
  finally
    LocalBitmap.Free;
    ReleaseDC(0, ScreenDC);
    Show;
  end;
end;
Working with TLazIntfImage, TRawImage and TLazCanvas
TLazIntfImage is a non-native equivalent of TRasterImage (more commonly utilized in the form of it's descendent TBitmap). The first thing to be aware about this class is that unlike TBitmap it will not automatically allocate a memory area for the bitmap, one should first initialize a memory area and then give it to the TLazIntfImage. Right after creating a TLazIntfImage one should either connect it to a TRawImage or load it from a TBitmap.
TRawImage is of the type object and therefore does not need to be created nor freed. It can either allocate the image memory itself when one calls TRawImage.CreateData or one can pass a memory block allocated for examply by a 3rd party library such as the Windows API of the Cocoa Framework from Mac OS X and pass the information of the image in TRawImage.Description, TRawImage.Data and TRawImage.DataSize. Instead of attaching it to a RawImage one could also load it from a TBitmap which will copy the data from the TBitmap and won't be syncronized with it afterwards. The TLazCanvas cannot exist alone and must always be attached to a TLazIntfImage.
The example below shows how to choose a format for the data and ask the TRawImage to create it for us and then we attach it to a TLazIntfImage and then attach a TLazCanvas to it:
uses graphtype, intfgraphics, lazcanvas;

var
  AImage: TLazIntfImage;
  ACanvas: TLazCanvas;
  lRawImage: TRawImage;
begin
    lRawImage.Init;
    lRawImage.Description.Init_BPP32_A8R8G8B8_BIO_TTB(AWidth, AHeight);
    lRawImage.CreateData(True);
    AImage := TLazIntfImage.Create(0,0);
    AImage.SetRawImage(lRawImage);
    ACanvas := TLazCanvas.Create(AImage);
Initializing a TLazIntfImage
One cannot simply create an instance of TLazIntfImage and start using it. It needs to add a storage to it. There are 3 ways to do this:
1. Attach it to a TRawImage
2. Load it from a TBitmap. Note that it will copy the memory of the TBitmap so it won't remain connected to it.
   SrcIntfImg:=TLazIntfImage.Create(0,0);
   SrcIntfImg.LoadFromBitmap(ABitmap.Handle,ABitmap.MaskHandle);
3. Load it from a raw image description, like this:
   IntfImg := TLazIntfImage.Create(0,0);
   IntfImg.DataDescription:=GetDescriptionFromDevice(0);
   IntfImg.SetSize(10,10);
The 0 device in GetDescriptionFromDevice(0) uses the current screen format.
TLazIntfImage.LoadFromFile
Here is an example how to load an image directly into a TLazIntfImage. It initializes the TLazIntfImage to a 32bit RGBA format. Keep in mind that this is probably not the native format of your screen.
uses LazLogger, Graphics, IntfGraphics, GraphType;
procedure TForm1.FormCreate(Sender: TObject);
var
  AImage: TLazIntfImage;
  lRawImage: TRawImage;
begin
  // create a TLazIntfImage with 32 bits per pixel, alpha 8bit, red 8 bit, green 8bit, blue 8bit,
  // Bits In Order: bit 0 is pixel 0, Top To Bottom: line 0 is top
  lRawImage.Init;
  lRawImage.Description.Init_BPP32_A8R8G8B8_BIO_TTB(0,0);
  lRawImage.CreateData(false);
  AImage := TLazIntfImage.Create(0,0);
  try
    AImage.SetRawImage(lRawImage);
    // Load an image from disk.
    // It uses the file extension to select the right registered image reader.
    // The AImage will be resized to the width, height of the loaded image.
    AImage.LoadFromFile('lazarus/examples/openglcontrol/data/texture1.png');
    debugln(['TForm1.FormCreate ',AImage.Width,' ',AImage.Height]);
  finally
    AImage.Free;
  end;
end;
Loading a TLazIntfImage into a TImage
The pixel data of a TImage is the TImage.Picture property, which is of type TPicture. TPicture is a multi format container containing one of several common image formats like Bitmap, Icon, Jpeg or PNG . Usually you will use the TPicture.Bitmap to load a TLazIntfImage:
Image1.Picture.Bitmap.LoadFromIntfImage(IntfImg);Notes:
- To load a color-transparent TLazIntfImage you have to set the Image1.Transparent to true. In "color-transparency", one color (usually the one of the pixel (0,0)) is declared to be transparent and is not drawn. This must be distinguished from "alpha-channel" transparency where a fourth channel is added to RGB images to describe the transparency of each pixel. See the next section for an example.
- TImage uses the screen format. If the TLazIntfImage has a different format then the pixels will be converted. Hint: You can use IntfImg.DataDescription:=GetDescriptionFromDevice(0); to initialize the TLazIntfImage with the screen format.
Creating and drawing a transparent bitmap for a TImage
"Transparency" in this section is understood as "alpha-channel transparency" where an additional color channel defines the transparency of each pixel. Usually, 24-bits-per-pixel images are extended to 32 bits-per-pixel to provide the alpha channel.
In the following example we draw some semi-transparent shapes on a transparent image which then is displayed on a TImage component. A TBitmap is created for this purpose as buffer for the image. We activate its alpha channel by setting it Pixelformat to pf32Bit so that semi-transparent drawing is possible. Drawing itself it done on a TLazIntfImage and a TLazCanvas which give an easy access to the underlying fcl-image features, but simultaneously provide an easy interface to the LCL class TBitmap:
uses
  fpImage, fpCanvas, IntfGraphics, LazCanvas;

procedure TForm1.Button1Click(Sender: TObject);
var
  bmp: TBitmap;
  img: TLazIntfImage;
  cnv: TLazCanvas;
begin
  bmp := TBitmap.Create;
  try
    bmp.PixelFormat := pf32Bit;           // IMPORTANT!
    bmp.SetSize(Image1.Width, Image1.Height);
    img := bmp.CreateIntfImage;
    try
      cnv := TLazCanvas.Create(img);
      try
        cnv.DrawingMode := dmAlphaBlend;  // This activates the alpha-blend mode.

        // Background
        cnv.Pen.Style := psClear;
        cnv.Brush.FPColor := colTransparent;
        cnv.FillRect(0, 0, img.Width, img.Height);

        // Yellow opaque rectangle
        cnv.Brush.FPColor := FPColor($FFFF, $FFFF, 0);
        cnv.Rectangle(10, 10, 190, 100);

        // Overlapping semi-transparent red circle
        cnv.Brush.FPColor := FPColor($FFFF, 0, 0, $4000);
        cnv.Ellipse(60, 60, 140, 140);

        // Overlapping semi-transparent blue circle
        cnv.Brush.FPColor := FPColor(0, 0, $FFFF, $8000);
        cnv.Ellipse(0, 100, 100, 200);
      finally
        cnv.Free;
      end;

      bmp.LoadFromIntfImage(img);
      Image1.Picture.Assign(bmp);
    finally
      img.Free;
    end;
  finally
    bmp.Free;
  end;
end;
Fading example
A fading example with TLazIntfImage
{ This code has been taken from the $LazarusPath/examples/lazintfimage/fadein1.lpi project. }
uses LCLType, // HBitmap type
     IntfGraphics, // TLazIntfImage type
     fpImage; // TFPColor type
...
 procedure TForm1.FadeIn(ABitMap: TBitMap);
 var
   SrcIntfImg, TempIntfImg: TLazIntfImage;
   ImgHandle,ImgMaskHandle: HBitmap;
   FadeStep: Integer;
   px, py: Integer;
   CurColor: TFPColor;
   TempBitmap: TBitmap;
 begin
   SrcIntfImg:=TLazIntfImage.Create(0,0);
   SrcIntfImg.LoadFromBitmap(ABitmap.Handle,ABitmap.MaskHandle);
   TempIntfImg:=TLazIntfImage.Create(0,0);
   TempIntfImg.LoadFromBitmap(ABitmap.Handle,ABitmap.MaskHandle);
   TempBitmap:=TBitmap.Create;
   for FadeStep:=1 to 32 do begin
     for py:=0 to SrcIntfImg.Height-1 do begin
       for px:=0 to SrcIntfImg.Width-1 do begin
         CurColor:=SrcIntfImg.Colors[px,py];
         CurColor.Red:=(CurColor.Red*FadeStep) shr 5;
         CurColor.Green:=(CurColor.Green*FadeStep) shr 5;
         CurColor.Blue:=(CurColor.Blue*FadeStep) shr 5;
         TempIntfImg.Colors[px,py]:=CurColor;
       end;
     end;
     TempIntfImg.CreateBitmaps(ImgHandle,ImgMaskHandle,false);
     TempBitmap.Handle:=ImgHandle;
     TempBitmap.MaskHandle:=ImgMaskHandle;
     Canvas.Draw(0,0,TempBitmap);
   end;
   SrcIntfImg.Free;
   TempIntfImg.Free;
   TempBitmap.Free;
 end;
Image format specific example
If you know that the TBitmap is using blue 8bit, green 8bit, red 8bit you can directly access the bytes, which is somewhat faster:
uses LCLType, // HBitmap type
     IntfGraphics, // TLazIntfImage type
     fpImage; // TFPColor type
...
type
  TRGBTripleArray = array[0..32767] of TRGBTriple;
  PRGBTripleArray = ^TRGBTripleArray;

procedure TForm1.FadeIn2(aBitMap: TBitMap);
 var
   IntfImg1, IntfImg2: TLazIntfImage;
   ImgHandle,ImgMaskHandle: HBitmap;
   FadeStep: Integer;
   px, py: Integer;
   CurColor: TFPColor;
   TempBitmap: TBitmap;
   Row1, Row2: PRGBTripleArray;
 begin
   IntfImg1:=TLazIntfImage.Create(0,0);
   IntfImg1.LoadFromBitmap(aBitmap.Handle,aBitmap.MaskHandle);

   IntfImg2:=TLazIntfImage.Create(0,0);
   IntfImg2.LoadFromBitmap(aBitmap.Handle,aBitmap.MaskHandle);

   TempBitmap:=TBitmap.Create;

   //with Scanline-like
   for FadeStep:=1 to 32 do begin
     for py:=0 to IntfImg1.Height-1 do begin
       Row1 := IntfImg1.GetDataLineStart(py); //like Delphi TBitMap.ScanLine
       Row2 := IntfImg2.GetDataLineStart(py); //like Delphi TBitMap.ScanLine
       for px:=0 to IntfImg1.Width-1 do begin
         Row2^[px].rgbtRed:= (FadeStep * Row1^[px].rgbtRed) shr 5;
         Row2^[px].rgbtGreen := (FadeStep * Row1^[px].rgbtGreen) shr 5; // Fading
         Row2^[px].rgbtBlue := (FadeStep * Row1^[px].rgbtBlue) shr 5;
       end;
     end;
     IntfImg2.CreateBitmaps(ImgHandle,ImgMaskHandle,false);

     TempBitmap.Handle:=ImgHandle;
     TempBitmap.MaskHandle:=ImgMaskHandle;
     Canvas.Draw(0,0,TempBitmap);
   end;

   IntfImg1.Free;
   IntfImg2.Free;
   TempBitmap.Free;
 end;
Conversion between TLazIntfImage and TBitmap
Since Lazarus has no TBitmap.ScanLines property, the best way to access the pixels of an image in a fast way for both reading and writing is by using TLazIntfImage. The TBitmap can be converted to a TLazIntfImage by using TBitmap.CreateIntfImage() and after modifying the pixels it can be converted back to a TBitmap by using TBitmap.LoadFromIntfImage(); Here's the sample on how to create TLazIntfImage from TBitmap, modify it and then go back to the TBitmap.
uses
  ...GraphType, IntfGraphics, LCLType, LCLProc,  LCLIntf ...

procedure TForm1.Button4Click(Sender: TObject);
var
  b: TBitmap;
  t: TLazIntfImage;
begin
  b := TBitmap.Create;
  try
    b.LoadFromFile('test.bmp');
    t := b.CreateIntfImage;

    // Read and/or write to the pixels
    t.Colors[10,20] := colGreen;

    b.LoadFromIntfImage(t);
  finally
    t.Free;
    b.Free;
  end;
end;
Using the non-native StretchDraw from LazCanvas
Just like TCanvas.StretchDraw there is TLazCanvas.StretchDraw but you need to specify the interpolation which you desire to use. The interpolation which provides a Windows-like StretchDraw with a very sharp result (the opposite of anti-aliased) can be added with:
TLazCanvas.Interpolation := TFPSharpInterpolation.Create;
There are other interpolations available in the unit fpcanvas.
uses
  intfgraphics, lazcanvas;

procedure TForm1.StretchDrawBitmapToBitmap(SourceBitmap, DestBitmap: TBitmap; DestWidth, DestHeight: integer);
var
  DestIntfImage, SourceIntfImage: TLazIntfImage;
  DestCanvas: TLazCanvas;
begin
  // Prepare the destination
  DestIntfImage := TLazIntfImage.Create(0, 0);
  try
    DestIntfImage.LoadFromBitmap(DestBitmap.Handle, 0);
    DestCanvas := TLazCanvas.Create(DestIntfImage);
    try
      //Prepare the source
      SourceIntfImage := TLazIntfImage.Create(0, 0);
      try
        SourceIntfImage.LoadFromBitmap(SourceBitmap.Handle, 0);
        // Execute the stretch draw via TFPSharpInterpolation
        DestCanvas.Interpolation := TFPSharpInterpolation.Create;
        try
          DestCanvas.StretchDraw(0, 0, DestWidth, DestHeight, SourceIntfImage);
          // Reload the image into the TBitmap
          DestBitmap.LoadFromIntfImage(DestIntfImage);
        finally
          DestCanvas.Interpolation.Free;
        end;
      finally
        SourceIntfImage.Free;
      end;
    finally
      DestCanvas.Free;
    end;
  finally
    DestIntfImage.Free;
  end;
end;

procedure TForm1.FormPaint(Sender: TObject);
var
  Bmp, DestBitmap: TBitmap;
begin
  // Prepare the destination
  DestBitmap := TBitmap.Create;
  try
    DestBitmap.SetSize(100, 100);
    // Create and draw the source bitmap: a small red rectangle
    Bmp := TBitmap.Create;
    try
      Bmp.SetSize(10, 10);
      Bmp.Canvas.Pen.Color := clBlack;
      Bmp.Canvas.Brush.Color := clRed;
      Bmp.Canvas.Rectangle(0, 0, 10, 10);
      Canvas.Draw(10, 10, Bmp);
      // Stretch-draw the source bitmap onto the destination bitmap canvas
      StretchDrawBitmapToBitmap(Bmp, DestBitmap, 100, 100);
      Canvas.Draw(100, 100, DestBitmap);
    finally
      Bmp.Free;
    end;
  finally
    DestBitmap.Free;
  end;
end;
Clipping
Clipping by a rectangle
Anything outside the specified ClipRect of the canvas is removed when Clipping is true:
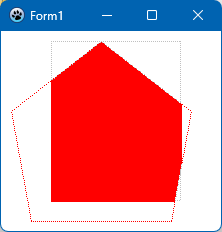
uses
  FPImage, IntfGraphics, LazCanvas;

procedure TForm1.FormPaint(Sender: TObject);
var
  bmp: TBitmap;
  img: TLazIntfImage;
  cnv: TLazCanvas;
  Rc: TRect;
  polyPts: array[0..4] of TPoint = (
    (x:100;y:10), (x:190;y:80), (x:170;y:190), (x:30;y:190), (x:10;y:80)
  );
begin
  // Buffer bitmap
  bmp := TBitmap.Create;
  try
    bmp.SetSize(Width, Height);
    img := bmp.CreateIntfImage;
    try
      cnv := TLazCanvas.Create(img);
      try
        cnv.Brush.FPColor := colWhite;
        cnv.Clear;

        // To better understand what is removed, we draw the outline of the
        // polygon to be clipped
        cnv.Pen.Style := psDot;
        cnv.Pen.FPColor := colRed;
        cnv.Polygon(polyPts);

        // Define the clipping rectangle
        Rc :=  Rect(50, 10, 180, 170);
        // To understand where the clipping rectangle is we draw its outline
        cnv.Brush.Style := bsClear;
        cnv.Pen.FPColor := colSilver;
        cnv.Rectangle(Rc);

        // Activate clipping
        cnv.ClipRect := Rc;
        cnv.Clipping := true;

        // Draw the polygon to be clipped
        cnv.Brush.Style := bsSolid;
        cnv.Brush.FPColor := colRed;
        cnv.Polygon(polyPts);
      finally
        cnv.Free;
      end;
      bmp.LoadFromIntfImage(img);
      Canvas.Draw(0, 0, bmp);
    finally
      img.Free;
    end;
  finally
    bmp.Free;
  end;
end;
Clipping by a region
For more complex clipping TLazCanvas provides several kinds of "regions". Pixels are drawn only when they are inside the parts added to the region. TLazCanvas supports rectangular, elliptical and polygonal parts. In the following example, a region is created which contains an ellipse and a rectangle. Clipping is activated by using this region in the SetLazClipRegion() method of the LazCanvas:
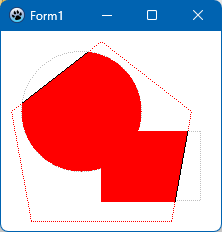
uses
  FPImage, FPCanvas, IntfGraphics, LazCanvas, LazRegions;

procedure TForm1.FormPaint(Sender: TObject);
var
  bmp: TBitmap;
  img: TLazIntfImage;
  cnv: TLazCanvas;
  rgn: TLazRegion;
  Rc1, Rc2: TRect;
  polyPts: array[0..4] of TPoint = (
    (x:100;y:10), (x:190;y:80), (x:170;y:190), (x:30;y:190), (x:10;y:80)
  );
begin
  // Buffer bitmap
  bmp := TBitmap.Create;
  try
    bmp.SetSize(ClientWidth, ClientHeight);
    img := bmp.CreateIntfImage;
    try
      cnv := TLazCanvas.Create(img);
      cnv.Brush.FPColor := colWhite;
      cnv.Clear;

      // To better understand what is clipped, draw the outline of the polygon
      // to be clipped
      cnv.Pen.Style := psDot;
      cnv.Pen.FPColor := colRed;
      cnv.Brush.Style := bsClear;
      cnv.Polygon(polyPts);

      // ... and we draw the outline of the parts in the clipping region:
      // We clip by an elliptical region...
      Rc1 := Rect(20, 20, 140, 140);
      cnv.Pen.FPColor := colSilver;
      cnv.Ellipse(Rc1);
      // ... and by a rectangular region
      Rc2 := Rect(100, 100, 200, 170);
      cnv.Rectangle(Rc2);

      // Create the clipping region
      rgn := TLazRegion.Create;
      try
        // Show pixels that are inside the ellipse...
        rgn.AddEllipse(Rc1.Left, Rc1.Top, Rc1.Right, Rc1.Bottom);
        // ... and the rectangle.
        rgn.AddRectangle(Rc2);
        // Activate the clip region
        cnv.SetLazClipRegion(rgn);

        // Draw the polygon to be clipped
        cnv.Brush.FPColor := colRed;
        cnv.Brush.Style := bsSolid;
        cnv.Pen.Style := psSolid;
        cnv.Pen.FPColor := colBlack;
        cnv.Polygon(polyPts);
      finally
        cnv.Free;
      end;

      // Draw the buffer bitmap in the Paintbox
      bmp.LoadFromIntfImage(img);
      Canvas.Draw(0, 0, bmp);
    finally
      img.Free;
    end;
  finally
    bmp.Free;
  end;
end;
Motion Graphics - How to Avoid flickering
Many programs draw their output to the GUI as 2D graphics. If those graphics need to change quickly you will soon face a problem: quickly changing graphics often flicker on the screen. This happens when users sometimes see the whole images and sometimes only when it is partially drawn. It occurs because the painting process requires time.
How can you avoid the flickering and get the best drawing speed? Of course you could work with hardware acceleration using OpenGL, but this approach is quite heavy for small programs or old computers.
Another solution is drawing to a TCanvas. If you need help with OpenGL, take a look at the example that comes with Lazarus. You can also use A.J. Venter's gamepack, which provides a double-buffered canvas and a sprite component.
A brief and very helpful article on avoiding flicker can be found at http://delphi.about.com/library/bluc/text/uc052102g.htm. Although written for Delphi, the techniques work well with Lazarus.
Now we will examine the options we have for drawing to a Canvas:
- Draw to a TImage
- Draw on the OnPaint event of the form, a TPaintBox or another control
- Create a custom control which draws itself
- Using A.J. Venter's gamepack
Draw to a TImage
A TImage consists of 2 parts: A TGraphic, usually a TBitmap, holding the persistent picture and the visual area, which is repainted on every OnPaint. Resizing the TImage does not resize the bitmap. The graphic (or bitmap) is accessible via Image1.Picture.Graphic (or Image1.Picture.Bitmap). The canvas is Image1.Picture.Bitmap.Canvas. The canvas of the visual area of a TImage is only accessible during Image1.OnPaint via Image1.Canvas.
Important: Never use the OnPaint of the Image1 event to draw to the graphic/bitmap of a TImage. The graphic of a TImage is buffered so all you need to do is draw to it from anywhere and the change is there forever. However, if you are constantly redrawing, the image will flicker. In this case you can try the other options. Drawing to a TImage is considered slower then the other approaches.
Resizing the bitmap of a TImage
Note: Do not use this during OnPaint.
with Image1.Picture.Bitmap do begin
  Width:=100;
  Height:=120;
end;
Same in one step:
with Image1.Picture.Bitmap do begin
  SetSize(100, 120);
end;
Painting on the bitmap of a TImage
Note: Do not use this during OnPaint.
with Image1.Picture.Bitmap.Canvas do begin
  // fill the entire bitmap with red
  Brush.Color := clRed;
  FillRect(0, 0, Width, Height);
end;
Note: Inside of Image1.OnPaint the Image1.Canvas points to the volatile visible area. Outside of Image1.OnPaint the Image1.Canvas points to Image1.Picture.Bitmap.Canvas.
Another example:
procedure TForm1.BitBtn1Click(Sender: TObject);
var
  x, y: Integer;
begin
  // Draws the backgroung
  MyImage.Canvas.Pen.Color := clWhite;
  MyImage.Canvas.Rectangle(0, 0, Image.Width, Image.Height);

  // Draws squares
  MyImage.Canvas.Pen.Color := clBlack;
  for x := 1 to 8 do
    for y := 1 to 8 do
      MyImage.Canvas.Rectangle(Round((x - 1) * Image.Width / 8), Round((y - 1) * Image.Height / 8),
        Round(x * Image.Width / 8), Round(y * Image.Height / 8));
end;
Painting on the volatile visual area of the TImage
You can only paint on this area during OnPaint. OnPaint is eventually called automatically by the LCL when the area was invalidated. You can invalidate the area manually with Image1.Invalidate. This will not immediately call OnPaint and you can call Invalidate as many times as you want.
procedure TForm.Image1Paint(Sender: TObject);
begin
  // paint a line
  Canvas.Pen.Color := clRed;
  Canvas.Line(0, 0, Width, Height);
end;
Draw on the OnPaint event
In this case all the drawing has to be done on the OnPaint event of the form, or of another control. The drawing isn't buffered like in the TImage, and it needs to be fully redrawn in each call of the OnPaint event handler.
procedure TForm.Form1Paint(Sender: TObject);
begin
  // paint a line
  Canvas.Pen.Color := clRed;
  Canvas.Line(0, 0, Width, Height);
end;
Create a custom control which draws itself
Creating a custom control has the advantage of structuring your code and you can reuse the control. This approach is very fast, but it can still generate flickering if you don't draw to a TBitmap first and then draw to the canvas. On this case there is no need to use the OnPaint event of the control.
Here is an example custom control:
uses
  Classes, SysUtils, Controls, Graphics, LCLType;

type
  TMyDrawingControl = class(TCustomControl)
  public
    procedure EraseBackground(DC: HDC); override;
    procedure Paint; override;
  end;

implementation

procedure TMyDrawingControl.EraseBackground(DC: HDC);
begin
  // Uncomment this to enable default background erasing
  //inherited EraseBackground(DC);
end;

procedure TMyDrawingControl.Paint;
var
  x, y: Integer;
  Bitmap: TBitmap;
begin
  Bitmap := TBitmap.Create;
  try
    // Initializes the Bitmap Size
    Bitmap.Height := Height;
    Bitmap.Width := Width;

    // Draws the background
    Bitmap.Canvas.Pen.Color := clWhite;
    Bitmap.Canvas.Rectangle(0, 0, Width, Height);

    // Draws squares
    Bitmap.Canvas.Pen.Color := clBlack;
    for x := 1 to 8 do
      for y := 1 to 8 do
        Bitmap.Canvas.Rectangle(Round((x - 1) * Width / 8), Round((y - 1) * Height / 8),
          Round(x * Width / 8), Round(y * Height / 8));

    Canvas.Draw(0, 0, Bitmap);
  finally
    Bitmap.Free;
  end;

  inherited Paint;
end;
and how we create it on the form:
procedure TMyForm.FormCreate(Sender: TObject);
begin
  MyDrawingControl := TMyDrawingControl.Create(Self);
  MyDrawingControl.Height := 400;
  MyDrawingControl.Width := 500;
  MyDrawingControl.Top := 0;
  MyDrawingControl.Left := 0;
  MyDrawingControl.Parent := Self;
  MyDrawingControl.DoubleBuffered := True;
end;
It is destroyed automatically, because we use Self as owner.
Setting Top and Left to zero is not necessary, since this is the standard position, but is done so to reinforce where the control will be put.
"MyDrawingControl.Parent := Self;" is very important and you won't see your control if you don't do so.
"MyDrawingControl.DoubleBuffered := True;" is required to avoid flickering on Windows. It has no effect on gtk.
Image formats
Here is a table with the correct class to use for each image format.
| Format | Image class | Unit |
|---|---|---|
| Cursor (cur) | TCursor | Graphics |
| Bitmap (bmp) | TBitmap | Graphics |
| Windows icon (ico) | TIcon | Graphics |
| Mac OS X icon (icns) | TicnsIcon | Graphics |
| Pixmap (xpm) | TPixmap | Graphics |
| Portable Network Graphic (png) | TPortableNetworkGraphic | Graphics |
| JPEG (jpg, jpeg) | TJpegImage | Graphics |
| PNM (pnm) | TPortableAnyMapGraphic | Graphics |
| Tiff (tif, tiff) | TTiffImage | Graphics |
See also the list of fcl-image supported formats.
Converting formats
Sometimes it is necessary to convert one graphic type to another. One of the ways is to convert a graphic to intermediate format, and then convert it to TBitmap. Most of the formats can create an image from TBitmap.
Converting Bitmap to PNG and saving it to a file:
procedure SaveToPng(const bmp: TBitmap; PngFileName: String);
var
  png : TPortableNetworkGraphic;
begin
  png := TPortableNetworkGraphic.Create;
  try
    png.Assign(bmp);
    png.SaveToFile(PngFileName);
  finally
    png.Free;
  end;
end;
Pixel Formats
TColor
The internal pixel format for TColor in the LCL is the XXBBGGRR format, which matches the native Windows format and is opposite to most other libraries, which use AARRGGBB. The XX part is used to identify if the color is a fixed color, which case XX should be 00 or if it is an index to a system color. There is no space reserved for an alpha channel.
To convert from separate RGB channels to TColor use:
RGBToColor(RedVal, GreenVal, BlueVal);To get each channel of a TColor variable use the Red, Green and Blue functions:
RedVal := Red(MyColor);
GreenVal := Green(MyColor);
BlueVal := Blue(MyColor);
TFPColor
TFPColor uses the AARRGGBB format common to most libraries, but it uses 16-bits for the depth of each color channel, totaling 64-bits per pixel, which is unusual. This does not necessarily mean that images will consume that much memory, however. Images created using TRawImage+TLazIntfImage can have any internal storage format and then on drawing operations TFPColor is converted to this internal format.
The unit Graphics provides routines to convert between TColor and TFPColor:
function FPColorToTColorRef(const FPColor: TFPColor): TColorRef;
function FPColorToTColor(const FPColor: TFPColor): TColor;
function TColorToFPColor(const c: TColorRef): TFPColor; overload;
function TColorToFPColor(const c: TColor): TFPColor; overload; // does not work on system color
Drawing with fcl-image
You can draw images which won't be displayed in the screen without the LCL, by just using fcl-image directly. For example a program running on a webserver without X11 could benefit from not having a visual library as a dependency. FPImage (alias fcl-image) is a very generic image and drawing library written completely in Pascal. In fact the LCL uses FPImage too for all the loading and saving from/to files and implements the drawing function through calls to the widgetset (winapi, gtk, carbon, ...). Fcl-image on the other hand also has drawing routines.
For more information, please read the article about fcl-image.
Common OnPaint Error
A common error that causes many false bug reports is to call an OnPaint event for one object from another object. When using the LCL, this may work in GTK2 and Windows but will probably fail with Qt, Carbon and Cocoa. It is not normally necessary to call Invalidate. However, it may sometimes be needed in the Button1Click procedure.
This is bad:
procedure TForm1.Button1Click(Sender: TObject);
begin
  Shape1Paint(Self); // Call Shape1 OnPaint event
  Shape1.Invalidate; // Invoke actual painting

  //more code for Button1
end;
This is good:
procedure TForm1.Button1Click(Sender: TObject);
begin
  //code for Button1
  //set some condition
  Shape1.Invalidate; // May be necessary on some occasions
end;

// Shape1Paint should be attached to the OnPaint event of shape object !
procedure TForm1.Shape1Paint(Sender: TObject);
begin
  if some_condition then
    with Shape1.Canvas do
    begin
      //lots of stuff
    end;
end;
Some useful examples
Example 1: Drawing on loaded JPEG with TImage
Add procedure LoadAndDraw to the public section of your form, and paste next code to implemantation section:
procedure TForm1.LoadAndDraw(const sFileName: String);
var
  jpg: TPicture;
begin
  jpg := TPicture.Create;
  try
    jpg.LoadFromFile(sFileName);

    Image.Picture.Bitmap.SetSize(jpg.Width, jpg.Height);
    Image.Picture.Bitmap.Canvas.Draw(0, 0, jpg.Bitmap);

    Image.Picture.Bitmap.Canvas.Pen.Color := clRed;
    Image.Picture.Bitmap.Canvas.Line(0, 0, 140, 140);
  finally
    jpg.Free;
  end;
end;
Example 2: Drawing on controls of Form
1) Create a New project - Application, add to uses section next modules if needed: Types, Controls, Graphics.
2) Place on form Button1, GroupBox1 and RadioGroup1
3) Place on GroupBox1 one more button - Button2
4) Your TForm1.Create should looks like:
procedure TForm1.FormCreate(Sender: TObject);
var
  i: Integer;
begin
  for i := 0 to Self.ControlCount - 1 do
    RadioGroup1.Items.AddObject(Controls[i].Name, Controls[i]);

  RadioGroup1.Items.AddObject(Button2.Name,Button2);
end;
5) For RadioGroup1 create handler of OnSelectionChanged event:
procedure TForm1.RadioGroup1SelectionChanged(Sender: TObject);
begin
  Self.Repaint;
end;
6) Add to public section of your form procedure HighlightControl:
procedure TForm1.HighlightControl(AControl: TControl);
var
  R: Types.TRect;
  aCC: TControlCanvas;
begin
  R := AControl.BoundsRect;
  InflateRect(R, 2, 2);          // make rect a bit bigger then control
  aCC := TControlCanvas.Create;
  aCC.Control := AControl.Parent;
  aCC.Pen.Color := clGreen;
  aCC.Pen.Width := 5;
  aCC.Pen.Style := psSolid;
  aCC.Brush.Style := bsClear;
  aCC.Rectangle(R);
  aCC.free;
end;
See also
2D drawing
- ZenGL - cross-platform game development library using OpenGL.
- BGRABitmap - Drawing shapes and bitmaps with transparency, direct access to pixels, etc.
- LazRGBGraphics - A package for fast in memory image processing and pixel manipulations (like scan line).
- fpvectorial - Offers support to read, modify and write vectorial images.
- Double Gradient - Draw 'double gradient' & 'n gradient' bitmaps easy.
- Gradient Filler - TGradientFiller is the best way to create custom n gradients in Lazarus.
- PascalMagick - an easy to use API for interfacing with ImageMagick, a multiplatform free software suite to create, edit, and compose bitmap images.
- Sample Graphics - graphics gallery created with Lazarus and drawing tools
- Fast direct pixel access - speed comparison of some methods for direct bitmap pixel access
- AggPas - AggPas is an Object Pascal native port of the Anti-Grain Geometry library. It is fast and very powerful with anti-aliased drawing and subpixel accuracy. You can think of AggPas as of a rendering engine that produces pixel images in memory from some vectorial data. Both Lazarus and fpGUI bundle AggPas.
3D drawing
- OpenGL - OpenGL (Open Graphics Library) is a cross-platform API for producing 3D computer graphics.
- GLScene - A port of the 3D visual OpenGL graphics Library GLScene.
- macOS Metal Framework - Render advanced 3D graphics and perform data-parallel computations using graphics processors.
- Castle Game Engine - An open-source cross-platform 3D and 2D game engine (official website).
Charts
- TAChart - Charting component for Lazarus
- PlotPanel - A plotting and charting component for animated graphs
- Perlin Noise - An article about using Perlin Noise on LCL applications.
From the Free Pascal wiki, page "Developing with Graphics", as it stood on 2024-05-23 after a change by Wp, out of the wiki's dump of 2024-05-26. Copyright stays with the author who wrote it, according to the old wiki's Licensing page. If you have concerns about this material, message the admin.
Talk about this page
Nobody has opened a bench for this page yet. Sign in to open one.