

Catalog · How the catalog works
Delphi-YOLO-ONNX-RuntimeWrapper

Delphi runtime wrapper for YOLO deep machine learning models
- ★ 26 on GitHub
Anyone may press Interesting, signed in or not. It helps others find this project.
README
Delphi YOLO ONNX Runtime wrapper
- Introduction
- Supported platforms
- Customizing the Runtime Environment
- Installing the Development Environment
- Package composition
- How to use
- Prediction example
- License
Introduction
What is Delphi YOLO ONNX Runtime wrapper?
The Delphi YOLO ONNX Runtime wrapper is a singleton interface which provides loading and running a YOLO deep machine learning model (https://docs.ultralytics.com// from the Delphi applications. It allows you to detect objects in an image with Delphi using Object Pascal programming language. We made an easy access to the artificial intelligence (AI) computer vision model for your VCL and FMX applications.
This project implements the following functions:
- Obtaining metadata from the model in ONNX format.
- Recognizing 80 predefined classes using trained YOLO models in ONNX format.
It is possible to expand the functionality to use the ONNX format for other types of models.
To use models in ONNX Runtime, you can convert YOLO models to ONNX format. For more information, see: https://docs.ultralytics.com/integrations/onnx/
Remarks
[! NOTE]
YOLO models are provided under AGPL-3.0 and Enterprise licenses.
[! IMPORTANT]
This is an unofficial library. Delphi YOLO ONNX Runtime wrapper does not provide any official library for
Delphior forYOLO.
Supported platforms
These limitations stem from the use of the ONNX runtime API.
Windows (x64), Linux (x64, ARM64), Mac (X64)
Customizing the Runtime Environment
The YOLO ONNX Runtime is accessed by running Python code. Python is not installed by default on the operating system. You can download the required version of Python from python.org: https://www.python.org/downloads/
At this stage it is necessary to decide which platform will be used (32-bit or 64-bit).
Make sure you have Python installed and pip (package manager) is up to date.
python -m pip install --upgrade pipOnce python is successfully installed, open the command prompt and use pip to install numpy.
pip install numpyIn the next step, install ONNX Runtime. For more information, visit the official ONNX Runtime website: https://onnxruntime.ai
Install ONNX Runtime CPU:
pip install onnxruntimeIf necessary, install ONNX Runtime GPU: Install ONNX Runtime GPU (DirectML):
pip install onnxruntime-directmlInstall ONNX Runtime GPU (CUDA 12.x):
pip install onnxruntime-gpuDownloading and installing OpenCV: OpenCV can be downloaded and installed directly using pip. To install OpenCV, simply go to the command line and enter the following command:
pip install opencv-pythonInstalling the Development Environment
The Python4Delphi (P4D) library is used to access Python objects from Delphi.
There are several ways of installation.
- Use GetIt Package manager
- Use GitHub: https://github.com/pyscripter/python4delphi
YOLO OnnxRTWrapper can be installed using a package or manually by copying the contents of the source folder. Download or clone repository. Open project package/OnnxRTWrapper.dpk, build and install by IDE.
Then go to:
Tools-Options-Language-Delphi-Libraryand tell the IDE where to find the sources. You should modify the "Library Path" and the "Browsing path". Add folders: source, python_common and ONNXRT_core. Repeat it for both Windows 32 and Windows 64 platforms.
Package composition
python_common folder
-
Python.Manager.pas
This is a wrapper for the Python4Delphi library, as a singleton pattern. This allows to run Python code through Delphi functions.
-
Python.ONNXRT.Code.pas
These are python code functions used for detection by the ONNX Runtime.
-
Python.Yolo.Code.pas
These are python code functions for Ultralytics YOLO models.
ONNXRT_core folder
-
ONNXRT.Constants.pas
These are the constants for the ONNX Runtime detection.
{OnnxRT detection value names} S_INPUT_IMAGEFILE = 'input_imagefile'; S_OUT_IMAGEFILE = 'out_imagefile'; S_MODELFILE = 'modelfile'; S_PROVIDERS = 'providers'; S_FILTERCLASSES = 'filterclasses'; S_CONFIDENCE_THRESHOLD = 'cf_threshold'; S_IOU_THRESHOLD ='iou_threshold'; S_MODELTYPE = 'modeltype';{options for python code generating} pcDrawDetected = 1; //Generate draw code pcLoad = 2; //Generate code to open image pcSave = 4; //Generate code to save processed image pcEnableIO = 7; //Mask options - only lad and save section pcDisableIO = High(Word) - pcEnableIO; //Mask options - exclude load and save section pcAddImport = 8; //Add import code pcAddDefinitions = 16; //Add definitions to code pcFullCode = High(Word); -
ONNXRT.Types.pas
These are the types for the ONNX Runtime detection.
type TModelType = (mtYolo); TProcessStatus = (psNone, psInitialization, psInitialized, psProcessing, psFinished, psError);{Record for access to metadata of ONNX} TMetadata = record model_description: string; model_domain: string; graph_description: string; graph_name: string; producer_name: string; model_version: string; { Custom metadata map } date: string; description: string; author: string; version: string; task: string; license: string; docs: string; stride: string; batch: string; imgsz: string; names: string; inputs: TArray<string>; outputs: TArray<string>; public procedure AddInput(const aInput: string); procedure AddOutput(const aOutput: string); end; -
ONNXRT.Utils.pas
These are the common functions used by the YOLO ONNX Runtime wrapper library classes.
-
ONNXRT.Classes.pas
These are classes and interfaces of the detection results.
-
ONNXRT.Core.pas
This is base class and interface of the OnnxRTWrapper.
How to use
The first time the interface is accessed, events must be registered and initialization must be performed. The interface can be accessed by calling the global function:
function OnnxrtWrapper: IOnnxrtWrapper;or by class instance:
TOnnxrtWrapper.InstanceIt is possible to subscribe for status changes:
    /// <summary> Registering a status change event. </summary>
    procedure RegisterStatusEvent(aStatusEvent: TProc<TObject, Integer, string>);
    /// <summary> Unregistering a status change event. </summary>
    procedure UnRegisterStatusEvent(aStatusEvent: TProc<TObject, Integer, string>);
For example:
procedure TfrmONNXDetection.OnStatusChange(Sender: TObject; aIntStatus: Integer;
  aStrStatus: string; aComplete: Boolean);
begin
  memoLog.Lines.Add(EmptyStr);
  memoLog.Lines.Add(lblStatus.Text + aStrStatus);
  if aStrStatus.Equals('error') then
    memoLog.Lines.Add(OnnxrtWrapper.LastError);
  lblStatusName.Text := aStrStatus;
  lblTimeValue.Text := OnnxrtWrapper.ProcessTime.AsString;
  lblFunctionTimeValue.Text := OnnxrtWrapper.FunctionTime.AsString;
  if aComplete then
  begin
    btnSetPython.Visible := not OnnxrtWrapper.IsInitialized;
    memoLog.Lines.Add(lblProcessTime.Text + lblTimeValue.Text);
    memoLog.Lines.Add(lblFunctionTime.Text + lblFunctionTimeValue.Text);
  end;
  Application.ProcessMessages;
end;
...
procedure TfrmONNXDetection.FormCreate(Sender: TObject);
begin
  //Registering a status changing event
  OnnxrtWrapper.RegisterStatusEvent(OnStatusChange);
  //Registering a result addition event
  OnnxrtWrapper.DetectionResults.OnAddDetected :=
    procedure(Sender: TObject; aObject: IDetectedObject)
      begin
        memoLog.Lines.Add(EmptyStr);
        memoLog.Lines.Add('DetectionResults.OnAddDetected');
        memoLog.Lines.Add('  box (x,y,w,h) = [' + aObject.Box.Left.ToString
          + ', ' + aObject.Box.Top.ToString
          + ', ' + aObject.Box.Width.ToString
          + ', ' + aObject.Box.Height.ToString + ']');
        memoLog.Lines.Add('  score = ' + aObject.Score.ToString);
        memoLog.Lines.Add('  class index = ' + aObject.ClassIndex.ToString);
        memoLog.Lines.Add('  class name = ' + aObject.ClassLabel);
      end;

  sbCfThreshold.Text := OnnxrtWrapper.DetectionValue[S_CONFIDENCE_THRESHOLD];
  sbIouThreshold.Text := OnnxrtWrapper.DetectionValue[S_IOU_THRESHOLD];
end;
When API functions are called, initialization and connection to the Python module will be done automatically. But if desired or in case of failure, initialization is performed by calling the Initialize function with the full path to the Python library.
function Initialize(const aDllName: string = ''): Boolean;After each operation, we will have modified data about the current state:
OnnxrtWrapper.ProcessStatus: the status of current process.
OnnxrtWrapper.FunctionTime: elapsed time of Python code execution.
OnnxrtWrapper.ProcessTime: elapsed time of current process.
OnnxrtWrapper.LastError: the last operation error description.
Next, we can retrieve the model metadata:
var LMeta := OnnxrtWrapper.GetMetadata;For example:
procedure TfrmONNXDetection.btnModelpropClick(Sender: TObject);
begin
  var LMeta := OnnxrtWrapper.GetMetadata;
  if OnnxrtWrapper.ProcessStatus <> psError then
  begin
    memoLog.Lines.Add(EmptyStr);
    memoLog.Lines.Add('METADATA:');
    memoLog.Lines.Add('  model_description = ' + LMeta.model_description);
    memoLog.Lines.Add('  model_domain = ' + LMeta.model_domain);
    memoLog.Lines.Add('  graph_description = ' + LMeta.graph_description);
    memoLog.Lines.Add('  graph_name = ' + LMeta.graph_name);
    memoLog.Lines.Add('  producer_name = ' + LMeta.producer_name);
    memoLog.Lines.Add('  model_version = ' + LMeta.model_version);
    memoLog.Lines.Add('  date = ' + LMeta.date);
    memoLog.Lines.Add('  description = ' + LMeta.description);
    memoLog.Lines.Add('  author = ' + LMeta.author);
    memoLog.Lines.Add('  version = ' + LMeta.version);
    memoLog.Lines.Add('  task = ' + LMeta.task);
    memoLog.Lines.Add('  license = ' + LMeta.license);
    memoLog.Lines.Add('  docs = ' + LMeta.docs);
    memoLog.Lines.Add('  stride = ' + LMeta.stride);
    memoLog.Lines.Add('  batch = ' + LMeta.batch);
    memoLog.Lines.Add('  imgsz = ' + LMeta.imgsz);
    memoLog.Lines.Add('  names = ' + LMeta.names);
    memoLog.Lines.Add('INPUTS:');
    for var i := Low(LMeta.inputs) to High(LMeta.inputs) do
      memoLog.Lines.Add('  input[' + i.ToString + '] = ' + LMeta.inputs[i]);
    memoLog.Lines.Add('OUTPUTS:');
    for var i := Low(LMeta.outputs) to High(LMeta.outputs) do
      memoLog.Lines.Add('  output[' + i.ToString + '] = ' + LMeta.outputs[i]);
  end;
end;
From the metadata, you can get the names of the classes used in the model:
    /// <summary>
    ///   Getting the list of model classes from metadata record.
    ///   Format is: "Index: 'ClassName'".
    /// </summary>
    function GetModelClasses(const aMeta: TMetadata): string;
For the prediction we have overloaded functions:
    /// <summary>
    ///   Main detection procedure.
    /// </summary>
    /// <param name="aValues">
    ///   Detection values used.
    ///   If not assigned, the internal detection values are used.
    ///   If the output image file name is set, the image will be saved.
    /// </param>
    /// <return> True when success. </return>
    function Predict(aValues: TDictionary<string, string> = nil): Boolean; overload;
    /// <summary>
    ///   Main detection procedure.
    ///   Parameters are detection values.
    ///   If the output image file name "aOutImagefile" is set, the image will be saved.
    /// </summary>
    /// <return> True when success. </return>
    function Predict(const aModelFile, aImagefile : string;
      const aOutImagefile: string = '';
      const aProviders: string = '';
      const aFilterClasses: string = '';
      const acfThreshold: string = '';
      const aiouThreshold: string = '';
      const aModelType: string = ''): Boolean; overload;
For the prediction function, you must specify the initial data. The main ones are:
- Model file name.
- Image file name.
If we intend to save the obtained result, it is necessary to specify the output image file name. All other parameters can be omitted, as they will either use default values or retain the last assigned values.
uses
  ONNXRT.Core, ONNXRT.Classes, ONNXRT.Constants, ONNXRT.Types;

with OnnxrtWrapper do
begin
  DetectionValue[S_MODELFILE] := '../model.onnx';
  DetectionValue[S_PROVIDERS] := 'CUDAExecutionProvider, CPUExecutionProvider'; //if empty CPUExecutionProvider is default
  DetectionValue[S_INPUT_IMAGEFILE] := './img/cat.jpg';
  DetectionValue[S_OUT_IMAGEFILE] := './img/cat-dt.jpg';
  DetectionValue[S_CONFIDENCE_THRESHOLD] := '0.5'; // it is default
  DetectionValue[S_IOU_THRESHOLD] := '0.5'; // it is default
  DetectionValue[S_MODELTYPE] := 'yolo'; // it is default
  DetectionValue[S_FILTERCLASSES] := '"cat", "person"';
  if Predict then
  begin
    if FileExists(OnnxrtWrapper.DetectionValue[S_OUT_IMAGEFILE]) then
      imgDetectedImage.Bitmap.LoadFromFile(OnnxrtWrapper.DetectionValue[S_OUT_IMAGEFILE]);
  end;
end;
The results are accessed through the DetectionResults property. It is an interface list of detected objects with properties:
Box: TRectF - Detected class boundaries.
Score: Double - Detected class score.
ClassIndex: Integer - Detected class index.
ClassLabel: string - Detected class name.
Color: TAlphaColor - Generated color for detected class.
Important: Boxes are snapped to the dimensions of the original image.
Enumeration is available:
    for var V in OnnxrtWrapper.DetectionResults do
    begin
      memoLog.Lines.Add('  score = ' + V.Score.ToString);
      memoLog.Lines.Add('  class index = ' + V.ClassIndex.ToString);
      memoLog.Lines.Add('  class name = ' + V.ClassLabel);
    end;
You can define an event that occurs when a result is added:
    property OnAddDetected: TProc<TObject, IDetectedObject>;
    ...
    OnnxrtWrapper.DetectionResults.OnAddDetected :=
      procedure(Sender: TObject; aObject: IDetectedObject)
        begin
          ...
        end;
Prediction example
The project has a demo program OnnxDetectionTest that we use to test the functionality of the library. The program is executed as an FMX-project for the 64-bit platform.
In our work, we used a trained YOLO11l model converted to ONNX format.
  @software{yolo11_ultralytics,
    author = {Glenn Jocher and Jing Qiu},
    title = {Ultralytics YOLO11},
    version = {11.0.0},
    year = {2024},
    url = {https://github.com/ultralytics/ultralytics},
    orcid = {0000-0001-5950-6979, 0000-0002-7603-6750, 0000-0003-3783-7069},
    license = {AGPL-3.0}
  }
Images were sourced from https://pixabay.com/
Initial data and processing results
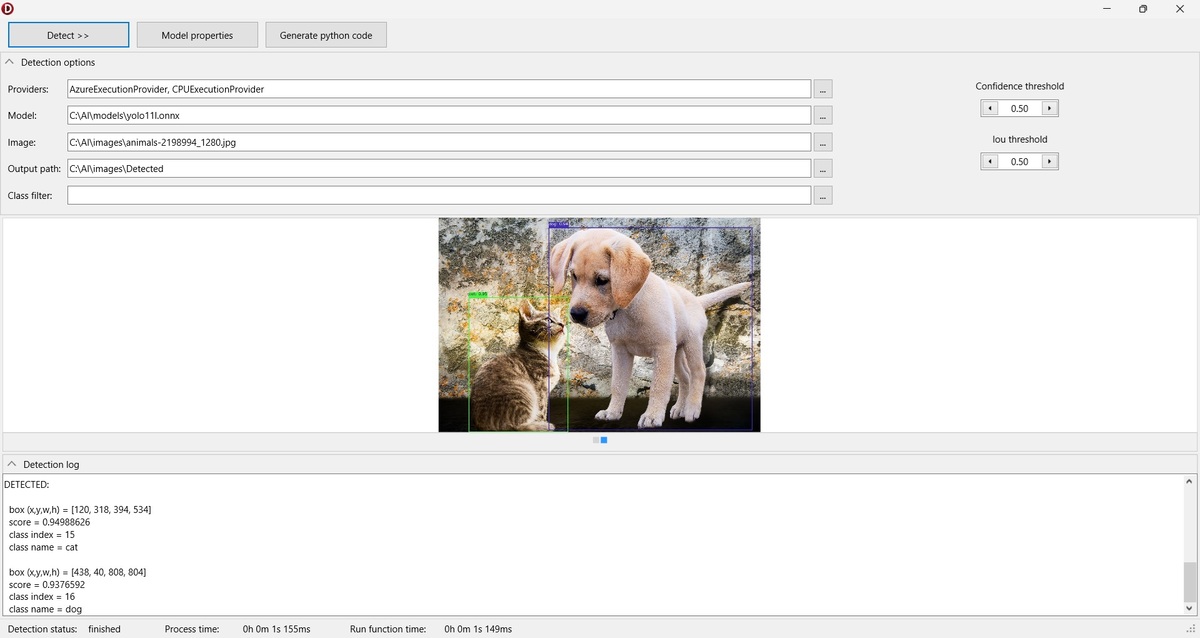
Detected classes
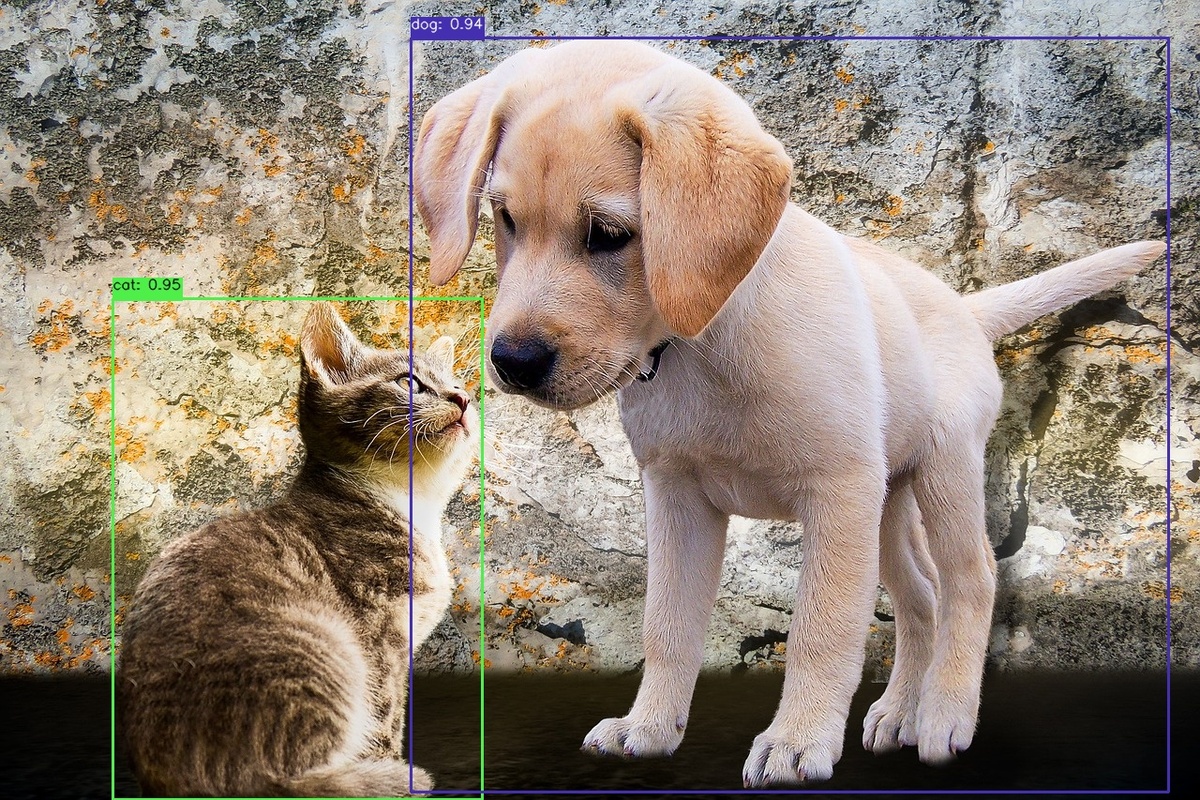
Example of prediction #1
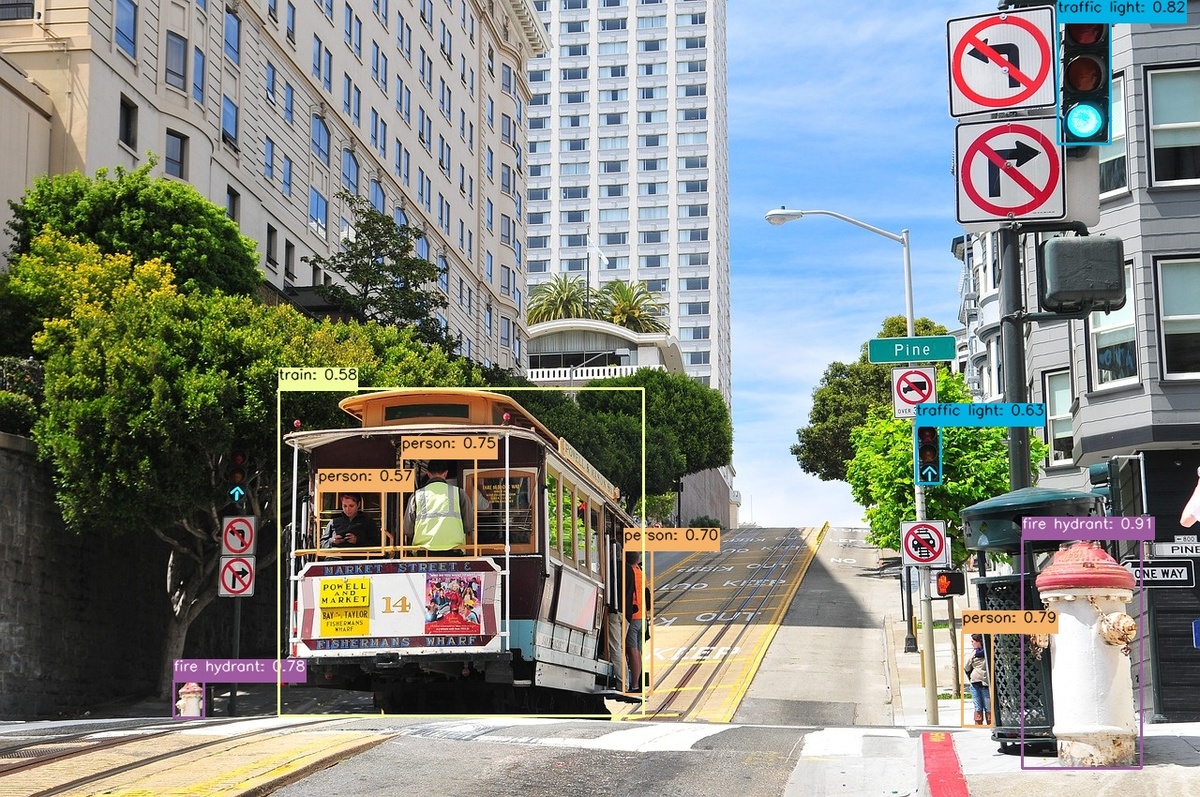
Example of prediction #2
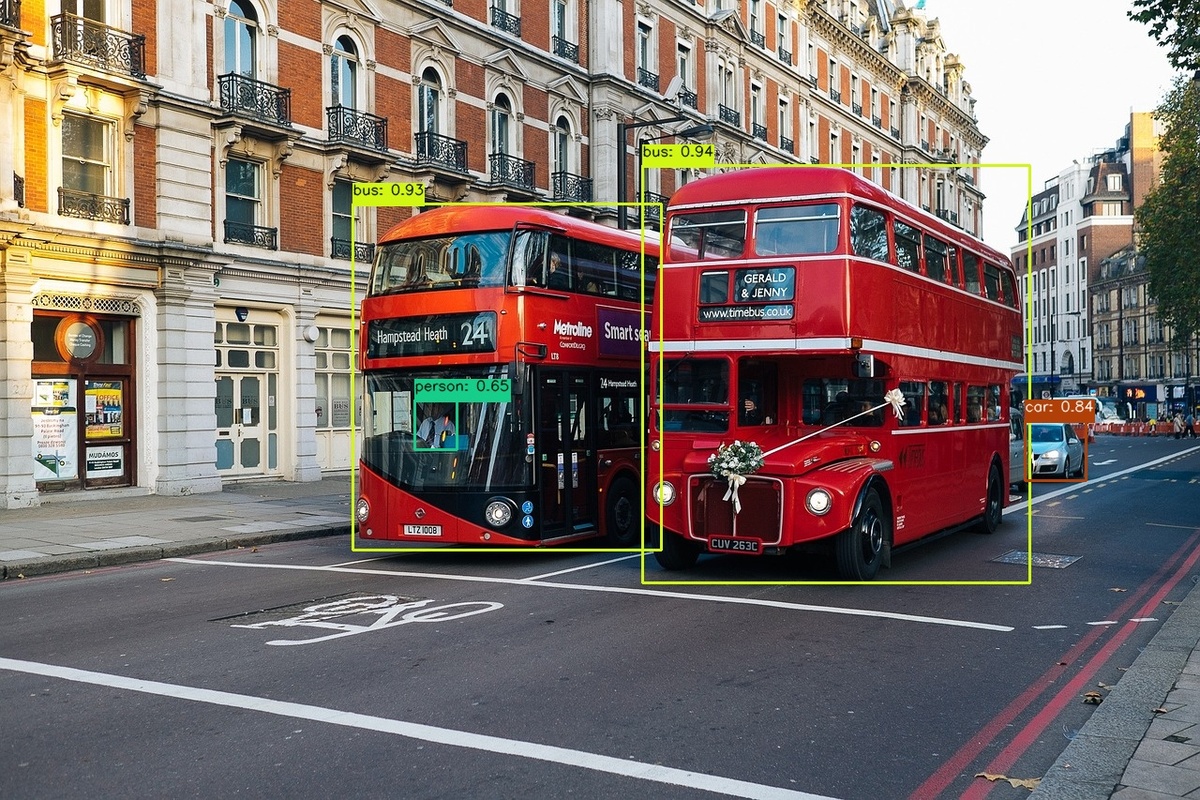
License
This project is licensed under the MIT License.