

Catalog · How the catalog works
SS-Cloak

Shadowsocks-Rust + Cloak obfuscator (GUI client & server)
- ★ 2 on GitHub
Anyone may press Interesting, signed in or not. It helps others find this project.
README
SS-Cloak
Shadowsocks-Rust client (with GUI) and server (for VPS) with obfuscation.
Dependencies: systemd, gtk2, lib64proxy-gnome, (libgtk2.0-0, libproxy1v5 for Ubuntu)
Client ports: SOCKS5 - 127.0.0.1:1080 (changeable), HTTP - 127.0.0.1:8889 (fixed, ver. >= 0.4.1)
Work directories / services:
- Client:
~/.config/ss-cloak-client; Service:/etc/systemd/user/ss-cloak-client.service - Server:
/etc/ss-cloak-server; Service:/etc/systemd/system/ss-cloak-server.service
SS-Cloak-Server
Rent a VPS with a foreign IP address and install a package on it ss-cloak-server (rpm/deb)
SS-Cloak-Client
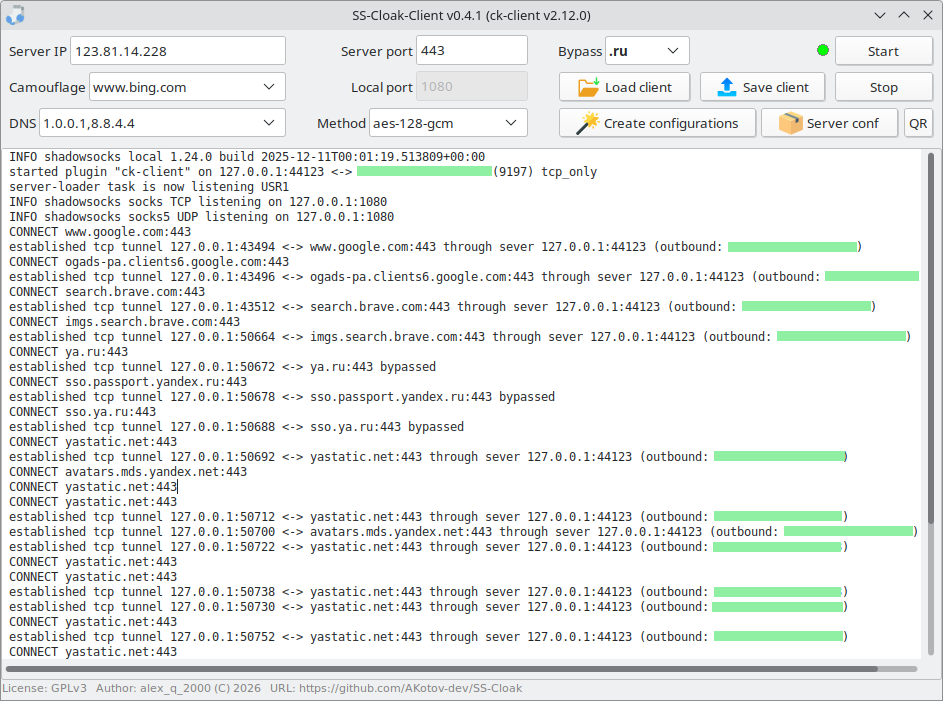
Install the ss-cloak-client package to your computer, launch the GUI, enter the IP address / Port of your server and click the Create configurations button. The Client configuration files will be created and you will be prompted to save the server-conf.tar.gz archive in order to place the config.json and ckserver.json files on the server in the working directory /etc/ss-cloak-server. With each click of the Create configurations button, new/unique Client and Server configurations are created with automatic change of PublicKey, PrivateKey, Password, UID, etc.
After that, start the server: systemctl restart ss-cloak-server and the client (Start button). Set up a connection in your browser via the SOCKS5 proxy 127.0.0.1:1080. Also check the box Send DNS requests via SOCKS5 proxy. Chromium-based browsers receive proxy settings automatically: the proxy is enabled and disabled on the fly, without the need for manual intervention. You can check your new location here: https://whoer.net
System‑wide Proxy (SWP) and DNS considerations
Starting with ss-cloak-client v0.4.1, automatic system-wide proxy and domain zone bypass (direct connections bypassing proxies, such as .ru, .ir, etc.) were introduced. SWP starts immediately after clicking the Start button, and the server switches to autostart mode after a computer reboot. Clicking the Stop button disables proxy autostart and SWP mode.
The SWP mode hermetically seals the GUI session, including DNS resolution (browsers and other GUI applications). However, in desktop environments based on gsettings + libproxy, the env/CLI layer receives proxy variables as all_proxy/ALL_PROXY=socks://…. This results in SOCKS4‑level usage, meaning DNS resolution is performed locally, unlike socks5h://, where DNS is resolved through the proxy.
For reliable use of System‑wide Proxy mode in XFCE, LXDE (as well as i3, IceWM, OpenBox), it is strongly recommended to install XDE‑Proxy‑GUI, which ensures correct and consistent proxy handling in GUI sessions.
For robust DNS protection against MITM attacks when a proxy is not used, it is recommended to use DNSCrypt‑GUI.
Note
- The
2022-blake3-aes-128-gcmand2022-blake3-aes-256-gcmencryption methods require time synchronization on the server and client. Time zones are irrelevant. A difference of 30 minutes will result in a disconnection. - If System‑wide Proxy is not feasible in your desktop environment, a practical alternative is to use browser‑level proxy extensions, such as
Socks5 Configurator. - To switch proxies on the fly, use
Chromium-based browsers(Chrome, Chromium, Brave, Edge, etc.). Firefox in most cases requires manual proxy activation and configuration. - When setting up a proxy, don't forget about the presence of a
firewall. - By default, the
.ru /.рфzone is bypassed. If complete anonymity is required, select any other zone from the list and clickStart. - For Android smartphones, it is convenient to use Exclave + Cloak-android.
Useful links: Shadowsocks-Rust, Cloak. Similar project: SS-Obfuscator.