

Catalog · How the catalog works
tpx

TpX: drawing tool for TeX
- ★ 15 on GitHub
Anyone may press Interesting, signed in or not. It helps others find this project.
README
TpX: drawing tool for TeX
This is the continuation of the TpX project that has been ported to the cross-platform Lazarus environment for Windows/Mac/Linux.
TpX is a lightweight, easy-to-use graphical editor for creating drawings and including them into LaTeX files in publication-ready form. It can also be used as a stand-alone editor for vector graphics. Up to version 1.5 it has been developed by Alexander Tsyplakov.
Download and install
Download TpX 1.6.0 for Windows x86-64, Linux x86-64 or Apple Silicon macOS. Extract the archive and run the editor; no compiler is needed. See INSTALL.md for the short installation steps, dependencies and Mac first-launch instructions. The Mac app is ad hoc signed and not notarized.
TpX 1.6.0 predates opening and saving TikZ and SVG sources, the Inspector and
File → Open Example; the browser build and the guide below follow the
current master. With the default tikz TeX format, a 1.6.0 .TpX file
carries its TikZ picture after the editor data, so include the saved drawing
directly with \input{figure.TpX}.
For the latest desktop fixes, download a
development build from CI.
Windows x86-64, Linux x86-64 and Apple Silicon macOS packages are built and
tested automatically on every push to master. Sign in to GitHub, open the
latest successful run, and choose your platform under Artifacts. Extract
the downloaded artifact ZIP, then extract the package inside and follow its
INSTALL.md; no compiler or Lazarus installation is needed. These are test
builds, retained for 30 days. The archive name and bundled BUILD.json
identify the source commit. Each package contains its source, and the artifact
also includes a checksum file.
To try TpX without installing it, open the
browser build. It is deployed from the
latest master and runs on the Lazarus CustomDrawn WASI backend proposed in
Lazarus MR !813.
Preferences and recovery files
TpX keeps preferences, recovery drafts and preview caches in your user profile,
separate from the application and drawing files. Windows uses
%APPDATA%\TpX\TpX.ini for preferences, %LOCALAPPDATA%\TpX\AutoSaveRecovery
for recovery drafts and %LOCALAPPDATA%\TpX\preview-cache for the preview
cache. Linux uses the XDG config, state and cache directories, with ~/.config,
~/.local/state and ~/.cache as fallbacks. macOS uses
~/Library/Preferences/TpX/TpX.ini,
~/Library/Application Support/TpX/AutoSaveRecovery and
~/Library/Caches/TpX/preview-cache.
Existing per-user preferences take precedence. If there are none, TpX imports
the historical TpX.ini from beside the executable or the previous macOS
settings location and leaves the original in place.
For a self-contained copy, start TpX with --portable or place an empty
TpX.portable file beside the executable. TpX then stores files under
TpX-portable-data/{config,state,cache} beside that copy. For a macOS app,
place the sentinel beside TpX.app; portable data stays beside the bundle so
the signed app resources remain intact. Help → Storage locations shows the
paths in use.
First scientific figure
The desktop File → Open Example menu opens three bundled drawings as new unsaved documents, so Save asks where to write your copy. In the browser, download the quadratic function, vector addition, or double-slit example, then choose File → Open. Choose File → Download a copy to keep browser edits outside the current tab. The examples use native vector objects and TeX labels; they have no linked image assets.
To build a figure from a blank page:
-
Choose File → New. Draw axes with Insert → Insert line, then use Insert → Insert curve for a plotted trace; click to place its points and double-click to finish.
-
Add a label with Insert → Insert text. Select it to edit its caption and TeX source; for example, enter
$f(x)=x^2-1$as the TeX source. The caption remains editable on the canvas. -
Select an object to inspect its style and text properties in the Inspector. Choose Point coordinates… for point geometry; Object properties focuses the Inspector on the selection.
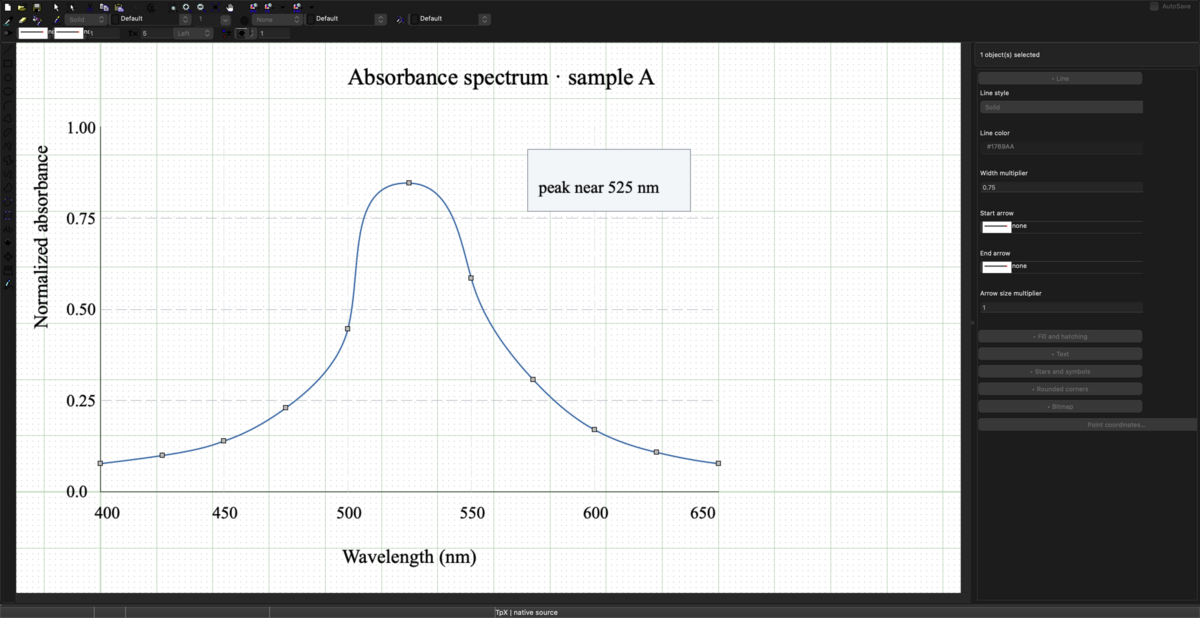
The Inspector stays beside the drawing, so edits can be checked against the figure as you work.
-
Choose File → Save as… (File → Download a copy as… in the browser), select TikZ source, and save
figure.tikz. Keep the.TpXfile for native editing; TikZ save-back supports a defined subset and refuses edits it cannot represent safely. -
Include the TikZ snippet in LaTeX:
\usepackage{tikz}
...
\input{figure.tikz}
Compile with
pdflatex. Debian/Ubuntu needtexlive-latex-baseandtexlive-picturesfor the engine and PGF/TikZ. The snippet carries a bounding rectangle based on the figure's drawing extent.
Imported or refreshed TeX source stays inert until View → Trust TeX preview
for this document is chosen. Review the source first: desktop previews pass
it to the local LaTeX and dvipng tools; installing dvisvgm enables reusable
SVG previews. The browser uses bundled MathJax for supported math text and
does not run a local TeX engine or external programs. TikZ import is bounded
to 4 MiB, 500,000 tokens, and 256 nested groups.
Browser documents live in a temporary virtual file system for the current tab. File → Open copies the selected file into that space, and File → Download a copy downloads a copy; closing or reloading the tab discards unsaved browser edits. See INSTALL.md for platform setup.
Basic 3D objects (box, cylinder, sphere, cone, torus, extrusions and revolutions) are described in doc/basic-3d.md.
Build and run on Linux
TpX uses Free Pascal, Lazarus, the Lazarus Components Library (LCL), and the
Printer4Lazarus package included with Lazarus. GTK2 is the default Linux
backend. Building requires GNU Make and the GTK2 development libraries.
On Debian or Ubuntu:
sudo apt update
sudo apt install git make lazarus lcl-gtk2 fp-compiler fp-units-gfx libgtk2.0-dev
On Arch Linux or CachyOS:
sudo pacman -S --needed git make fpc lazarus gtk2Clone, build, and start the editor:
git clone https://github.com/krystophny/tpx.git
cd tpx
make
make run
make build also builds the editor. The executable is
obj/<cpu>-<os>/TpX, for example obj/x86_64-linux/TpX.
An X11 display or XWayland is required to run the GTK2 editor.
The build stores its Lazarus configuration in the ignored .lazarus/ directory.
The Makefile detects Lazarus in /usr/lib/lazarus or /usr/share/lazarus,
including versioned subdirectories used by Debian and Ubuntu.
For another installation location, pass the directory containing lcl/:
make LAZARUS_DIR=/path/to/lazarusTo build directly with Lazarus, use lazbuild --ws=gtk2 TpX.lpi.
If it reports that the Lazarus directory is invalid, add
--lazarusdir=/path/to/lazarus. Open TpX.lpi in the Lazarus IDE to develop
or debug the editor. Additional build flags can be passed through
LAZBUILD_FLAGS, for example make LAZBUILD_FLAGS=--build-all.
With Python 3 installed, run make test to check saved-drawing round trips
and SVG geometry. On a machine without a display, install Xvfb and use
xvfb-run -a make test. These checks also run in GitHub Actions on Linux.
TeX and import/export tools
The editor can build and run without TeX. Previewing drawings and exporting
through LaTeX require latex, pdflatex, dvips, and the drawing packages.
Ghostscript (gs) supports PostScript conversion and previews, mpost supports
MetaPost output, and pstoedit supports PostScript/PDF import.
If Ghostscript, LaTeX or dvips is missing when a preview or export needs it, TpX shows the required tool and an installation command or download link. You can copy the command or open TpX settings to select an executable. TpX also searches PATH and common installation directories when a saved path is no longer valid. Command-line exports report missing tools on stderr and return a nonzero exit status.
On Debian or Ubuntu:
sudo apt install texlive-latex-base texlive-latex-recommended texlive-latex-extra \
  texlive-pictures texlive-pstricks texlive-metapost ghostscript pstoedit
On Arch Linux or CachyOS:
sudo pacman -S --needed texlive-latex texlive-latexrecommended texlive-latexextra \
  texlive-pictures texlive-pstricks texlive-metapost ghostscript pstoedit
Bitmap-to-EPS conversion uses sam2p by default. Install it from your
distribution when available, or follow the sam2p build instructions.
Without it, TpX writes bitmaps into EPS and PostScript output as uncompressed
image data, which works but produces larger files.
Its PNG, JPEG, and TIFF readers use Netpbm and libjpeg tools. Those are provided
by netpbm and libjpeg-turbo-progs on Debian/Ubuntu, or netpbm and
libjpeg-turbo on Arch/CachyOS. In TpX's settings, check the tool paths and
choose the viewers used to open previews.
Drawing and TikZ defaults
Sized shapes support both dragging and click-to-click placement. In the Edit menu, Snap to shapes attracts points to visible endpoints and corners within six screen pixels. Shape snapping takes priority over grid snapping; points farther away still use the grid when it is enabled.
Text can be selected across its visible area. Text properties offer left,
center, and right alignment. Enter a complete math expression such as
$(a+b)$ in the text field, or use the TeX source field for other LaTeX code.
Choose the Text tool and click the canvas to type at a new label's position;
click an existing label with that tool or double-click it in selection mode to
edit it. With a text label selected, Edit → Edit text also opens the
canvas editor. Enter inserts a line break, while
Ctrl+Enter (or Command+Enter on macOS), Tab, or Done finishes the edit.
Escape cancels the uncommitted edit after any active input-method composition
ends.
Lines, shapes, curves and arcs have a line opacity and a fill opacity from 0
(transparent) to 1 (opaque, the default) under More properties in the
Inspector, for example for a translucent highlight over a curve. Hatching takes
the fill opacity. The canvas, TikZ, PGF, PSTricks (opacity/strokeopacity),
SVG and PDF output keep the opacity. EPS/PostScript, MetaPost, the LaTeX
picture environment and EMF have no transparency and draw such paint opaque;
PSTricks transparency needs a PostScript-to-PDF route that allows it, such as
ps2pdf -dALLOWPSTRANSPARENCY. A translucent line and its arrowheads composite
as one layer (a transparency group in TikZ, PGF, PDF and, through the same
Ghostscript route, PSTricks, and an SVG group with opacity), so a head does not darken the line where it covers
it. Editable SVG documents keep the opacity on each shape instead, because
their profile has no group opacity. Text, images and 3D objects are always
opaque.
Opaque drawings are saved exactly as before; the .TpX attributes are lo
and fo and appear only when an opacity is below 1.
A filled shape can also have a linear or radial gradient (Fill gradient
in the Inspector). It runs from the fill color and fill opacity to the
gradient end color (Default: the fill color) and end opacity, so a radial
gradient with end opacity 0 gives a soft disc that fades out at its edge. A
linear gradient follows Gradient angle (degrees counterclockwise from left
to right). Both are laid out on the bounding box of the filled path with the
rules of TikZ's axis and radial shadings, and the canvas, TikZ (shadings, with
a fading when the two opacities differ) and SVG (user-space gradients) agree.
PDF, PGF, PSTricks, EPS/PostScript, MetaPost, the LaTeX picture environment
and EMF have no gradient output and fill with the start color and opacity.
For curves, TikZ measures the box including Bézier control points, so a
gradient there can sit slightly differently than on the canvas or in SVG. The
.TpX attributes are grad (linear or radial), gc, go and ga;
older TpX versions show the solid start color.
Use Edit → Object properties to open the Object Inspector on the right; View → Object inspector toggles it, and its splitter can be dragged to resize the panel. Collapse a section to make room for the drawing. When a selection contains different values for a field, the Inspector shows Mixed; editing that field applies only that property to the selected objects and preserves their other individual values. Coordinates, transforms, scale and preferences keep their dedicated dialogs. File pickers and explicit discard/replacement confirmations remain dialogs as well.
For a short desktop workflow check, draw a line and rectangle, create a canvas
label, change line width and text height in the Inspector, and edit the label's
TeX source in place. Use Tab, undo/redo, resize or collapse the Inspector, then
save and reopen; check that the geometry, anchor, Text and TeX source remain.
Desktop live previews typeset TeX text in the canvas using LaTeX and dvipng,
with reusable SVG output when dvisvgm is available. View → Live LaTeX
Preview toggles this behavior; it is enabled by default. Without the tools,
the canvas shows editable text. Explicit LaTeX previews and exports still work
as before.
On native desktop builds, File → Automatic refresh → Auto refresh is on by default for source formats TpX can safely edit and save back. Pause refresh for the current drawing or choose Reload from disk… to reload explicitly. If external changes arrive while the drawing has unsaved edits, TpX keeps the local scene and offers Keep local edits or Save local copy…; malformed external files leave the current scene unchanged. Imported or refreshed TeX content stays inert until View → Trust TeX preview for this document is chosen. Trust applies only to the current document; opening another file, reloading changed source, or restoring a recovery draft asks again. Approving preview allows the configured local TeX tools to process its labels, so approve only source you trust. Browser builds open and save supported SVG and TikZ sources, but each file is a temporary snapshot: use File → Open again to import external changes.
TikZ output supplies drawing defaults for \tpxLineWidth, \tpxTextSize,
\tpxDashSize, and \tpxDotSize. Define these before including the drawing
to override them, for example:
\newcommand{\tpxLineWidth}{0.4mm}
\newcommand{\tpxTextSize}{10pt}
\input{drawing.TpX}
Object-specific widths and text heights remain proportional to these defaults.
Unset defaults belong to the drawing's local group and do not affect later
figures. Disable FontSizeInTeX to inherit the document's font size instead.
Opened TikZ source saves back by patching supported edits into the original
source, preserving untouched text, comments, and whitespace. TpX rejects edits
whose meaning cannot be represented safely in the source. Native .tpx files
retain TpX editor data; TikZ save-back preserves supported drawing semantics
and source text, not TpX-only grouping or other editor metadata.
Cropped LaTeX export
Export PdfLaTeX source and run pdflatex on the generated .tex file to
produce a PDF cropped to the drawing, including its configured border. This
uses the preview package supplied by the TeX prerequisites above. Exported
assets omit figure placement, centering, captions, and labels; those settings
remain in the editable drawing. Interactive document previews keep their
existing page layout.
PDF from LaTeX EPS also produces a cropped PDF and supports math text.
Build and run on macOS
The Cocoa build was tested on Apple Silicon with Lazarus 4.8 and Free Pascal
- .3 from the upstream
fixes_3_2branch. The older Homebrew FPC 3.2.2 compiler can fail with current Xcode linkers on Objective-C method atoms. Install Xcode command-line tools and the bootstrap compiler:
xcode-select --install
brew install fpc git make python texlive ghostscript pstoedit
Build the maintained compiler in a private prefix:
git clone --depth 1 --branch fixes_3_2 https://gitlab.com/freepascal.org/fpc/source.git ~/code/fpc-source
cd ~/code/fpc-source
tpx_sdk=$(xcrun --sdk macosx --show-sdk-path)
make -j8 all FPC=/opt/homebrew/bin/fpc OPT="-XR$tpx_sdk" FPMAKE_BUILD_OPT="-XR$tpx_sdk"
make install INSTALL_PREFIX="$HOME/.local/tpx-fpc"
"$HOME/.local/tpx-fpc/bin/fpcmkcfg" \
  -d basepath="$HOME/.local/tpx-fpc/lib/fpc/3.2.3" \
  -d sharepath="$HOME/.local/tpx-fpc/share/fpc/3.2.3" \
  -o "$HOME/.local/tpx-fpc/etc/fpc.cfg"
ln -s ../lib/fpc/3.2.3/ppca64 "$HOME/.local/tpx-fpc/bin/ppca64"
export PATH="$HOME/.local/tpx-fpc/bin:/opt/homebrew/bin:$PATH"
export PPC_CONFIG_PATH="$HOME/.local/tpx-fpc/etc"
Then build Lazarus and TpX using that compiler:
git clone --depth 1 --branch lazarus_4_8 https://gitlab.com/freepascal.org/lazarus/lazarus.git ~/code/lazarus
cd ~/code/lazarus
# Apply the provider repairs used by the published binaries.
git apply ~/code/tpx/ci/patches/lazarus-4.8-opendocument.patch
git apply ~/code/tpx/ci/patches/lazarus-4.8-cocoa-font-cancel.patch
git apply ~/code/tpx/ci/patches/lazarus-4.8-cocoa-text-shortcuts.patch
git apply ~/code/tpx/ci/patches/lazarus-4.8-gtk2-text-composition.patch
git apply ~/code/tpx/ci/patches/lazarus-4.8-cocoa-focus-handoff.patch
make lazbuild LCL_PLATFORM=cocoa CPU_TARGET=aarch64 FPC="$HOME/.local/tpx-fpc/bin/fpc"
cd ~/code/tpx
make test WIDGETSET=cocoa LAZBUILD="$HOME/code/lazarus/lazbuild" \
  LAZARUS_DIR="$HOME/code/lazarus" LAZARUS_CONFIG="$PWD/.lazarus" \
  LAZBUILD_FLAGS="--compiler=$HOME/.local/tpx-fpc/lib/fpc/3.2.3/ppca64"
./obj/aarch64-darwin/TpX
The native GUI tests require a logged-in graphical session. Tool paths in
TpX's settings use Unix executable names on macOS, such as pdflatex and gs.