

TAChart Tutorial: ColorMapSeries, Zooming: what changed
Revision 0 to 1. Removed lines have a minus sign; added lines have a plus sign.
Title: TAChart Tutorial: ColorMapSeries, Zooming
| Old | New | Line | |
|---|---|---|---|
| 1 | + | ## Introduction | |
| 2 | + | ||
| 3 | + | 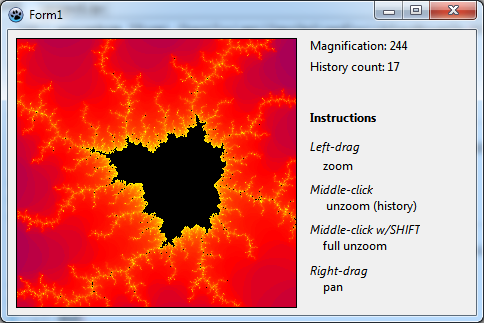 | |
| 4 | + | ||
| 5 | + | The \[<http://en.wikipedia.org/wiki/Mandelbrot_set>\|"Mandelbrot set"\], named after Benoit Mandelbrot, is a so-called "fractal" -- a two-dimensional shape that is famous for its self-similarity at various scales. Magnifying a fractal reveals small-scale details similar to the large-scale characteristics. | |
| 6 | + | ||
| 7 | + | In this tutorial, we will use [[TAChart]] to draw the Mandelbrot set by means of a **colormap series** and practice a variety of zooming techniques, like using the **zoom drag tool**, or setting up an **extent history**. | |
| 8 | + | ||
| 9 | + | As usual, youl'll require a basic knowledge of working with TAChart which you can aquire by going through the [[TAChart Tutorial: Getting started|"Getting Started" tutorial]]. And, of course, you must be familiar with the Lazarus IDE and the Object Pascal language. | |
| 10 | + | ||
| 11 | + | ## Using TColormapSeries | |
| 12 | + | ||
| 13 | + | What is a [[TAChart documentation|TColorMapSeries]]? | |
| 14 | + | ||
| 15 | + | The series that you typically work with are for two-dimensional data -- there is one axis for the *x* coordinates, and another one for the *y* values which are assigned to the *x* values. `TColorMapSeries` is one exception: it displays three-dimensional data: we have a point in the *xy* plane and assign to it a third value as its height above the *xy* plane. Often, 3D plots, are considered to be like a mountain landscape above a base plane. Unfortunately, TAChart cannot draw 3D projections. But there is an alternative: the height above the base plane can be can be mapped to a color, this means the chart fills the xy plane with colors which correspnd to the value of the third coordinate. | |
| 16 | + | ||
| 17 | + | `TColorMapSeries` is a functional series, this means that it cannot plot arbitrary data, but only data that can be calculated from a function. For this purpose, the series exposes an event `OnCalculate` which is called for every (*x*,*y*) point to pass the function value. In this sense, the `TColorMapSeries` is similar to the `TFuncSeries` which we meet in [[TAChart Tutorial: Function Series|another tutorial]]. | |
| 18 | + | ||
| 19 | + | The second basic ingredient is a `ColorSource` which maps the function values to a color. It is convenient to use a `TListChartSource` for this purpose. In general, it stores *x* and *y* values along with a color value and a descriptive label in `TChartDataItem`s, but for the mapping purpose we need only the *x* and color entries. | |
| 20 | + | ||
| 21 | + | Ready to start? | |
| 22 | + | ||
| 23 | + | Create a new project, and add a client-aligned `TChart` component. Don't make the window too large since the project in this tutorial will require a *lot* of computation, and too many pixels will kill performance... | |
| 24 | + | ||
| 25 | + | Double-click on the chart to open the series editor and add a *"Color map series"* to the chart. Next, drop a `TListChartSource` to the form. This will be the color source for the ColorMapSeries. So, name it "`ColorSource`" and assign it to the corresponding property of the series. | |
| 26 | + | ||
| 27 | + | 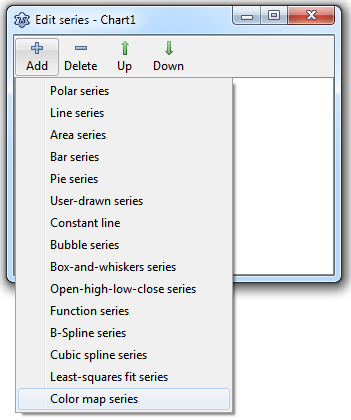 | |
| 28 | + | ||
| 29 | + | ## Setting up the color map | |
| 30 | + | ||
| 31 | + | To get some familiarity in this new terrain, let us begin with a simple example: we use the ColorMapSeries to draw a gradient along the *x* axis. | |
| 32 | + | ||
| 33 | + | At first, we write an event handler for the ColorMapSeries' `OnCalculate`. This is easy since we want only a simple linear gradient: | |
| 34 | + | ||
| 35 | + | ``` pascal | |
| 36 | + | procedure TForm1.Chart1ColorMapSeries1Calculate(const AX, AY: Double; | |
| 37 | + | out AZ: Double); | |
| 38 | + | var | |
| 39 | + | ext: TDoubleRect; | |
| 40 | + | begin | |
| 41 | + | ext := Chart1.GetFullExtent; | |
| 42 | + | AZ := (AX - ext.a.x) /(ext.b.x - ext.a.x); | |
| 43 | + | end; | |
| 44 | + | ``` | |
| 45 | + | ||
| 46 | + | To be independent of the size of the chart we normalize the *x* coordinate to the range of *x* data (in [[TAChart documentation|graph units]]). The *x* range can be calculated from the [[TAChart documentation|FullExtent]] of the chart -- this is a rectangle of double-precision values defined by the corner points of the chart's plotting rectangle before any zooming or panning is applied. The normalization as shown above makes sure that AZ is 0 at the left and 1 at the right end of the *x* axis. | |
| 47 | + | ||
| 48 | + | Finally we have to populate the ColorSource to setup the gradient. This is very easy since the ColorMapSeries does all the interpolations if its property `Interpolate` is set to `true`. | |
| 49 | + | ||
| 50 | + | To define the gradient we begin with the value 0.0 and assign it to the color blue. The end of the gradient corresponds to the value 1.0 and it should appear in yellow. We make these assignments in a procedure `PopulateColorSource` that we call from the `OnCreate` event handler of the form; we use a separate procedure since we'll do some modifications throughout this tutorial and want to keep things separate. | |
| 51 | + | ||
| 52 | + | ``` pascal | |
| 53 | + | procedure TForm1.FormCreate(Sender: TObject); | |
| 54 | + | begin | |
| 55 | + | PopulateColorSource; | |
| 56 | + | end; | |
| 57 | + | ||
| 58 | + | procedure TForm1.PopulateColorSource; | |
| 59 | + | const | |
| 60 | + | DUMMY = 0.0; | |
| 61 | + | begin | |
| 62 | + | with ColorSource do begin | |
| 63 | + | Add(0.0, DUMMY, '', clBlue); // 0.0 --> blue | |
| 64 | + | Add(1.0, DUMMY, '', clYellow); // 1.0 --> yellow | |
| 65 | + | end; | |
| 66 | + | end; | |
| 67 | + | ``` | |
| 68 | + | ||
| 69 | + | Due to the syntax of `TListChartSource.Add` we also have to enter values for the *y* coordinate and the marks text, we use the constant `DUMMY` and an empty string since we don't need them. | |
| 70 | + | ||
| 71 | + | Let's run the program. If you don't see a gradient you may have forgotten to activate the `Interpolate` setting of the ColorMapSource. If you look carefully you will see some narrow banding of the color shades particularly in the center transition region. This is due to the `StepX` and `StepY` properties of the ColorMapSource which are still at their default value of 4. This means that the xy plane is not scanned pixel by pixel, but in blocks of 4x4 pixels, to speed up drawing. Set these values to 1 to get rid of the banding. The improved resolution is also advantageous for the Mandelbrot set later. However, it will slow down program execution which may be quite dramatic if you have a slow computer... | |
| 72 | + | ||
| 73 | + | 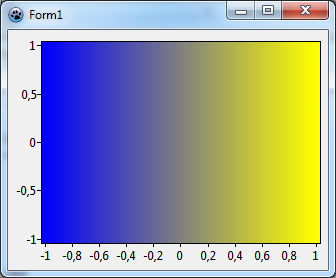 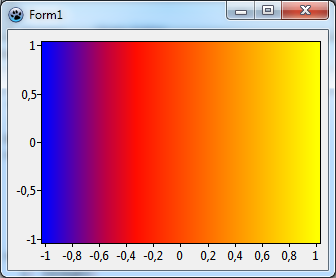 | |
| 74 | + | ||
| 75 | + | Let's go a step further and add another pivot to our gradient. What about red in the middle corresponding to, say, 0.3? Just put another call to `Add` into the `PopulateColorSource` procedure. Since the interpolation requires a sorted list you should add the new color between the other ones, or you should call `Sort` after adding color-value pairs. The result of this tree-color gradient is shown above, we will use it now when we draw the Mandelbrot set. | |
| 76 | + | ||
| 77 | + | ``` pascal | |
| 78 | + | procedure TForm1.PopulateColorSource; | |
| 79 | + | const | |
| 80 | + | DUMMY = 0.0; | |
| 81 | + | begin | |
| 82 | + | with ColorSource do begin | |
| 83 | + | Add(0.0, DUMMY, '', clBlue); // 0.0 --> blue | |
| 84 | + | Add(0.3, DUMMY, '', clRed); // 0.3 --> red | |
| 85 | + | Add(1.0, DUMMY, '', clYellow); // 1.0 --> yellow | |
| 86 | + | end; | |
| 87 | + | end; | |
| 88 | + | ``` | |
| 89 | + | ||
| 90 | + | ## The Mandelbrot set | |
| 91 | + | ||
| 92 | + | So what is the Mandelbrot set? Roughly speaking, it is a set of points in the *xy* plane that follow a certain rule, like a circle which has the rule that all points on the circle (i.e. in the set) must have the same distance from the origin. | |
| 93 | + | ||
| 94 | + | For the Mandelbrot set the rule is a bit more complex. The world "complex" is to be understood here in a two-fold sense: complex in the sense of "complicated", but also complex in the mathematical sense that the points in the *xy* plane are treated as complex numbers. If you are not familiar with complex numbers, don't give up -- we will avoid calculations with these "strange" numbers completely. | |
| 95 | + | ||
| 96 | + | ### Calculation | |
| 97 | + | ||
| 98 | + | The best way to understand the Mandelbrot set is do its construction. We apply the following recipe for each 2d point in the *xy* plane; these starting points will be called c = (c<sub>x</sub>, c<sub>y</sub>). | |
| 99 | + | ||
| 100 | + | 1. Begin by assigning c to another point z = (z<sub>x</sub>, z<sub>y</sub>) = (c<sub>x</sub>, c<sub>y</sub>). | |
| 101 | + | 2. Calculate the "square" of z according to the following formula: z<sup>2</sup> = (z<sub>x</sub><sup>2</sup> - z<sub>y</sub><sup>2</sup>, 2 * z<sub>x</sub> * z<sub>y</sub>) -- this formula may appear a bit strange, but if you are familiar with complex numbers then you will notice that it is the way how to calculate the square of a complex number. If you are not just take it as given. | |
| 102 | + | 3. Then add the coordinates of c to those of `z`<sup>`2`</sup>. The result of this step is z<sup>2</sup> + c = (z<sub>x</sub><sup>2</sup> - z<sub>y</sub><sup>2</sup> + c<sub>x</sub>, 2 * z<sub>x</sub> * z<sub>y</sub> + c<sub>y</sub>) | |
| 103 | + | 4. Now take that result and put it into the calculation in step 2 again as a new value of z. | |
| 104 | + | 5. Repeat this procedure again and again. As a result the point z will follow some kind of trajectory in the *xy* plane. In the figure we show some examples of that trace: | |
| 105 | + | - 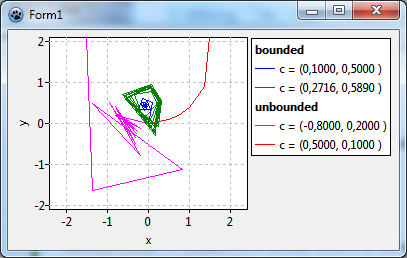 The red and fuchsia curves eventually move away from the origin, these paths are **"unbounded"**. It can be shown that once the path has crossed a critical distance of 2 from the origin it will never return back and will escape into infinity. Usually the calculation counts the iterations until the distance from the origin exceeds 2. The number of iterations is mapped to a color which is used to draw the pixel at the starting point c. | |
| 106 | + | - The blue path, on the other hand, converges towards the origin. The green curve does not converge, but remains within the escape radius. Both cases are called **"bounded"**. The iterative calculation would go on forever. Therefore it is stopped after a maximum count of iterations. The starting points c for these trajectories are said to belong to the Mandelbrot set and will be drawn in black color. | |
| 107 | + | ||
| 108 | + | Although this description may sound a bit complicated only a few lines of Pascal code are required to do the calculation. The following function determines whether a point c is in the Mandelbrot set or not. It returns the number of iterations needed and the coordinates of the point after the last iteration performed. | |
| 109 | + | ||
| 110 | + | ``` pascal | |
| 111 | + | const | |
| 112 | + | MANDELBROT_NUM_ITERATIONS = 100; | |
| 113 | + | MANDELBROT_ESCAPE_RADIUS = 2.0; | |
| 114 | + | MANDELBROT_LIMIT = sqr(MANDELBROT_ESCAPE_RADIUS); | |
| 115 | + | ||
| 116 | + | function InMandelbrotSet(c:TDoublePoint; out Iterations:Integer; out z: TDoublePoint): Boolean; | |
| 117 | + | var | |
| 118 | + | j: Integer; | |
| 119 | + | begin | |
| 120 | + | Iterations := 0; | |
| 121 | + | z := DoublePoint(0.0, 0.0); | |
| 122 | + | for j:=0 to MANDELBROT_NUM_ITERATIONS-1 do begin | |
| 123 | + | z := DoublePoint( | |
| 124 | + | sqr(z.X) - sqr(z.Y) + c.X, | |
| 125 | + | 2 * z.X * z.Y + c.Y | |
| 126 | + | ); | |
| 127 | + | if sqr(z.X) + sqr(z.Y) > MANDELBROT_LIMIT then begin | |
| 128 | + | Result := false; | |
| 129 | + | // point did escape --> c is not in Mandelbrot set | |
| 130 | + | exit; | |
| 131 | + | end; | |
| 132 | + | inc(Iterations); | |
| 133 | + | end; | |
| 134 | + | Result := true; | |
| 135 | + | end; | |
| 136 | + | ``` | |
| 137 | + | ||
| 138 | + | ### Drawing | |
| 139 | + | ||
| 140 | + | Now we want to draw the Mandelbrot set. You know what to do? Yes - we have to write a corresponding handler for `OnCalculate`. In this event handler we call our `InMandelbrotSet` procedure. If the point passed to the event handler is in the Mandelbrot set we set its color to black, if not we divide the number of iterations by the maximum number of iterations to get a value between 0 and 1 which has a corresponding entry in our ColorSource. Oh - but how can we give the points in the Mandelbrot set a black color? Just add another number-color pair to the ColorSource which links `clBlack` to, e.g., -1. | |
| 141 | + | ||
| 142 | + | ``` pascal | |
| 143 | + | procedure TForm1.PopulateColorSource; | |
| 144 | + | const | |
| 145 | + | DUMMY = 0.0; | |
| 146 | + | begin | |
| 147 | + | with ColorSource do begin | |
| 148 | + | Clear; | |
| 149 | + | Add(-1.0, DUMMY, '', clBlack); | |
| 150 | + | Add( 0.0, DUMMY, '', clBlue); | |
| 151 | + | Add( 0.3, DUMMY, '', clRed); | |
| 152 | + | Add( 1.0, DUMMY, '', clYellow); | |
| 153 | + | end; | |
| 154 | + | end; | |
| 155 | + | ||
| 156 | + | procedure TForm1.Chart1ColorMapSeries1Calculate(const AX, AY: Double; | |
| 157 | + | out AZ: Double); | |
| 158 | + | var | |
| 159 | + | iterations: Integer; | |
| 160 | + | z: TDoublePoint; | |
| 161 | + | begin | |
| 162 | + | if InMandelBrotSet(DoublePoint(AX, AY), iterations, z) then | |
| 163 | + | AZ := -1 | |
| 164 | + | else | |
| 165 | + | AZ := iterations / MANDELBROT_NUM_ITERATIONS; | |
| 166 | + | end; | |
| 167 | + | ``` | |
| 168 | + | ||
| 169 | + | And that's what we get - see the left image: | |
| 170 | + | ||
| 171 | + | 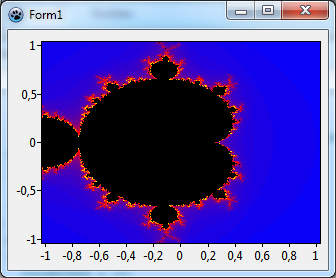 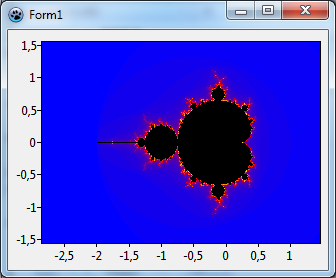 | |
| 172 | + | ||
| 173 | + | Very nice. But as usual the first result is not yet the best one. These are two points that we can improve: | |
| 174 | + | ||
| 175 | + | - The picture is **clipped**. This is because we did not define the calculation range that the ColorMapSeries occupies for *x* and *y*. The overview of the Mandelbrot set is seen best when *x* and *y* range between -2.2 and 0.8, and between -1.5 and 1.5, respectively. Enter these numbers in the chart's `Extent` fields `XMin, XMax, YMin` and `YMax`, and set the fields `UseXMin, UseXMax, UseYMin` and `UseYMin` to `true` to activate these values as axis limits. You might as well use the `Extent` property of the series, but then you would have to set the chart's `Margins` to 0 in order to remove the non-filled background near the axes. | |
| 176 | + | ||
| 177 | + | - The picture looks somehow **distorted** if you compare it with the images in [1](http://en.wikipedia.org/wiki/Mandelbrot_set). This happens because *x* and *y* axes have different unit lengths. To avoid the distortion the distance between 0 and 1 must be equal for both axes. Of course, we could initialize the width and height of the form correctly, but the user could resize the form, and this would distort our image again. However, `TChart` has a practical property to enforce a "square" coordinate system: set `Proportional` to `true`. With this setting the extent of the *x* and *y* axes is adjusted automatically to always get equal units. | |
| 178 | + | ||
| 179 | + | The result after these modifications is displayed above in the right image. You maybe notice that the *x* axis range is wider than we had requested. This is a consequence of the `Proportional` setting since the aspect ratio of our window is not compatible with the *x* and *y* ranges set in the chart's `Extent`. | |
| 180 | + | ||
| 181 | + | Before we continue with the tutorial, here's a piece of "homework": Modify the program such that the Mandelbrot set is not black, but shows colors according to the distance of the trajectory from the origin when the iteration is aborted. | |
| 182 | + | ||
| 183 | + | ## Zooming and panning | |
| 184 | + | ||
| 185 | + | It was mentioned in the introduction that the Mandelbrot set is self-similar at magnified scales. This calls for zooming -- and this will be the subject of the next part of the tutorial. | |
| 186 | + | ||
| 187 | + | ### Built-in zooming and unzooming | |
| 188 | + | ||
| 189 | + | `TChart` has built-in zooming capabilities. You just have to drag a rectangle with the mouse from the top-left to the bottom-right corner of the region that you want to magnify and hold the left mouse button down while dragging. To restore the old viewport drag in any other direction, or just click into the image. | |
| 190 | + | ||
| 191 | + | 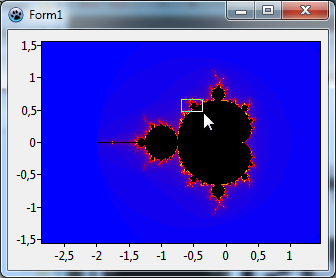 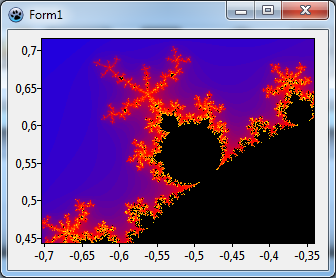 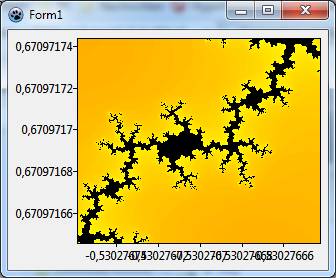 | |
| 192 | + | ||
| 193 | + | Of course, you can use the new magnified image to zoom again and again. However, at some zoom level, the axis labels will get longer and longer and may eventually overlap. This does not look nice. Do we need the axes at all? No -- let's turn them off by going to the left and the bottom axis and setting their property `Visible` to `false`. | |
| 194 | + | ||
| 195 | + | But maybe we should have some indication on the size of the current viewport. We could display the current magnification in a label. In order to have space for other info labels later in this tutorial, we'll use a panel as a container for the label. Align this "info panel" to the right and delete its `Caption`. You may want to resize the form to get a sufficiently large chart again. Add the label to the top of the panel and name it `LblMagnification`. | |
| 196 | + | ||
| 197 | + | ### Extents | |
| 198 | + | ||
| 199 | + | How do we get the current magnification? The viewport is described in TAChart by several [[TAChart documentation|"extents"]]; these are rectangles like `TRect`, but the corner points are given by floating point numbers. This data type is called `TDoubleRect` and is declared in unit `TAChartUtils`. We already had discussed the function `GetFullExtent` of `TChart` which returns the unzoomed/unpanned viewport. After zooming or panning the visible viewport can be accessed by `CurrentExtent` or `LogicalExtent`. Both rectangles are very similar, the former one is slightly larger than the latter one since it also takes care of the space needed for the axis tick marks and the inner chart margins. Because this extra space is not considered in the full extent, we have to compare the widths of the full extent to that of the logical extent to calculate the magnification. We need not consider the extent heights because of the `Proportional` setting of the chart. | |
| 200 | + | ||
| 201 | + | It should be noted that the extents are always given in [[TAChart documentation|graph units]], i.e. the underlying coordinate system of the chart. Since we do not use [[TAChart documentation|TChartTransformations]] this is the same as the coordinate system displayed at the axes (axes coordinates). | |
| 202 | + | ||
| 203 | + | When do we update the magnification label? Whenever the extent of the chart changes. `TChart` provides two events for this occasion: `OnExtentChanged` and `OnExtentChanging`. Both events are fired when the extent already has changed, OnExtentChanged is called from within the drawing routine, `OnExtentChanging` is called before any drawing. The difference is important if your event handler would initiate a re-draw of the chart again -- this might lock your application... In our application the difference is not important, so we'll vote against `OnExtentChanging` which is not yet available in the official Lazarus version. | |
| 204 | + | ||
| 205 | + | ``` pascal | |
| 206 | + | procedure TForm1.Chart1ExtentChanged(ASender: TChart); | |
| 207 | + | var | |
| 208 | + | cex, fex: TDoubleRect; | |
| 209 | + | factor: double; | |
| 210 | + | begin | |
| 211 | + | cex := Chart1.CurrentExtent; | |
| 212 | + | fex := Chart1.GetFullExtent; | |
| 213 | + | if cex.b.x = cex.a.x then exit; | |
| 214 | + | ||
| 215 | + | factor := (fex.b.x - fex.a.x) / (cex.b.x - cex.a.x); | |
| 216 | + | if factor > 1e6 then | |
| 217 | + | LblMagnification.Caption := Format('Magnification: %.0e', [factor]) | |
| 218 | + | else | |
| 219 | + | LblMagnification.Caption := Format('Magnification: %0.n', [factor]); | |
| 220 | + | end; | |
| 221 | + | ``` | |
| 222 | + | ||
| 223 | + | 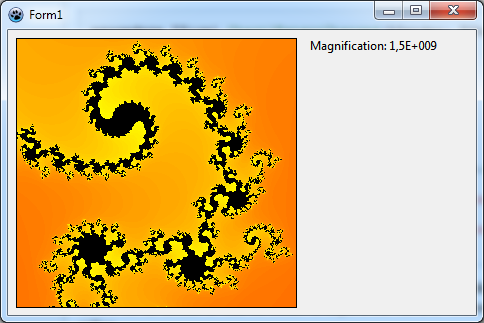 | |
| 224 | + | ||
| 225 | + | This is a possible version of the event handler. Since very large magnification factors will be difficult to read we switch to exponential numeric notation above 1 million. | |
| 226 | + | ||
| 227 | + | ### Zooming towards infinity... | |
| 228 | + | ||
| 229 | + | Play with the magnifications -- the image on the right is magnified by more than a 1 billion times (1E9). And when you are lucky you'll find locations where you can zoom to magnifications of 1E14 before the image gets ugly. Hold on for a moment and think about this number: if the original, non-zoomed window is 10 cm across -- then it would measure 1E13 meters at this magnification. This is the **size of the solar system**! It does not make sense to zoom any further because we reached the limit of double precision number used by TAChart internally. However, theoretically, it could go on and on and on... | |
| 230 | + | ||
| 231 | + | ### Using ChartTools | |
| 232 | + | ||
| 233 | + | Maybe you want to shift the viewport a bit to the left or right at the same magnification. This operation is called **panning**. In the trunk version of Lazarus, you can pan the image by dragging it with the right mouse button. In the release version there is not built-in panning support. But you can achieve panning by of the so-called [[TAChart documentation|ChartTools]]. Most of all, these tools are important because they give better control of the zooming and panning process. | |
| 234 | + | ||
| 235 | + | We will not go into details of what ChartTools are and what they can do in general. Refer to the [[TAChart Tutorial: Chart Tools|corresponding tutorial]] for an introduction if they are not familiar to you. | |
| 236 | + | ||
| 237 | + |  To begin with, add a ChartToolSet component to the form and link it to the property `Toolset` of the chart. Then double-click on the toolset and add a [[TAChart documentation|Panning by drag]] tool. Select the tool in the object inspector -- it is a child of the ChartToolset in the object tree -- and set its property `Shift` to `ssRight`. This will be the mouse button to activate the panning action. You may combine other keys in the `Shift` property if you like. | |
| 238 | + | ||
| 239 | + | Since the built-in tools are turned off by using a ChartToolset you also have to restore the zooming capabilities. -- Just the same procedure: add a [[TAChart documentation|Zoom by drag]] and set its `Shift` property to `ssLeft`. | |
| 240 | + | ||
| 241 | + | If you run the program now you can pan even if you have the official Lazarus version. | |
| 242 | + | ||
| 243 | + | ### Zoom history | |
| 244 | + | ||
| 245 | + | For those who use the trunk version we can add another gadget, a **zoom history**. Since this was added to TAChart only recently, users of the official version are out of luck, they must skip this section - sorry... | |
| 246 | + | ||
| 247 | + | If you zoom deeper and deeper into the Mandelbrot set you may want to go one or more steps back to investigate details that are no longer visible at the current zoom level. The zoom history stores all the extents that once were active during the entire zooming and panning process. | |
| 248 | + | ||
| 249 | + | The units `TATypes` and `TAChartUtils` provide a class `TAChartExtentHistory` which allows to implement a zoom history. Since this is not a component it must be used by code. We create and destroy it in the `FormCreate` and `FormDestroy` events as the zoom history is needed throughout the entire program: | |
| 250 | + | ||
| 251 | + | ``` pascal | |
| 252 | + | procedure TForm1.FormCreate(Sender: TObject); | |
| 253 | + | begin | |
| 254 | + | PopulateColorSource; | |
| 255 | + | Chart1ColorMapseries1.ColorSource := ColorSource; | |
| 256 | + | // this is new: | |
| 257 | + | ZoomHistory := TChartExtentHistory.Create; | |
| 258 | + | ZoomHistory.Capacity := 100; | |
| 259 | + | // our history can capture 100 items until the oldest item is dropped. | |
| 260 | + | end; | |
| 261 | + | ||
| 262 | + | procedure TForm1.FormDestroy(Sender: TObject); | |
| 263 | + | begin | |
| 264 | + | ZoomHistory.Free; | |
| 265 | + | end; | |
| 266 | + | ``` | |
| 267 | + | ||
| 268 | + | Whenever zooming or panning events occur the visible viewport of the chart must be added to the history. Let's begin with zooming where we use the `AfterMouseUp` event of the ZoomDragTool for simplicity. We could also take the more general `OnExtentChanged` event of the chart, but here we have to be careful to skip the extent changes caused by unzooming -- please study the *extent demo* that comes with TAChart for details. | |
| 269 | + | ||
| 270 | + | Note that the extent already has changed when the `AfterMouseUp` event fires. Therefore, the extent to be added to the history is the `PrevLogicalExtent` of the chart -- this is the viewport that was active before the extent was changed: | |
| 271 | + | ||
| 272 | + | ``` pascal | |
| 273 | + | procedure TForm1.ChartToolset1ZoomDragTool1AfterMouseUp(ATool: TChartTool; | |
| 274 | + | APoint: TPoint); | |
| 275 | + | begin | |
| 276 | + | ZoomHistory.Add(Chart1.PrevLogicalExtent); | |
| 277 | + | end; | |
| 278 | + | ``` | |
| 279 | + | ||
| 280 | + | Panning is a bit more tricky because the extent changes occur while moving the mouse. At the moment of MouseUp the `PrevLogicalExtent` that was active when panning started has been overwritten many times. But the solution is simple: The PanDragTool can use above code in the `OnAfterMouseDown` event handler. | |
| 281 | + | ||
| 282 | + | It would be interesting to show in our info panel also the current zoom/pan level, this is the count of items in the history. The `TChartExtentHistory` has a corresponding property `Count` for that. So, let's add another label ("`LblHistoryCount`") to the info panel and modify the `OnExtentChanged` event handler of the chart by adding the following line: | |
| 283 | + | ||
| 284 | + | ``` pascal | |
| 285 | + | LblHistoryCount.Caption := Format('History count: %d', [ZoomHistory.Count]); | |
| 286 | + | ``` | |
| 287 | + | ||
| 288 | + | And how to we **restore the previous zoom level**? By using one more ChartTool. We don't have any special requirements, so we take a [[TAChart documentation|UserDefinedChartTool]]. Set its `Shift` property such that the tool reacts on a click of the middle mouse button. And in the `OnAfterMouseClick` event handler we read the last item from the history (`ZoomHistory.Pop`) and assign the extent rectangle to the chart's `LogicalExtent` which adjusts the viewport accordingly. The item is removed from the history stack after reading. The history count display in the info panel adjusts automatically because the event `OnExtentChanged` is triggered. Note that we have to check for an empty history to avoid an exception. | |
| 289 | + | ||
| 290 | + | ``` pascal | |
| 291 | + | procedure TForm1.ChartToolset1UserDefinedTool1AfterMouseUp(ATool: TChartTool; | |
| 292 | + | APoint: TPoint); | |
| 293 | + | begin | |
| 294 | + | if ZoomHistory.Count > 0 then | |
| 295 | + | Chart1.LogicalExtent := ZoomHistory.Pop; | |
| 296 | + | end; | |
| 297 | + | ``` | |
| 298 | + | ||
| 299 | + | If you want to quickly **return to the unzoomed view at magnification 1** you can drag with the left mouse button in any direction other than left-top to right-bottom, or just click into the chart. Since we introduced the middle mouse button for unzooming the user interface may be more consistent if we'd add another [[TAChart documentation|UserDefinedChartTool]] and assign its `Shift` property to `ssMiddle` and `ssShift` -- I associate the `SHIFT` key with the action of making something bigger, like lowercase to uppercase characters. Therefore, the combination of the middle key for unzooming with the `SHIFT` key could be remembered to trigger unzooming in a big step. | |
| 300 | + | ||
| 301 | + | Nevertheless, it may be difficult for the user to keep in mind all the key combinations. Therefore, add to our info panel a few more labels in which you give **instructions on zooming, panning and unzooming**. | |
| 302 | + | ||
| 303 | + | So, here is the final result of this tutorial project. Have fun! | |
| 304 | + | ||
| 305 | + |  | |
| 306 | + | ||
| 307 | + | ## Source code | |
| 308 | + | ||
| 309 | + | The sources of the tutorial project can be found in the folder *tutorial\mandelbrot* of the trunk TAChart installation. | |
| 310 | + | ||
| 311 | + | ### project1.lpr | |
| 312 | + | ||
| 313 | + | ``` pascal | |
| 314 | + | program mandelbrot; | |
| 315 | + | ||
| 316 | + | {$mode objfpc}{$H+} | |
| 317 | + | ||
| 318 | + | uses | |
| 319 | + | {$IFDEF UNIX}{$IFDEF UseCThreads} | |
| 320 | + | cthreads, | |
| 321 | + | {$ENDIF}{$ENDIF} | |
| 322 | + | Interfaces, // this includes the LCL widgetset | |
| 323 | + | Forms, main, tachartlazaruspkg | |
| 324 | + | { you can add units after this }; | |
| 325 | + | ||
| 326 | + | {$R *.res} | |
| 327 | + | ||
| 328 | + | begin | |
| 329 | + | RequireDerivedFormResource := True; | |
| 330 | + | Application.Initialize; | |
| 331 | + | Application.CreateForm(TForm1, Form1); | |
| 332 | + | Application.Run; | |
| 333 | + | end. | |
| 334 | + | ``` | |
| 335 | + | ||
| 336 | + | ### main.pas | |
| 337 | + | ||
| 338 | + | ``` pascal | |
| 339 | + | unit main; | |
| 340 | + | ||
| 341 | + | {$mode objfpc}{$H+} | |
| 342 | + | ||
| 343 | + | interface | |
| 344 | + | ||
| 345 | + | uses | |
| 346 | + | Classes, ExtCtrls, StdCtrls, SysUtils, TAGraph, TAFuncSeries, | |
| 347 | + | TASources, Forms, Controls, Graphics, Dialogs, TATypes, TATools, Types; | |
| 348 | + | ||
| 349 | + | type | |
| 350 | + | ||
| 351 | + | { TForm1 } | |
| 352 | + | ||
| 353 | + | TForm1 = class(TForm) | |
| 354 | + | Chart1: TChart; | |
| 355 | + | Chart1ColorMapSeries1: TColorMapSeries; | |
| 356 | + | ChartToolset1: TChartToolset; | |
| 357 | + | ChartToolset1PanDragTool1: TPanDragTool; | |
| 358 | + | ChartToolset1UserDefinedTool1: TUserDefinedTool; | |
| 359 | + | ChartToolset1UserDefinedTool2: TUserDefinedTool; | |
| 360 | + | ChartToolset1ZoomDragTool1: TZoomDragTool; | |
| 361 | + | ColorSource: TListChartSource; | |
| 362 | + | Label1: TLabel; | |
| 363 | + | Label2: TLabel; | |
| 364 | + | Label3: TLabel; | |
| 365 | + | Label4: TLabel; | |
| 366 | + | Label5: TLabel; | |
| 367 | + | Label6: TLabel; | |
| 368 | + | Label7: TLabel; | |
| 369 | + | Label8: TLabel; | |
| 370 | + | Label9: TLabel; | |
| 371 | + | LblMagnification: TLabel; | |
| 372 | + | LblHistoryCount: TLabel; | |
| 373 | + | Panel1: TPanel; | |
| 374 | + | Panel2: TPanel; | |
| 375 | + | Panel3: TPanel; | |
| 376 | + | procedure Chart1ColorMapSeries1Calculate(const AX, AY: Double; | |
| 377 | + | out AZ: Double); | |
| 378 | + | procedure Chart1ExtentChanged(ASender: TChart); | |
| 379 | + | procedure ChartToolset1PanDragTool1AfterMouseDown(ATool: TChartTool; | |
| 380 | + | APoint: TPoint); | |
| 381 | + | procedure ChartToolset1UserDefinedTool1AfterMouseUp(ATool: TChartTool; | |
| 382 | + | APoint: TPoint); | |
| 383 | + | procedure ChartToolset1UserDefinedTool2AfterMouseUp(ATool: TChartTool; | |
| 384 | + | APoint: TPoint); | |
| 385 | + | procedure ChartToolset1ZoomDragTool1AfterMouseUp(ATool: TChartTool; | |
| 386 | + | APoint: TPoint); | |
| 387 | + | procedure FormCreate(Sender: TObject); | |
| 388 | + | procedure FormDestroy(Sender: TObject); | |
| 389 | + | private | |
| 390 | + | ZoomHistory: TChartExtentHistory; | |
| 391 | + | procedure PopulateColorSource; | |
| 392 | + | end; | |
| 393 | + | ||
| 394 | + | var | |
| 395 | + | Form1: TForm1; | |
| 396 | + | ||
| 397 | + | implementation | |
| 398 | + | ||
| 399 | + | {$R *.lfm} | |
| 400 | + | ||
| 401 | + | uses | |
| 402 | + | StrUtils, | |
| 403 | + | TAChartUtils, TAGeometry; | |
| 404 | + | ||
| 405 | + | const | |
| 406 | + | MANDELBROT_NUM_ITERATIONS = 100; | |
| 407 | + | MANDELBROT_ESCAPE_RADIUS = 2.0; | |
| 408 | + | MANDELBROT_LIMIT = sqr(MANDELBROT_ESCAPE_RADIUS); | |
| 409 | + | ||
| 410 | + | function InMandelBrotSet( | |
| 411 | + | AC: TDoublePoint; out AIterations: Integer; out AZ: TDoublePoint): Boolean; | |
| 412 | + | var | |
| 413 | + | j: Integer; | |
| 414 | + | begin | |
| 415 | + | AIterations := 0; | |
| 416 | + | AZ := DoublePoint(0.0, 0.0); | |
| 417 | + | for j := 0 to MANDELBROT_NUM_ITERATIONS - 1 do begin | |
| 418 | + | AZ := DoublePoint( | |
| 419 | + | Sqr(AZ.X) - Sqr(AZ.Y) + AC.X, | |
| 420 | + | 2 * AZ.X * AZ.Y + AC.Y); | |
| 421 | + | if Sqr(AZ.X) + Sqr(AZ.Y) > MANDELBROT_LIMIT then | |
| 422 | + | // point did escape --> AC is not in Mandelbrot set | |
| 423 | + | exit(false); | |
| 424 | + | AIterations += 1; | |
| 425 | + | end; | |
| 426 | + | Result := true; | |
| 427 | + | end; | |
| 428 | + | ||
| 429 | + | { TForm1 } | |
| 430 | + | ||
| 431 | + | procedure TForm1.FormCreate(Sender:TObject); | |
| 432 | + | begin | |
| 433 | + | PopulateColorSource; | |
| 434 | + | ZoomHistory := TChartExtentHistory.Create; | |
| 435 | + | ZoomHistory.Capacity := 100; | |
| 436 | + | end; | |
| 437 | + | ||
| 438 | + | procedure TForm1.FormDestroy(Sender: TObject); | |
| 439 | + | begin | |
| 440 | + | ZoomHistory.Free; | |
| 441 | + | end; | |
| 442 | + | ||
| 443 | + | procedure TForm1.Chart1ColorMapSeries1Calculate( | |
| 444 | + | const AX, AY: Double; out AZ: Double); | |
| 445 | + | var | |
| 446 | + | iterations: Integer; | |
| 447 | + | z: TDoublePoint; | |
| 448 | + | begin | |
| 449 | + | if InMandelBrotSet(DoublePoint(AX, AY), iterations, z) then | |
| 450 | + | AZ := -1 | |
| 451 | + | // or - as a solution to the "homework" exercise: | |
| 452 | + | // AZ := sqrt(sqr(z.x) + sqr(z.y)) / MANDELBROT_ESCAPE_RADIUS | |
| 453 | + | else | |
| 454 | + | AZ := iterations / MANDELBROT_NUM_ITERATIONS; | |
| 455 | + | end; | |
| 456 | + | ||
| 457 | + | procedure TForm1.Chart1ExtentChanged(ASender: TChart); | |
| 458 | + | var | |
| 459 | + | cex, fex: TDoubleRect; | |
| 460 | + | factor: Double; | |
| 461 | + | begin | |
| 462 | + | cex := ASender.CurrentExtent; | |
| 463 | + | fex := ASender.GetFullExtent; | |
| 464 | + | if cex.b.x = cex.a.x then exit; | |
| 465 | + | ||
| 466 | + | factor := (fex.b.x - fex.a.x) / (cex.b.x - cex.a.x); | |
| 467 | + | LblMagnification.Caption := | |
| 468 | + | 'Magnification: ' + Format(IfThen(factor > 1e6, '%.0e', '%0.g'), [factor]); | |
| 469 | + | LblHistoryCount.Caption := Format('History count: %d', [ZoomHistory.Count]); | |
| 470 | + | end; | |
| 471 | + | ||
| 472 | + | procedure TForm1.ChartToolset1PanDragTool1AfterMouseDown( | |
| 473 | + | ATool: TChartTool; APoint: TPoint); | |
| 474 | + | begin | |
| 475 | + | Unused(ATool, APoint); | |
| 476 | + | ZoomHistory.Add(Chart1.PrevLogicalExtent); | |
| 477 | + | end; | |
| 478 | + | ||
| 479 | + | procedure TForm1.ChartToolset1UserDefinedTool1AfterMouseUp( | |
| 480 | + | ATool: TChartTool; APoint: TPoint); | |
| 481 | + | begin | |
| 482 | + | Unused(ATool, APoint); | |
| 483 | + | if ZoomHistory.Count > 0 then | |
| 484 | + | Chart1.LogicalExtent := ZoomHistory.Pop; | |
| 485 | + | end; | |
| 486 | + | ||
| 487 | + | procedure TForm1.ChartToolset1UserDefinedTool2AfterMouseUp( | |
| 488 | + | ATool: TChartTool; APoint: TPoint); | |
| 489 | + | begin | |
| 490 | + | Unused(ATool, APoint); | |
| 491 | + | Chart1.ZoomFull; | |
| 492 | + | end; | |
| 493 | + | ||
| 494 | + | procedure TForm1.ChartToolset1ZoomDragTool1AfterMouseUp( | |
| 495 | + | ATool: TChartTool; APoint: TPoint); | |
| 496 | + | begin | |
| 497 | + | Unused(ATool, APoint); | |
| 498 | + | ZoomHistory.Add(Chart1.PrevLogicalExtent); | |
| 499 | + | end; | |
| 500 | + | ||
| 501 | + | procedure TForm1.PopulateColorSource; | |
| 502 | + | const | |
| 503 | + | DUMMY = 0.0; | |
| 504 | + | begin | |
| 505 | + | with ColorSource do begin | |
| 506 | + | Clear; | |
| 507 | + | Add(-1.0, DUMMY, '', clBlack); | |
| 508 | + | Add( 0.0, DUMMY, '', clBlue); | |
| 509 | + | Add( 0.3, DUMMY, '', clRed); | |
| 510 | + | Add( 1.0, DUMMY, '', clYellow); | |
| 511 | + | end; | |
| 512 | + | end; | |
| 513 | + | ||
| 514 | + | end. | |
| 515 | + | ``` | |
| 516 | + | ||
| 517 | + | ### main.lfm | |
| 518 | + | ||
| 519 | + | ``` pascal | |
| 520 | + | object Form1: TForm1 | |
| 521 | + | Left = 326 | |
| 522 | + | Height = 285 | |
| 523 | + | Top = 155 | |
| 524 | + | Width = 468 | |
| 525 | + | Caption = 'Form1' | |
| 526 | + | ClientHeight = 285 | |
| 527 | + | ClientWidth = 468 | |
| 528 | + | OnCreate = FormCreate | |
| 529 | + | OnDestroy = FormDestroy | |
| 530 | + | LCLVersion = '1.1' | |
| 531 | + | object Chart1: TChart | |
| 532 | + | Left = 4 | |
| 533 | + | Height = 277 | |
| 534 | + | Top = 4 | |
| 535 | + | Width = 288 | |
| 536 | + | AxisList = < | |
| 537 | + | item | |
| 538 | + | Visible = False | |
| 539 | + | Minors = <> | |
| 540 | + | Title.LabelFont.Orientation = 900 | |
| 541 | + | end | |
| 542 | + | item | |
| 543 | + | Visible = False | |
| 544 | + | Alignment = calBottom | |
| 545 | + | Minors = <> | |
| 546 | + | end> | |
| 547 | + | Extent.UseXMax = True | |
| 548 | + | Extent.UseXMin = True | |
| 549 | + | Extent.UseYMax = True | |
| 550 | + | Extent.UseYMin = True | |
| 551 | + | Extent.XMax = 0.8 | |
| 552 | + | Extent.XMin = -2.2 | |
| 553 | + | Extent.YMax = 1.5 | |
| 554 | + | Extent.YMin = -1.5 | |
| 555 | + | Foot.Brush.Color = clBtnFace | |
| 556 | + | Foot.Font.Color = clBlue | |
| 557 | + | Proportional = True | |
| 558 | + | Title.Brush.Color = clBtnFace | |
| 559 | + | Title.Font.Color = clBlue | |
| 560 | + | Title.Text.Strings = ( | |
| 561 | + | 'TAChart' | |
| 562 | + | ) | |
| 563 | + | Toolset = ChartToolset1 | |
| 564 | + | OnExtentChanged = Chart1ExtentChanged | |
| 565 | + | Align = alClient | |
| 566 | + | BorderSpacing.Around = 4 | |
| 567 | + | DoubleBuffered = True | |
| 568 | + | ParentColor = False | |
| 569 | + | object Chart1ColorMapSeries1: TColorMapSeries | |
| 570 | + | ColorSource = ColorSource | |
| 571 | + | Interpolate = True | |
| 572 | + | OnCalculate = Chart1ColorMapSeries1Calculate | |
| 573 | + | StepX = 1 | |
| 574 | + | StepY = 1 | |
| 575 | + | end | |
| 576 | + | end | |
| 577 | + | object Panel1: TPanel | |
| 578 | + | Left = 296 | |
| 579 | + | Height = 285 | |
| 580 | + | Top = 0 | |
| 581 | + | Width = 172 | |
| 582 | + | Align = alRight | |
| 583 | + | BevelOuter = bvNone | |
| 584 | + | ClientHeight = 285 | |
| 585 | + | ClientWidth = 172 | |
| 586 | + | TabOrder = 1 | |
| 587 | + | object Panel2: TPanel | |
| 588 | + | Left = 0 | |
| 589 | + | Height = 213 | |
| 590 | + | Top = 72 | |
| 591 | + | Width = 172 | |
| 592 | + | Align = alClient | |
| 593 | + | BevelOuter = bvNone | |
| 594 | + | ClientHeight = 213 | |
| 595 | + | ClientWidth = 172 | |
| 596 | + | TabOrder = 0 | |
| 597 | + | object Label2: TLabel | |
| 598 | + | Left = 6 | |
| 599 | + | Height = 13 | |
| 600 | + | Top = 8 | |
| 601 | + | Width = 69 | |
| 602 | + | Caption = 'Instructions' | |
| 603 | + | Font.Style = [fsBold] | |
| 604 | + | ParentColor = False | |
| 605 | + | ParentFont = False | |
| 606 | + | end | |
| 607 | + | object Label1: TLabel | |
| 608 | + | Left = 6 | |
| 609 | + | Height = 13 | |
| 610 | + | Top = 37 | |
| 611 | + | Width = 45 | |
| 612 | + | Caption = 'Left-drag' | |
| 613 | + | Font.Style = [fsItalic] | |
| 614 | + | ParentColor = False | |
| 615 | + | ParentFont = False | |
| 616 | + | end | |
| 617 | + | object Label3: TLabel | |
| 618 | + | Left = 6 | |
| 619 | + | Height = 13 | |
| 620 | + | Top = 80 | |
| 621 | + | Width = 53 | |
| 622 | + | Caption = 'Middle-click' | |
| 623 | + | Font.Style = [fsItalic] | |
| 624 | + | ParentColor = False | |
| 625 | + | ParentFont = False | |
| 626 | + | end | |
| 627 | + | object Label4: TLabel | |
| 628 | + | Left = 6 | |
| 629 | + | Height = 13 | |
| 630 | + | Top = 120 | |
| 631 | + | Width = 97 | |
| 632 | + | Caption = 'Middle-click w/SHIFT' | |
| 633 | + | Font.Style = [fsItalic] | |
| 634 | + | ParentColor = False | |
| 635 | + | ParentFont = False | |
| 636 | + | end | |
| 637 | + | object Label5: TLabel | |
| 638 | + | Left = 6 | |
| 639 | + | Height = 13 | |
| 640 | + | Top = 161 | |
| 641 | + | Width = 51 | |
| 642 | + | Caption = 'Right-drag' | |
| 643 | + | Font.Style = [fsItalic] | |
| 644 | + | ParentColor = False | |
| 645 | + | ParentFont = False | |
| 646 | + | end | |
| 647 | + | object Label6: TLabel | |
| 648 | + | Left = 19 | |
| 649 | + | Height = 13 | |
| 650 | + | Top = 56 | |
| 651 | + | Width = 25 | |
| 652 | + | Caption = 'zoom' | |
| 653 | + | ParentColor = False | |
| 654 | + | end | |
| 655 | + | object Label7: TLabel | |
| 656 | + | Left = 22 | |
| 657 | + | Height = 13 | |
| 658 | + | Top = 96 | |
| 659 | + | Width = 81 | |
| 660 | + | Caption = 'unzoom (history)' | |
| 661 | + | ParentColor = False | |
| 662 | + | end | |
| 663 | + | object Label8: TLabel | |
| 664 | + | Left = 19 | |
| 665 | + | Height = 13 | |
| 666 | + | Top = 136 | |
| 667 | + | Width = 54 | |
| 668 | + | Caption = 'full unzoom' | |
| 669 | + | ParentColor = False | |
| 670 | + | end | |
| 671 | + | object Label9: TLabel | |
| 672 | + | Left = 19 | |
| 673 | + | Height = 13 | |
| 674 | + | Top = 177 | |
| 675 | + | Width = 18 | |
| 676 | + | Caption = 'pan' | |
| 677 | + | ParentColor = False | |
| 678 | + | end | |
| 679 | + | end | |
| 680 | + | object Panel3: TPanel | |
| 681 | + | Left = 0 | |
| 682 | + | Height = 72 | |
| 683 | + | Top = 0 | |
| 684 | + | Width = 172 | |
| 685 | + | Align = alTop | |
| 686 | + | BevelOuter = bvNone | |
| 687 | + | ClientHeight = 72 | |
| 688 | + | ClientWidth = 172 | |
| 689 | + | TabOrder = 1 | |
| 690 | + | object LblMagnification: TLabel | |
| 691 | + | Left = 6 | |
| 692 | + | Height = 13 | |
| 693 | + | Top = 8 | |
| 694 | + | Width = 67 | |
| 695 | + | Caption = 'Magnification:' | |
| 696 | + | ParentColor = False | |
| 697 | + | end | |
| 698 | + | object LblHistoryCount: TLabel | |
| 699 | + | Left = 6 | |
| 700 | + | Height = 13 | |
| 701 | + | Top = 29 | |
| 702 | + | Width = 68 | |
| 703 | + | Caption = 'History count:' | |
| 704 | + | ParentColor = False | |
| 705 | + | end | |
| 706 | + | end | |
| 707 | + | end | |
| 708 | + | object ColorSource: TListChartSource | |
| 709 | + | left = 115 | |
| 710 | + | top = 57 | |
| 711 | + | end | |
| 712 | + | object ChartToolset1: TChartToolset | |
| 713 | + | left = 115 | |
| 714 | + | top = 120 | |
| 715 | + | object ChartToolset1ZoomDragTool1: TZoomDragTool | |
| 716 | + | Shift = [ssLeft] | |
| 717 | + | OnAfterMouseUp = ChartToolset1ZoomDragTool1AfterMouseUp | |
| 718 | + | end | |
| 719 | + | object ChartToolset1PanDragTool1: TPanDragTool | |
| 720 | + | Shift = [ssRight] | |
| 721 | + | OnAfterMouseDown = ChartToolset1PanDragTool1AfterMouseDown | |
| 722 | + | end | |
| 723 | + | object ChartToolset1UserDefinedTool1: TUserDefinedTool | |
| 724 | + | Shift = [ssMiddle] | |
| 725 | + | OnAfterMouseUp = ChartToolset1UserDefinedTool1AfterMouseUp | |
| 726 | + | end | |
| 727 | + | object ChartToolset1UserDefinedTool2: TUserDefinedTool | |
| 728 | + | Shift = [ssShift, ssMiddle] | |
| 729 | + | OnAfterMouseUp = ChartToolset1UserDefinedTool2AfterMouseUp | |
| 730 | + | end | |
| 731 | + | end | |
| 732 | + | end | |
| 733 | + | ``` | |
| 734 | + | ||
| 735 | + | ## Related tutorials | |
| 736 | + | ||
| 737 | + | - [[TAChart Tutorial: Getting started]]: first steps with TAChart | |
| 738 | + | - [[TAChart Tutorial: Chart Tools]]: introduction to chart tools | |
| 739 | + | - [[TAChart Tutorial: Function Series]]: introduces `TFuncSeries` which follows a similar concept as `TColorMapSeries` | |
| 740 | + | ||
| 741 | + | --- | |
| 742 | + | *From the Free Pascal wiki, page "TAChart Tutorial: ColorMapSeries, Zooming", as it stood on 2020-02-28 after a change by Trev, out of the wiki's dump of 2024-05-26. Copyright stays with the author who wrote it, according to the old wiki's [[Licensing]] page. If you have concerns about this material, [message the admin](/wiki-contact).* |