

OpenGL Tutorial/es: what changed
Revision 1 to 2. Removed lines have a minus sign; added lines have a plus sign.
| Old | New | Line | |
|---|---|---|---|
| 1 | 1 | OpenGL es el principal entorno para el diseño de aplicaciones 2D y 3D portables. Desde su introducción en 1992, OpenGL ha llegado a ser la interfaz de programación de aplicaciones (API) gráficas 2D y 3D más ampliamente utilizadao en la industria, aportando miles de aplicaciones a una gran variedad de plataformas de computación. OpenGL promueve la innovación y acelera el diseño de aplicaciones mediante la incorporación de un amplio conjunto de acabados, aplicACIÓN de texturas, efectos especiales y otras potentes funciones de visualización. Los desarrolladores pueden llevar la potencia de OpenGL a través de todos los escritorios más extendidos y plataformas de estaciones de trabajo, asegurando un amplio desarrollo de aplicaciones. | |
| 2 | 2 | ||
| 3 | 3 | Puedes encontrar más información acerca de OpenGL [aquí](http://www.opengl.org/about/overview/). | |
| 4 | 4 | ||
| 5 | 5 | # GLUT | |
| 6 | 6 | ||
| 7 | 7 | GLUT es el conjunto de utilidades OpenGL, un conjunto de utilidades de ventana independiente para escribir programas OpenGL. Implementa una interfaz gráfica simple de programación de aplicaciones (API) para OpenGL. GLUT hace que sea considerablemente más fácil de aprender y explorar la programación con OpenGL aportando una API portable de forma que permite escribir un programa que funcionará en todos los PC y estaciones de trabajo en las diferentes plataformas existentes. | |
| 8 | 8 | ||
| 9 | 9 | Se puede encontrar más información acerca de GLUT [aquí](http://www.opengl.org/resources/libraries/glut/). | |
| 10 | 10 | ||
| 11 | 11 | Algunos Sistemas Operativos llevan preinstalado GLUT, pero en el caso de que no sea así se puede encontrar fácilmente utilizando [Google](http://www.google.com/). | |
| 12 | 12 | ||
| 13 | 13 | Los binarios para Windows se pueden descargar desde [www.xmission.com](http://www.xmission.com/~nate/glut.html). | |
| 14 | 14 | ||
| 15 | 15 | La información de las unidades de FPC para GLUT se encuentran aquí [[OpenGL]]. | |
| 16 | 16 | ||
| 17 | 17 | # LCL | |
| 18 | 18 | ||
| 19 | 19 | La librería de componente de Lazarus también se puede utilizar con OpenGL. Lazarus incluye un control "TOpenGLControl" - un control LCL con un contexto OpenGL. Se puede encontrar el paquete LazOpenGLContext en lazarus/components/opengl/lazopenglcontext.lpk. Además podemos encontrar un ejemplo en lazarus/examples/openglcontrol/openglcontrol_demo.lpi. | |
| 20 | 20 | ||
| 21 | 21 | # LCL / GLUT | |
| 22 | 22 | ||
| 23 | 23 | ¿Cuando utilizar GLUT, y cuando LCL? | |
| 24 | 24 | ||
| 25 | 25 | - GLUT es mejor si deseas dibujar todo tu mismo. | |
| 26 | 26 | - LCL es mejor para las aplicaciones habituales. Por ejemplo un editor 3D necesita una pocas ventanas OpenGL y el resto es una aplicación normal utilizando botones, cajas de edición, ventanas, ventanas modales, etc. | |
| 27 | 27 | ||
| 28 | 28 | La parte OpenGL es otro tanto de lo mismo. GLUT necesita una dll en windows, mientras la LCL no requiere ninguna, pero el ejecutable LCL es bastante más grande. | |
| 29 | 29 | ||
| 30 | 30 | # Creando tu primer programa GLUT | |
| 31 | 31 | ||
| 32 | 32 | Para utilizar GLUT, primero hay que iniciarlo. Esto se hace utilizando la función **glutInit**. Esta función analiza la línea de ordenes y pasa los parámetros a la ventana principal, pero espera la entrada en estilo C/C++. Tendrás que escribir tu propia función para realizar la conversión de *ParamCount* y *ParamStr* a parámetros al estilo C/C++ de línea de ordenes. | |
| 33 | 33 | ||
| 34 | 34 | ``` pascal | |
| 35 | 35 | procedure glutInitPascal(ParseCmdLine: Boolean); | |
| 36 | 36 | var | |
| 37 | 37 | Cmd: array of PChar; | |
| 38 | 38 | CmdCount, I: Integer; | |
| 39 | 39 | begin | |
| 40 | 40 | if ParseCmdLine then | |
| 41 | 41 | CmdCount := ParamCount + 1 | |
| 42 | 42 | else | |
| 43 | 43 | CmdCount := 1; | |
| 44 | 44 | SetLength(Cmd, CmdCount); | |
| 45 | 45 | for I := 0 to CmdCount - 1 do | |
| 46 | 46 | Cmd[I] := PChar(ParamStr(I)); | |
| 47 | 47 | glutInit(@CmdCount, @Cmd); | |
| 48 | 48 | end; | |
| 49 | 49 | ``` | |
| 50 | 50 | ||
| 51 | 51 | En esencia lo que hace es crear una matriz y rellenarla con las cadenas (strings) de ParamStr. Este procedimiento recibe un parámetro que permite controlar lo que se pasa a glutInit, bien la línea de mandatos completa o bien sólo el nombre del fichero ejecutable. | |
| 52 | 52 | ||
| 53 | 53 | ToDo: probablemente **glutInit(@argc, @argv);** sea suficiente. | |
| 54 | 54 | ||
| 55 | 55 | Más acerca de glutInit: <http://www.opengl.org/resources/libraries/glut/spec3/node10.html> | |
| 56 | 56 | ||
| 57 | 57 | Ahora, necesitas crear una ventana principal. Ajusta el modo de visualización de la ventana principal con **glutInitDisplayMode**. Únicamente recibe un parámetro, que es una combinación de indicadores. En general todo lo que se necesita es **GLUT_DOUBLE** o **GLUT_RGB o GLUT_DEPTH**. | |
| 58 | 58 | ||
| 59 | 59 | Más acerca de glutInitDisplayMode: <http://www.opengl.org/resources/libraries/glut/spec3/node12.html> | |
| 60 | 60 | ||
| 61 | 61 | La posición y el tamaño de la ventana se controla utilizando **glutInitWindowPosition** y **glutInitWindowSize**. Toman 2 parámetros. Las coordenada X e Y en el former, y width (ancho) y height (alto) en el latter. Se puede utilizar **glutGet** para obtener el tamaño de pantalla y centrar la ventana. | |
| 62 | 62 | ||
| 63 | 63 | Más acerca de glutInitWindowPosition, glutInitWindowSize y glutGet: <http://www.opengl.org/resources/libraries/glut/spec3/node11.html> <http://www.opengl.org/documentation/specs/glut/spec3/node70.html> | |
| 64 | 64 | ||
| 65 | 65 | Finalmente se debería crear la ventana utilizando la función **glutCreateWindow**. Esto generará la ventana y establecerá su caption a través de un parámetro. Como resultado se retornará el manejador (handler) de ventana. Esto se puede utilizar con otras funciones que lo requieran. | |
| 66 | 66 | ||
| 67 | 67 | Más acerca de glutCreateWindow: <http://www.opengl.org/resources/libraries/glut/spec3/node16.html> | |
| 68 | 68 | ||
| 69 | 69 | Antes de que el programa pueda entrar en el bucle principal, se deben establecer algunas callbacks. Se necesitarán las callback para dibujar la ventana, para su redimensionado y para obtener las entradas desde el teclado. Estas callbacks se establecen utilizando **glutDisplayFunc**, **glutReshapeFunc** y **glutKeyboardFunc**. | |
| 70 | 70 | ||
| 71 | 71 | Más acerca de las callbacks: <http://www.opengl.org/resources/libraries/glut/spec3/node45.html#SECTION00080000000000000000> | |
| 72 | 72 | ||
| 73 | 73 | Tu función de dibujo podría parecerse a lo siguiente: | |
| 74 | 74 | ||
| 75 | 75 | ``` pascal | |
| 76 | 76 | procedure DrawGLScene; cdecl; | |
| 77 | 77 | begin | |
| 78 | 78 | glClear(GL_COLOR_BUFFER_BIT or GL_DEPTH_BUFFER_BIT); | |
| 79 | 79 | glutSwapBuffers; | |
| 80 | 80 | end; | |
| 81 | 81 | ``` | |
| 82 | 82 | ||
| 83 | 83 | Esto solamente borra la ventana con el color de fondo y realiza un reset del zbuffer (no te preocupes acerca de que puede ser el zbuffer...más acerca de esto más adelante). | |
| 84 | 84 | ||
| 85 | 85 | La función de redimensionado podría parecerse a esto: | |
| 86 | 86 | ||
| 87 | 87 | ``` pascal | |
| 88 | 88 | procedure ReSizeGLScene(Width, Height: Integer); cdecl; | |
| 89 | 89 | begin | |
| 90 | 90 | if Height = 0 then | |
| 91 | 91 | Height := 1; | |
| 92 | 92 | ||
| 93 | 93 | glViewport(0, 0, Width, Height); | |
| 94 | 94 | glMatrixMode(GL_PROJECTION); | |
| 95 | 95 | glLoadIdentity; | |
| 96 | 96 | gluPerspective(45, Width / Height, 0.1, 1000); | |
| 97 | 97 | ||
| 98 | 98 | glMatrixMode(GL_MODELVIEW); | |
| 99 | 99 | glLoadIdentity; | |
| 100 | 100 | end; | |
| 101 | 101 | ``` | |
| 102 | 102 | ||
| 103 | 103 | Con este código, se le indica a OpenGL donde debe dibujar en la ventana y establecer las matrices a los valores deseados (las funciones de matriz se explicarán más adelante). | |
| 104 | 104 | ||
| 105 | 105 | La entrada de teclado (Keyboard) se evalúa con la siguiente callback: | |
| 106 | 106 | ||
| 107 | 107 | ``` pascal | |
| 108 | 108 | procedure GLKeyboard(Key: Byte; X, Y: Longint); cdecl; | |
| 109 | 109 | begin | |
| 110 | 110 | if Key = 27 then | |
| 111 | 111 | Halt(0); | |
| 112 | 112 | end; | |
| 113 | 113 | ``` | |
| 114 | 114 | ||
| 115 | 115 | Esta función indica al programa que debe salir del mismo si se presiona la tecla ESC. GLUT está orientado a eventos y el único medio de salir del programa es llamar **Halt** desde dentro de una de las funciones callback. Si se cierra la ventana de algún otro modo, desaparecerá, pero el programa continuará en el bucle dentro de la rutina principal indefinidamente. Para comenzar el bucle principal hay que llamar a la función **glutMainLoop**. Esto iniciará un bucle que nunca finalizará y que realizará las llamadas a todas las funciones callback. | |
| 116 | 116 | ||
| 117 | 117 | La porción principal del programa puede parecerse a lo siguiente: | |
| 118 | 118 | ||
| 119 | 119 | ``` pascal | |
| 120 | 120 | const | |
| 121 | 121 | AppWidth = 640; | |
| 122 | 122 | AppHeight = 480; | |
| 123 | 123 | ||
| 124 | 124 | procedure InitializeGL; | |
| 125 | 125 | begin | |
| 126 | 126 | glClearColor(0.18, 0.20, 0.66, 0); | |
| 127 | 127 | end; | |
| 128 | 128 | ||
| 129 | 129 | var | |
| 130 | 130 | ScreenWidth, ScreenHeight: Integer; | |
| 131 | 131 | begin | |
| 132 | 132 | glutInitPascal(True); | |
| 133 | 133 | glutInitDisplayMode(GLUT_DOUBLE or GLUT_RGB or GLUT_DEPTH); | |
| 134 | 134 | glutInitWindowSize(AppWidth, AppHeight); | |
| 135 | 135 | ScreenWidth := glutGet(GLUT_SCREEN_WIDTH); | |
| 136 | 136 | ScreenHeight := glutGet(GLUT_SCREEN_HEIGHT); | |
| 137 | 137 | glutInitWindowPosition((ScreenWidth - AppWidth) div 2, | |
| 138 | 138 | (ScreenHeight - AppHeight) div 2); | |
| 139 | 139 | glutCreateWindow('OpenGL Tutorial 1'); | |
| 140 | 140 | ||
| 141 | 141 | InitializeGL; | |
| 142 | 142 | ||
| 143 | 143 | glutDisplayFunc(@DrawGLScene); | |
| 144 | 144 | glutReshapeFunc(@ReSizeGLScene); | |
| 145 | 145 | glutKeyboardFunc(@GLKeyboard); | |
| 146 | 146 | ||
| 147 | 147 | glutMainLoop; | |
| 148 | 148 | end. | |
| 149 | 149 | ``` | |
| 150 | 150 | ||
| 151 | 151 | La siguiente tutoría añade un poco de código que dibuja una figura sencilla. | |
| 152 | 152 | ||
| 153 | 153 | Descarga el código fuente o un ejecutable Linux / Windows desde [Lazarus CCR SourceForge](http://sourceforge.net/project/showfiles.php?group_id=92177&package_id=199145). | |
| 154 | 154 | ||
| 155 | 155 | # Dibujando una figura simple | |
| 156 | 156 | ||
| 157 | 157 | **Nota:** Las siguientes partes tratan principalmente sobre OpenGL, por lo que utilizan las librerías GLUT y LCL. Las funciones específicas de GLUT se reconocen porque llevan el prefijo 'glu'. | |
| 158 | 158 | ||
| 159 | 159 | Esta vez solo añadiremos unas pocas líneas de código y nos centraremos en explicar algunas de las funciones de OpenGL. | |
| 160 | 160 | ||
| 161 | 161 | Expliquemos el código que ya tenemos escrito. | |
| 162 | 162 | ||
| 163 | 163 | ``` pascal | |
| 164 | 164 | . | |
| 165 | 165 | . | |
| 166 | 166 | . | |
| 167 | 167 | glMatrixMode(GL_PROJECTION); | |
| 168 | 168 | glLoadIdentity; | |
| 169 | 169 | gluPerspective(45, Width / Height, 0.1, 1000); | |
| 170 | 170 | ||
| 171 | 171 | glMatrixMode(GL_MODELVIEW); | |
| 172 | 172 | glLoadIdentity; | |
| 173 | 173 | end; | |
| 174 | 174 | ``` | |
| 175 | 175 | ||
| 176 | 176 | Usando la función **glMatrixMode** elegimos que matriz queremos cambiar. OpenGL trabaja con 3 matrices: **GL_MODELVIEW**: Se usa para mover el vértice al espacio del modelo. **GL_PROJECTION**: Se usa para convertir las coordenadas 3d en coordenadas 2d para determinar la posición final del pixel. **GL_TEXTURE**: Se usa para alterar las coordenadas de la textura. | |
| 177 | 177 | ||
| 178 | 178 | Una vez que elegimos la matriz que queremos cambiar, podemos llamar a las funciones que afectan a los valores de la matriz. **glLoadIdentity** reinicializa la matriz por lo que no afectará a la posición del vértice. Puesto que casi todas las funciones de matrices multiplican la matriz actual por una generada, a veces necesitaremos limpiar la matriz usando esta función. | |
| 179 | 179 | ||
| 180 | 180 | Para establecer una matriz de perspectiva, podemos usar la función **gluPerspective**. Cuatro parámetros presentan el punto de vista, aspecto (aspect radio), distancia la plano. Es así de simple. | |
| 181 | 181 | ||
| 182 | 182 | Ahora, vamos a cambiar la matriz modelo... esta vez la ajustamos a la identidad. | |
| 183 | 183 | ||
| 184 | 184 | Bien... y ahora, el código para dibujar la primera figura: | |
| 185 | 185 | ||
| 186 | 186 | ``` pascal | |
| 187 | 187 | procedure DrawGLScene; cdecl; | |
| 188 | 188 | begin | |
| 189 | 189 | glClear(GL_COLOR_BUFFER_BIT or GL_DEPTH_BUFFER_BIT); | |
| 190 | 190 | ||
| 191 | 191 | glLoadIdentity; | |
| 192 | 192 | glTranslatef(0, 0, -5); | |
| 193 | 193 | ||
| 194 | 194 | glBegin(GL_TRIANGLES); | |
| 195 | 195 | glColor3f(1, 0, 0); | |
| 196 | 196 | glVertex3f(-1, -1, 0); | |
| 197 | 197 | ||
| 198 | 198 | glColor3f(0, 1, 0); | |
| 199 | 199 | glVertex3f(1, -1, 0); | |
| 200 | 200 | ||
| 201 | 201 | glColor3f(0, 0, 1); | |
| 202 | 202 | glVertex3f(0, 1, 0); | |
| 203 | 203 | glEnd; | |
| 204 | 204 | ||
| 205 | 205 | glutSwapBuffers; | |
| 206 | 206 | end; | |
| 207 | 207 | ``` | |
| 208 | 208 | ||
| 209 | 209 | Ya hemos usado la función glClear, que reseteará los buffers. Vamos a saltarnos las dos siguientes funciones, y vayamos directamente a las de dibujo. | |
| 210 | 210 | ||
| 211 | 211 | **glBegin** marca el inicio de un bloque de dibujo. Después de esta función puedes empezar a introducir vértices. Los parámetros describen como van a ser usados los vértices cuando se dibujen. | |
| 212 | 212 | ||
| 213 | 213 | - GL_POINTS: Trata cada vértices como un único punto. Vertex n define el punto n. Pueden dibujarse n. | |
| 214 | 214 | - GL_LINES: Trata cada par de vérices como un segmento independiente. Los vértices 2n-1 y 2n definen la línea n. Se dibujan n/2 lineas. | |
| 215 | 215 | - GL_LINE_STRIP: Dibuja un grupo de segmentos de línea conectados entre sí. Se dibujan n-1 lineas. | |
| 216 | 216 | - GL_LINE_LOOP: Dibuja un grupo de segmentos de lineas conectados entre sí. El primer vértice y el último también están conectados, formando un lazo. Los vertices n y n+1 definen la línea n. La última linea es definida por los vertices n y 1. Se dibujan n líneas. | |
| 217 | 217 | - GL_TRIANGLES: Trata cada triplete de vértices como un triángulo independiente. Los vértices 3n-2, 3n-1 y 3n definen el triángulo. Se dibujan n/3 triángulos. | |
| 218 | 218 | - GL_TRIANGLE_STRIP: Dibuja un grupo de triángulos conectados. Un triángulo es definido por cada vértice creado después de los dos primeros vértices. Para valores inpares de n, vertices n, n+1 and n+2 define triangle n. For even n, vertices n+1, n and n+2 define triangle n. Se dibujan n-2 triángulos. | |
| 219 | 219 | - GL_TRIANGLE_FAN: Dibuja un grupo de triángulos conectados. Un triángulo se define con cada vértice creado después de los dos primeros vértices. Los vértices 1. n+1 y n+2 definen el triángulo n. Se dibujan n-2 triángulos. | |
| 220 | 220 | - GL_QUADS: Trata cada grupo de 4 vértices como un cuadrilátero independiente. Los vértices 4n-3, 4n-2, 4n-1 y 4n definen el cuadrilátero n. Se dibujan n/4 cuadriláteros. | |
| 221 | 221 | - GL_QUAD_STRIP: Dibuja un grupo de cuadriláteros conectados. Un cuadrilátero es definido por cada pa de vértices creados después del primer par. Los vértices 2n-1, 2n, 2n+2 y 2n+1 definen el cuadrilátero n. Se dibujan n/2-1 cuadriláteros. Tenga en cuenta que el orden en el que los vértices se usan para crear un cuadrilátero a partir de strip data es diferente from that used with independent data. | |
| 222 | 222 | - GL_POLYGON: Dibuja un polígono convexo. Los vértices del 1 al n definen este polígono. | |
| 223 | 223 | ||
| 224 | 224 | 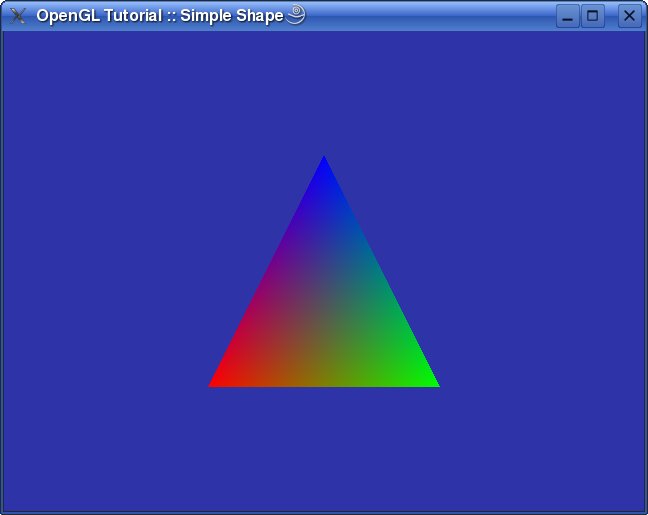 You'll draw single triangle and for that GL_TRIANGLES flag will do the trick. La función **glVertex3f** define la posición del vértice que queremos dibujar. Hay más funciones glVertex*. Solo se diferencian en el número y tipo de los parámetros que introducimos. For instance... glVertex2i toma dos parámetros (X e Y) de tipo integer. Casi siempre glVertex3f será la función que más se use. | |
| 225 | 225 | ||
| 226 | 226 | Before glVertex you can set color, material, textura... Por simplicidad you'll just specify color para cada vértice en este tutorial. El color se establece usando la función **glColor3f**. glColor tambien puede tomar un conjunto de parámetros diferentes como glVertex. | |
| 227 | 227 | ||
| 228 | 228 | As we look through code podemos ver que asignamos a Z el valor 0 en todos los vértices. Since you set near plane to 0.1, triangle will not be visible. That is where those two functions we skipped in the beginning jump in. ya sabemos que glLoadIdentity resetea la matriz. **glTranslatef** moves triangles by X, Y and Z values you provide. Since you set Z to -5 (negative Z is farther from camera) todos los vertices se dibujarán 5 unidades far from point of view and will be visible. | |
| 229 | 229 | ||
| 230 | 230 | Al final llamamos a la función **glEnd** que termina el proceso de dibujado. Si queremos, podemos comenzar otro bloque de dibujado usando glBegin. | |
| 231 | 231 | ||
| 232 | 232 | Descargue el código fuente, el ejecutable de linux o windows desde [Lazarus CCR SourceForge](http://sourceforge.net/project/showfiles.php?group_id=92177&package_id=199145). | |
| 233 | 233 | ||
| 234 | 234 | # Usando [Listas de despliegue](http://es.wikipedia.org/wiki/Lista_de_despliegue) | |
| 235 | 235 | ||
| 236 | 236 | A veces necesitaras dibujar algunos objetos varias veces en la escena. OpenGL tiene la habiliad de construir **Listas de despliegue (*display lists*)** con las cuales dibujar se hace un poco más rápido. Crear una lista de despliegue es muy fácil... dibuja los vértices como hiciste en el tutorial anterior, y enciérralos con las llamadas **glNewList** y **glEndList**. | |
| 237 | 237 | ||
| 238 | 238 | ``` pascal | |
| 239 | 239 | const | |
| 240 | 240 | LIST_OBJECT = 1; | |
| 241 | 241 | ||
| 242 | 242 | procedure CreateList; | |
| 243 | 243 | begin | |
| 244 | 244 | glNewList(LIST_OBJECT, GL_COMPILE); | |
| 245 | 245 | glBegin(GL_TRIANGLE_FAN); | |
| 246 | 246 | glColor3f(1, 0, 0); | |
| 247 | 247 | glVertex3f(0, 0.5, 0); | |
| 248 | 248 | ||
| 249 | 249 | glColor3f(1, 1, 0); | |
| 250 | 250 | glVertex3f(-0.5, -0.5, 0.5); | |
| 251 | 251 | ||
| 252 | 252 | glColor3f(1, 1, 1); | |
| 253 | 253 | glVertex3f(0.5, -0.5, 0.5); | |
| 254 | 254 | ||
| 255 | 255 | glColor3f(0, 1, 1); | |
| 256 | 256 | glVertex3f(0.5, -0.5, -0.5); | |
| 257 | 257 | ||
| 258 | 258 | glColor3f(0, 0, 1); | |
| 259 | 259 | glVertex3f(-0.5, -0.5, -0.5); | |
| 260 | 260 | ||
| 261 | 261 | glColor3f(0, 1, 0); | |
| 262 | 262 | glVertex3f(-0.5, -0.5, 0.5); | |
| 263 | 263 | glEnd; | |
| 264 | 264 | ||
| 265 | 265 | glBegin(GL_QUADS); | |
| 266 | 266 | glColor3f(1, 1, 0); | |
| 267 | 267 | glVertex3f(-0.5, -0.5, 0.5); | |
| 268 | 268 | ||
| 269 | 269 | glColor3f(1, 1, 1); | |
| 270 | 270 | glVertex3f(0.5, -0.5, 0.5); | |
| 271 | 271 | ||
| 272 | 272 | glColor3f(0, 1, 1); | |
| 273 | 273 | glVertex3f(0.5, -0.5, -0.5); | |
| 274 | 274 | ||
| 275 | 275 | glColor3f(0, 0, 1); | |
| 276 | 276 | glVertex3f(-0.5, -0.5, -0.5); | |
| 277 | 277 | ||
| 278 | 278 | glColor3f(0, 1, 0); | |
| 279 | 279 | glVertex3f(-0.5, -0.5, 0.5); | |
| 280 | 280 | glEnd; | |
| 281 | 281 | glEndList; | |
| 282 | 282 | end; | |
| 283 | 283 | ``` | |
| 284 | 284 | ||
| 285 | 285 | **glNewList** crea una nueva lista de despliegue y todas las funciones de dibujo serán grabadas hasta que se llame a **glEndList**. El primer parámetro para la función glNewList es list ID. Toda lista es definida por su ID. Si una lista con un ID dado ya está creada, será borrada antes de grabar. Si el segundo parámetro es GL_COMPILE entonces todas las funciones solamente son grabadas, pero si es GL_COMPILE_AND_EXECUTE entonces son guardadas y ejecutadas automáticamente. | |
| 286 | 286 | ||
| 287 | 287 | **glIsList** es una función que puede ayudar con tus listas de despliegue. Puede decirte si un ID de una lista ya contiene datos. | |
| 288 | 288 | ||
| 289 | 289 | Otra función útil es *glGenLists*'. Creará múltiples listas. Puedes pasar el número de listas de despliegue que necesitas y obtendrás el ID del primero. Si necesitas n listas, y obtienes un ID, listas de despliegue son: r, r+1, r+2,..., r+n-1 | |
| 290 | 290 | ||
| 291 | 291 | Todas las listas deben ser borradas antes de que el programa acabe: | |
| 292 | 292 | ||
| 293 | 293 | ``` pascal | |
| 294 | 294 | procedure GLKeyboard(Key: Byte; X, Y: Longint); cdecl; | |
| 295 | 295 | begin | |
| 296 | 296 | if Key = 27 then | |
| 297 | 297 | begin | |
| 298 | 298 | glDeleteLists(LIST_OBJECT, 1); | |
| 299 | 299 | Halt(0); | |
| 300 | 300 | end; | |
| 301 | 301 | end; | |
| 302 | 302 | ``` | |
| 303 | 303 | ||
| 304 | 304 | **glDeleteLists** tiene 2 parámetros, ID de lista de despliegue y un número de listas a borrar. Si el ID es r, y el número de listas a borrar es n, las litas borradas son: r, r+1, r+2,..., r+n-1 | |
| 305 | 305 | ||
| 306 | 306 | Ahora conoces como crear y borrar listas, vamos a ver como dibujarlas: | |
| 307 | 307 | ||
| 308 | 308 | ``` pascal | |
| 309 | 309 | procedure DrawGLScene; cdecl; | |
| 310 | 310 | begin | |
| 311 | 311 | glClear(GL_COLOR_BUFFER_BIT or GL_DEPTH_BUFFER_BIT); | |
| 312 | 312 | ||
| 313 | 313 | glLoadIdentity; | |
| 314 | 314 | glTranslatef(-2, 0, -5); | |
| 315 | 315 | glRotatef(40, 1, 0, 1); | |
| 316 | 316 | glCallList(LIST_OBJECT); | |
| 317 | 317 | ||
| 318 | 318 | glLoadIdentity; | |
| 319 | 319 | glTranslatef(1, -2, -10); | |
| 320 | 320 | glRotatef(62, 0, 1, 0); | |
| 321 | 321 | glCallList(LIST_OBJECT); | |
| 322 | 322 | ||
| 323 | 323 | glLoadIdentity; | |
| 324 | 324 | glTranslatef(-4, 0.5, -15); | |
| 325 | 325 | glRotatef(200, 1, 0, 0); | |
| 326 | 326 | glCallList(LIST_OBJECT); | |
| 327 | 327 | ||
| 328 | 328 | glutSwapBuffers; | |
| 329 | 329 | end; | |
| 330 | 330 | ``` | |
| 331 | 331 | ||
| 332 | 332 | 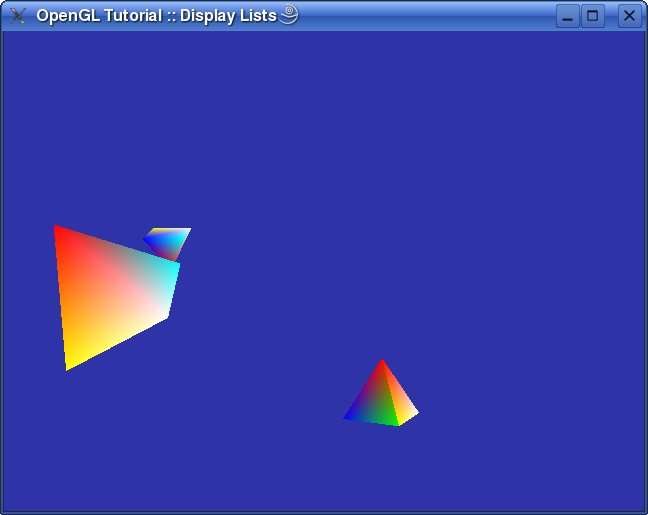 Usando **glCallList** puedes dibujar solo un display list. En este tutorial, antes de display list, puedes cambiar la matriz modelo, y dibujar en diferentes lugares. A veces te gustaria dibujar multiples listas de una vez. Esto es posible usando la función **glCallLists**. Coge el número de listas que quieres dibujar, es un array que contiene los ID de display list. El tipo de lista puede ser una de los siguientes: | |
| 333 | 333 | ||
| 334 | 334 | - GL_BYTE: list is treated as an array of signed bytes, each in the range -128 through 127. | |
| 335 | 335 | - GL_UNSIGNED_BYTE: list is treated as an array of unsigned bytes, each in the range 0 through 255. | |
| 336 | 336 | - GL_SHORT: list is treated as an array of signed two-byte integers, each in the range -32768 through 32767. | |
| 337 | 337 | - GL_UNSIGNED_SHORT: list is treated as an array of unsigned two-byte integers, each in the range 0 through 65535. | |
| 338 | 338 | - GL_INT: lists is treated as an array of signed four-byte integers. | |
| 339 | 339 | - GL_UNSIGNED_INT: list is treated as an array of unsigned four-byte integers. | |
| 340 | 340 | - GL_FLOAT: list is treated as an array of four-byte floating-point values. | |
| 341 | 341 | - GL_2_BYTES: list is treated as an array of unsigned bytes. Each pair of bytes specifies a single display list ID. The value of the pair is computed as 256 times the unsigned value of the first byte plus the unsigned value of the second byte. | |
| 342 | 342 | - GL_3_BYTES: list is treated as an array of unsigned bytes. Each triplet of bytes specifies a single display list ID. The value of the triplet is computed as 65536 times the unsigned value of the first byte, plus 256 times the unsigned value of the second byte, plus the unsigned value of the third byte. | |
| 343 | 343 | - GL_4_BYTES: list is treated as an array of unsigned bytes. Each quadruplet of bytes specifies a single display list ID. The value of the quadruplet is computed as 16777216 times the unsigned value of the first byte, plus 65536 times the unsigned value of the second byte, plus 256 times the unsigned value of the third byte, plus the unsigned value of the fourth byte. | |
| 344 | 344 | ||
| 345 | 345 | Esto es todo por ahora. En el siguiente tutorial, mostraré como crear un pequeño sistema planetario. Hablaremos sobre las matrices y como hacer una escena animada que no dependa del número de cuadros por segundo. | |
| 346 | 346 | ||
| 347 | 347 | Descarga el codido fuente, linux ejecutable o windows ejecutable de [Lazarus CCR SourceForge](http://sourceforge.net/project/showfiles.php?group_id=92177&package_id=199145). | |
| 348 | 348 | ||
| 349 | 349 | # Full screen animation | |
| 350 | 350 | ||
| 351 | 351 | Entrar en modo pantalal completa es fácil con. Hagamos cambios en la parte "main del programa:the program: | |
| 352 | 352 | ||
| 353 | 353 | ``` pascal | |
| 354 | 354 | const | |
| 355 | 355 | FSMode = '800x600:32@75'; | |
| 356 | 356 | ||
| 357 | 357 | begin | |
| 358 | 358 | glutInitPascal(False); | |
| 359 | 359 | glutInitDisplayMode(GLUT_DOUBLE or GLUT_RGB or GLUT_DEPTH); | |
| 360 | 360 | glutGameModeString(FSMode); | |
| 361 | 361 | glutEnterGameMode; | |
| 362 | 362 | glutSetCursor(GLUT_CURSOR_NONE); | |
| 363 | 363 | ||
| 364 | 364 | InitializeGL; | |
| 365 | 365 | ||
| 366 | 366 | glutDisplayFunc(@DrawGLScene); | |
| 367 | 367 | glutReshapeFunc(@ReSizeGLScene); | |
| 368 | 368 | glutKeyboardFunc(@GLKeyboard); | |
| 369 | 369 | glutIdleFunc(@DrawGLScene); | |
| 370 | 370 | ||
| 371 | 371 | glutMainLoop; | |
| 372 | 372 | end. | |
| 373 | 373 | ``` | |
| 374 | 374 | ||
| 375 | 375 | Since we don't want GLUT to parse command line this time we call glutInitPascal with False parameter. As you can see, there is no code for window creation. GLUT have **glutEnterGameMode** that create full screen window. To specify what kind of full screen mode you want, you call **glutGameModeString** function which takes string that defines mode you like. | |
| 376 | 376 | ||
| 377 | 377 | Format of that string is: | |
| 378 | 378 | ||
| 379 | - | ||
| 379 | + | ```text | |
| 380 | + | [width "x" height][":" bpp]["@" hertz] | |
| 381 | + | ``` | |
| 380 | 382 | ||
| 381 | 383 | In FSMode string we declared that full screen mode should be 800x600, with 32bit pallete and 75Hz refresh. It is possible to skip one of the group. If you omit size, GLUT will try to use current one or first smaller that can work. That policy is used and for other parameters. | |
| 382 | 384 | ||
| 383 | 385 | Usually in full screen mode cursor is not visible. To hide cursor you use **glutSetCursor** function. It takes only one parameter which describes cursor you would like to see: | |
| 384 | 386 | ||
| 385 | 387 | ``` pascal | |
| 386 | 388 | GLUT_CURSOR_RIGHT_ARROW | |
| 387 | 389 | GLUT_CURSOR_LEFT_ARROW | |
| 388 | 390 | GLUT_CURSOR_INFO | |
| 389 | 391 | GLUT_CURSOR_DESTROY | |
| 390 | 392 | GLUT_CURSOR_HELP | |
| 391 | 393 | GLUT_CURSOR_CYCLE | |
| 392 | 394 | GLUT_CURSOR_SPRAY | |
| 393 | 395 | GLUT_CURSOR_WAIT | |
| 394 | 396 | GLUT_CURSOR_TEXT | |
| 395 | 397 | GLUT_CURSOR_CROSSHAIR | |
| 396 | 398 | GLUT_CURSOR_UP_DOWN | |
| 397 | 399 | GLUT_CURSOR_LEFT_RIGHT | |
| 398 | 400 | GLUT_CURSOR_TOP_SIDE | |
| 399 | 401 | GLUT_CURSOR_BOTTOM_SIDE | |
| 400 | 402 | GLUT_CURSOR_LEFT_SIDE | |
| 401 | 403 | GLUT_CURSOR_RIGHT_SIDE | |
| 402 | 404 | GLUT_CURSOR_TOP_LEFT_CORNER | |
| 403 | 405 | GLUT_CURSOR_TOP_RIGHT_CORNER | |
| 404 | 406 | GLUT_CURSOR_BOTTOM_RIGHT_CORNER | |
| 405 | 407 | GLUT_CURSOR_BOTTOM_LEFT_CORNER | |
| 406 | 408 | GLUT_CURSOR_FULL_CROSSHAIR | |
| 407 | 409 | GLUT_CURSOR_NONE | |
| 408 | 410 | GLUT_CURSOR_INHERIT | |
| 409 | 411 | ``` | |
| 410 | 412 | ||
| 411 | 413 | **glutIdleFunc** defines callback function that you want to be called every time you program has no messages to process. Since we just want to render new frame if there is nothing to do, just set idle function to DrawGLScene. Some other tutorials show that idle function should send refresh message insted of drawing, but that way I have 50-100 frames less than using method I described. | |
| 412 | 414 | ||
| 413 | 415 | Now, let's look at the program termination where you need to exit full screen mode: | |
| 414 | 416 | ||
| 415 | 417 | ``` pascal | |
| 416 | 418 | procedure GLKeyboard(Key: Byte; X, Y: Longint); cdecl; | |
| 417 | 419 | begin | |
| 418 | 420 | if Key = 27 then | |
| 419 | 421 | begin | |
| 420 | 422 | glutLeaveGameMode; | |
| 421 | 423 | Halt(0); | |
| 422 | 424 | end; | |
| 423 | 425 | end; | |
| 424 | 426 | ``` | |
| 425 | 427 | ||
| 426 | 428 | As you can see, all you need to do is to call **glutLeaveGameMode**. | |
| 427 | 429 | ||
| 428 | 430 | Now, we'll introduce some new matrix functions. First, let's change ReSizeGLScene function: | |
| 429 | 431 | ||
| 430 | 432 | ``` pascal | |
| 431 | 433 | procedure ReSizeGLScene(Width, Height: Integer); cdecl; | |
| 432 | 434 | begin | |
| 433 | 435 | . | |
| 434 | 436 | . | |
| 435 | 437 | . | |
| 436 | 438 | ||
| 437 | 439 | glMatrixMode(GL_MODELVIEW); | |
| 438 | 440 | glLoadIdentity; | |
| 439 | 441 | gluLookAt(0, 20, 25, 0, 0, 0, 0, 1, 0); | |
| 440 | 442 | end; | |
| 441 | 443 | ``` | |
| 442 | 444 | ||
| 443 | 445 | **gluLookAt** create matrix that will define from where are you look to objects. First 3 parameters are X, Y and Z coordinate of position of camera. Next 3 parameters are X, Y and Z coordinate of point where camera look at, and last 3 parameters defines "up" vector (where is "up" for the camera). Usually, up is positive y axis. | |
| 444 | 446 | ||
| 445 | 447 | OK, let's draw now. Since you set matrix with gluLookAt that should be used with all objects, you can't just use glLoadIdentity to reset matrix for next object... you'll save previous matrix state and restore it after object is drawn: | |
| 446 | 448 | ||
| 447 | 449 | ``` pascal | |
| 448 | 450 | procedure DrawGLScene; cdecl; | |
| 449 | 451 | var | |
| 450 | 452 | T: Single; | |
| 451 | 453 | begin | |
| 452 | 454 | T := glutGet(GLUT_ELAPSED_TIME) / 1000; | |
| 453 | 455 | glClear(GL_COLOR_BUFFER_BIT or GL_DEPTH_BUFFER_BIT); | |
| 454 | 456 | ||
| 455 | 457 | glPushMatrix; | |
| 456 | 458 | glRotatef(5 * T, 0, 1, 0); | |
| 457 | 459 | glColor3f(1, 1, 0); | |
| 458 | 460 | glutWireSphere(2, 20, 20); | |
| 459 | 461 | glPopMatrix; | |
| 460 | 462 | ||
| 461 | 463 | glPushMatrix; | |
| 462 | 464 | glRotatef(90 * T, 0, 1, 0); | |
| 463 | 465 | glTranslatef(5, 0, 0); | |
| 464 | 466 | glRotatef(40 * T, 0, 1, 0); | |
| 465 | 467 | glColor3f(1, 0, 0); | |
| 466 | 468 | glutWireSphere(0.6, 10, 10); | |
| 467 | 469 | glPopMatrix; | |
| 468 | 470 | ||
| 469 | 471 | glPushMatrix; | |
| 470 | 472 | glRotatef(60 * T, 0, 1, 0); | |
| 471 | 473 | glTranslatef(-3, 0, 9); | |
| 472 | 474 | glRotatef(50 * T, 0, 1, 0); | |
| 473 | 475 | glColor3f(0, 1, 0); | |
| 474 | 476 | glutWireSphere(1, 16, 16); | |
| 475 | 477 | ||
| 476 | 478 | glPushMatrix; | |
| 477 | 479 | glRotatef(360 * T, 0, 1, 0); | |
| 478 | 480 | glTranslatef(-1.7, 0, 0); | |
| 479 | 481 | glRotatef(50 * T, 0, 1, 0); | |
| 480 | 482 | glColor3f(0, 0, 1); | |
| 481 | 483 | glutWireSphere(0.4, 10, 10); | |
| 482 | 484 | glPopMatrix; | |
| 483 | 485 | ||
| 484 | 486 | glPopMatrix; | |
| 485 | 487 | ||
| 486 | 488 | glutSwapBuffers; | |
| 487 | 489 | end; | |
| 488 | 490 | ``` | |
| 489 | 491 | ||
| 490 | 492 | 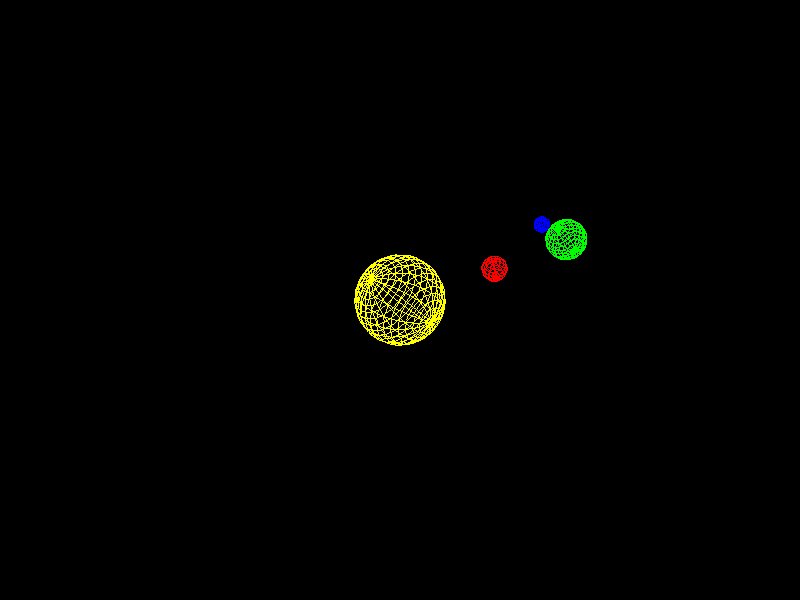 **glPushMatrix** i **glPopMatrix** are used to save and restore matrix state. As you can see, we save matrix state, then change matrix in order to draw object in right place, and then restore old matrix state. | |
| 491 | 493 | ||
| 492 | 494 | You may wonder what is **T** variable for. Well, it is used to determen animation speed. Every change that depends on time is multiplied with T. That way animation speed is constant on every frame rate. **glutGet** function with **GLUT_ELAPSED_TIME** parameter returns time in milliseconds from glutInit is called. By dividing that value with 1000, we get time in seconds. | |
| 493 | 495 | ||
| 494 | 496 | **glRotatef** function create rotation matrix. First parameter is angle in degrees, and last 3 parameters defines axis around which rotation will be done. Since you multiplied angle with T, object will be rotated by that angle in exactly 1 second. | |
| 495 | 497 | ||
| 496 | 498 | Download source code, linux executable or windows executable from [Lazarus CCR SourceForge](http://sourceforge.net/project/showfiles.php?group_id=92177&package_id=199145). | |
| 497 | 499 | ||
| 498 | 500 | # Luz | |
| 499 | 501 | ||
| 500 | 502 | Este tutorial introducirá algo de luz en la escena. You'll make rotating cube and one light which will add some realism to the scene, but first let's make some utility unit. | |
| 501 | 503 | ||
| 502 | 504 | Por el momento tendremos sólamente funciones básicas para ayudarnos a obtener los tiempos current y delta (tiempo transcurrido desde la llamada de un render a otro) y para calcular los frames por segundo. | |
| 503 | 505 | ||
| 504 | 506 | ``` pascal | |
| 505 | 507 | unit utils; | |
| 506 | 508 | ||
| 507 | 509 | {$mode objfpc}{$H+} | |
| 508 | 510 | ||
| 509 | 511 | interface | |
| 510 | 512 | ||
| 511 | 513 | uses | |
| 512 | 514 | glut; | |
| 513 | 515 | ||
| 514 | 516 | function GetTotalTime: Single; | |
| 515 | 517 | function GetDeltaTime: Single; | |
| 516 | 518 | procedure FrameRendered(Count: Integer = 1); | |
| 517 | 519 | function GetFPS: Single; | |
| 518 | 520 | ||
| 519 | 521 | implementation | |
| 520 | 522 | ||
| 521 | 523 | var | |
| 522 | 524 | OldTime: Integer = 0; | |
| 523 | 525 | FPSTime: Integer = 0; | |
| 524 | 526 | FPSCount: Integer = 0; | |
| 525 | 527 | ||
| 526 | 528 | function GetTotalTime: Single; | |
| 527 | 529 | begin | |
| 528 | 530 | Result := glutGet(GLUT_ELAPSED_TIME) / 1000; | |
| 529 | 531 | end; | |
| 530 | 532 | ||
| 531 | 533 | function GetDeltaTime: Single; | |
| 532 | 534 | var | |
| 533 | 535 | NewTime: Integer; | |
| 534 | 536 | begin | |
| 535 | 537 | NewTime := glutGet(GLUT_ELAPSED_TIME); | |
| 536 | 538 | Result := (NewTime - OldTime) / 1000; | |
| 537 | 539 | OldTime := NewTime; | |
| 538 | 540 | end; | |
| 539 | 541 | ||
| 540 | 542 | procedure FrameRendered(Count: Integer); | |
| 541 | 543 | begin | |
| 542 | 544 | Inc(FPSCount, Count); | |
| 543 | 545 | end; | |
| 544 | 546 | ||
| 545 | 547 | function GetFPS: Single; | |
| 546 | 548 | var | |
| 547 | 549 | NewTime: Integer; | |
| 548 | 550 | begin | |
| 549 | 551 | NewTime := glutGet(GLUT_ELAPSED_TIME); | |
| 550 | 552 | ||
| 551 | 553 | Result := FPSCount / ((NewTime - FPSTime) / 1000); | |
| 552 | 554 | ||
| 553 | 555 | FPSTime := NewTime; | |
| 554 | 556 | FPSCount := 0; | |
| 555 | 557 | end; | |
| 556 | 558 | ||
| 557 | 559 | end. | |
| 558 | 560 | ``` | |
| 559 | 561 | ||
| 560 | 562 | Como puedes observar, no hay complejidades en esta unit. Se salva simplente el tiempo entre las llamadas y se retorna la diferencia. Se debe hacer una llamada a FrameRendered cada vez que se dibuja una escena de manera que la función pueda calcular los FPS (Frames por segundo:Frames Per Second). | |
| 561 | 563 | ||
| 562 | 564 | Ahora, divirtámonos con las luces. | |
| 563 | 565 | ||
| 564 | 566 | OpenGL tiene varios tipos de luz... ambiente, difusa, point, spot, especular y emissive. | |
| 565 | 567 | ||
| 566 | 568 | La luz ambiente es algo así como la del Sol. Cuando los rayos solares pasan a través de la ventana de una habitación inciden sobre las paredes y tiene lugar su reflexión y su dispersión en todas las direcciones lo cual averagely brightens up la habitación completa. Todos los vertices son lit con luz ambiente. | |
| 567 | 569 | ||
| 568 | 570 | La Luz Difusa puede representarse como rayos de luz paralelos llegando desde puntos lejanos. They will lit only vertices that are oriented towards the light source. | |
| 569 | 571 | ||
| 570 | 572 | Point light lights all around it. Es como una bola de fuego, it send light rays all around it and lights vertices that are oriented towards light source and that are close enough. | |
| 571 | 573 | ||
| 572 | 574 | Spot light es como la luz de una linterna. Es simplemente un punto de luz source con un cono de luz de radio pequeño. All vertices that falls inside of cone and are close enough are lit. | |
| 573 | 575 | ||
| 574 | 576 | Just like Diffuse light, Specular light is a directional type of light. It comes from one particular direction. The difference between the two is that specular light reflects off the surface in a sharp and uniform way. The rendering of specular light relies on the angle between the viewer and the light source. From the viewer’s standpoint specular light creates a highlighted area on the surface of the viewed object known as specular highlight or specular reflection. | |
| 575 | 577 | ||
| 576 | 578 | Emissive light is a little different than any other previously explained light components. This light comes out of object you draw but don't lit other objects in nearby. | |
| 577 | 579 | ||
| 578 | 580 | Por simplicidad utilizaremos únicamente luz difusa en este tutorial. Con el tiempo puede que aparezcan otros tipos de luz pero por ahora nos centraremos en este. :) | |
| 579 | 581 | ||
| 580 | 582 | Veamos como habilitar la luz en la escena: | |
| 581 | 583 | ||
| 582 | 584 | ``` pascal | |
| 583 | 585 | const | |
| 584 | 586 | DiffuseLight: array[0..3] of GLfloat = (0.8, 0.8, 0.8, 1); | |
| 585 | 587 | ||
| 586 | 588 | glEnable(GL_LIGHTING); | |
| 587 | 589 | glLightfv(GL_LIGHT0, GL_DIFFUSE, DiffuseLight); | |
| 588 | 590 | glEnable(GL_LIGHT0); | |
| 589 | 591 | ``` | |
| 590 | 592 | ||
| 591 | 593 | As you see, we enable lighting in OpenGL so lights affect scene you are rendering. Light parameters are set with **glLightfv** function. It takes 3 parameters... one for light number you want to change (OpenGL suports up to 8 lights), next tells OpenGL que parámetro de la luz cambiar, y este último es el nuevo parámetro para la luz. You'll set just diffuse color for light en este tutorial. After that, you can enable light and there will be light en la escena... pero... eso no es todo. | |
| 592 | 594 | ||
| 593 | 595 | Para saber más sobre glLightfv: <http://www.opengl.org//documentation/specs/man_pages/hardcopy/GL/html/gl/light.html> | |
| 594 | 596 | ||
| 595 | 597 | Si necesitas utilizar luces no basta simplemente con establecer el color de los vértices... debes establecer el material de los vértices. Establezcamos el material para el dibujo: | |
| 596 | 598 | ||
| 597 | - | ||
| 598 | - | ||
| 599 | + | ```text | |
| 600 | + | glEnable(GL_COLOR_MATERIAL); | |
| 601 | + | glColorMaterial(GL_FRONT, GL_AMBIENT_AND_DIFFUSE); | |
| 602 | + | ``` | |
| 599 | 603 | ||
| 600 | 604 | 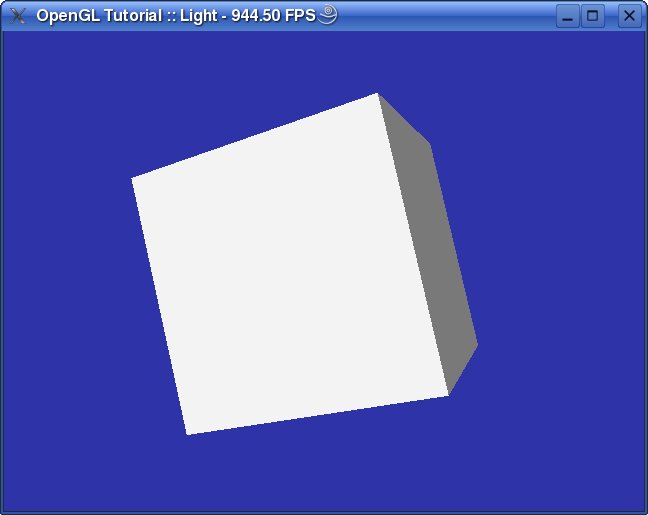 ¿Esperabas hacer algo más complicado? :) Bien, este código nos permitirá utilizar la función glColor para configurar los materiales de los vértices. Utilizando la función glEnable y la bandera GL_COLOR_MATERIAL, puedes definir que propiedades de los materiales, cambiará glColor. **glColorMaterial(GL_FRONT, GL_AMBIENT_AND_DIFFUSE)** le dice a OpenGL que glColor cambia las propiedades del material ambient y diffuse. Discutiremos los materiales más tarde en estos tutoriales. | |
| 601 | 605 | ||
| 602 | 606 | Una cosa más que es importante cuando utilizamos luces... cada vértice debe tener asociada una "normal". La "Normal" se utiliza para encontrar la dirección del vértice de forma que la luz se puede calcular de la forma apropiada. Utilizarás la función GLUT para dibujar un cubo que nos aportará las "normales" de por sí, so this time we'll just walk by normals. | |
| 603 | 607 | ||
| 604 | 608 | Después de establecer todo esto, la luz brillará en el cubo :) | |
| 605 | 609 | ||
| 606 | 610 | Parte de lo que sigue está copiado de [The OpenGL Light Bible](http://www.falloutsoftware.com/tutorials/gl/gl8.htm) | |
| 607 | 611 | ||
| 608 | 612 | Download source code, linux executable or windows executable from [Lazarus CCR SourceForge](http://sourceforge.net/project/showfiles.php?group_id=92177&package_id=199145). | |
| 609 | 613 | ||
| 610 | 614 | # Fuentes Bitmap | |
| 611 | 615 | ||
| 612 | 616 | Games and programs usually need to write some text on screen. GLUT provides several functions for drawing chars that are platform independent. | |
| 613 | 617 | ||
| 614 | 618 | First, we'll show how to use default bitmap fonts. Almost all code additions will be made to utils.pas unit. | |
| 615 | 619 | ||
| 616 | 620 | Since text will be drawn in 2D, we'll need to know width and height of viewport... so, we'll write two functions for that: | |
| 617 | 621 | ||
| 618 | 622 | ``` pascal | |
| 619 | 623 | function glGetViewportWidth: Integer; | |
| 620 | 624 | var | |
| 621 | 625 | Rect: array[0..3] of Integer; | |
| 622 | 626 | begin | |
| 623 | 627 | glGetIntegerv(GL_VIEWPORT, @Rect); | |
| 624 | 628 | Result := Rect[2] - Rect[0]; | |
| 625 | 629 | end; | |
| 626 | 630 | ||
| 627 | 631 | function glGetViewportHeight: Integer; | |
| 628 | 632 | var | |
| 629 | 633 | Rect: array[0..3] of Integer; | |
| 630 | 634 | begin | |
| 631 | 635 | glGetIntegerv(GL_VIEWPORT, @Rect); | |
| 632 | 636 | Result := Rect[3] - Rect[1]; | |
| 633 | 637 | end; | |
| 634 | 638 | ``` | |
| 635 | 639 | ||
| 636 | 640 | We just get left/right, top/bottom and calculate width/height by subtracting them. | |
| 637 | 641 | ||
| 638 | 642 | There must be functions for entering and leaving 2D mode: | |
| 639 | 643 | ||
| 640 | 644 | ``` pascal | |
| 641 | 645 | procedure glEnter2D; | |
| 642 | 646 | begin | |
| 643 | 647 | glMatrixMode(GL_PROJECTION); | |
| 644 | 648 | glPushMatrix; | |
| 645 | 649 | glLoadIdentity; | |
| 646 | 650 | gluOrtho2D(0, glGetViewportWidth, 0, glGetViewportHeight); | |
| 647 | 651 | ||
| 648 | 652 | glMatrixMode(GL_MODELVIEW); | |
| 649 | 653 | glPushMatrix; | |
| 650 | 654 | glLoadIdentity; | |
| 651 | 655 | ||
| 652 | 656 | glDisable(GL_DEPTH_TEST); | |
| 653 | 657 | end; | |
| 654 | 658 | ||
| 655 | 659 | procedure glLeave2D; | |
| 656 | 660 | begin | |
| 657 | 661 | glMatrixMode(GL_PROJECTION); | |
| 658 | 662 | glPopMatrix; | |
| 659 | 663 | glMatrixMode(GL_MODELVIEW); | |
| 660 | 664 | glPopMatrix; | |
| 661 | 665 | ||
| 662 | 666 | glEnable(GL_DEPTH_TEST); | |
| 663 | 667 | end; | |
| 664 | 668 | ``` | |
| 665 | 669 | ||
| 666 | 670 | When entering 2D mode, we save current matrices and set 2D matrix using **gluOrtho2D** function. This way if we draw some thing on 100, 100 it will be drawn on exactly 100 pixels from left edge of window, and 100 pixels form bottom edge (positive Y is up). Also, we disable ZBuffer. This way text won't alter ZBuffer. | |
| 667 | 671 | ||
| 668 | 672 | Leaving 2D mode just returns old matrices and enable ZBuffer. | |
| 669 | 673 | ||
| 670 | 674 | Now, we can create function for text drawing: | |
| 671 | 675 | ||
| 672 | 676 | ``` pascal | |
| 673 | 677 | procedure glWrite(X, Y: GLfloat; Font: Pointer; Text: String); | |
| 674 | 678 | var | |
| 675 | 679 | I: Integer; | |
| 676 | 680 | begin | |
| 677 | 681 | glRasterPos2f(X, Y); | |
| 678 | 682 | for I := 1 to Length(Text) do | |
| 679 | 683 | glutBitmapCharacter(Font, Integer(Text[I])); | |
| 680 | 684 | end; | |
| 681 | 685 | ``` | |
| 682 | 686 | ||
| 683 | 687 | **glutBitmapCharacter** can draw only one character of selected font. First parameter is desired font (GLUT_BITMAP_9_BY_15, GLUT_BITMAP_8_BY_13, GLUT_BITMAP_TIMES_ROMAN_10, GLUT_BITMAP_TIMES_ROMAN_24, GLUT_BITMAP_HELVETICA_10, GLUT_BITMAP_HELVETICA_12 or GLUT_BITMAP_HELVETICA_18) and other one is character. | |
| 684 | 688 | ||
| 685 | 689 | Character will be drawn at current raster position. To set desired raster position we call **glRasterPos** function. glRasterPos can handle different number and types of parameters just like glVertex function. Coordinate specified is transformed by model and projection matrix to get 2D coordinate where new raster position will be. Since we entered 2D mode, X and Y coordinates are actual 2D coordinates where drawing will occur. | |
| 686 | 690 | ||
| 687 | 691 | This new functions will make text drawing very easy: | |
| 688 | 692 | ||
| 689 | 693 | ``` pascal | |
| 690 | 694 | procedure DrawGLScene; cdecl; | |
| 691 | 695 | begin | |
| 692 | 696 | glClear(GL_COLOR_BUFFER_BIT or GL_DEPTH_BUFFER_BIT); | |
| 693 | 697 | ||
| 694 | 698 | glLoadIdentity; | |
| 695 | 699 | glTranslatef(0, 0, -5); | |
| 696 | 700 | glRotatef(GetTotalTime * 10, 0, 0.5, 0.5); | |
| 697 | 701 | ||
| 698 | 702 | glColor3f(1, 0, 0); | |
| 699 | 703 | glutSolidCube(2); | |
| 700 | 704 | ||
| 701 | 705 | glEnter2D; | |
| 702 | 706 | ||
| 703 | 707 | glColor3f(0.2, 0.8 + 0.2 * Sin(GetTotalTime * 5), 0); | |
| 704 | 708 | glWrite(20, glGetViewportHeight - 20, GLUT_BITMAP_8_BY_13, | |
| 705 | 709 | Format('OpenGL Tutorial :: Bitmap Fonts :: FPS - %.2f FPS', [FPS])); | |
| 706 | 710 | ||
| 707 | 711 | glColor3f(1, 1, 1); | |
| 708 | 712 | glWrite(50, glGetViewportHeight - 60, GLUT_BITMAP_9_BY_15, 'GLUT_BITMAP_9_BY_15'); | |
| 709 | 713 | glWrite(50, glGetViewportHeight - 90, GLUT_BITMAP_8_BY_13, 'GLUT_BITMAP_8_BY_13'); | |
| 710 | 714 | glWrite(50, glGetViewportHeight - 120, GLUT_BITMAP_TIMES_ROMAN_10, 'GLUT_BITMAP_TIMES_ROMAN_10'); | |
| 711 | 715 | glWrite(50, glGetViewportHeight - 150, GLUT_BITMAP_TIMES_ROMAN_24, 'GLUT_BITMAP_TIMES_ROMAN_24'); | |
| 712 | 716 | glWrite(50, glGetViewportHeight - 180, GLUT_BITMAP_HELVETICA_10, 'GLUT_BITMAP_HELVETICA_10'); | |
| 713 | 717 | glWrite(50, glGetViewportHeight - 210, GLUT_BITMAP_HELVETICA_12, 'GLUT_BITMAP_HELVETICA_12'); | |
| 714 | 718 | glWrite(50, glGetViewportHeight - 240, GLUT_BITMAP_HELVETICA_18, 'GLUT_BITMAP_HELVETICA_18'); | |
| 715 | 719 | ||
| 716 | 720 | glColor3f(0.5, 0.5, 1); | |
| 717 | 721 | glWrite( | |
| 718 | 722 | glGetViewportWidth - glutBitmapLength(GLUT_BITMAP_9_BY_15, LazText) - 5, | |
| 719 | 723 | 10, GLUT_BITMAP_9_BY_15, LazText); | |
| 720 | 724 | ||
| 721 | 725 | glLeave2D; | |
| 722 | 726 | ||
| 723 | 727 | glutSwapBuffers; | |
| 724 | 728 | ||
| 725 | 729 | FrameRendered; | |
| 726 | 730 | end; | |
| 727 | 731 | ``` | |
| 728 | 732 | ||
| 729 | 733 | 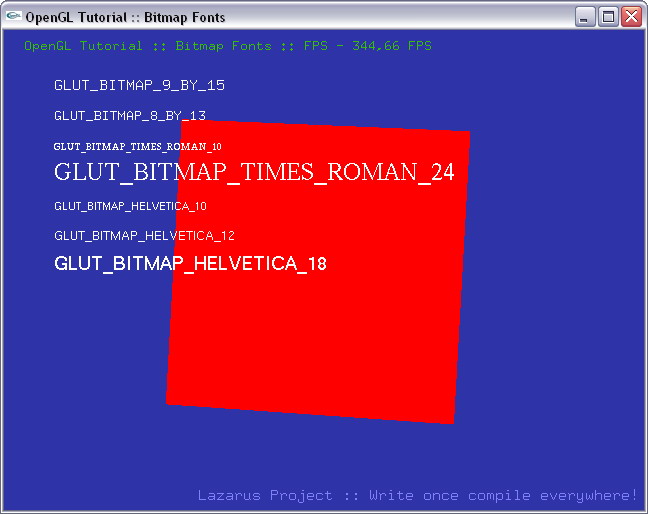 We draw red cube and rotate it, and some text to show how various bitmap fonts look like. **glutBitmapLength** function is used to find width of string so it could be aligned to right. Code can easily be altered to center text. | |
| 730 | 734 | ||
| 731 | 735 | Note: See how cube looks without light. | |
| 732 | 736 | ||
| 733 | 737 | Download source code, linux executable or windows executable from [Lazarus CCR SourceForge](http://sourceforge.net/project/showfiles.php?group_id=92177&package_id=199145). | |
| 734 | 738 | ||
| 735 | 739 | # Texturas | |
| 736 | 740 | ||
| 737 | 741 | Es tiempo de usar texturas :) | |
| 738 | 742 | ||
| 739 | 743 | Este tutorial mostrará como dibujar polígonos con textura y como to blend textures using multipass technic. Since OpenGL has no builtin mechanism for loading textures, we'll use external library: [Vampyre Imaging Library](http://imaginglib.sourceforge.net/). We'll use just OpenGL helper functions, but you may find this lib handy for some other things to. | |
| 740 | 744 | ||
| 741 | 745 | Let's get started... we'll create display list for drawing textured rectangle: | |
| 742 | 746 | ||
| 743 | 747 | ``` pascal | |
| 744 | 748 | procedure CreateList; | |
| 745 | 749 | begin | |
| 746 | 750 | glNewList(LIST_OBJECT, GL_COMPILE); | |
| 747 | 751 | glBegin(GL_QUADS); | |
| 748 | 752 | glTexCoord2f(1, 0); | |
| 749 | 753 | glVertex3f( 2, 2, 0); | |
| 750 | 754 | glTexCoord2f(0, 0); | |
| 751 | 755 | glVertex3f(-2, 2, 0); | |
| 752 | 756 | glTexCoord2f(0, 1); | |
| 753 | 757 | glVertex3f(-2,-2, 0); | |
| 754 | 758 | glTexCoord2f(1, 1); | |
| 755 | 759 | glVertex3f( 2,-2, 0); | |
| 756 | 760 | glEnd; | |
| 757 | 761 | glEndList; | |
| 758 | 762 | end; | |
| 759 | 763 | ``` | |
| 760 | 764 | ||
| 761 | 765 | Notice **glTexCoord** functions. They are used to specify which part of texture is assigned to vertex. Coordinates defined in this functions are from 0 to 1 (values greater than 1 are allowed but can generate different results). 0 is first pixel and 1 is last pixel. So, 0.5 will be right in the middle of texture. | |
| 762 | 766 | ||
| 763 | 767 | Texture loading is extremely easy with Vampyre Imaging Library: | |
| 764 | 768 | ||
| 765 | 769 | ``` pascal | |
| 766 | 770 | var | |
| 767 | 771 | Tex1, Tex2: GLuint; | |
| 768 | 772 | ||
| 769 | 773 | procedure InitializeGL; | |
| 770 | 774 | begin | |
| 771 | 775 | glClearColor(0, 0, 0, 0); | |
| 772 | 776 | Tex1 := LoadGLTextureFromFile('ashwood.bmp'); | |
| 773 | 777 | Tex2 := LoadGLTextureFromFile('Flare.bmp'); | |
| 774 | 778 | glEnable(GL_TEXTURE_2D); | |
| 775 | 779 | end; | |
| 776 | 780 | ``` | |
| 777 | 781 | ||
| 778 | 782 | **LoadGLTextureFromFile** loads texture from file and returns it's ID. When texture is loaded it is allready setup for rendering. Last line just enables 2D textures. | |
| 779 | 783 | ||
| 780 | 784 | To draw textured polygon you have to bind texture and setup texture coordinations (texture coordinations are set in display list in this tutorial): | |
| 781 | 785 | ||
| 782 | 786 | ``` pascal | |
| 783 | 787 | ... | |
| 784 | 788 | glLoadIdentity; | |
| 785 | 789 | glTranslatef(-5, 0, -15); | |
| 786 | 790 | glBindTexture(GL_TEXTURE_2D, Tex1); | |
| 787 | 791 | glCallList(LIST_OBJECT); | |
| 788 | 792 | ... | |
| 789 | 793 | ``` | |
| 790 | 794 | ||
| 791 | 795 | **glBindTexture** function is used to select texture. When you draw polygins they will have selected texture on them. It's that easy :) | |
| 792 | 796 | ||
| 793 | 797 | So, using one texture is easy... but how to blend two textures. Basicly you draw polygon once with one texture, setup blending parameters, and draw polygon once more time with other texture. You can blend houndreds of textures this way. Let's see how code for this looks: | |
| 794 | 798 | ||
| 795 | 799 | ``` pascal | |
| 796 | 800 | ... | |
| 797 | 801 | glLoadIdentity; | |
| 798 | 802 | glTranslatef(5, 0, -15); | |
| 799 | 803 | glBindTexture(GL_TEXTURE_2D, Tex1); | |
| 800 | 804 | glCallList(LIST_OBJECT); | |
| 801 | 805 | ||
| 802 | 806 | glEnable(GL_BLEND); | |
| 803 | 807 | glBlendFunc(GL_ZERO, GL_SRC_COLOR); | |
| 804 | 808 | glLoadIdentity; | |
| 805 | 809 | glTranslatef(5, 0, -15); | |
| 806 | 810 | glBindTexture(GL_TEXTURE_2D, Tex2); | |
| 807 | 811 | glCallList(LIST_OBJECT); | |
| 808 | 812 | glDisable(GL_BLEND); | |
| 809 | 813 | ... | |
| 810 | 814 | ``` | |
| 811 | 815 | ||
| 812 | 816 | As you can see, polygon is drawn first time like we allready know. Before second drawing we enable blending by calling **glEnable(GL_BLEND)**. Blending means that finall pixel color is calculated like this: | |
| 813 | 817 | ||
| 814 | 818 | - DrawingColor * SRCBLEND + BackgroundColor * DESTBLEND | |
| 815 | 819 | ||
| 816 | 820 | SRCBLEND and DESTBLEND are defined using **glBlendFunc** function. In this tutorial we set SRCBLEND to GL_ZERO (zero) and DESTBLENT to GL_SRC_COLOR (DrawingColor) and finall color is then: | |
| 817 | 821 | ||
| 818 | 822 | DrawingColor * 0 + BackgroundColor * DrawingColor 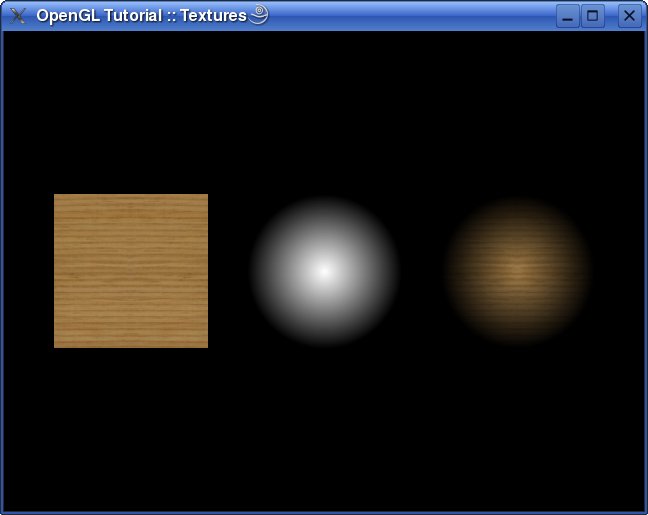 | |
| 819 | 823 | ||
| 820 | 824 | This means that background will get darker when you draw with dark colors... when you draw with white color, background color will not be changed. The result will look like this | |
| 821 | 825 | ||
| 822 | 826 | Next time, we'll use extensions to show how to use singlepass multitexturing. | |
| 823 | 827 | ||
| 824 | 828 | Download source code, linux executable or windows executable from [Lazarus CCR SourceForge](http://sourceforge.net/project/showfiles.php?group_id=92177&package_id=199145). | |
| 825 | 829 | ||
| 826 | 830 | # Multitexturing (extensions) | |
| 827 | 831 | ||
| 828 | 832 | When youknow multipass multi texturing, singlepass is very easy. Texturing is separated in stages. First stage setup and draw first texture, second stage draws another one and so on. Todo lo que hay que hacer es configurar las etapas de textura y renderizar el objeto. | |
| 829 | 833 | ||
| 830 | 834 | Veamos como queda el código: | |
| 831 | 835 | ||
| 832 | 836 | ``` pascal | |
| 833 | 837 | procedure InitializeGL; | |
| 834 | 838 | begin | |
| 835 | 839 | Load_GL_ARB_multitexture; | |
| 836 | 840 | glClearColor(0, 0, 0, 0); | |
| 837 | 841 | Tex1 := LoadGLTextureFromFile('Lazarus.bmp'); | |
| 838 | 842 | Tex2 := LoadGLTextureFromFile('Mask.bmp'); | |
| 839 | 843 | glActiveTextureARB(GL_TEXTURE0_ARB); | |
| 840 | 844 | glEnable(GL_TEXTURE_2D); | |
| 841 | 845 | glBindTexture(GL_TEXTURE_2D, Tex1); | |
| 842 | 846 | glActiveTextureARB(GL_TEXTURE1_ARB); | |
| 843 | 847 | glEnable(GL_TEXTURE_2D); | |
| 844 | 848 | glBindTexture(GL_TEXTURE_2D, Tex2); | |
| 845 | 849 | end; | |
| 846 | 850 | ``` | |
| 847 | 851 | ||
| 848 | 852 | Primero necesitamos cargar la extensión de OpenGL que permitirá utilizar las funciones de multitextura. **Load_GL_ARB_multitexture** tratará de cargar estas extensiones retornando TRUE en caso de éxito. | |
| 849 | 853 | ||
| 850 | 854 | Para seleccionar la etapa de textura que queremos establecer utilizamos la función **glActiveTextureARB**. Toma únicamente un parámetro para definir la etapa que se necesita. Después de esto todas las funciones de textura (enabling, disabling, binding, creating...) afectarán esta etapa. | |
| 851 | 855 | ||
| 852 | 856 | Después de establecer todo en la función de inicialización, todo lo que resta por hacer es dibujar el objeto: | |
| 853 | 857 | ||
| 854 | 858 | ``` pascal | |
| 855 | 859 | procedure DrawGLScene; cdecl; | |
| 856 | 860 | begin | |
| 857 | 861 | glClear(GL_COLOR_BUFFER_BIT or GL_DEPTH_BUFFER_BIT); | |
| 858 | 862 | ||
| 859 | 863 | glLoadIdentity; | |
| 860 | 864 | glTranslatef(0, 0, -5); | |
| 861 | 865 | ||
| 862 | 866 | glBegin(GL_QUADS); | |
| 863 | 867 | glMultiTexCoord2fARB(GL_TEXTURE0_ARB, 1, 0); | |
| 864 | 868 | glMultiTexCoord2fARB(GL_TEXTURE1_ARB, 1, 0); | |
| 865 | 869 | glVertex3f(2.516, 2, 0); | |
| 866 | 870 | glMultiTexCoord2fARB(GL_TEXTURE0_ARB, 0, 0); | |
| 867 | 871 | glMultiTexCoord2fARB(GL_TEXTURE1_ARB, 0, 0); | |
| 868 | 872 | glVertex3f(-2.516, 2, 0); | |
| 869 | 873 | glMultiTexCoord2fARB(GL_TEXTURE0_ARB, 0, 1); | |
| 870 | 874 | glMultiTexCoord2fARB(GL_TEXTURE1_ARB, 0, 1); | |
| 871 | 875 | glVertex3f(-2.516,-2, 0); | |
| 872 | 876 | glMultiTexCoord2fARB(GL_TEXTURE0_ARB, 1, 1); | |
| 873 | 877 | glMultiTexCoord2fARB(GL_TEXTURE1_ARB, 1, 1); | |
| 874 | 878 | glVertex3f(2.516,-2, 0); | |
| 875 | 879 | glEnd; | |
| 876 | 880 | ||
| 877 | 881 | glutSwapBuffers; | |
| 878 | 882 | end; | |
| 879 | 883 | ``` | |
| 880 | 884 | ||
| 881 | 885 | 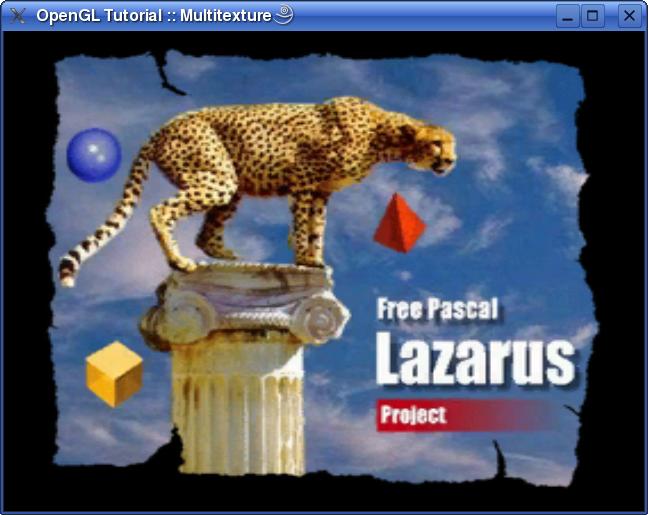 Como puedes observar, la diferencia está únicamente en la definiciónde las coordenadas de la textura. We now use **glMultiTexCoord2fARB** function that takes texture stage and texture coordinations. Every thing else is unchanged. | |
| 882 | 886 | ||
| 883 | 887 | Hoy días prácticamente todas las tarjetas gráficas soportan al menos 2 etapas de textura. Using singlepass multitexturing is faster than multipass version since you draw objects only once. If hardware supports singlepass multitexturing (Load_GL_ARB_multitexture returns TRUE) use it. | |
| 884 | 888 | ||
| 885 | 889 | Download source code, linux executable or windows executable from [Lazarus CCR SourceForge](http://sourceforge.net/project/showfiles.php?group_id=92177&package_id=199145). | |
| 886 | 890 | ||
| 887 | 891 | # Render to texture | |
| 888 | 892 | ||
| 889 | 893 | This one will be short. OpenGL can capture current scene to texture so you can use it for texturing other objects (TV screen, mirror or some thing else). Well just render scene to texture and apply it to rotating plane. | |
| 890 | 894 | ||
| 891 | 895 | First, we must create empty texture which we'll use to capture scene: | |
| 892 | 896 | ||
| 893 | 897 | ``` pascal | |
| 894 | 898 | procedure SetupRenderTexture; | |
| 895 | 899 | var | |
| 896 | 900 | Data: Pointer; | |
| 897 | 901 | begin | |
| 898 | 902 | GetMem(Data, 256*256*3); | |
| 899 | 903 | glGenTextures(1, @RenderTexture); | |
| 900 | 904 | glBindTexture(GL_TEXTURE_2D, RenderTexture); | |
| 901 | 905 | glTexImage2D(GL_TEXTURE_2D, 0, 3, 256, 256, 0, GL_RGB, GL_UNSIGNED_BYTE, Data); | |
| 902 | 906 | glTexParameteri(GL_TEXTURE_2D, GL_TEXTURE_MAG_FILTER, GL_LINEAR); | |
| 903 | 907 | glTexParameteri(GL_TEXTURE_2D, GL_TEXTURE_MIN_FILTER, GL_LINEAR); | |
| 904 | 908 | FreeMem(Data); | |
| 905 | 909 | end; | |
| 906 | 910 | ``` | |
| 907 | 911 | ||
| 908 | 912 | Buffer for 256*256 RGB image is created and it is used to setup 2D texture. | |
| 909 | 913 | ||
| 910 | 914 | Main part is in drawing function: | |
| 911 | 915 | ||
| 912 | 916 | ``` pascal | |
| 913 | 917 | procedure DrawGLScene; cdecl; | |
| 914 | 918 | var | |
| 915 | 919 | TotalTime: Single; | |
| 916 | 920 | begin | |
| 917 | 921 | glClearColor(0, 0, 0, 0); | |
| 918 | 922 | glClear(GL_COLOR_BUFFER_BIT or GL_DEPTH_BUFFER_BIT); | |
| 919 | 923 | glEnable(GL_LIGHTING); | |
| 920 | 924 | glDisable(GL_TEXTURE_2D); | |
| 921 | 925 | glViewport(0, 0, 256, 256); | |
| 922 | 926 | ||
| 923 | 927 | TotalTime := GetTotalTime; | |
| 924 | 928 | ||
| 925 | 929 | glLoadIdentity; | |
| 926 | 930 | glTranslatef(0, 0, -5); | |
| 927 | 931 | glRotatef(50 * TotalTime, 1, 0, 0); | |
| 928 | 932 | glRotatef(100 * TotalTime, 0, 1, 0); | |
| 929 | 933 | glRotatef(50 * TotalTime, 0, 0, 1); | |
| 930 | 934 | ||
| 931 | 935 | glColor3f(1, 1, 1); | |
| 932 | 936 | glutSolidCube(2); | |
| 933 | 937 | ||
| 934 | 938 | glCopyTexImage2D(GL_TEXTURE_2D, 0, GL_RGB, 0, 0, 256, 256, 0); | |
| 935 | 939 | ||
| 936 | 940 | glClearColor(0.18, 0.20, 0.66, 0); | |
| 937 | 941 | glClear(GL_COLOR_BUFFER_BIT or GL_DEPTH_BUFFER_BIT); | |
| 938 | 942 | glDisable(GL_LIGHTING); | |
| 939 | 943 | glEnable(GL_TEXTURE_2D); | |
| 940 | 944 | glViewport(0, 0, AppWidth, AppHeight); | |
| 941 | 945 | ||
| 942 | 946 | glLoadIdentity; | |
| 943 | 947 | glTranslatef(0, 0, -7); | |
| 944 | 948 | glRotatef(20 * TotalTime, 1, 0, 0); | |
| 945 | 949 | glRotatef(50 * TotalTime, 0, 1, 0); | |
| 946 | 950 | ||
| 947 | 951 | glBegin(GL_QUADS); | |
| 948 | 952 | glTexCoord2f(1, 0); | |
| 949 | 953 | glVertex3f(2, 2, 0); | |
| 950 | 954 | glTexCoord2f(0, 0); | |
| 951 | 955 | glVertex3f(-2, 2, 0); | |
| 952 | 956 | glTexCoord2f(0, 1); | |
| 953 | 957 | glVertex3f(-2,-2, 0); | |
| 954 | 958 | glTexCoord2f(1, 1); | |
| 955 | 959 | glVertex3f(2,-2, 0); | |
| 956 | 960 | glEnd; | |
| 957 | 961 | ||
| 958 | 962 | glutSwapBuffers; | |
| 959 | 963 | end; | |
| 960 | 964 | ``` | |
| 961 | 965 | ||
| 962 | 966 | 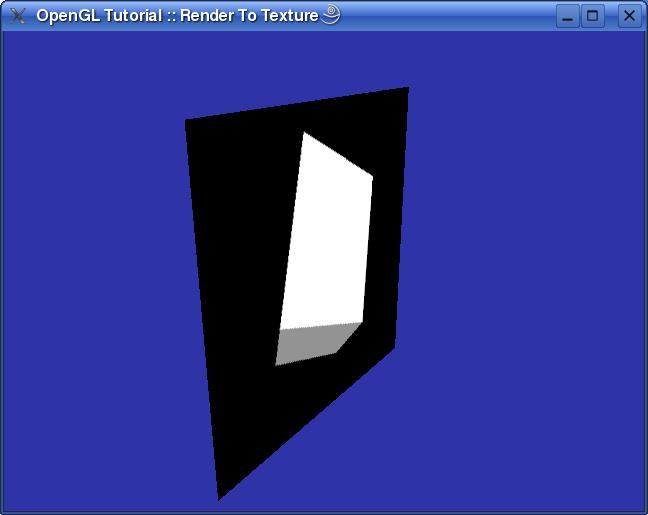 First, everything is setup for scene that will be captured. Viewport is reduced to 256*256 so it will fit into texture and scene is drawn. **glCopyTexImage2D** is used to capture scene to currently selected texture. | |
| 963 | 967 | ||
| 964 | 968 | When we have scene captured to texture, everything can be cleared again, viewport can be returned to original size and final scene is drawn using previous scene as texture. | |
| 965 | 969 | ||
| 966 | 970 | P.S. Captured texture can be saved using **SaveGLTextureToFile** function from [Vampyre Imaging Library](http://imaginglib.sourceforge.net/). | |
| 967 | 971 | ||
| 968 | 972 | Download source code, linux executable or windows executable from [Lazarus CCR SourceForge](http://sourceforge.net/project/showfiles.php?group_id=92177&package_id=199145). | |
| 969 | 973 | ||
| 970 | 974 | # Vertex array | |
| 971 | 975 | ||
| 972 | 976 | OpenGL is capable of rendering primitives using data that is stored in buffers insted of calling glVertex. Buffers can be used to define vertex and texture coordinates, and colors (index and RGBA), normals and edge flags. | |
| 973 | 977 | ||
| 974 | 978 | In this tutorial well use only vertex and color buffers, and we'll show non-indexed and indexed drawing. Non-indexed mode draws buffers as streams. Indexed mode will draw buffer elements in order that is defined in index buffer. But enough talking... let's start coding. | |
| 975 | 979 | ||
| 976 | 980 | First, let's define some types and constants: | |
| 977 | 981 | ||
| 978 | 982 | ``` pascal | |
| 979 | 983 | type | |
| 980 | 984 | TVertex3f = record | |
| 981 | 985 | X, Y, Z: Single; | |
| 982 | 986 | end; | |
| 983 | 987 | ||
| 984 | 988 | TColor3f = record | |
| 985 | 989 | R, G, B: Single; | |
| 986 | 990 | end; | |
| 987 | 991 | ||
| 988 | 992 | VertexBuffer: array [0..5] of TVertex3f = ( | |
| 989 | 993 | (X : 1; Y : 1; Z : 0), | |
| 990 | 994 | (X : -1; Y : 1; Z : 0), | |
| 991 | 995 | (X : -1; Y : -1; Z : 0), | |
| 992 | 996 | (X : 1; Y : 1; Z : 0), | |
| 993 | 997 | (X : -1; Y : -1; Z : 0), | |
| 994 | 998 | (X : 1; Y : -1; Z : 0) | |
| 995 | 999 | ); | |
| 996 | 1000 | ColorBuffer: array [0..5] of TColor3f = ( | |
| 997 | 1001 | (R : 1; G : 0; B : 1), | |
| 998 | 1002 | (R : 0; G : 0; B : 1), | |
| 999 | 1003 | (R : 0; G : 1; B : 0), | |
| 1000 | 1004 | (R : 1; G : 0; B : 1), | |
| 1001 | 1005 | (R : 0; G : 1; B : 0), | |
| 1002 | 1006 | (R : 1; G : 1; B : 0) | |
| 1003 | 1007 | ); | |
| 1004 | 1008 | ``` | |
| 1005 | 1009 | ||
| 1006 | 1010 | We have two buffers. One for vertex coordinates and one for vertex colors. This 6 vertices defines 2 triangles that forms rectangle. | |
| 1007 | 1011 | ||
| 1008 | 1012 | Drawing primitives using buffers is easy: | |
| 1009 | 1013 | ||
| 1010 | 1014 | ``` pascal | |
| 1011 | 1015 | glEnableClientState(GL_VERTEX_ARRAY); | |
| 1012 | 1016 | glEnableClientState(GL_COLOR_ARRAY); | |
| 1013 | 1017 | glVertexPointer(3, GL_FLOAT, 0, @VertexBuffer[0]); | |
| 1014 | 1018 | glColorPointer(3, GL_FLOAT, 0, @ColorBuffer[0]); | |
| 1015 | 1019 | ||
| 1016 | 1020 | glDrawArrays(GL_TRIANGLES, 0, Length(VertexBuffer)); | |
| 1017 | 1021 | ||
| 1018 | 1022 | glDisableClientState(GL_VERTEX_ARRAY); | |
| 1019 | 1023 | glDisableClientState(GL_COLOR_ARRAY); | |
| 1020 | 1024 | ``` | |
| 1021 | 1025 | ||
| 1022 | 1026 | First we enable buffers we want to use using **glEnableClientState** function. Than we can select buffers we want to use. Every buffer type has own function for selecting (**glColorPointer**, **glEdgeFlagPointer**, **glIndexPointer**, **glNormalPointer**, **glTexCoordPointer**, **glVertexPointer**). | |
| 1023 | 1027 | ||
| 1024 | 1028 | First parameter in those functions defines how many numbers every element contains. For example, let's take vertex buffer. If this parameter is 2 than OpenGL expects that every element in buffer contains x and y coordinate. If this parameter is, for example, 4, than every element should contains x, y, z and w coordinate. | |
| 1025 | 1029 | ||
| 1026 | 1030 | Next parameter defines what type of data element contains (GL_BYTE, GL_UNSIGNED_BYTE, GL_SHORT, GL_UNSIGNED_SHORT, GL_INT, GL_UNSIGNED_INT, GL_FLOAT or GL_DOUBLE). | |
| 1027 | 1031 | ||
| 1028 | 1032 | Next one defines how many bytes are between each element. This way you can have buffer that contains vertex coordinates and some custom data. For arbitrary data type, this parameter can be calculated like this: | |
| 1029 | 1033 | ||
| 1030 | 1034 | ``` pascal | |
| 1031 | 1035 | type | |
| 1032 | 1036 | TBufferData = record | |
| 1033 | 1037 | DataBefore: TDataBefore; | |
| 1034 | 1038 | Vertex: TVertex; | |
| 1035 | 1039 | DataAfter: TDataAfter; | |
| 1036 | 1040 | end; | |
| 1037 | 1041 | ``` | |
| 1038 | 1042 | ||
| 1039 | - | ||
| 1043 | + | ```text | |
| 1044 | + | Bytes between elements = SizeOf(TDataBefore) + SizeOf(TDataAfter) | |
| 1045 | + | ``` | |
| 1040 | 1046 | ||
| 1041 | 1047 | Last parameter if pointer to the begginig of buffer. | |
| 1042 | 1048 | ||
| 1043 | 1049 | When buffers are selected we can draw them using **glDrawArrays** functions. All enabled buffers are used to draw primitives. What kind of polygons are being generated is defined in first parameter (same as in glBegin function). Next two defines subset of buffer which is used for drawing (start and count). | |
| 1044 | 1050 | ||
| 1045 | 1051 | When buffers are not needed you can disable them. | |
| 1046 | 1052 | ||
| 1047 | 1053 | To demonstrate indexed mode, I made some simple mesh class that can load vertex, color and index data from external files: | |
| 1048 | 1054 | ||
| 1049 | 1055 | ``` pascal | |
| 1050 | 1056 | type | |
| 1051 | 1057 | TMesh = class | |
| 1052 | 1058 | private | |
| 1053 | 1059 | FVertices: array of TVertex3f; | |
| 1054 | 1060 | FColors: array of TColor3f; | |
| 1055 | 1061 | FIndices: array of Integer; | |
| 1056 | 1062 | procedure FreeBuffers; | |
| 1057 | 1063 | public | |
| 1058 | 1064 | constructor Create; | |
| 1059 | 1065 | destructor Destroy; override; | |
| 1060 | 1066 | procedure LoadMesh(FileName: String); | |
| 1061 | 1067 | procedure DrawMesh; | |
| 1062 | 1068 | end; | |
| 1063 | 1069 | ``` | |
| 1064 | 1070 | ||
| 1065 | 1071 | FVertices will contain data about vertices, FColors data about color and FIndices data about indices when external file is loaded. | |
| 1066 | 1072 | ||
| 1067 | 1073 | First we'll write some code that deals with creation and destruction of class: | |
| 1068 | 1074 | ||
| 1069 | 1075 | ``` pascal | |
| 1070 | 1076 | procedure TMesh.FreeBuffers; | |
| 1071 | 1077 | begin | |
| 1072 | 1078 | FVertices := nil; | |
| 1073 | 1079 | FColors := nil; | |
| 1074 | 1080 | FIndices := nil; | |
| 1075 | 1081 | end; | |
| 1076 | 1082 | ||
| 1077 | 1083 | constructor TMesh.Create; | |
| 1078 | 1084 | begin | |
| 1079 | 1085 | FreeBuffers; | |
| 1080 | 1086 | end; | |
| 1081 | 1087 | ||
| 1082 | 1088 | destructor TMesh.Destroy; | |
| 1083 | 1089 | begin | |
| 1084 | 1090 | FreeBuffers; | |
| 1085 | 1091 | inherited Destroy; | |
| 1086 | 1092 | end; | |
| 1087 | 1093 | ``` | |
| 1088 | 1094 | ||
| 1089 | 1095 | File that will contain mesh data is simple text file. First row will contain number of vertices and indices separated by space character. After that row will come rows for every vertex and color. X, Y, Z, R, G and B all separated by space character. In the end, there will be rows for indices... every index number is written in its own row... so, for one triangle, data file will look like this: | |
| 1090 | 1096 | ||
| 1091 | - | ||
| 1092 | - | ||
| 1093 | - | ||
| 1094 | - | ||
| 1095 | - | ||
| 1096 | - | ||
| 1097 | - | ||
| 1097 | + | ```text | |
| 1098 | + | 3 3 | |
| 1099 | + | -1 -1 0 1 1 1 | |
| 1100 | + | 1 -1 0 1 1 1 | |
| 1101 | + | 0 1 0 1 1 1 | |
| 1102 | + | 0 | |
| 1103 | + | 1 | |
| 1104 | + | 2 | |
| 1105 | + | ``` | |
| 1098 | 1106 | ||
| 1099 | 1107 | This means that there is 3 vertices and 3 indices defined in file. First vrtex is at -1, -1, 0 and has color 1, 1, 1 and so on. Indices defines that order in which vertices are drawn (in this case vertices are drawn in the same order as they are defined). | |
| 1100 | 1108 | ||
| 1101 | 1109 | Code for loading this data will loke like this: | |
| 1102 | 1110 | ||
| 1103 | 1111 | ``` pascal | |
| 1104 | 1112 | procedure TMesh.LoadMesh(FileName: String); | |
| 1105 | 1113 | var | |
| 1106 | 1114 | MeshFile: TextFile; | |
| 1107 | 1115 | VertexCount, IndexCount: Integer; | |
| 1108 | 1116 | iV, iI: Integer; | |
| 1109 | 1117 | begin | |
| 1110 | 1118 | FreeBuffers; | |
| 1111 | 1119 | ||
| 1112 | 1120 | AssignFile(MeshFile, FileName); | |
| 1113 | 1121 | Reset(MeshFile); | |
| 1114 | 1122 | ||
| 1115 | 1123 | ReadLn(MeshFile, VertexCount, IndexCount); | |
| 1116 | 1124 | ||
| 1117 | 1125 | SetLength(FVertices, VertexCount); | |
| 1118 | 1126 | SetLength(FColors, VertexCount); | |
| 1119 | 1127 | SetLength(FIndices, IndexCount); | |
| 1120 | 1128 | ||
| 1121 | 1129 | for iV := 0 to VertexCount - 1 do | |
| 1122 | 1130 | ReadLn(MeshFile, | |
| 1123 | 1131 | FVertices[iV].X, FVertices[iV].Y, FVertices[iV].Z, | |
| 1124 | 1132 | FColors[iV].R, FColors[iV].G, FColors[iV].B); | |
| 1125 | 1133 | ||
| 1126 | 1134 | for iI := 0 to IndexCount - 1 do | |
| 1127 | 1135 | ReadLn(MeshFile, FIndices[iI]); | |
| 1128 | 1136 | ||
| 1129 | 1137 | CloseFile(MeshFile); | |
| 1130 | 1138 | end; | |
| 1131 | 1139 | ``` | |
| 1132 | 1140 | ||
| 1133 | 1141 | After loading data, we have everything for drawing: | |
| 1134 | 1142 | ||
| 1135 | 1143 | ``` pascal | |
| 1136 | 1144 | procedure TMesh.DrawMesh; | |
| 1137 | 1145 | begin | |
| 1138 | 1146 | glEnableClientState(GL_VERTEX_ARRAY); | |
| 1139 | 1147 | glEnableClientState(GL_COLOR_ARRAY); | |
| 1140 | 1148 | glVertexPointer(3, GL_FLOAT, 0, @FVertices[0]); | |
| 1141 | 1149 | glColorPointer(3, GL_FLOAT, 0, @FColors[0]); | |
| 1142 | 1150 | ||
| 1143 | 1151 | glDrawElements(GL_TRIANGLES, Length(FIndices), GL_UNSIGNED_INT, @FIndices[0]); | |
| 1144 | 1152 | ||
| 1145 | 1153 | glDisableClientState(GL_VERTEX_ARRAY); | |
| 1146 | 1154 | glDisableClientState(GL_COLOR_ARRAY); | |
| 1147 | 1155 | end; | |
| 1148 | 1156 | ``` | |
| 1149 | 1157 | ||
| 1150 | 1158 | As you can see, allmost everything is the same as for non-indexed drawing, except function that actually draw polygons. In this case we use **glDrawElements** function. For this one we specify what kind of polygons we want, how many indices are in index buffer, type of data in index buffer and pointer to the beginning of index buffer. | |
| 1151 | 1159 | ||
| 1152 | 1160 | 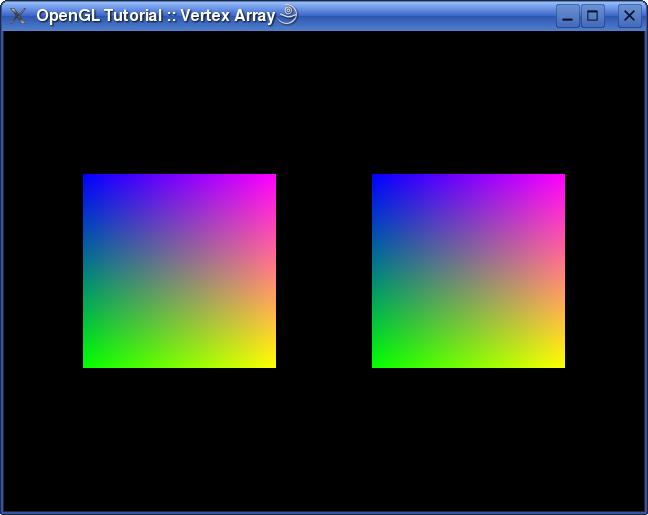Full source code comes with mesh data file that this class can use to generates rectangle that is identical with one that is drawn using non-indexed mode. Mesh data file looks like this: | |
| 1153 | 1161 | ||
| 1154 | - | ||
| 1155 | - | ||
| 1156 | - | ||
| 1157 | - | ||
| 1158 | - | ||
| 1159 | - | ||
| 1160 | - | ||
| 1161 | - | ||
| 1162 | - | ||
| 1163 | - | ||
| 1164 | - | ||
| 1162 | + | ```text | |
| 1163 | + | 4 6 | |
| 1164 | + | 1 1 0 1 0 1 | |
| 1165 | + | -1 1 0 0 0 1 | |
| 1166 | + | -1 -1 0 0 1 0 | |
| 1167 | + | 1 -1 0 1 1 0 | |
| 1168 | + | 0 | |
| 1169 | + | 1 | |
| 1170 | + | 2 | |
| 1171 | + | 0 | |
| 1172 | + | 2 | |
| 1173 | + | 3 | |
| 1174 | + | ``` | |
| 1165 | 1175 | ||
| 1166 | 1176 | As you can see, there is data for only 4 vertices and 6 indices. So, first triangle is defined by vertices 0, 1 and 2, and the seccond one by vertices 0, 2 and 3. By using indexed mode we don't have to duplicate vertices. | |
| 1167 | 1177 | ||
| 1168 | 1178 | Download source code, linux executable or windows executable from [Lazarus CCR SourceForge](http://sourceforge.net/project/showfiles.php?group_id=92177&package_id=199145). | |
| 1169 | 1179 | ||
| 1170 | 1180 | ------------------------------------------------------------------------ | |
| 1171 | 1181 | ||
| 1172 | 1182 | [[Creating bindings for C libraries]] | |
| 1173 | 1183 | ||
| 1174 | 1184 | --- | |
| 1175 | 1185 | *From the Free Pascal wiki, page "OpenGL Tutorial/es", as it stood on 2020-02-23 after a change by Trev, out of the wiki's dump of 2024-05-26. Copyright stays with the author who wrote it, according to the old wiki's [[Licensing]] page. If you have concerns about this material, [message the admin](/wiki-contact).* | |
| 1176 | 1186 | Category: Castellano | |
| 1177 | 1187 | Category: Español | |
| 1178 | 1188 | Category: Example programs/es |