

Lazarus on Raspberry Pi/es: what changed
Revision 0 to 1. Removed lines have a minus sign; added lines have a plus sign.
Title: Lazarus on Raspberry Pi/es
| Old | New | Line | |
|---|---|---|---|
| 1 | + | La información que viene a continuación es una traducción lo más aproximada posible de la entrada en inglés (con alguna variación allí donde requiera ser más detallada o explicativa) y puede que las que se redacten en los otros idiomas alternativos de esta wiki. Cada uno que utilice esta información bajo su propio riesgo, puede contener errores. Antes de aplicar los ejemplos asegurarse que la información es aplicable (y se corresponde) con la placa sobre la que se va a trabajar dada la existencia de diferentes modelos en los cuales tanto los pines de conexión como su funcionalidad y voltaje pueden variar. Si no se tiene conocimiento de lo que se está haciendo mejor no aplicarlo. Por otro lado siempre que se trabaja con dispositivos electrónicos se deben guardar las medidas de seguridad apropiadas dado que un uso indebido de dicho hardware puede conllevar la pérdida de la garantía. Desde aquí no se dá garantía ni implícita ni explícita sobre el correcto funcionamiento de la información aquí mostrada. Antes de seguir este tutorial es recomendable tener conocimientos de electrónica (también para conocer los riesgos de manejar tensiones e intensidades), aunque los componentes empleados en los ejemplos son simples. | |
| 2 | + | ||
| 3 | + | <img src="Lazarus_on_Raspberry_Pi_Raspian_Wheezy_version_2012-10-28.png" title="Lazarus on Raspbian Wheezy" width="200" alt="Lazarus on Raspbian Wheezy" /> *(Raspberry Pi only)* | |
| 4 | + | ||
| 5 | + | **Raspberry Pi** es un ordenador con una placa del tamaño de una tarjeta de crédito (ver fotos más abajo). Ha sido diseñada en Reino Unido (UK) por la Fundación Raspberry Pi con la intención de fomentar el aprendizaje básico de la computación en escuelas. Las Raspberry Pi se utilizan también para propósitos tan diversos como pueden ser servidores de medios, robótica e ingeniería de control. | |
| 6 | + | ||
| 7 | + | La Fundación Raspberry Pi recomienda [[Raspbian]] Wheezy como la distribución estandar a utilizar con su hardware. También se utilizan sistemas alternativos tales como RISC y distribuciones Linux variadas y [[Android]]. | |
| 8 | + | ||
| 9 | + | Lazarus corre en modo nativo bajo la distro Raspbian con sistema operativo Linux. | |
| 10 | + | ||
| 11 | + | ## Installando y compilando Lazarus | |
| 12 | + | ||
| 13 | + | ### Instalación simple bajo Raspbian | |
| 14 | + | ||
| 15 | + | #### Raspberry Pi 1 | |
| 16 | + | ||
| 17 | + | En la distro de Linux Raspbian es fácil instalar Lazarus y FreePascal. Para lograrlo simplemente abre una ventana de terminal y teclea lo siguiente: | |
| 18 | + | ||
| 19 | + | ``` bash | |
| 20 | + | sudo apt-get update | |
| 21 | + | sudo apt-get upgrade | |
| 22 | + | sudo apt-get install fpc | |
| 23 | + | sudo apt-get install lazarus | |
| 24 | + | ``` | |
| 25 | + | ||
| 26 | + | Esto instala una versión precompilada estable de FreePascal y Lazarus en la distro Raspbian que corre en el hardware Raspberry Pi. Por supuesto se necesita una conexión de red. La instalación puede llevar unos 30 minutos, pero la mayor parte de este proceso tiene lugar automáticamente. Después de la instalación ya se puede arrancar Lazarus desde la sección "Programming" en el menú de comienzo de LXDE. | |
| 27 | + | ||
| 28 | + | Install Lazarus Rasbian Part1 en.png\|Paso instalación 1 Install Lazarus Rasbian Part2 en.png\|Paso instalación 2 Install Lazarus Rasbian Part3 en.png\|Paso instalación 3 Install Lazarus Rasbian Part4 en.png\|Paso instalación 4 | |
| 29 | + | ||
| 30 | + | Si necesitas una versión más nueva, o si Lazarus/FreePascal muestran errores durante la instalación puedes consultar más información [aquí](http://www.raspberrypi.org/forums/viewtopic.php?f=34&t=88145). | |
| 31 | + | ||
| 32 | + | #### Raspberry Pi 2 | |
| 33 | + | ||
| 34 | + | Desde junio de 2015 el método de instalación regular "out of the box (listo para usar)" también funciona para Raspberry Pi 2 Modelo B. La versión que lleva instalada es, por tanto, demasiado antigua. Para aquellos que busquen construir los últimos IDE de FreePascal y Lazarus mejor ver [este artículo](http://www.tweaking4all.com/hardware/raspberry-pi/install-lazarus-pascal-on-raspberry-pi-2/). | |
| 35 | + | ||
| 36 | + | <File:Lazarus> 0 9 30 4 on RPi 2.png\|Lazarus "out of the box" en Raspberry Pi 2 | |
| 37 | + | ||
| 38 | + | 160 | |
| 39 | + | ||
| 40 | + | #### Raspberry Pi 3 | |
| 41 | + | ||
| 42 | + | Ver Raspberry Pi 2. | |
| 43 | + | ||
| 44 | + | <figure> | |
| 45 | + | <img src="RaspBerryPi3B+.png" title=" Foto detalle RaspBerry Pi 3 B+|thumb|220px|center" /> | |
| 46 | + | <figcaption> Foto detalle RaspBerry Pi 3 B+|thumb|220px|center</figcaption> | |
| 47 | + | </figure> | |
| 48 | + | ||
| 49 | + | <File:RaspBerryPi3B+_img1.png> | |
| 50 | + | ||
| 51 | + | <File:RaspBerryPi3B+_img2.png> | |
| 52 | + | ||
| 53 | + | Como se puede observar tiene más pines de los cuales se debe consultar la funcionalidad de cada uno antes de conectar algo. | |
| 54 | + | ||
| 55 | + | <figure> | |
| 56 | + | <img src="RaspBerryPi3B+_img3.png" title=" Foto detalle RaspBerry Pi 3 B+|thumb|220px|center" /> | |
| 57 | + | <figcaption> Foto detalle RaspBerry Pi 3 B+|thumb|220px|center</figcaption> | |
| 58 | + | </figure> | |
| 59 | + | ||
| 60 | + | ### Compilación cruzada (cross compiling) para Raspberry Pi desde Windows | |
| 61 | + | ||
| 62 | + | 1\. Utilizando fpcup | |
| 63 | + | ||
| 64 | + | Un camino es utilizar fpcup para configurar un compilador cruzado; seguir estas instrucciones: | |
| 65 | + | ||
| 66 | + | [[fpcup|fpcup#Linux_ARM_cross_compiler]] | |
| 67 | + | ||
| 68 | + | 2\. Utilizando scripts | |
| 69 | + | ||
| 70 | + | Alternativamente, para una aproximación más manual, y utilizando ficheros de proceso por lotes, puedes seguir los siguientes pasos. | |
| 71 | + | ||
| 72 | + | 2.1 Prerequisitos | |
| 73 | + | ||
| 74 | + | `FPC 2.7.1 or higher installed with sourcecode`\ | |
| 75 | + | `Install the Windows version from the Linaro binutils for linux gnueabihf into %FPCPATH%/bin/win32-armhf-linux `[`1`](https://launchpad.net/linaro-toolchain-binaries/trunk/2013.10/+download/gcc-linaro-arm-linux-gnueabihf-4.8-2013.10_win32.zip) | |
| 76 | + | ||
| 77 | + | 2.2 Script ejemplo para construir (adaptar los trayectos a como se necesiten) | |
| 78 | + | ||
| 79 | + | ``` bat | |
| 80 | + | set PATH=C:\pp\bin\i386-win32;%PATH%; | |
| 81 | + | set FPCMAKEPATH=C:/pp | |
| 82 | + | set FPCPATH=C:/pp | |
| 83 | + | set OUTPATH=C:/pp271 | |
| 84 | + | %FPCMAKEPATH%/bin/i386-win32/make distclean OS_TARGET=linux CPU_TARGET=arm CROSSBINDIR=%FPCPATH%/bin/win32-armhf-linux CROSSOPT="-CpARMV6 -CfVFPV2 -OoFASTMATH" FPC=%FPCPATH%/bin/i386-win32/ppc386.exe | |
| 85 | + | ||
| 86 | + | %FPCMAKEPATH%/bin/i386-win32/make all OS_TARGET=linux CPU_TARGET=arm CROSSBINDIR=%FPCPATH%/bin/win32-armhf-linux CROSSOPT="-CpARMV6 -CfVFPV2 -OoFASTMATH" FPC=%FPCPATH%/bin/i386-win32/ppc386.exe | |
| 87 | + | if errorlevel 1 goto quit | |
| 88 | + | %FPCMAKEPATH%/bin/i386-win32/make crossinstall CROSSBINDIR=%FPCPATH%/bin/win32-armhf-linux CROSSOPT="-CpARMV6 -CfVFPV2 -OoFASTMATH" OS_TARGET=linux CPU_TARGET=arm FPC=%FPCPATH%/bin/i386-win32/ppc386.exe INSTALL_BASEDIR=%OUTPATH% | |
| 89 | + | ||
| 90 | + | :quit | |
| 91 | + | pause | |
| 92 | + | ``` | |
| 93 | + | ||
| 94 | + | Con el resultado de ppcrossarm.exe y ARM RTL deberias ser capaz de construir una versión de Lazarus para plataforma cruzada como habitualmente y compilar proyectos FPC para Raspberry Pi y otros dispositivos armhf. Recuerda que no todas las librerias, - especialmente en Windows - se encuentran disponibles para Linux arm. | |
| 95 | + | ||
| 96 | + | ### Compilando desde el código fuente | |
| 97 | + | ||
| 98 | + | Puede que necesites compilar Lazarus a partir de sus fuentes subverion. Ver \[<http://www.michellcomputing.co.uk/blog/?p=72>: Michell Computing: Lazarus en la Raspberry Pi\] para más detalles.. | |
| 99 | + | ||
| 100 | + | <File:Start> Menu with Lazarus en.png\|Como arrancar Lazarus en Raspbian Wheezy <File:Lazarus> on Raspberry Pi.jpg\|Lazarus bajo Raspberry Pi <File:rpi> gpio pins.png\|Numeración de los pines GPIO | |
| 101 | + | ||
| 102 | + | Compilando desde las fuentes en Raspberry con Gentoo (y otra distro) | |
| 103 | + | ||
| 104 | + | ------------------------------------------------------------------------ | |
| 105 | + | ||
| 106 | + | Si necesitas instalar la última release estable de fpc y, adicional y aisladamente, el compilador fpc del trunk entonces puedes leer la siguiente guía. | |
| 107 | + | ||
| 108 | + | Esto se escribió utilizando Gentoo, pero esta guía debería ser de utilidad para cualquier otra distro: [[Install fpc on Raspberry with Gentoo]] | |
| 109 | + | ||
| 110 | + | ## Accediendo a hardware externo | |
| 111 | + | ||
| 112 | + | <figure> | |
| 113 | + | <img src="rpi_pinout_all_50.png" title="Raspberry Pi pinout of external connectors" width="300" /> | |
| 114 | + | <figcaption>Raspberry Pi pinout of external connectors</figcaption> | |
| 115 | + | </figure> | |
| 116 | + | ||
| 117 | + | Una de las finalidades en el desarrollo de Raspberry Pi fue la de facilitar el acceso sin esfuerzo a dispositivos externos tales como sensores y actuadores. A nivel de sofware desde FreePascal y Lazarus además presenta varias modalidades de acceso de E/S (Entrada/Salida) / (I/O (Input/Output): | |
| 118 | + | ||
| 119 | + | 1. [[Lazarus on Raspberry Pi|Direct access]] Utilizando la unidad [[BaseUnix]]. | |
| 120 | + | 2. Acceso a través de [[Lazarus on Raspberry Pi|encapsulated shell calls]] | |
| 121 | + | 3. Acceso a través de [[Lazarus on Raspberry Pi|wiringPi library]]. | |
| 122 | + | 4. Acceso a través de la unidad [[Lazarus on Raspberry Pi|rpi_hal]]. | |
| 123 | + | 5. Acceso a través de la unidad [[Lazarus on Raspberry Pi|PiGpio]]. | |
| 124 | + | 6. Acceso a través de la librería [PascalIO](https://github.com/SAmeis/pascalio). | |
| 125 | + | 7. Acceso a través de la librería [PXL](http://asphyre.net/products/pxl). | |
| 126 | + | ||
| 127 | + | ### Acceso nativo al hardware | |
| 128 | + | ||
| 129 | + | 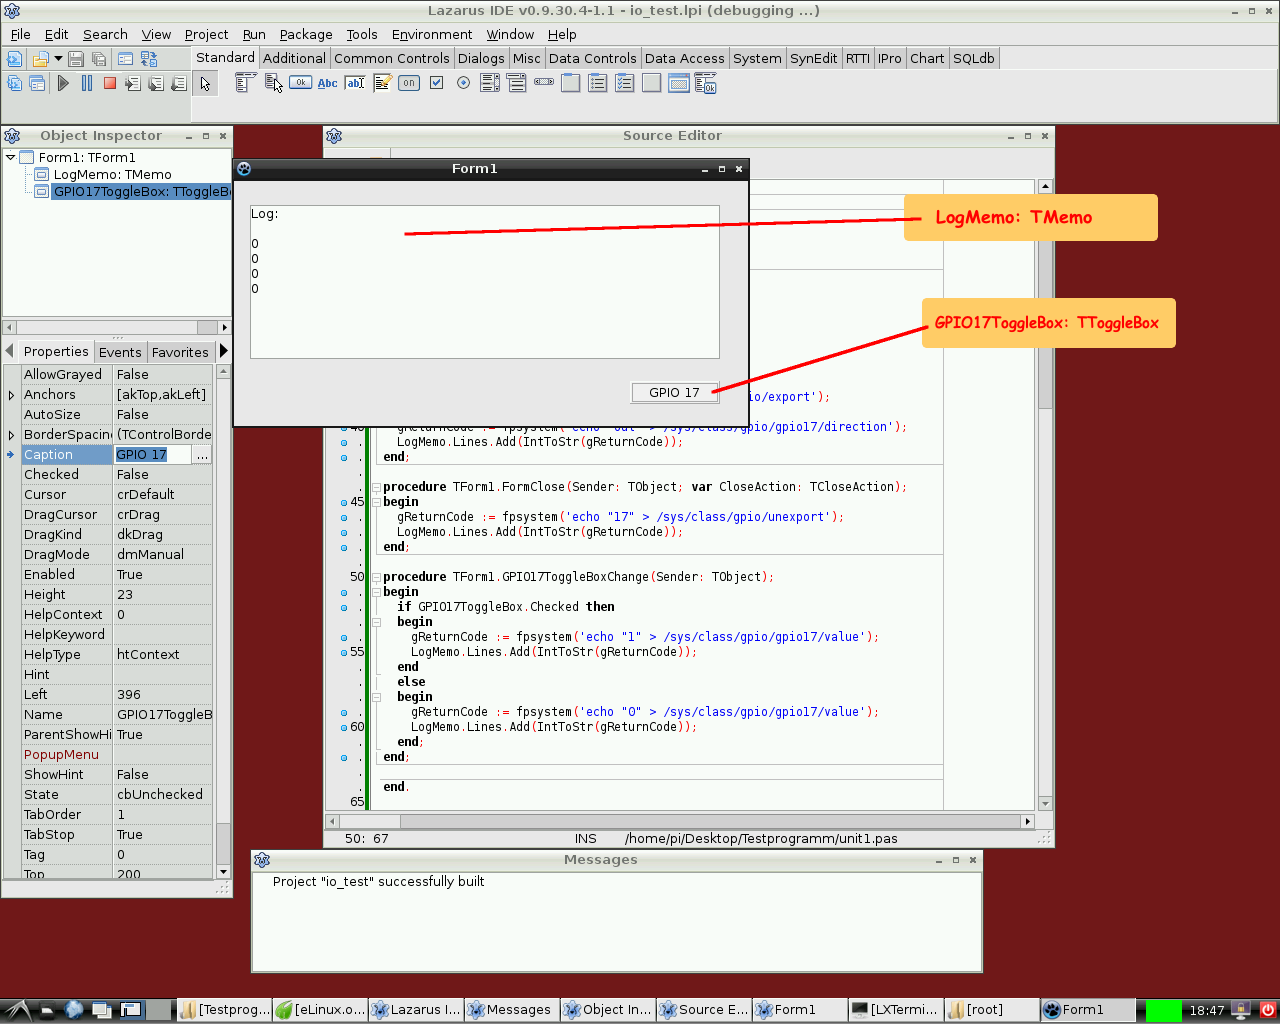 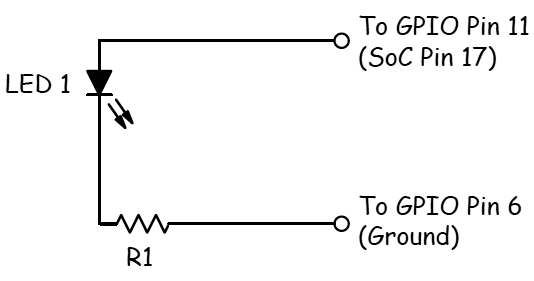 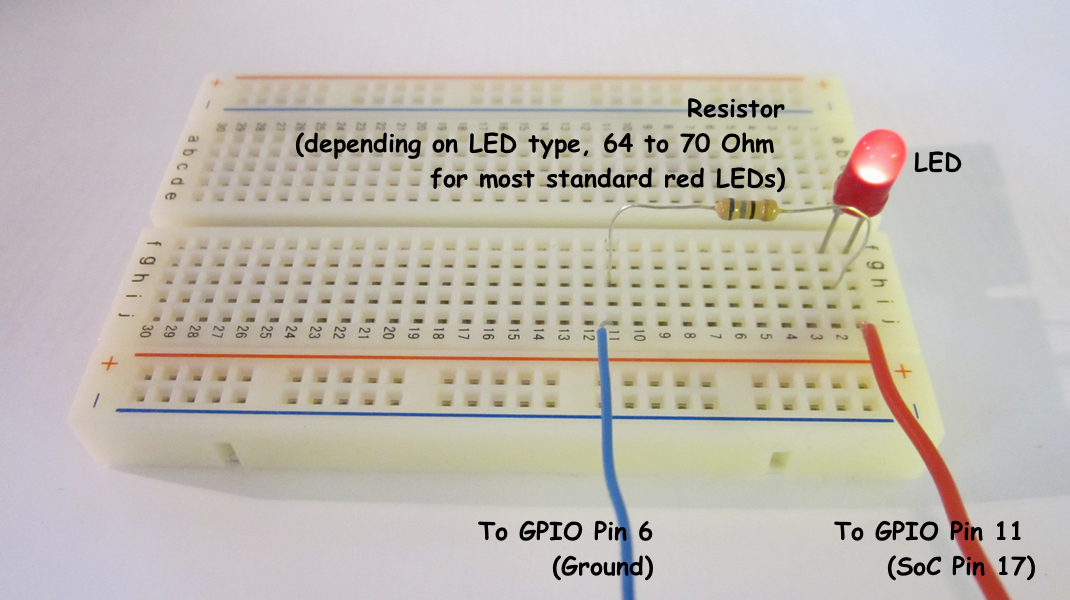 Este método provee acceso a hardware externo que no requiere librerías adicionales. El único requerimiento es la librería BaseUnix que es parte de la RTL de FreePascal. | |
| 130 | + | ||
| 131 | + | #### Conmutando un dispositivo a través de un puerto GPIO | |
| 132 | + | ||
| 133 | + | El siguiente ejemplo lista un programa simple que controla el pin 17 GPIO establecido como salida para conmutar el estado de un LED, transistor o relé. Este programa contiene un [[doc:lcl/stdctrls/ttogglebox.html|ToggleBox]] with name *GPIO17ToggleBox* y para logging retorna códigos a un [[doc:lcl/stdctrls/tmemo.html|TMemo]] llamado *LogMemo*. | |
| 134 | + | ||
| 135 | + | Para el ejemplo, el ánodo del LED se ha conectado al Pin 11 del conector Pi (que a su vez su correspondencia es con el pin 17 del chip BCM2835 SOC) y por otro lado el cátodo del LED se ha conectado al pin 6 del conector (que corresponde a masa (GND: Ground) pero poniendo una resistencia entre medias de 68 Ohm (R1 en el esquema) tal como se describió previamente por Upton and Halfacree (esto nos permite limitar convenientemente la intensidad que circula por el LED). Subsecuentemente el LED puede ser conmutado entre dos estados ON / OFF mediante el toggle box de la aplicación. | |
| 136 | + | ||
| 137 | + | El código puede requerir en un principio que se ejecute como root, i.e. adicionalmente con una cuenta tipo root (no recomendado) o a través del mandato **su** antepuesto al nombre del programa lo que nos promocionará el acceso como super usuario (su: super user). Una mejor opción es añadir el usuario con el que trabajemos a los grupos gpio, i2c y spi tal como se indica a continuación: | |
| 138 | + | ||
| 139 | + | ``` bash | |
| 140 | + | sudo adduser pi gpio | |
| 141 | + | sudo adduser pi i2c | |
| 142 | + | sudo adduser pi spi | |
| 143 | + | ``` | |
| 144 | + | ||
| 145 | + | *Unidad de control:* | |
| 146 | + | ||
| 147 | + | ``` pascal | |
| 148 | + | unit Unit1; | |
| 149 | + | ||
| 150 | + | {Demo application for GPIO on Raspberry Pi} | |
| 151 | + | {Inspired by the Python input/output demo application by Gareth Halfacree} | |
| 152 | + | {written for the Raspberry Pi User Guide, ISBN 978-1-118-46446-5} | |
| 153 | + | ||
| 154 | + | {$mode objfpc}{$H+} | |
| 155 | + | ||
| 156 | + | interface | |
| 157 | + | ||
| 158 | + | uses | |
| 159 | + | Classes, SysUtils, FileUtil, Forms, Controls, Graphics, Dialogs, StdCtrls, | |
| 160 | + | Unix, BaseUnix; | |
| 161 | + | ||
| 162 | + | type | |
| 163 | + | ||
| 164 | + | { TForm1 } | |
| 165 | + | ||
| 166 | + | TForm1 = class(TForm) | |
| 167 | + | LogMemo: TMemo; | |
| 168 | + | GPIO17ToggleBox: TToggleBox; | |
| 169 | + | procedure FormActivate(Sender: TObject); | |
| 170 | + | procedure FormClose(Sender: TObject; var CloseAction: TCloseAction); | |
| 171 | + | procedure GPIO17ToggleBoxChange(Sender: TObject); | |
| 172 | + | private | |
| 173 | + | { private declarations } | |
| 174 | + | public | |
| 175 | + | { public declarations } | |
| 176 | + | end; | |
| 177 | + | ||
| 178 | + | const | |
| 179 | + | PIN_17: PChar = '17'; | |
| 180 | + | PIN_ON: PChar = '1'; | |
| 181 | + | PIN_OFF: PChar = '0'; | |
| 182 | + | OUT_DIRECTION: PChar = 'out'; | |
| 183 | + | ||
| 184 | + | var | |
| 185 | + | Form1: TForm1; | |
| 186 | + | gReturnCode: longint; {stores the result of the IO operation} | |
| 187 | + | ||
| 188 | + | implementation | |
| 189 | + | ||
| 190 | + | {$R *.lfm} | |
| 191 | + | ||
| 192 | + | { TForm1 } | |
| 193 | + | ||
| 194 | + | procedure TForm1.FormActivate(Sender: TObject); | |
| 195 | + | var | |
| 196 | + | fileDesc: integer; | |
| 197 | + | begin | |
| 198 | + | { Prepare SoC pin 17 (pin 11 on GPIO port) for access: } | |
| 199 | + | try | |
| 200 | + | fileDesc := fpopen('/sys/class/gpio/export', O_WrOnly); | |
| 201 | + | gReturnCode := fpwrite(fileDesc, PIN_17[0], 2); | |
| 202 | + | LogMemo.Lines.Add(IntToStr(gReturnCode)); | |
| 203 | + | finally | |
| 204 | + | gReturnCode := fpclose(fileDesc); | |
| 205 | + | LogMemo.Lines.Add(IntToStr(gReturnCode)); | |
| 206 | + | end; | |
| 207 | + | { Set SoC pin 17 as output: } | |
| 208 | + | try | |
| 209 | + | fileDesc := fpopen('/sys/class/gpio/gpio17/direction', O_WrOnly); | |
| 210 | + | gReturnCode := fpwrite(fileDesc, OUT_DIRECTION[0], 3); | |
| 211 | + | LogMemo.Lines.Add(IntToStr(gReturnCode)); | |
| 212 | + | finally | |
| 213 | + | gReturnCode := fpclose(fileDesc); | |
| 214 | + | LogMemo.Lines.Add(IntToStr(gReturnCode)); | |
| 215 | + | end; | |
| 216 | + | end; | |
| 217 | + | ||
| 218 | + | procedure TForm1.FormClose(Sender: TObject; var CloseAction: TCloseAction); | |
| 219 | + | var | |
| 220 | + | fileDesc: integer; | |
| 221 | + | begin | |
| 222 | + | { Free SoC pin 17: } | |
| 223 | + | try | |
| 224 | + | fileDesc := fpopen('/sys/class/gpio/unexport', O_WrOnly); | |
| 225 | + | gReturnCode := fpwrite(fileDesc, PIN_17[0], 2); | |
| 226 | + | LogMemo.Lines.Add(IntToStr(gReturnCode)); | |
| 227 | + | finally | |
| 228 | + | gReturnCode := fpclose(fileDesc); | |
| 229 | + | LogMemo.Lines.Add(IntToStr(gReturnCode)); | |
| 230 | + | end; | |
| 231 | + | end; | |
| 232 | + | ||
| 233 | + | procedure TForm1.GPIO17ToggleBoxChange(Sender: TObject); | |
| 234 | + | var | |
| 235 | + | fileDesc: integer; | |
| 236 | + | begin | |
| 237 | + | if GPIO17ToggleBox.Checked then | |
| 238 | + | begin | |
| 239 | + | { Swith SoC pin 17 on: } | |
| 240 | + | try | |
| 241 | + | fileDesc := fpopen('/sys/class/gpio/gpio17/value', O_WrOnly); | |
| 242 | + | gReturnCode := fpwrite(fileDesc, PIN_ON[0], 1); | |
| 243 | + | LogMemo.Lines.Add(IntToStr(gReturnCode)); | |
| 244 | + | finally | |
| 245 | + | gReturnCode := fpclose(fileDesc); | |
| 246 | + | LogMemo.Lines.Add(IntToStr(gReturnCode)); | |
| 247 | + | end; | |
| 248 | + | end | |
| 249 | + | else | |
| 250 | + | begin | |
| 251 | + | { Switch SoC pin 17 off: } | |
| 252 | + | try | |
| 253 | + | fileDesc := fpopen('/sys/class/gpio/gpio17/value', O_WrOnly); | |
| 254 | + | gReturnCode := fpwrite(fileDesc, PIN_OFF[0], 1); | |
| 255 | + | LogMemo.Lines.Add(IntToStr(gReturnCode)); | |
| 256 | + | finally | |
| 257 | + | gReturnCode := fpclose(fileDesc); | |
| 258 | + | LogMemo.Lines.Add(IntToStr(gReturnCode)); | |
| 259 | + | end; | |
| 260 | + | end; | |
| 261 | + | end; | |
| 262 | + | ||
| 263 | + | end. | |
| 264 | + | ``` | |
| 265 | + | ||
| 266 | + | *Programa principal:* | |
| 267 | + | ||
| 268 | + | ``` pascal | |
| 269 | + | program io_test; | |
| 270 | + | ||
| 271 | + | {$mode objfpc}{$H+} | |
| 272 | + | ||
| 273 | + | uses | |
| 274 | + | {$IFDEF UNIX}{$IFDEF UseCThreads} | |
| 275 | + | cthreads, | |
| 276 | + | {$ENDIF}{$ENDIF} | |
| 277 | + | Interfaces, // this includes the LCL widgetset | |
| 278 | + | Forms, Unit1 | |
| 279 | + | { puedes añadir unidades después de esto }; | |
| 280 | + | ||
| 281 | + | {$R *.res} | |
| 282 | + | ||
| 283 | + | begin | |
| 284 | + | Application.Initialize; | |
| 285 | + | Application.CreateForm(TForm1, Form1); | |
| 286 | + | Application.Run; | |
| 287 | + | end. | |
| 288 | + | ``` | |
| 289 | + | ||
| 290 | + | #### Leyendo el estado de un pin | |
| 291 | + | ||
| 292 | + | 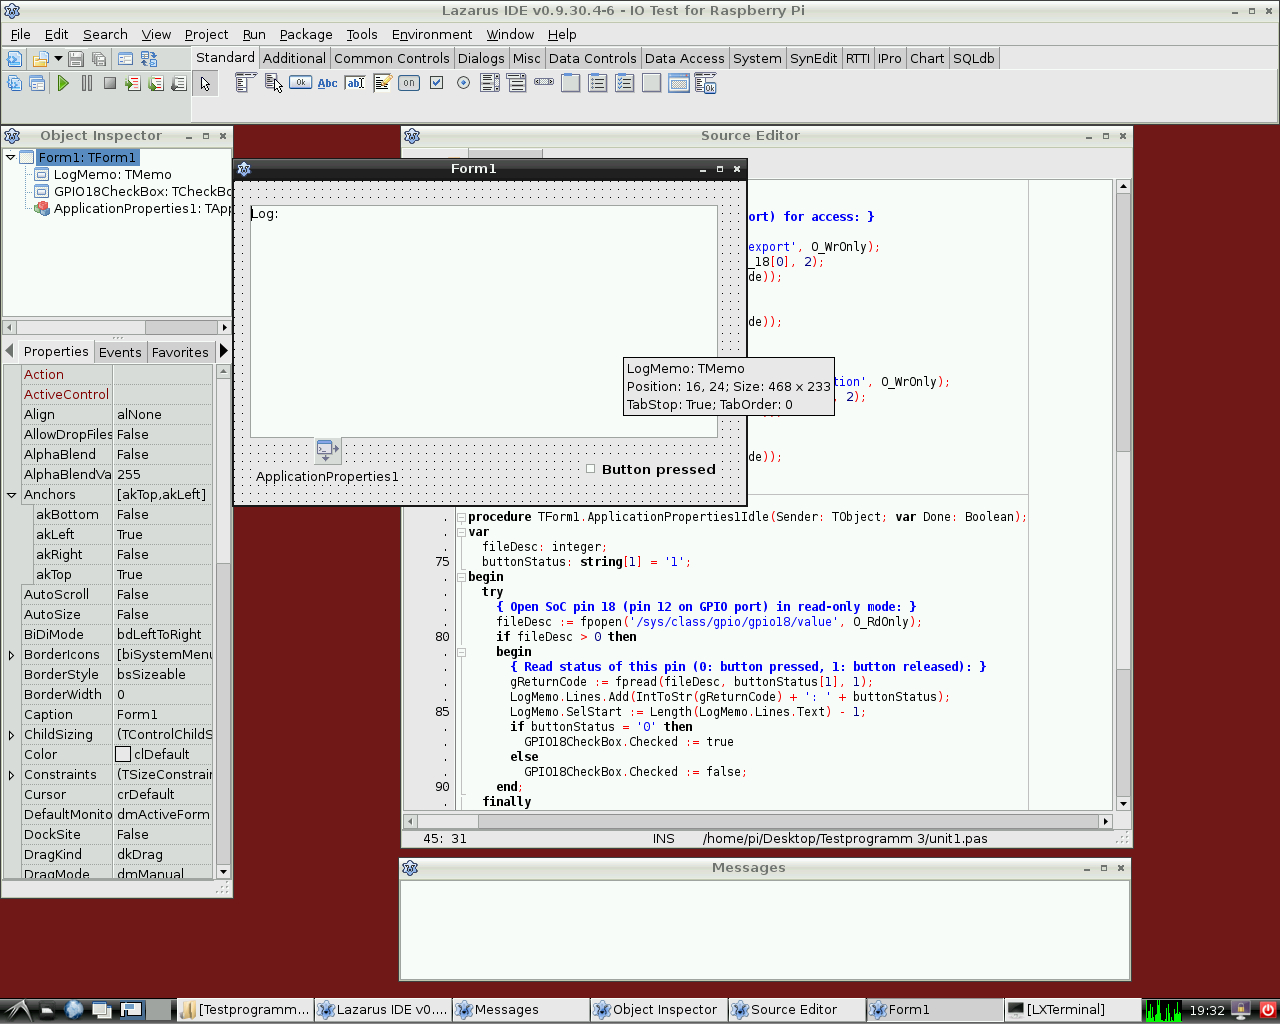 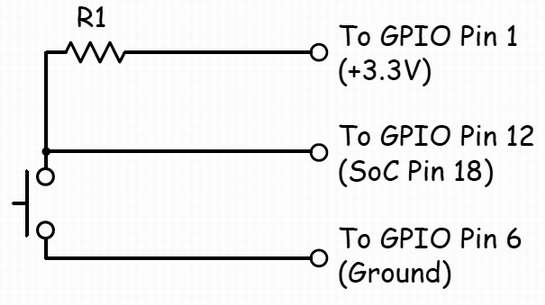 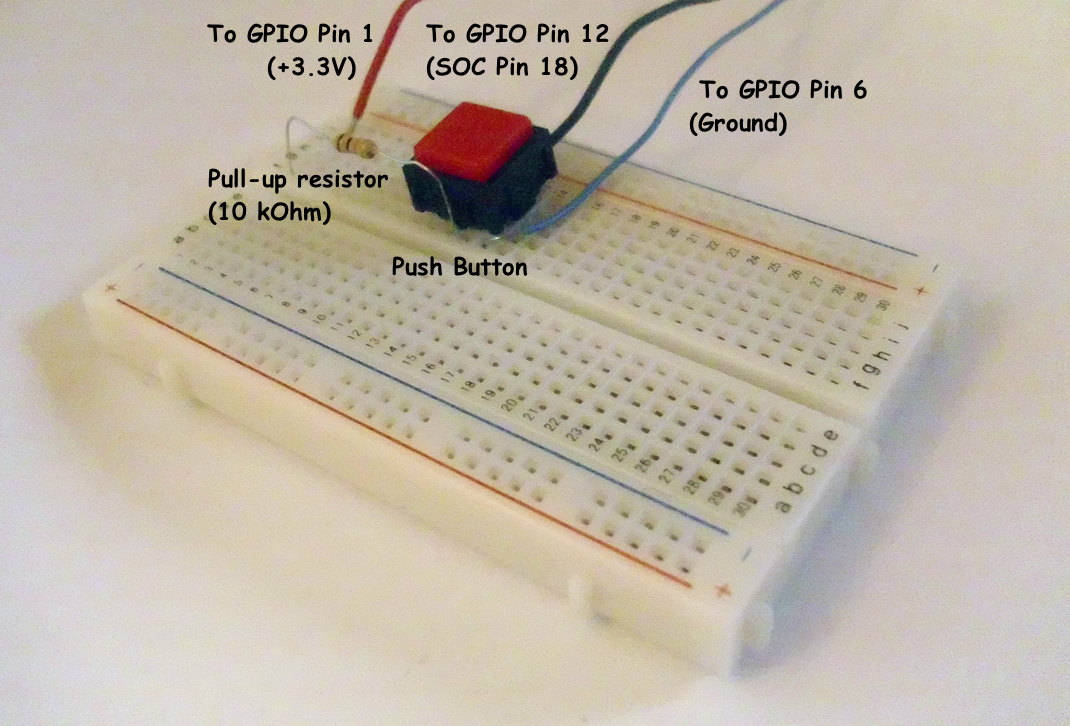 | |
| 293 | + | ||
| 294 | + | Por supuesto también es posible leer el estado de un pulsador conectado a un puerto GPIO (General Porpouse Inpunt Output). | |
| 295 | + | ||
| 296 | + | El siguiente ejemplo es muy similar al anterior. Controla el pin GPIO 18 como entrada para un dispositivo binario tal como un pulsador, un transistor o un relé. Este programa contiene un [[doc:lcl/stdctrls/tcheckbox.html|CheckBox]] con el nombre *GPIO18CheckBox* y un [[doc:lcl/stdctrls/tmemo.html|TMemo]] llamado *LogMemo* para los códigos retornados de logging. | |
| 297 | + | ||
| 298 | + | Para el ejemplo se ha conectado un pulsador al Pin 12 del conector de la Pi (correspondiente al pin GPIO 18 del SOC BCM2835) a través de una resistencia de 10 KOhm conectada al pin 1 (+3.3V, ver diagrama de cableado). El otro polo se ha cableado al pin 6 del conector (corresponde a la masa o GND). El programa detecta el estado del pulsador y commuta correlativamente a On u Off según el estado del mismo. | |
| 299 | + | ||
| 300 | + | Ten en cuenta que el potencial del pin 18 es "alto" (gracias a la conexión al pin 1 mediate la resistencia) si el pulsador está sin pulsar y "bajo" si se encuentra pulsado (porque en esta situación el pin 18 se encuentra conectado a masa (GND) a través del pulsador). Por tanto, el pin GPIO marca 0 si el botón está presionado y 1 si está sin pulsar. | |
| 301 | + | ||
| 302 | + | Este programa tiene que ser ejecutado también como usuario root. | |
| 303 | + | ||
| 304 | + | *Unidad de control:* | |
| 305 | + | ||
| 306 | + | ``` pascal | |
| 307 | + | unit Unit1; | |
| 308 | + | ||
| 309 | + | {Demo application for GPIO on Raspberry Pi} | |
| 310 | + | {Inspired by the Python input/output demo application by Gareth Halfacree} | |
| 311 | + | {written for the Raspberry Pi User Guide, ISBN 978-1-118-46446-5} | |
| 312 | + | ||
| 313 | + | {This application reads the status of a push-button} | |
| 314 | + | ||
| 315 | + | {$mode objfpc}{$H+} | |
| 316 | + | ||
| 317 | + | interface | |
| 318 | + | ||
| 319 | + | uses | |
| 320 | + | Classes, SysUtils, FileUtil, Forms, Controls, Graphics, Dialogs, StdCtrls, | |
| 321 | + | ButtonPanel, Unix, BaseUnix; | |
| 322 | + | ||
| 323 | + | type | |
| 324 | + | ||
| 325 | + | { TForm1 } | |
| 326 | + | ||
| 327 | + | TForm1 = class(TForm) | |
| 328 | + | ApplicationProperties1: TApplicationProperties; | |
| 329 | + | GPIO18CheckBox: TCheckBox; | |
| 330 | + | LogMemo: TMemo; | |
| 331 | + | procedure ApplicationProperties1Idle(Sender: TObject; var Done: Boolean); | |
| 332 | + | procedure FormActivate(Sender: TObject); | |
| 333 | + | procedure FormClose(Sender: TObject; var CloseAction: TCloseAction); | |
| 334 | + | private | |
| 335 | + | { private declarations } | |
| 336 | + | public | |
| 337 | + | { public declarations } | |
| 338 | + | end; | |
| 339 | + | ||
| 340 | + | const | |
| 341 | + | PIN_18: PChar = '18'; | |
| 342 | + | IN_DIRECTION: PChar = 'in'; | |
| 343 | + | ||
| 344 | + | var | |
| 345 | + | Form1: TForm1; | |
| 346 | + | gReturnCode: longint; {stores the result of the IO operation} | |
| 347 | + | ||
| 348 | + | implementation | |
| 349 | + | ||
| 350 | + | {$R *.lfm} | |
| 351 | + | ||
| 352 | + | { TForm1 } | |
| 353 | + | ||
| 354 | + | procedure TForm1.FormActivate(Sender: TObject); | |
| 355 | + | var | |
| 356 | + | fileDesc: integer; | |
| 357 | + | begin | |
| 358 | + | { Prepare SoC pin 18 (pin 12 on GPIO port) for access: } | |
| 359 | + | try | |
| 360 | + | fileDesc := fpopen('/sys/class/gpio/export', O_WrOnly); | |
| 361 | + | gReturnCode := fpwrite(fileDesc, PIN_18[0], 2); | |
| 362 | + | LogMemo.Lines.Add(IntToStr(gReturnCode)); | |
| 363 | + | finally | |
| 364 | + | gReturnCode := fpclose(fileDesc); | |
| 365 | + | LogMemo.Lines.Add(IntToStr(gReturnCode)); | |
| 366 | + | end; | |
| 367 | + | { Set SoC pin 18 as input: } | |
| 368 | + | try | |
| 369 | + | fileDesc := fpopen('/sys/class/gpio/gpio18/direction', O_WrOnly); | |
| 370 | + | gReturnCode := fpwrite(fileDesc, IN_DIRECTION[0], 2); | |
| 371 | + | LogMemo.Lines.Add(IntToStr(gReturnCode)); | |
| 372 | + | finally | |
| 373 | + | gReturnCode := fpclose(fileDesc); | |
| 374 | + | LogMemo.Lines.Add(IntToStr(gReturnCode)); | |
| 375 | + | end; | |
| 376 | + | end; | |
| 377 | + | ||
| 378 | + | procedure TForm1.ApplicationProperties1Idle(Sender: TObject; var Done: Boolean); | |
| 379 | + | var | |
| 380 | + | fileDesc: integer; | |
| 381 | + | buttonStatus: string[1] = '1'; | |
| 382 | + | begin | |
| 383 | + | try | |
| 384 | + | { Open SoC pin 18 (pin 12 on GPIO port) in read-only mode: } | |
| 385 | + | fileDesc := fpopen('/sys/class/gpio/gpio18/value', O_RdOnly); | |
| 386 | + | if fileDesc > 0 then | |
| 387 | + | begin | |
| 388 | + | { Read status of this pin (0: button pressed, 1: button released): } | |
| 389 | + | gReturnCode := fpread(fileDesc, buttonStatus[1], 1); | |
| 390 | + | LogMemo.Lines.Add(IntToStr(gReturnCode) + ': ' + buttonStatus); | |
| 391 | + | LogMemo.SelStart := Length(LogMemo.Lines.Text) - 1; | |
| 392 | + | if buttonStatus = '0' then | |
| 393 | + | GPIO18CheckBox.Checked := true | |
| 394 | + | else | |
| 395 | + | GPIO18CheckBox.Checked := false; | |
| 396 | + | end; | |
| 397 | + | finally | |
| 398 | + | { Close SoC pin 18 (pin 12 on GPIO port) } | |
| 399 | + | gReturnCode := fpclose(fileDesc); | |
| 400 | + | LogMemo.Lines.Add(IntToStr(gReturnCode)); | |
| 401 | + | LogMemo.SelStart := Length(LogMemo.Lines.Text) - 1; | |
| 402 | + | end; | |
| 403 | + | end; | |
| 404 | + | ||
| 405 | + | procedure TForm1.FormClose(Sender: TObject; var CloseAction: TCloseAction); | |
| 406 | + | var | |
| 407 | + | fileDesc: integer; | |
| 408 | + | begin | |
| 409 | + | { Free SoC pin 18: } | |
| 410 | + | try | |
| 411 | + | fileDesc := fpopen('/sys/class/gpio/unexport', O_WrOnly); | |
| 412 | + | gReturnCode := fpwrite(fileDesc, PIN_18[0], 2); | |
| 413 | + | LogMemo.Lines.Add(IntToStr(gReturnCode)); | |
| 414 | + | finally | |
| 415 | + | gReturnCode := fpclose(fileDesc); | |
| 416 | + | LogMemo.Lines.Add(IntToStr(gReturnCode)); | |
| 417 | + | end; | |
| 418 | + | end; | |
| 419 | + | ||
| 420 | + | end. | |
| 421 | + | ``` | |
| 422 | + | ||
| 423 | + | El programa main es idéntico al del ejemplo de arriba. | |
| 424 | + | ||
| 425 | + | ### Acceso hardware mediante llamadas encapsuladas del shell | |
| 426 | + | ||
| 427 | + | Otro modo de acceder al hardware es mediante el encapsulamiento de mandatos a través del shell. Esto se consigue mediante el uso de la función [[Executing External Programs|fpsystem]]. Este método permite el acceso a funciones que no están soportadas por la unidad BaseUnix. El siguiente código implementa un programa que tiene la misma funcionalidad que as the program resulting from the first listing above. | |
| 428 | + | ||
| 429 | + | *Controlling unit:* | |
| 430 | + | ||
| 431 | + | ``` pascal | |
| 432 | + | unit Unit1; | |
| 433 | + | ||
| 434 | + | {Demo application for GPIO on Raspberry Pi} | |
| 435 | + | {Inspired by the Python input/output demo application by Gareth Halfacree} | |
| 436 | + | {written for the Raspberry Pi User Guide, ISBN 978-1-118-46446-5} | |
| 437 | + | ||
| 438 | + | {$mode objfpc}{$H+} | |
| 439 | + | ||
| 440 | + | interface | |
| 441 | + | ||
| 442 | + | uses | |
| 443 | + | Classes, SysUtils, FileUtil, Forms, Controls, Graphics, Dialogs, StdCtrls, Unix; | |
| 444 | + | ||
| 445 | + | type | |
| 446 | + | ||
| 447 | + | { TForm1 } | |
| 448 | + | ||
| 449 | + | TForm1 = class(TForm) | |
| 450 | + | LogMemo: TMemo; | |
| 451 | + | GPIO17ToggleBox: TToggleBox; | |
| 452 | + | procedure FormActivate(Sender: TObject); | |
| 453 | + | procedure FormClose(Sender: TObject; var CloseAction: TCloseAction); | |
| 454 | + | procedure GPIO17ToggleBoxChange(Sender: TObject); | |
| 455 | + | private | |
| 456 | + | { private declarations } | |
| 457 | + | public | |
| 458 | + | { public declarations } | |
| 459 | + | end; | |
| 460 | + | ||
| 461 | + | var | |
| 462 | + | Form1: TForm1; | |
| 463 | + | gReturnCode: longint; {stores the result of the IO operation} | |
| 464 | + | ||
| 465 | + | implementation | |
| 466 | + | ||
| 467 | + | {$R *.lfm} | |
| 468 | + | ||
| 469 | + | { TForm1 } | |
| 470 | + | ||
| 471 | + | procedure TForm1.FormActivate(Sender: TObject); | |
| 472 | + | begin | |
| 473 | + | { Prepare SoC pin 17 (pin 11 on GPIO port) for access: } | |
| 474 | + | gReturnCode := fpsystem('echo "17" > /sys/class/gpio/export'); | |
| 475 | + | LogMemo.Lines.Add(IntToStr(gReturnCode)); | |
| 476 | + | { Set SoC pin 17 as output: } | |
| 477 | + | gReturnCode := fpsystem('echo "out" > /sys/class/gpio/gpio17/direction'); | |
| 478 | + | LogMemo.Lines.Add(IntToStr(gReturnCode)); | |
| 479 | + | end; | |
| 480 | + | ||
| 481 | + | procedure TForm1.FormClose(Sender: TObject; var CloseAction: TCloseAction); | |
| 482 | + | begin | |
| 483 | + | { Free SoC pin 17: } | |
| 484 | + | gReturnCode := fpsystem('echo "17" > /sys/class/gpio/unexport'); | |
| 485 | + | LogMemo.Lines.Add(IntToStr(gReturnCode)); | |
| 486 | + | end; | |
| 487 | + | ||
| 488 | + | procedure TForm1.GPIO17ToggleBoxChange(Sender: TObject); | |
| 489 | + | begin | |
| 490 | + | if GPIO17ToggleBox.Checked then | |
| 491 | + | begin | |
| 492 | + | { Swith SoC pin 17 on: } | |
| 493 | + | gReturnCode := fpsystem('echo "1" > /sys/class/gpio/gpio17/value'); | |
| 494 | + | LogMemo.Lines.Add(IntToStr(gReturnCode)); | |
| 495 | + | end | |
| 496 | + | else | |
| 497 | + | begin | |
| 498 | + | { Switch SoC pin 17 off: } | |
| 499 | + | gReturnCode := fpsystem('echo "0" > /sys/class/gpio/gpio17/value'); | |
| 500 | + | LogMemo.Lines.Add(IntToStr(gReturnCode)); | |
| 501 | + | end; | |
| 502 | + | end; | |
| 503 | + | ||
| 504 | + | end. | |
| 505 | + | ``` | |
| 506 | + | ||
| 507 | + | El programa main es idéntico al del ejemplo de arriba. Este programa necesita ejecutarse con privilegios de root también. | |
| 508 | + | ||
| 509 | + | ### Procedimientos y funciones de wiringPi | |
| 510 | + | ||
| 511 | + | Alex Schaller's wrapper unit for Gordon Henderson's Arduino compatible wiringPi library provides a numbering scheme that resembles that of Arduino boards. | |
| 512 | + | ||
| 513 | + | **Function wiringPiSetup:longint:** Initializes wiringPi system using the wiringPi pin numbering scheme. | |
| 514 | + | ||
| 515 | + | **Procedure wiringPiGpioMode(mode:longint):** Initializes wiringPi system with the Broadcom GPIO pin numbering scheme. | |
| 516 | + | ||
| 517 | + | **Procedure pullUpDnControl(pin:longint;** pud:longint): controls the internal pull-up/down resistors on a GPIO pin. | |
| 518 | + | ||
| 519 | + | **Procedure pinMode(pin:longint; mode:longint):** sets the mode of a pin to either INPUT, OUTPUT, or PWM_OUTPUT. | |
| 520 | + | ||
| 521 | + | **Procedure digitalWrite(pin:longint; value:longint):** sets an output bit. | |
| 522 | + | ||
| 523 | + | **Procedure pwmWrite(pin:longint; value:longint):** sets an output PWM value between 0 and 1024. | |
| 524 | + | ||
| 525 | + | **Function digitalRead(pin:longint):longint:** reads the value of a given Pin, returning 1 or 0. | |
| 526 | + | ||
| 527 | + | **Procedure delay(howLong:dword):** waits for at least howLong milliseconds. | |
| 528 | + | ||
| 529 | + | **Procedure delayMicroseconds(howLong:dword):** waits for at least howLong microseconds. | |
| 530 | + | ||
| 531 | + | **Function millis:dword:** returns the number of milliseconds since the program called one of the wiringPiSetup functions. | |
| 532 | + | ||
| 533 | + | ### rpi_hal-Hardware Abstraction Library (funciones y procedimientos GPIO, I2C y SPI de la librería de abstracción hardware de la RaspBerry Pi) | |
| 534 | + | ||
| 535 | + | Esta unidad con cerca de 1700 líneas de código aportada por Stefan Fischer, aporta procedimientos y funciones para acceso HW I2C, SPI y GPIO en la RaspBerry Pi: | |
| 536 | + | ||
| 537 | + | Justamente un extracto de los procedimientos y funciones disponibles: | |
| 538 | + | ||
| 539 | + | **procedure gpio_set_pin (pin:longword;highlevel:boolean);** { Establece RPi GPIO pin a nivel alto o bajo; Velocidad @ 700MHz -\> 0.65MHz } | |
| 540 | + | ||
| 541 | + | **function gpio_get_PIN (pin:longword):boolean;** { Get RPi GPIO pin Level is true when Pin level is '1'; false when '0'; Speed @ 700MHz -\> 1.17MHz } | |
| 542 | + | ||
| 543 | + | **procedure gpio_set_input (pin:longword);** { Establece RPi GPIO pin en modo entrada } | |
| 544 | + | ||
| 545 | + | **procedure gpio_set_output(pin:longword);** { Establece RPi GPIO pin en modo salida} | |
| 546 | + | ||
| 547 | + | **procedure gpio_set_alt (pin,altfunc:longword);** { Establece RPi GPIO pin to alternate function nr. 0..5 } | |
| 548 | + | ||
| 549 | + | **procedure gpio_set_gppud (mask:longword);** { Establece RPi GPIO Pull-up/down Register (GPPUD) with mask } | |
| 550 | + | ||
| 551 | + | ... | |
| 552 | + | ||
| 553 | + | **function rpi_snr :string;** { Emtrega el SNR: 0000000012345678 } | |
| 554 | + | ||
| 555 | + | **function rpi_hw :string;** { Entrega el tipo de procesador: BCM2708 } | |
| 556 | + | ||
| 557 | + | **function rpi_proc:string;** { ARMv6-compatible processor rev 7 (v6l) } | |
| 558 | + | ||
| 559 | + | ... | |
| 560 | + | ||
| 561 | + | **function i2c_bus_write(baseadr,reg:word; var <data:databuf_t>; lgt:byte; testnr:integer) : integer;** | |
| 562 | + | ||
| 563 | + | **function i2c_bus_read (baseadr,reg:word; var <data:databuf_t>; lgt:byte; testnr:integer) : integer;** | |
| 564 | + | ||
| 565 | + | **function i2c_string_read(baseadr,reg:word; var <data:databuf_t>; lgt:byte; testnr:integer) : string;** | |
| 566 | + | ||
| 567 | + | **function i2c_string_write(baseadr,reg:word; s:string; testnr:integer) : integer;** | |
| 568 | + | ||
| 569 | + | ... | |
| 570 | + | ||
| 571 | + | **procedure SPI_Write(devnum:byte; reg,data:word);** | |
| 572 | + | ||
| 573 | + | **function SPI_Read(devnum:byte; reg:word) : byte;** | |
| 574 | + | ||
| 575 | + | **procedure SPI_BurstRead2Buffer (devnum,start_reg:byte; xferlen:longword);** | |
| 576 | + | ||
| 577 | + | **procedure SPI_BurstWriteBuffer (devnum,start_reg:byte; xferlen:longword);** { Write 'len' Bytes from Buffer SPI Dev startig at address 'reg' } | |
| 578 | + | ||
| 579 | + | ... | |
| 580 | + | ||
| 581 | + | *Test Program (testrpi.pas):* | |
| 582 | + | ||
| 583 | + | ``` pascal | |
| 584 | + | //Progama simple de chequeo, el cual utiliza rpi_hal; | |
| 585 | + | ||
| 586 | + | program testrpi; | |
| 587 | + | uses rpi_hal; | |
| 588 | + | begin | |
| 589 | + | writeln('Show CPU-Info, RPI-HW-Info and Registers:'); | |
| 590 | + | rpi_show_all_info; | |
| 591 | + | writeln('Let Status LED Blink. Using GPIO functions:'); | |
| 592 | + | GPIO_PIN_TOGGLE_TEST; | |
| 593 | + | writeln('Test SPI Read function. (piggy back board with installed RFM22B Module is required!)'); | |
| 594 | + | Test_SPI; | |
| 595 | + | end. | |
| 596 | + | ``` | |
| 597 | + | ||
| 598 | + | ### Unidad nativa PiGpio de bajo nivel escrita en pascal (control GPIO en lugar de la librería c de wiringPi) | |
| 599 | + | ||
| 600 | + | *Esta unit (pigpio.pas[2](https://docs.google.com/file/d/0B-b-5ooIWPvGN1BIcEJzRDgyeUE/edit?usp=sharing)) de 270 líneas de código aportada por Gabor Szollosi, funciona muy rápido (para ex. GPIO pin output conmutando a una frecuencia de 8 MHz) :* | |
| 601 | + | ||
| 602 | + | ``` pascal | |
| 603 | + | ||
| 604 | + | unit PiGpio; | |
| 605 | + | { | |
| 606 | + | BCM2835 GPIO Registry Driver, also can use to manipulate cpu other registry areas | |
| 607 | + | ||
| 608 | + | This code is tested only Broadcom bcm2835 cpu, different arm cpus may need different | |
| 609 | + | gpio driver implementation | |
| 610 | + | ||
| 611 | + | 2013 Gabor Szollosi | |
| 612 | + | } | |
| 613 | + | {$mode objfpc}{$H+} | |
| 614 | + | ||
| 615 | + | interface | |
| 616 | + | ||
| 617 | + | uses | |
| 618 | + | Classes, SysUtils; | |
| 619 | + | ||
| 620 | + | const | |
| 621 | + | REG_GPIO = $3F000;// bcm2835 gpio register 0x2000 0000 (RPi1), 0x3F00 0000 (RPi2) | |
| 622 | + | // new fpMap uses page offset, one page is 4096 bytes = 0x1000 so simply calculate 0x2000 0000 / 0x1000 = 0x2000 0 | |
| 623 | + | PAGE_SIZE = 4096; | |
| 624 | + | BLOCK_SIZE = 4096; | |
| 625 | + | // The BCM2835 has 54 GPIO pins. | |
| 626 | + | // BCM2835 data sheet, Page 90 onwards. | |
| 627 | + | // There are 6 control registers, each control the functions of a block | |
| 628 | + | // of 10 pins. | |
| 629 | + | ||
| 630 | + | CLOCK_BASE = (REG_GPIO + $101); | |
| 631 | + | GPIO_BASE = (REG_GPIO + $200); | |
| 632 | + | GPIO_PWM = (REG_GPIO + $20C); | |
| 633 | + | ||
| 634 | + | INPUT = 0; | |
| 635 | + | OUTPUT = 1; | |
| 636 | + | PWM_OUTPUT = 2; | |
| 637 | + | LOW = False; | |
| 638 | + | HIGH = True; | |
| 639 | + | PUD_OFF = 0; | |
| 640 | + | PUD_DOWN = 1; | |
| 641 | + | PUD_UP = 2; | |
| 642 | + | ||
| 643 | + | // PWM | |
| 644 | + | ||
| 645 | + | PWM_CONTROL = 0; | |
| 646 | + | PWM_STATUS = 4; | |
| 647 | + | PWM0_RANGE = 16; | |
| 648 | + | PWM0_DATA = 20; | |
| 649 | + | PWM1_RANGE = 32; | |
| 650 | + | PWM1_DATA = 36; | |
| 651 | + | ||
| 652 | + | PWMCLK_CNTL = 160; | |
| 653 | + | PWMCLK_DIV = 164; | |
| 654 | + | ||
| 655 | + | PWM1_MS_MODE = $8000; // Run in MS mode | |
| 656 | + | PWM1_USEFIFO = $2000; // Data from FIFO | |
| 657 | + | PWM1_REVPOLAR = $1000; // Reverse polarity | |
| 658 | + | PWM1_OFFSTATE = $0800; // Ouput Off state | |
| 659 | + | PWM1_REPEATFF = $0400; // Repeat last value if FIFO empty | |
| 660 | + | PWM1_SERIAL = $0200; // Run in serial mode | |
| 661 | + | PWM1_ENABLE = $0100; // Channel Enable | |
| 662 | + | ||
| 663 | + | PWM0_MS_MODE = $0080; // Run in MS mode | |
| 664 | + | PWM0_USEFIFO = $0020; // Data from FIFO | |
| 665 | + | PWM0_REVPOLAR = $0010; // Reverse polarity | |
| 666 | + | PWM0_OFFSTATE = $0008; // Ouput Off state | |
| 667 | + | PWM0_REPEATFF = $0004; // Repeat last value if FIFO empty | |
| 668 | + | PWM0_SERIAL = $0002; // Run in serial mode | |
| 669 | + | PWM0_ENABLE = $0001; // Channel Enable | |
| 670 | + | ||
| 671 | + | type | |
| 672 | + | ||
| 673 | + | { TIoPort } | |
| 674 | + | ||
| 675 | + | TIoPort = class // IO bank object | |
| 676 | + | private // | |
| 677 | + | ||
| 678 | + | //function get_pinDirection(aPin: TGpIoPin): TGpioPinConf; | |
| 679 | + | ||
| 680 | + | public | |
| 681 | + | FGpio: ^LongWord; | |
| 682 | + | FClk: ^LongWord; | |
| 683 | + | FPwm: ^LongWord; | |
| 684 | + | procedure SetPinMode(gpin, mode: byte); | |
| 685 | + | function GetBit(gpin : byte):boolean;inline; // gets pin bit} | |
| 686 | + | procedure ClearBit(gpin : byte);inline;// write pin to 0 | |
| 687 | + | procedure SetBit(gpin : byte);inline;// write pin to 1 | |
| 688 | + | procedure SetPullMode(gpin, mode: byte); | |
| 689 | + | procedure PwmWrite(gpin : byte; value : LongWord);inline;// write pin to pwm value | |
| 690 | + | end; | |
| 691 | + | ||
| 692 | + | { TIoDriver } | |
| 693 | + | ||
| 694 | + | TIoDriver = class | |
| 695 | + | private | |
| 696 | + | ||
| 697 | + | public | |
| 698 | + | destructor Destroy;override; | |
| 699 | + | function MapIo:boolean;// creates io memory mapping | |
| 700 | + | procedure UnmapIoRegisrty(FMap: TIoPort);// close io memory mapping | |
| 701 | + | function CreatePort(PortGpio, PortClk, PortPwm: LongWord):TIoPort; // create new IO port | |
| 702 | + | end; | |
| 703 | + | ||
| 704 | + | var | |
| 705 | + | ||
| 706 | + | fd: integer;// /dev/mem file handle | |
| 707 | + | procedure delayNanoseconds (howLong : LongWord); | |
| 708 | + | ||
| 709 | + | implementation | |
| 710 | + | ||
| 711 | + | uses | |
| 712 | + | baseUnix, Unix; | |
| 713 | + | ||
| 714 | + | procedure delayNanoseconds (howLong : LongWord); | |
| 715 | + | var | |
| 716 | + | sleeper, dummy : timespec; | |
| 717 | + | begin | |
| 718 | + | sleeper.tv_sec := 0 ; | |
| 719 | + | sleeper.tv_nsec := howLong ; | |
| 720 | + | fpnanosleep (@sleeper,@dummy) ; | |
| 721 | + | end; | |
| 722 | + | { TIoDriver } | |
| 723 | + | //******************************************************************************* | |
| 724 | + | destructor TIoDriver.Destroy; | |
| 725 | + | begin | |
| 726 | + | inherited Destroy; | |
| 727 | + | end; | |
| 728 | + | //******************************************************************************* | |
| 729 | + | function TIoDriver.MapIo: boolean; | |
| 730 | + | begin | |
| 731 | + | Result := True; | |
| 732 | + | fd := fpopen('/dev/mem', O_RdWr or O_Sync); // Open the master /dev/memory device | |
| 733 | + | if fd < 0 then | |
| 734 | + | begin | |
| 735 | + | Result := False; // unsuccessful memory mapping | |
| 736 | + | end; | |
| 737 | + | // | |
| 738 | + | end; | |
| 739 | + | //******************************************************************************* | |
| 740 | + | procedure TIoDriver.UnmapIoRegisrty(FMap:TIoPort); | |
| 741 | + | begin | |
| 742 | + | if FMap.FGpio <> nil then | |
| 743 | + | begin | |
| 744 | + | fpMUnmap(FMap.FGpio,PAGE_SIZE); | |
| 745 | + | FMap.FGpio := Nil; | |
| 746 | + | end; | |
| 747 | + | if FMap.FClk <> nil then | |
| 748 | + | begin | |
| 749 | + | fpMUnmap(FMap.FClk,PAGE_SIZE); | |
| 750 | + | FMap.FClk := Nil; | |
| 751 | + | end; | |
| 752 | + | if FMap.FPwm <> nil then | |
| 753 | + | begin | |
| 754 | + | fpMUnmap(FMap.FPwm ,PAGE_SIZE); | |
| 755 | + | FMap.FPwm := Nil; | |
| 756 | + | end; | |
| 757 | + | end; | |
| 758 | + | //******************************************************************************* | |
| 759 | + | function TIoDriver.CreatePort(PortGpio, PortClk, PortPwm: LongWord): TIoPort; | |
| 760 | + | begin | |
| 761 | + | Result := TIoPort.Create;// new io port, pascal calls new fpMap, where offst is page sized 4096 bytes!!! | |
| 762 | + | Result.FGpio := FpMmap(Nil, PAGE_SIZE, PROT_READ or PROT_WRITE, MAP_SHARED, fd, PortGpio); // port config gpio memory | |
| 763 | + | Result.FClk:= FpMmap(Nil, PAGE_SIZE, PROT_READ or PROT_WRITE, MAP_SHARED, fd, PortClk);; // port clk | |
| 764 | + | Result.FPwm:= FpMmap(Nil, PAGE_SIZE, PROT_READ or PROT_WRITE, MAP_SHARED, fd, PortPwm);; // port pwm | |
| 765 | + | end; | |
| 766 | + | //******************************************************************************* | |
| 767 | + | procedure TIoPort.SetPinMode(gpin, mode: byte); | |
| 768 | + | var | |
| 769 | + | fSel, shift, alt : byte; | |
| 770 | + | gpiof, clkf, pwmf : ^LongWord; | |
| 771 | + | begin | |
| 772 | + | fSel := (gpin div 10)*4 ; //Select Gpfsel 0 to 5 register | |
| 773 | + | shift := (gpin mod 10)*3 ; //0-9 pin shift | |
| 774 | + | gpiof := Pointer(LongWord(Self.FGpio)+fSel); | |
| 775 | + | if (mode = INPUT) then | |
| 776 | + | gpiof^ := gpiof^ and ($FFFFFFFF - (7 shl shift)) //7 shl shift komplemens - Sets bits to zero = input | |
| 777 | + | else if (mode = OUTPUT) then | |
| 778 | + | begin | |
| 779 | + | gpiof^ := gpiof^ and ($FFFFFFFF - (7 shl shift)) or (1 shl shift); | |
| 780 | + | end | |
| 781 | + | else if (mode = PWM_OUTPUT) then | |
| 782 | + | begin | |
| 783 | + | Case gpin of | |
| 784 | + | 12,13,40,41,45 : alt:= 4 ; | |
| 785 | + | 18,19 : alt:= 2 ; | |
| 786 | + | else alt:= 0 ; | |
| 787 | + | end; | |
| 788 | + | If alt > 0 then | |
| 789 | + | begin | |
| 790 | + | gpiof^ := gpiof^ and ($FFFFFFFF - (7 shl shift)) or (alt shl shift); | |
| 791 | + | clkf := Pointer(LongWord(Self.FClk)+PWMCLK_CNTL); | |
| 792 | + | clkf^ := $5A000011 or (1 shl 5) ; //stop clock | |
| 793 | + | delayNanoseconds(200); | |
| 794 | + | clkf := Pointer(LongWord(Self.FClk)+PWMCLK_DIV); | |
| 795 | + | clkf^ := $5A000000 or (32 shl 12) ; // set pwm clock div to 32 (19.2/3 = 600KHz) | |
| 796 | + | clkf := Pointer(LongWord(Self.FClk)+PWMCLK_CNTL); | |
| 797 | + | clkf^ := $5A000011 ; //start clock | |
| 798 | + | Self.ClearBit(gpin); | |
| 799 | + | pwmf := Pointer(LongWord(Self.FPwm)+PWM_CONTROL); | |
| 800 | + | pwmf^ := 0 ; // Disable PWM | |
| 801 | + | delayNanoseconds(200); | |
| 802 | + | pwmf := Pointer(LongWord(Self.FPwm)+PWM0_RANGE); | |
| 803 | + | pwmf^ := $400 ; //max: 1023 | |
| 804 | + | delayNanoseconds(200); | |
| 805 | + | pwmf := Pointer(LongWord(Self.FPwm)+PWM1_RANGE); | |
| 806 | + | pwmf^ := $400 ; //max: 1023 | |
| 807 | + | delayNanoseconds(200); | |
| 808 | + | // Enable PWMs | |
| 809 | + | pwmf := Pointer(LongWord(Self.FPwm)+PWM0_DATA); | |
| 810 | + | pwmf^ := 0 ; //start value | |
| 811 | + | pwmf := Pointer(LongWord(Self.FPwm)+PWM1_DATA); | |
| 812 | + | pwmf^ := 0 ; //start value | |
| 813 | + | pwmf := Pointer(LongWord(Self.FPwm)+PWM_CONTROL); | |
| 814 | + | pwmf^ := PWM0_ENABLE or PWM1_ENABLE ; | |
| 815 | + | end; | |
| 816 | + | end; | |
| 817 | + | end; | |
| 818 | + | //******************************************************************************* | |
| 819 | + | procedure TIoPort.SetBit(gpin : byte); | |
| 820 | + | var | |
| 821 | + | gpiof : ^LongWord; | |
| 822 | + | begin | |
| 823 | + | gpiof := Pointer(LongWord(Self.FGpio) + 28 + (gpin shr 5) shl 2); | |
| 824 | + | gpiof^ := 1 shl gpin; | |
| 825 | + | end; | |
| 826 | + | //******************************************************************************* | |
| 827 | + | procedure TIoPort.ClearBit(gpin : byte); | |
| 828 | + | var | |
| 829 | + | gpiof : ^LongWord; | |
| 830 | + | begin | |
| 831 | + | gpiof := Pointer(LongWord(Self.FGpio) + 40 + (gpin shr 5) shl 2); | |
| 832 | + | gpiof^ := 1 shl gpin; | |
| 833 | + | end; | |
| 834 | + | //******************************************************************************* | |
| 835 | + | function TIoPort.GetBit(gpin : byte):boolean; | |
| 836 | + | var | |
| 837 | + | gpiof : ^LongWord; | |
| 838 | + | begin | |
| 839 | + | gpiof := Pointer(LongWord(Self.FGpio) + 52 + (gpin shr 5) shl 2); | |
| 840 | + | if (gpiof^ and (1 shl gpin)) = 0 then Result := False else Result := True; | |
| 841 | + | end; | |
| 842 | + | //******************************************************************************* | |
| 843 | + | procedure TIoPort.SetPullMode(gpin, mode: byte); | |
| 844 | + | var | |
| 845 | + | pudf, pudclkf : ^LongWord; | |
| 846 | + | begin | |
| 847 | + | pudf := Pointer(LongWord(Self.FGpio) + 148 ); | |
| 848 | + | pudf^ := mode; //mode = 0, 1, 2 :Off, Down, Up | |
| 849 | + | delayNanoseconds(200); | |
| 850 | + | pudclkf := Pointer(LongWord(Self.FGpio) + 152 + (gpin shr 5) shl 2); | |
| 851 | + | pudclkf^ := 1 shl gpin ; | |
| 852 | + | delayNanoseconds(200); | |
| 853 | + | pudf^ := 0 ; | |
| 854 | + | pudclkf^ := 0 ; | |
| 855 | + | end; | |
| 856 | + | //******************************************************************************* | |
| 857 | + | procedure TIoPort.PwmWrite(gpin : byte; value : Longword); | |
| 858 | + | var | |
| 859 | + | pwmf : ^LongWord; | |
| 860 | + | port : byte; | |
| 861 | + | begin | |
| 862 | + | Case gpin of | |
| 863 | + | 12,18,40 : port:= PWM0_DATA ; | |
| 864 | + | 13,19,41,45 : port:= PWM1_DATA ; | |
| 865 | + | else exit; | |
| 866 | + | end; | |
| 867 | + | pwmf := Pointer(LongWord(Self.FPwm) + port); | |
| 868 | + | pwmf^ := value and $FFFFFBFF; // $400 complemens | |
| 869 | + | end; | |
| 870 | + | //******************************************************************************* | |
| 871 | + | end. | |
| 872 | + | ``` | |
| 873 | + | ||
| 874 | + | *Controlling Lazarus unit:(Project files[3](https://drive.google.com/folderview?id=0B-b-5ooIWPvGU043ZTZ0cUc2YkE&usp=sharing))* | |
| 875 | + | ||
| 876 | + | ``` pascal | |
| 877 | + | unit Unit1; | |
| 878 | + | ||
| 879 | + | {Demo application for GPIO on Raspberry Pi} | |
| 880 | + | {Inspired by the Python input/output demo application by Gareth Halfacree} | |
| 881 | + | {written for the Raspberry Pi User Guide, ISBN 978-1-118-46446-5} | |
| 882 | + | ||
| 883 | + | {$mode objfpc}{$H+} | |
| 884 | + | ||
| 885 | + | interface | |
| 886 | + | ||
| 887 | + | uses | |
| 888 | + | Classes, SysUtils, FileUtil, Forms, Controls, Graphics, Dialogs, StdCtrls, | |
| 889 | + | ExtCtrls, Unix, PiGpio; | |
| 890 | + | ||
| 891 | + | type | |
| 892 | + | ||
| 893 | + | { TForm1 } | |
| 894 | + | ||
| 895 | + | TForm1 = class(TForm) | |
| 896 | + | GPIO25In: TButton; | |
| 897 | + | SpeedButton: TButton; | |
| 898 | + | LogMemo: TMemo; | |
| 899 | + | GPIO23switch: TToggleBox; | |
| 900 | + | Timer1: TTimer; | |
| 901 | + | GPIO18Pwm: TToggleBox; | |
| 902 | + | Direction: TToggleBox; | |
| 903 | + | procedure DirectionChange(Sender: TObject); | |
| 904 | + | procedure GPIO18PwmChange(Sender: TObject); | |
| 905 | + | procedure GPIO25InClick(Sender: TObject); | |
| 906 | + | procedure FormActivate(Sender: TObject); | |
| 907 | + | procedure FormClose(Sender: TObject; var CloseAction: TCloseAction); | |
| 908 | + | procedure GPIO23switchChange(Sender: TObject); | |
| 909 | + | procedure SpeedButtonClick(Sender: TObject); | |
| 910 | + | procedure Timer1Timer(Sender: TObject); | |
| 911 | + | private | |
| 912 | + | { private declarations } | |
| 913 | + | public | |
| 914 | + | { public declarations } | |
| 915 | + | end; | |
| 916 | + | ||
| 917 | + | const | |
| 918 | + | INPUT = 0; | |
| 919 | + | OUTPUT = 1; | |
| 920 | + | PWM_OUTPUT = 2; | |
| 921 | + | LOW = False; | |
| 922 | + | HIGH = True; | |
| 923 | + | PUD_OFF = 0; | |
| 924 | + | PUD_DOWN = 1; | |
| 925 | + | PUD_UP = 2; | |
| 926 | + | // Convert Raspberry Pi P1 pins (Px) to GPIO port | |
| 927 | + | P3 = 0; | |
| 928 | + | P5 = 1; | |
| 929 | + | P7 = 4; | |
| 930 | + | P8 = 14; | |
| 931 | + | P10 = 15; | |
| 932 | + | P11 = 17; | |
| 933 | + | P12 = 18; | |
| 934 | + | P13 = 21; | |
| 935 | + | P15 = 22; | |
| 936 | + | P16 = 23; | |
| 937 | + | P18 = 24; | |
| 938 | + | P19 = 10; | |
| 939 | + | P21 = 9; | |
| 940 | + | P22 = 25; | |
| 941 | + | P23 = 11; | |
| 942 | + | P24 = 8; | |
| 943 | + | P26 = 7; | |
| 944 | + | ||
| 945 | + | var | |
| 946 | + | Form1: TForm1; | |
| 947 | + | GPIO_Driver: TIoDriver; | |
| 948 | + | GpF: TIoPort; | |
| 949 | + | PWM :Boolean; | |
| 950 | + | i, d : integer; | |
| 951 | + | Pin,Pout,Ppwm : byte; | |
| 952 | + | ||
| 953 | + | implementation | |
| 954 | + | ||
| 955 | + | {$R *.lfm} | |
| 956 | + | ||
| 957 | + | { TForm1 } | |
| 958 | + | ||
| 959 | + | procedure TForm1.FormActivate(Sender: TObject); | |
| 960 | + | begin | |
| 961 | + | if not GPIO_Driver.MapIo then | |
| 962 | + | begin | |
| 963 | + | LogMemo.Lines.Add('Error mapping gpio registry'); | |
| 964 | + | end | |
| 965 | + | else | |
| 966 | + | begin | |
| 967 | + | GpF := GpIo_Driver.CreatePort(GPIO_BASE, CLOCK_BASE, GPIO_PWM); | |
| 968 | + | end ; | |
| 969 | + | Timer1.Enabled:= True; | |
| 970 | + | Timer1.Interval:= 25; //25 ms controll interval | |
| 971 | + | Pin := P22; | |
| 972 | + | Pout := P16; | |
| 973 | + | Ppwm := P12; | |
| 974 | + | i:=1; | |
| 975 | + | GpF.SetPinMode(Pout,OUTPUT); | |
| 976 | + | GpF.SetPinMode(Pin,INPUT); | |
| 977 | + | GpF.SetPullMode(Pin,PUD_Up); // Input PullUp High level | |
| 978 | + | end; | |
| 979 | + | ||
| 980 | + | procedure TForm1.GPIO25InClick(Sender: TObject); | |
| 981 | + | begin | |
| 982 | + | If GpF.GetBit(Pin) then LogMemo.Lines.Add('In: '+IntToStr(1)) | |
| 983 | + | else LogMemo.Lines.Add('In: '+IntToStr(0)); | |
| 984 | + | end; | |
| 985 | + | ||
| 986 | + | procedure TForm1.GPIO18PwmChange(Sender: TObject); | |
| 987 | + | begin | |
| 988 | + | if GPIO18Pwm.Checked then | |
| 989 | + | begin | |
| 990 | + | GpF.SetPinMode(Ppwm,PWM_OUTPUT); | |
| 991 | + | PWM := True; //PWM on | |
| 992 | + | end | |
| 993 | + | else | |
| 994 | + | begin | |
| 995 | + | GpF.SetPinMode(Ppwm,INPUT); | |
| 996 | + | PWM := False; //PWM off | |
| 997 | + | end; | |
| 998 | + | end; | |
| 999 | + | ||
| 1000 | + | procedure TForm1.DirectionChange(Sender: TObject); | |
| 1001 | + | begin | |
| 1002 | + | if Direction.Checked then d:=10 else d:=-10; | |
| 1003 | + | end; | |
| 1004 | + | ||
| 1005 | + | ||
| 1006 | + | procedure TForm1.FormClose(Sender: TObject; var CloseAction: TCloseAction); | |
| 1007 | + | begin | |
| 1008 | + | GpF.SetPinMode(Ppwm,INPUT); | |
| 1009 | + | GpF.ClearBit(Pout); | |
| 1010 | + | GpIo_Driver.UnmapIoRegisrty(GpF); | |
| 1011 | + | end; | |
| 1012 | + | ||
| 1013 | + | procedure TForm1.GPIO23switchChange(Sender: TObject); | |
| 1014 | + | ||
| 1015 | + | Begin | |
| 1016 | + | Timer1.Enabled := False; | |
| 1017 | + | if GPIO23switch.Checked then | |
| 1018 | + | begin | |
| 1019 | + | GpF.SetBit(Pout); //Turn LED on | |
| 1020 | + | end | |
| 1021 | + | else | |
| 1022 | + | begin | |
| 1023 | + | GpF.ClearBit(Pout); //Turn LED off | |
| 1024 | + | end; | |
| 1025 | + | Timer1.Enabled := True; | |
| 1026 | + | end; | |
| 1027 | + | ||
| 1028 | + | procedure TForm1.SpeedButtonClick(Sender: TObject); | |
| 1029 | + | var | |
| 1030 | + | i,p,k,v: longint; | |
| 1031 | + | ido:TDateTime; | |
| 1032 | + | begin | |
| 1033 | + | ido:= Time; | |
| 1034 | + | k:= TimeStampToMSecs(DateTimeToTimeStamp(ido)); | |
| 1035 | + | LogMemo.Lines.Add('Start: '+TimeToStr(ido)); | |
| 1036 | + | p:=10000000 ; | |
| 1037 | + | For i:=1 to p do Begin | |
| 1038 | + | GpF.SetBit(P16); | |
| 1039 | + | GpF.ClearBit(P16); | |
| 1040 | + | end; | |
| 1041 | + | ido:= Time; | |
| 1042 | + | v:= TimeStampToMSecs(DateTimeToTimeStamp(ido)); | |
| 1043 | + | LogMemo.Lines.Add('Stop: '+TimeToStr(ido)+' Frequency: '+ | |
| 1044 | + | IntToStr(p div (v-k))+' kHz'); | |
| 1045 | + | end; | |
| 1046 | + | ||
| 1047 | + | procedure TForm1.Timer1Timer(Sender: TObject); | |
| 1048 | + | begin | |
| 1049 | + | If PWM then Begin | |
| 1050 | + | If (d > 0) and (i+d < 1024) then begin | |
| 1051 | + | i:=i+d; | |
| 1052 | + | GpF.PwmWrite(Ppwm,i); | |
| 1053 | + | end ; | |
| 1054 | + | If (d < 0) and (i+d > -1) then begin | |
| 1055 | + | i:=i+d; | |
| 1056 | + | GpF.PwmWrite(Ppwm,i); | |
| 1057 | + | end; | |
| 1058 | + | end; | |
| 1059 | + | end; | |
| 1060 | + | ||
| 1061 | + | ||
| 1062 | + | end. | |
| 1063 | + | ``` | |
| 1064 | + | ||
| 1065 | + | ### PXL (Platform eXtended Library) for low level native access to GPIO, I²C, SPI, PWM, UART, V4L2, displays and sensors | |
| 1066 | + | ||
| 1067 | + | - Fácil y rápido acceso a GPIO, I²C, SPI, PWM, UART y timer de alta preción de la CPU. | |
| 1068 | + | - V4L2 captura de video/imagen utilizando los conectores dedicados de la placa y cámaras USB. Por ejemplo cámaras serie como VC0706 y LSY201. | |
| 1069 | + | - OpenGL ES hardware de renderizado con y sin servidor X. Software de renderizado. | |
| 1070 | + | - Pantallas I²C y SPI tales como SSD1306, SSD1351, PCB8544 (Nokia), HX8357 y ILI9340. | |
| 1071 | + | - LCD de caracteres con cableado de pines directo. | |
| 1072 | + | - Suporte para software SPI y UART (bit-banging). | |
| 1073 | + | - Suporte para SC16IS7x0 (controladora UART conectada a través de I²C o SPI), incluyendo pins GPIO extra. | |
| 1074 | + | - Soporte para sensores tales como BMP180, DHT22, L3GD20, LSM303 y SHT10. | |
| 1075 | + | - Otras características como networking, math, transformación de imágenes, efectos, dibujo de primitivas gráficas... | |
| 1076 | + | ||
| 1077 | + | *Más información y descargas de la [librería PXL](http://asphyre.net/products/pxl).* | |
| 1078 | + | ||
| 1079 | + | ## Referencias | |
| 1080 | + | ||
| 1081 | + | - Eben Upton and Gareth Halfacree. Raspberry Pi User Guide. John Wiley and Sons, Chichester 2012, ISBN 111846446X | |
| 1082 | + | - B. J. Rao (2013) The Raspberry Pi, Pi Vision and Lazarus/FPC. [Blaise Pascal Magazine](http://www.blaisepascal.eu). 29: 14-21. | |
| 1083 | + | ||
| 1084 | + | ## External Links | |
| 1085 | + | ||
| 1086 | + | - [Raspberry Pi Foundation](http://www.raspberrypi.org) | |
| 1087 | + | - [Raspberry Pi Spy: Raspberry Pi tutorials, scripts, help and downloads](http://www.raspberrypi-spy.co.uk) | |
| 1088 | + | - [Lazarus wrapper unit for Gordon Henderson's wiringPi C library](http://www.lazarus.freepascal.org/index.php/topic,17404.0.html) | |
| 1089 | + | - [Pin layout of the wiringPi library](https://projects.drogon.net/raspberry-pi/wiringpi/pins/) | |
| 1090 | + | - [Additional information on Lazarus and Raspberry Pi at eLinux.org](http://www.elinux.org/Lazarus_on_RPi) | |
| 1091 | + | - [Getting Started with Pascal on the Pi](http://www.pp4s.co.uk/main/gs-pi-intro.html) | |
| 1092 | + | - [Lazberry Pi: Comprehensive information on Lazarus on the Raspberry Pi computer](http://superbitysoft.co.uk/lazberrypi/). | |
| 1093 | + | - [Stefan Fischer's Lazarus unit rpi_hal](http://www.lazarus.freepascal.org/index.php/topic,20991.0.html). | |
| 1094 | + | - [Improved Lazarus Unit for fast access to GPIO](http://www.meltonisl.com/software.html). | |
| 1095 | + | - [PXL - Platform eXtended Library](http://asphyre.net/products/pxl). | |
| 1096 | + | ||
| 1097 | + | --- | |
| 1098 | + | *From the Free Pascal wiki, page "Lazarus on Raspberry Pi/es", as it stood on 2020-02-19 after a change by Trev, out of the wiki's dump of 2024-05-26. Copyright stays with the author who wrote it, according to the old wiki's [[Licensing]] page. If you have concerns about this material, [message the admin](/wiki-contact).* |