

Lazarus Tutorial Part 2: what changed
Revision 1 to 2. Removed lines have a minus sign; added lines have a plus sign.
| Old | New | Line | |
|---|---|---|---|
| 1 | 1 | This is part 2 of the [[Lazarus Tutorial]]. | |
| 2 | 2 | ||
| 3 | 3 | ## A simple text editor | |
| 4 | 4 | ||
| 5 | 5 | The second part of the tutorial features a small but useful program to show some of the possibilities and techniques to create an application with Lazarus. This part is more comprehensive in comparison to [[Lazarus Tutorial|part one]] assuming that the previous topics are already understood. | |
| 6 | 6 | ||
| 7 | 7 | The application will be a very simple text editor. Create a new project and save it. Populate the *Form1* with the components as you see in the picture below. These are four *TButtons*, a *TMemo*, a *TOpenDialog*, a *TSaveDialog* and a *TFontDialog*. Give the components proper names by changing each 'name' property in the [[IDE Window: Object Inspector|Object Inspector]]. For the buttons names *ButtonFileOpen*, *ButtonFileSave*, *ButtonFont* and *ButtonNew* are used in this tutorial, the memo and the dialogs keep their original names. Adjust the captions of the buttons to fit to the picture. | |
| 8 | 8 | ||
| 9 | - | ||
| 10 | - | ||
| 11 | - | ||
| 12 | - | ||
| 9 | + | 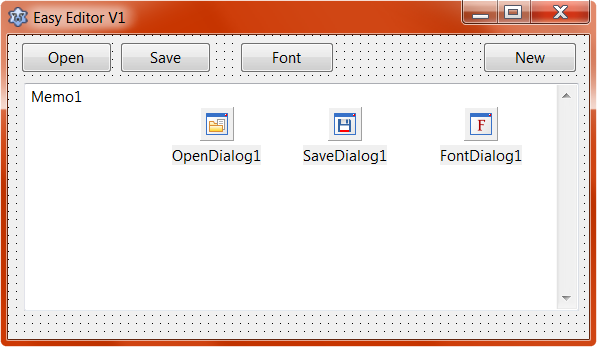 | |
| 13 | 10 | ||
| 14 | 11 | Change the anchors of each control (controls are the visual components) by clicking the control and opening the anchor editor in the [[IDE Window: Object Inspector|Object Inspector]] at the property *Anchors* by clicking the ... ellipsis. The anchors define which side of the form (actually the parent control) the control will stick to, or if it should adjust its size according to the size of the Form. The last is done by setting both anchors of one direction (eg the left+right anchors). *Memo1* should stretch itself in both directions when the Form size is increased, so all four anchors should be set. The *ButtonNew* should be right aligned, so deactivate its left anchor and activate the right anchor in the anchor editor. | |
| 15 | 12 | ||
| 16 | - | ||
| 13 | + | You can compile and run the project now by pressing `F9`. Change the size of the application by dragging its border and see if the controls move or stay as you would expect it. You can close the application by simply clicking the x or with the key combination `Ctrl+F2`. Or, which is the same, pressing the squared stop button in the [[Main menu|Lazarus menu]]. | |
| 17 | 14 | ||
| 18 | 15 | The above described 'movement' of the controls when dragging the application border can result in overlapping controls. This can be prevented by constraining the size of the form to a minimum width and height. That is done in the [[IDE Window: Object Inspector|Object Inspector]] for *Form1* in the item *Constraints*. Choose adequate values for a minimum height and a minimum width. Size constraints are available for all controls and are very useful in combination with anchoring and autosize properties. | |
| 19 | 16 | ||
| 20 | 17 | Now we should add some actual functionality to our application. Create an event handler for the *ButtonFileOpen*, by going to the Events tab in the [[IDE Window: Object Inspector|Object Inspector]], go to the *OnClick* event and press the ... ellipsis OR just double-click on the control on the form editor. The editor window shows up and you can see the event handler *ButtonFileOpenClick*. Copy the code below so that the event handler procedure looks as follows: | |
| 21 | 18 | ||
| 22 | 19 | ``` pascal | |
| 23 | 20 | procedure TForm1.ButtonFileOpenClick(Sender:TObject); | |
| 24 | 21 | var FileData: TStringList; | |
| 25 | 22 | begin | |
| 26 | 23 | if OpenDialog1.Execute then begin | |
| 27 | 24 | //Create the Stringlist so we can use it | |
| 28 | 25 | FileData:= TStringList.Create; | |
| 29 | 26 | //Load the Data from the file that was chosen with the file dialog | |
| 30 | 27 | FileData.LoadFromFile(OpenDialog1.FileName); | |
| 31 | 28 | //Copy loaded data to the Memo | |
| 32 | 29 | Memo1.Lines.Assign(FileData); | |
| 33 | 30 | //Enable the control | |
| 34 | 31 | Memo1.Enabled:= true; | |
| 35 | 32 | //Destroy the string list so that it doesn't further use memory space | |
| 36 | 33 | FileData.Free; | |
| 37 | 34 | end; | |
| 38 | 35 | ||
| 39 | 36 | end; | |
| 40 | 37 | ``` | |
| 41 | 38 | ||
| 42 | - | ||
| 39 | + | Press `F9` to compile and run the project and test the new functionality by pressing the button *Open*. A file open dialog appears and you can choose a file anywhere in your file system. It would be best if you already prepared a test file, but you also can just choose one of the project files. Be sure that it is a text file (like a .pas source file or similar). Press *OK* and the file is displayed in the memo. You already loaded a file! You even can modify it by clicking and typing! | |
| 43 | 40 | ||
| 44 | 41 | Let’s explain some of the code: *OpenDialog1.Execute* is a function that shows the dialog and blocks the application as long as the dialog stays open. When the user clicks *OK* or *Abort* to close the dialog, then the function will return to that place and return the value true if a file was chosen and the value false if the dialog was aborted. So that the following block is only processed, if a file was chosen. | |
| 45 | 42 | ||
| 46 | 43 | With `FileData := TStringList.Create;` we create an instance of the class *TStringList*, this is - as the name says - a list of strings. Into this string list we will load the file data, which is done in the next statement with `FileData.LoadFromFile`. The file name we can read from the open dialog property *FileName*. Now the file is already loaded into the string list. The memo contains a property *Lines* of the type *TString*, which is very similar to a string list. | |
| 47 | 44 | ||
| 48 | 45 | For copying the data into the memo we use the *Lines* property procedure *Assign*(). Now the data is in the memo and we can discard the string list with the statement FileData.Free to avoid a memory leak. If you use a class's instant variable before creating it or after freeing, i.e. if you try to access variables or procedures of the class, than this (most likely) results in an access violation, as there is no actual instance at the place the variable points to, crashing the application. | |
| 49 | 46 | ||
| 50 | 47 | Actually the file could be loaded directly into the memo instead of taking the intermediate step of loading it into a string list first, but by using a string list you could modify the data before displaying it in the memo. And of course this is to introduce the *TStringList* to you, as it is rather more common to work with data in a program than just to display it. | |
| 51 | 48 | ||
| 52 | 49 | So loading a file works now, the next step is we want to save a modified file. Therefore create the *OnClick* event handler for the *ButtonFileSave* like you did with the one before. Add the following code: | |
| 53 | 50 | ||
| 54 | 51 | ``` pascal | |
| 55 | 52 | procedure TForm1.ButtonFileSaveClick(Sender:TObject); | |
| 56 | 53 | begin | |
| 57 | 54 | if SaveDialog1.Execute | |
| 58 | 55 | then Memo1.Lines.SaveToFile(SaveDialog1.FileName); | |
| 59 | 56 | ||
| 60 | 57 | end; | |
| 61 | 58 | ``` | |
| 62 | 59 | ||
| 63 | 60 | The code should be self explanatory. | |
| 64 | 61 | ||
| 65 | 62 | Run the program, load a file, modify and save it. (Make sure not to override a project file, there is no override protection, yet.) Normally when you override an existing file with a program you expect a warning that the file already exists. We have to implement such functionality our selves. Modify the *ButtonFileSave* event handler as follows, compile and test the program. | |
| 66 | 63 | ||
| 67 | 64 | ``` pascal | |
| 68 | 65 | procedure TForm1.ButtonFileSaveClick(Sender:TObject); | |
| 69 | 66 | var shouldSave: Boolean; | |
| 70 | 67 | begin | |
| 71 | 68 | shouldSave:= false; | |
| 72 | 69 | ||
| 73 | 70 | If SaveDialog1.Execute Then Begin | |
| 74 | 71 | if FileExists(SaveDialog1.FileName) then begin | |
| 75 | 72 | if MessageDlg('File Exists', 'Do you wish to override the existing file?', | |
| 76 | 73 | mtConfirmation, [mbYes, mbNo],0) = mrYes | |
| 77 | 74 | then shouldSave:= true; | |
| 78 | 75 | ||
| 79 | 76 | end else shouldSave:= true; | |
| 80 | 77 | End; | |
| 81 | 78 | ||
| 82 | 79 | //Save the memo to the file that was chosen with the file dialog | |
| 83 | 80 | if shouldSave | |
| 84 | 81 | then Memo1.Lines.SaveToFile(SaveDialog1.FileName); | |
| 85 | 82 | ||
| 86 | 83 | end; | |
| 87 | 84 | ``` | |
| 88 | 85 | ||
| 89 | 86 | What the code does: After running the file dialog with SaveDialog1.Execute we check if the file already exists, therefore the function *FileExists* is called. If the file actually is there, then it will return the value true. And in this case we open a message window with the function *MessageDlg*. The code configures two options, *yes* and *no*. The local variable *shouldSave* is set accordingly and also is set if the file doesn't exist, yet. Finally the file is saved according to the temporary variable. | |
| 90 | 87 | ||
| 91 | 88 | Now we want to give the user the possibility to change the font. This works nearly exactly the same as with a file dialog: | |
| 92 | 89 | ||
| 93 | 90 | ``` pascal | |
| 94 | 91 | procedure TForm1.ButtonFontClick(Sender:TObject); | |
| 95 | 92 | begin | |
| 96 | 93 | if FontDialog1.Execute | |
| 97 | 94 | then Memo1.Font.Assign(FontDialog1.Font); | |
| 98 | 95 | ||
| 99 | 96 | end; | |
| 100 | 97 | ``` | |
| 101 | 98 | ||
| 102 | 99 | Assigning the font to the memo could be even done in a shorter way by `Memo1.Font:= FontDialog1.Font;` But I don't recommend doing so. The issue is, assigning a class instance (as *Font* is) with the ':=' operator only copies the instances address instead of the whole instance. i.e. both variables then contain the same instance which could cause trouble. In this specific case, thought, *Memo1.Font* is a property that won't directly assign the variable but call a function that makes sure that a copy of the instance is made. So here we are save in either way, but if you are not sure you should choose the safe way from the beginning. | |
| 103 | 100 | ||
| 104 | 101 | Also populate the event handler for the button *New*. Hint: *Memo1.Clear* erases the memo content. | |
| 105 | 102 | ||
| 106 | 103 | Now the basic functions of a text editor are already implemented and we should do some cosmetics. The program needs a name and icon. Open the *project settings* in the menu *project* in the menu bar. in the first 'line' you can define a name and an icon, both are shown on the tab bar. Design your own icon or just download the one here by rightclicking -\> save as. | |
| 107 | 104 | ||
| 108 | 105 | The caption of the application window can be changed in the object inspector (*Caption* entry of *Form1*). | |
| 109 | 106 | ||
| 110 | - | ||
| 111 | - | ||
| 112 | - | ||
| 113 | - | ||
| 107 | + |  | |
| 114 | 108 | ||
| 115 | 109 | The names we also can modify on runtime and when opening a file we want to do exactly that. Add the following lines in the *ButtonFileOpen* event handler: | |
| 116 | 110 | ||
| 117 | 111 | ``` pascal | |
| 118 | 112 | Form1.Caption:= 'Easy Editor - ' + OpenDialog1.FileName; | |
| 119 | 113 | Application.Title:= ExtractFilename(OpenDialog1.FileName); | |
| 120 | 114 | ``` | |
| 121 | 115 | ||
| 122 | 116 | As you can see, I named the application *Easy Editor*. *OpenDialog1.FileName* contains the full path, for the title bar this is allright, but in the task bar with the limited space only the file name should be shown. The folder path is stripped off with the function *ExtractFilename*. | |
| 123 | 117 | ||
| 124 | 118 | In the documentation you can find more file handling and file name functions: <https://www.freepascal.org/docs-html/rtl/sysutils/filenameroutines.html> | |
| 125 | 119 | ||
| 126 | 120 | In this application we use the easy-to-use but limited string list functionalities to load and save files. Other options are discussed in the Wiki article [[File Handling In Pascal]]. | |
| 127 | 121 | ||
| 128 | 122 | By now only the button-OnClick-event handlers were used. We want to add two more functionalities to show the usage of other events. Place a *TPanel* below the memo and populate two *TLabels* on the panel as you see it on the picture. Set the names as shown. Also add a *TCheckbox* above the memo, set its name to *CheckBoxDetails* and change its caption. Adjust all anchors as appropriate. | |
| 129 | 123 | ||
| 130 | - | ||
| 131 | - | ||
| 132 | - | ||
| 133 | - | ||
| 124 | + | 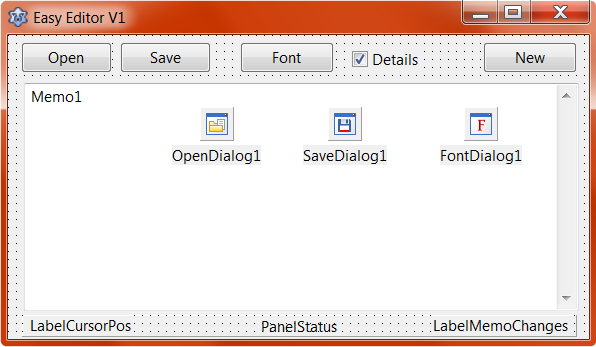 | |
| 134 | 125 | ||
| 135 | 126 | The left label *LabelCursorPos* will be used to show the current position of the cursor or when moving the cursor with keys. The right label *LabelMemoChanges* we use to indicate the number of changes that were done since the document was opened. To do the latter, you should create an event handler for the memos *OnChange* event (tab event in the object inspector). *OnChange* will fire each time the content of *Memo1* changes, i.e. for each pressed key individually. To take track of the quantity of the changes, we need a variable to count them. This we can place in the form's class in either the private or public section. So yes, you may freely add stuff to the class *TForm1*. We call the variable *fMemoChanges*. The prefix f stands for 'field' or 'field variable', which indicates the variable is part of a class or record (member variable). That prefix is commonly used in Lazarus programs, helping to distinguish from according properties, where a prefix is omitted. For the same benefit of better distinction, the identifiers of classes always should start with a capital T which stands for 'type'. That as a side note. | |
| 136 | 127 | ||
| 137 | 128 | ``` pascal | |
| 138 | 129 | type | |
| 139 | 130 | TForm1 = class(TForm) | |
| 140 | 131 | [...] | |
| 141 | 132 | private | |
| 142 | 133 | fMemoChanges: Integer; // <- Add this line | |
| 143 | 134 | public | |
| 144 | 135 | end; | |
| 145 | 136 | ``` | |
| 146 | 137 | ||
| 147 | 138 | The variable can be used in the event handler (or anywhere in the code). Add the following in the *OnChange* event handler of *Memo1*: | |
| 148 | 139 | ||
| 149 | 140 | ``` pascal | |
| 150 | 141 | procedure TForm1.Memo1Change(Sender:TObject); | |
| 151 | 142 | begin | |
| 152 | 143 | fMemoChanges:= fMemoChanges + 1; | |
| 153 | 144 | LabelMemoChanges.Caption:= IntToStr(fMemoChanges); | |
| 154 | 145 | ||
| 155 | 146 | end; | |
| 156 | 147 | ``` | |
| 157 | 148 | ||
| 158 | 149 | As you can see, the variable is incremented each time the event handler is called and afterwards is written into the label. *IntToStr* converts the integer to a string, other functions for conversions can be found in the documentation: <https://www.freepascal.org/docs-html/rtl/sysutils/conversionroutines.html> | |
| 159 | 150 | ||
| 160 | 151 | Compile and test the program, it should work as expected. As you saw in the code, at no place did we initialize this variable. For field variables the compiler does that for us in the moment the instance of the class is created. The initialization value always is zero or nil for pointers. | |
| 161 | 152 | ||
| 162 | 153 | Now to the second last functionality, the cursor position. We want to update it, when the position of the cursor in the memo changes. There is no explicit event for that (as far as I am aware of), so we have to use mouse and keyboard events instead. As that requires more than one event handler for one action, we prepare a procedure called *UpdateLinePos* with the functionality first, the procedure than will just be called in the event handlers. The procedure should be part of the class *TForm1*, as the counting variable is. | |
| 163 | 154 | ||
| 164 | 155 | ``` pascal | |
| 165 | 156 | type | |
| 166 | 157 | TForm1 = class(TForm) | |
| 167 | 158 | [...] | |
| 168 | 159 | private | |
| 169 | 160 | MemoChanges: Integer; | |
| 170 | 161 | Procedure UpdateCursorPos; // <- Add this procedure | |
| 171 | 162 | public | |
| 172 | 163 | ||
| 173 | 164 | end; | |
| 174 | 165 | ``` | |
| 175 | 166 | ||
| 176 | - | ||
| 167 | + | With the cursor still in the same line after writing the procedure declaration into the class, press the keys `Ctrl+Shift+C`. This advices the Lazarus IDE to autocomplete the procedure body in the interface section of the unit, saving you some typing effort. Add the below code to the procedure, the code should be easy to understand: | |
| 177 | 168 | ||
| 178 | 169 | ``` pascal | |
| 179 | 170 | Procedure TForm1.UpdateCursorPos; | |
| 180 | 171 | begin | |
| 181 | 172 | LabelCursorPos.Caption:= 'Line: ' + Inttostr(Memo1.CaretPos.Y) | |
| 182 | 173 | + ' Position: ' + Inttostr(Memo1.CaretPos.X); | |
| 183 | 174 | ||
| 184 | 175 | end; | |
| 185 | 176 | ``` | |
| 186 | 177 | ||
| 187 | 178 | Create the event handlers OnClick and OnKeyUp for Memo1. | |
| 188 | 179 | ||
| 189 | 180 | ``` pascal | |
| 190 | 181 | procedure TForm1.Memo1Click(Sender:TObject); | |
| 191 | 182 | begin | |
| 192 | 183 | UpdateCursorPos; | |
| 193 | 184 | end; | |
| 194 | 185 | ||
| 195 | 186 | procedure TForm1.Memo1KeyUp(Sender:TObject;var Key:Word;Shift:TShiftState); | |
| 196 | 187 | begin | |
| 197 | 188 | UpdateCursorPos; | |
| 198 | 189 | end; | |
| 199 | 190 | ``` | |
| 200 | 191 | ||
| 201 | 192 | Compile and test the program. Instead of the *OnKeyUp* you can try using *OnKeyDown*, but you will see that the position is not correct, as the key event is fired before the cursor was moved. I don't see an easy solution to solve that issue other than just using the *OnKeyUp* event, which is delayed to pressing down the key. The reason for that lies in the structure of the LCL, as the control (here the *TMemo*) when receiving a key, first checks if it should be forwarded to an event handler, then fires the event and just after that performs its own actions which in this case is adding a character and/or moving the cursor. | |
| 202 | 193 | ||
| 203 | 194 | As last functionality we want the labels in the bottom to be hideable by the user. Therefore a *TCheckbox* already was placed on the form. Create the *OnChange* event for the checkbox: | |
| 204 | 195 | ||
| 205 | 196 | ``` pascal | |
| 206 | 197 | procedure TForm1.CheckBoxDetailsChange(Sender:TObject); | |
| 207 | 198 | begin | |
| 208 | 199 | if CheckBoxDetails.Checked then begin | |
| 209 | 200 | PanelStatus.Visible:= true; | |
| 210 | 201 | Memo1.Height:= self.Height - Memo1.Top - 28; | |
| 211 | 202 | end else begin | |
| 212 | 203 | PanelStatus.Visible:= false; | |
| 213 | 204 | Memo1.Height:= self.Height - Memo1.Top - 8; | |
| 214 | 205 | end; | |
| 215 | 206 | end; | |
| 216 | 207 | ``` | |
| 217 | 208 | ||
| 218 | 209 | By hiding the panel also its child controls, both labels, are hidden, i.e. are not seen on the form anymore. With the properties *Left*, *Top*, *Width* and *Height* the position and size of a control can be changed, here only the height shall be increased, when the area below the memo is not needed for the labels. Here the self keyword is used, which represents the current instance, for which the procedure was invoked. In this case that is *Form1*. | |
| 219 | 210 | ||
| 220 | 211 | ``` pascal | |
| 221 | 212 | Memo1.Height:= self.Height - Memo1.Top - 8; | |
| 222 | 213 | ``` | |
| 223 | 214 | ||
| 224 | 215 | **Self** can be just omitted, its exactly the same as | |
| 225 | 216 | ||
| 226 | 217 | ``` pascal | |
| 227 | 218 | Memo1.Height:= Height - Memo1.Top - 8; | |
| 228 | 219 | ``` | |
| 229 | 220 | ||
| 230 | 221 | All functionality is included now, the last thing is that at startup of the program before loading the labels names, the default text of the memo and the panel's name is shown. You could tweak each caption in the object inspector, but e.g. a blank label and panel is (nearly) invisible on the form editor, so we prefer to do these settings when the program is started. Therefore you should create an event handler for the OnCreate event of the form. | |
| 231 | 222 | ||
| 232 | 223 | ``` pascal | |
| 233 | 224 | procedure TForm1.FormCreate(Sender:TObject); | |
| 234 | 225 | begin | |
| 235 | 226 | Memo1.Clear; | |
| 236 | 227 | LabelMemoChanges.Caption:= ''; | |
| 237 | 228 | LabelCursorPos.Caption:= ''; | |
| 238 | 229 | PanelStatus.Caption:= ''; | |
| 239 | 230 | PanelStatus.BevelOuter:= bvNone; | |
| 240 | 231 | ||
| 241 | 232 | end; | |
| 242 | 233 | ``` | |
| 243 | 234 | ||
| 244 | 235 | The *OnCreate* event handler is a good place for all kinds of initialization stuff at program start up, as the components at that moment already exist. | |
| 245 | 236 | ||
| 246 | 237 | We're done here, the running application should look like in the picture. It's up to you now to implement and distinguish between 'save' and 'save as', to save the font settings (e.g. one could use *SessionProperties* or *TIniFile*) to use a proper menu bar (*TMainMenu*) and so on. | |
| 247 | 238 | ||
| 248 | - | ||
| 249 | - | ||
| 250 | - | ||
| 251 | - | ||
| 239 | + | 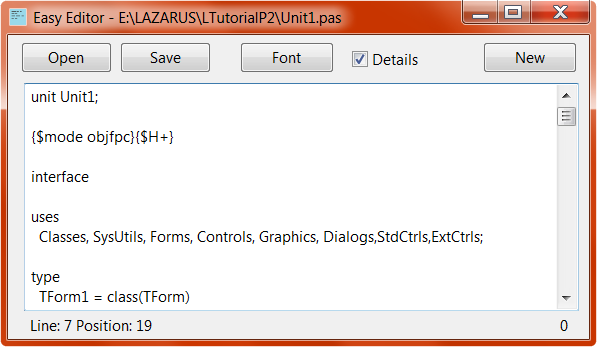 | |
| 252 | 240 | ||
| 253 | 241 | ## Learning the language | |
| 254 | 242 | ||
| 255 | 243 | As you could see in the code the graphic libraries heavily depend on object oriented language support. Usage and especially reading the user code is intuitive, but for writing applications it is necessary to be familiar with the language details of FreePascal. This topics couldn't be covered in this tutorial. | |
| 256 | 244 | ||
| 257 | 245 | ## Project Files | |
| 258 | 246 | ||
| 259 | 247 | When you start a new project, the IDE will create several files in the project folder. The .lps-file contains all project information excluding source code and form settings. | |
| 260 | 248 | ||
| 261 | 249 | The file unit1 you already know, its the source file we worked with in the tutorial. It actually is the file for *Form1*. If you create another form (menu *file* -\> *new* -\> *form*), it will have its own unit. Each form has a .lfm file with the same name as the form, there the components populated on the form and all their settings are saved. | |
| 262 | 250 | ||
| 263 | 251 | You may have recognized that the units don't have any entry point, where the program starts. They just contain procedures, functions and data, which could be called or accessed from outside. The entry and exit point of the program is in the ".lpr" file, the core of the program. | |
| 264 | 252 | ||
| 265 | 253 | ## LCL Internals | |
| 266 | 254 | ||
| 267 | 255 | In the (very compact) .lpr-file you can see several calls to functions of the class *Application*. This class is part of the LCL and contains the program structure. Open the lpr file of your project (via menu file -\> open OR via the project inspector, where all source files are listed). All the magic of a Lazarus application is called in the three lines: | |
| 268 | 256 | ||
| 269 | 257 | ``` pascal | |
| 270 | 258 | Application.Initialize; | |
| 271 | 259 | Application.CreateForm(TForm1,Form1); | |
| 272 | 260 | Application.Run; | |
| 273 | 261 | ``` | |
| 274 | 262 | ||
| 275 | 263 | **Application.Initialize** speaks for it self, all the initialization stuff for the program is done there, except the form initializations, which are done seperately for each form afterwards. **Application.CreateForm** will use the .lfm-file to populate and initialize the components on the form. The form's .lfm-file is compiled into the executable, so you could share the application binary without any other file. At that point all initializations are finished. | |
| 276 | 264 | ||
| 277 | 265 | **Application.Run** contains the Main Loop of the program. A lazarus program is event based, that means the program litererally does nothing until an event, like a mouse click occurs. The event handling is done in the main loop, a *repeat ... until* structure that is endlessly looped until the program is closed. Events on application level are called messages. The application class contains a message queue. When the operating system detects e.g. a mouse click that is associated with the application, i.e. the mouse position is on the application form, then a message telling the mouse click, is queued in the message queue. What the application main loop actually does, is polling this message queue, dequing the first message, processing it, i.e. calling the associated message handler doing its stuff, dequeueing the next message and so on, until all messages from the queue are processed. Note that the event handlers we commonly use, like *OnClick* and so on, are triggered by the control's event handler, triggered by the message handler, so there are several levels of handlers. | |
| 278 | 266 | ||
| 279 | 267 | After all messages are processed the program returnes the task for a defined time to the operating system for not wasting CPU-time. When that waiting time is over (around 10ms depending on the system), the operating system again schedules CPU time for our application, running the next cycle in the main loop checking if some messages were enqueued in the meantime. Processing the messages and returning CPU-time to the OS. Note that a message often triggers other messages. E.g. if you change the size of an other control in your *ButtonOnClick* event (trigered by a mouse message), then the size is not directly changed on the screen, but the code only changes the size values in the controls class and requests a repaint of the control. That request is done via a message that is enqueued. All that means, that when an event handler is executed, the application cannot do anything else in the meantime, so keep your event handlers short. If you perform a heavy calculation in e.g. a button's OnClick event that takes several seconds of time, then no clicks to any control can be performed, even the application can't be closed regularly. In that time the application is not responsive (and the operating system may tell so). Obviously an application behaving like this would be considered broken. | |
| 280 | 268 | ||
| 281 | 269 | A quick-and-dirty solution could be to intermediately use **Application.ProcessMessages**. The usage, when its appropriate and other measures you can learn in the multithreading application tutorial (beware, advanced topic). | |
| 282 | 270 | ||
| 283 | 271 | ## Debugging | |
| 284 | 272 | ||
| 285 | 273 | In this tutorial you could mostly just copy the code from here what shouldn't result in errors, crashes and so on. If you write your own application this obviously is different. You have several options in Lazarus to to make debugging easier including a live debugger. | |
| 286 | 274 | ||
| 287 | 275 | By default the debugger is enabled but a lot of runtime checks are disabled. Open the *Project settings* -\> *Compiler settings* -\> *Debugging*. In the very top you can choose a compile mode. On default there is only one mode, called Default. Click the ... ellipsis and press the button "*Create Debug and Release Modes*". Now you have three modes, you can delete the *Default* mode and set the mode to *Debug*. When you go back to the debug settings, you will see, that a lot of checkboxes are checked now, also debugging is enabled. When you compile and run the application (F9) then the debugger will be started automatically. Breakpoints can be defined in the code editor by pressing F5 or by clicking in the left border beside the line. When running the application the code execution will be paused in the moment the line of code is reached. In the paused state you can check contents of variables by hovering with the mouse over the variable in the code editor. In this state you can also check the call trace, i.e. from which functions the function that the breakpoint was set in, was called. This is especially helpful when trying to understand third party libraries, but also when a function is called from more than one place in your program and you are not sure, where the error occured. Open the call stack in the menu *view* -\> *debugger windows* -\> *call stack*. By pressing F9 or clicking Run, the code execution will continue, you can also perform single steps and so on. | |
| 288 | 276 | ||
| 289 | 277 | If you experience a program crash and the debugger is enabled, Lazarus will show you the line of code where the crash happened. Sometimes just an "assembly" window opens, then the debugger doesn't have information about the line number, which is the case when the access violation took place in library code that wasn't compiled with enabled debug options, which is the case for the LCL. The fatal memory access (although being in the library code) could have its origin in user code. So here again the call stack may help you identifying which procedure called the library code that crashed with e.g. invalid call parameters. | |
| 290 | 278 | ||
| 291 | 279 | In the debug mode the checkbox for using the *heaptrace* unit is checked, this is useful to track the usage of dynamic memory. The *heaptrace* unit will compare all allocated and disallocated memory throughout the program execution and show you if allocated memory is left in the end. If this is the case, you know that you didn't fully clean up your allocations. For the LCL components you don't need to take care, the LCL does. But if you create class instances manually, you have to make sure to destroy them after usage. Although the operating system cleans up after closing the application anyways, memory leaks can make long time running programs unstable. The notifications of the memory usage may be annoying sometimes, then just disable heap tracing in the debugging options. | |
| 292 | 280 | ||
| 293 | 281 | Often it is useful to output short statements to show what the program is and was doing. One possibility is to just write into a file for that purpose. If you want to directly see the outputs you may use the standard-out instead. Under Linux there always is a standard output. When running the program in the IDE you can see the output written by **Write**/**WriteLn** in the window *Debug Output* (menu *view* -\> *debugger windows* -\> *Debug Output*). In the *ButtonFileOpenClick* event you may add a short write statement: | |
| 294 | 282 | ||
| 295 | 283 | ``` pascal | |
| 296 | 284 | procedure TForm1.ButtonFileOpenClick(Sender:TObject); | |
| 297 | 285 | begin | |
| 298 | 286 | WriteLn('TForm1.ButtonFileOpenClick'); | |
| 299 | 287 | [...] | |
| 300 | 288 | ``` | |
| 301 | 289 | ||
| 302 | 290 | If the program is started in the shell instead through Lazarus, then the output will be shown there. | |
| 303 | 291 | ||
| 304 | 292 | Under Windows you can add the compiler directive **{\$APPTYPE CONSOLE}** in the very top of the projects lpr under the 'program' line: | |
| 305 | 293 | ||
| 306 | 294 | ``` pascal | |
| 307 | 295 | program EasyEditor; | |
| 308 | 296 | {$APPTYPE CONSOLE} | |
| 309 | 297 | ... | |
| 310 | 298 | ``` | |
| 311 | 299 | ||
| 312 | 300 | In contrast to the name it is still a GUI application but with additional console window, where your writes (using Write or WriteLn) will be displayed. Under Linux this compiler directive has no effect and does no harm either. | |
| 313 | 301 | ||
| 314 | 302 | ## Code completion | |
| 315 | 303 | ||
| 316 | 304 | The Lazarus IDE can help you to save a lot of typing and also simplifies coding by code completion. See [[Lazarus IDE Tools]]. | |
| 317 | 305 | ||
| 318 | 306 | ## See also | |
| 319 | 307 | ||
| 320 | 308 | - [[Lazarus Tutorial]] Part 1 | |
| 321 | 309 | - [[Form Tutorial|Lazarus Form Tutorial]] | |
| 322 | 310 | - [[Howdy World (Hello World on steroids)]] | |
| 323 | 311 | - [[Peg Solitaire tutorial]] | |
| 324 | 312 | - [[Lazarus IDE Tools]] | |
| 325 | 313 | - [[Lazarus project files]] | |
| 326 | 314 | ||
| 327 | 315 | --- | |
| 328 | 316 | *From the Free Pascal wiki, page "Lazarus Tutorial Part 2", as it stood on 2021-12-07 after a change by Trev, out of the wiki's dump of 2024-05-26. Copyright stays with the author who wrote it, according to the old wiki's [[Licensing]] page. If you have concerns about this material, [message the admin](/wiki-contact).* |