

Lazarus Tutorial: what changed
Revision 1 to 2. Removed lines have a minus sign; added lines have a plus sign.
| Old | New | Line | |
|---|---|---|---|
| 1 | 1 | Lazarus is a free and open source development tool for the [[FPC|Free Pascal compiler]], which is also free and open source. The Lazarus [[IDE|Integrated Development Environment]] (IDE, see [[Screenshots]]) is a programming environment to create standalone [[Graphical User Interface|graphical]] and [[Command-line interface|console applications]]. | |
| 2 | 2 | ||
| 3 | 3 | Lazarus currently runs on [[Portal:FreeBSD|FreeBSD]], [[Portal:Linux|Linux]], [[Portal:Mac|macOS]] and [[Portal:Windows|Windows]] and provides a customizable source editor and visual form creation environment along with a package manager, [[Debugger|debugger]] and complete GUI integration with the Free Pascal [[Compiler|compiler]]. | |
| 4 | 4 | ||
| 5 | 5 | ## Contents | |
| 6 | 6 | ||
| 7 | 7 | * 1 Getting Started | |
| 8 | 8 | * 1.1 Your first Lazarus Program! | |
| 9 | 9 | * 1.2 Modify your Program | |
| 10 | 10 | * 2 The Editor Windows | |
| 11 | 11 | * 3 The Main Menu | |
| 12 | 12 | * 4 The Toolbar | |
| 13 | 13 | * 5 The Component Palette | |
| 14 | 14 | * 5.1 How To Use the Palette | |
| 15 | 15 | * 5.2 Customization | |
| 16 | 16 | * 5.3 Examples | |
| 17 | 17 | * 6 How to use Common Controls | |
| 18 | 18 | * 6.1 Ways to Set Properties | |
| 19 | 19 | * 6.2 Common Properties | |
| 20 | 20 | * 6.3 Event Actions | |
| 21 | 21 | * 6.4 Constructors & Destructors | |
| 22 | 22 | * 7 Menu controls | |
| 23 | 23 | * 7.1 TMainMenu | |
| 24 | 24 | * 7.2 TPopupMenu | |
| 25 | 25 | * 7.3 Menu editor | |
| 26 | 26 | * 7.3.1 Setting Shortcuts Programmatically | |
| 27 | 27 | * 7.4 ActionList use | |
| 28 | 28 | * 8 The Debugger | |
| 29 | 29 | * 9 The Lazarus files | |
| 30 | 30 | * 10 See also | |
| 31 | 31 | ||
| 32 | 32 | ## Getting Started | |
| 33 | 33 | ||
| 34 | 34 | After you have [[Installing Lazarus|downloaded and installed]] the Lazarus IDE, which will also install the Free Pascal Compiler, you are ready to launch the Lazarus IDE and create your first program. | |
| 35 | 35 | ||
| 36 | 36 |  **Note:** On Linux Ubuntu at least, the command to start Lazarus from a console is "startlazarus". Otherwise, if you installed it from a Debian package, you should have a Lazarus menu entry under Application/Programming. (Issue: In Debian and Ubuntu the main binary and the package was renamed to "lazarus-ide" because the "tct" package already comes with a utility called "lazarus"). | |
| 37 | 37 | ||
| 38 | 38 | ### Your first Lazarus Program! | |
| 39 | 39 | ||
| 40 | 40 | From the Main Menu, choose Project-New Project-Application (or: File-New-Project-Application). A new GUI application is created, see also [[Form Tutorial]]. | |
| 41 | 41 | ||
| 42 | 42 | Several windows will appear on the desktop: the Main Menu at the top, the 'Object Inspector' on the left, the 'Source Editor' occupying most of the desktop, and a ready-made 'Form1' window ([[TForm|form1]]) overlying the Source Editor. | |
| 43 | 43 | ||
| 44 | 44 | To place a button on the form: on the top Menu window, underneath the menu line, is a row of tabs. If the [[Standard tab]] is not already selected, select it by clicking with the mouse. Then find the [[TButton|Button]] icon (a rectangle with 'OK' on it) and click on that with the mouse. Then click on the Form1 window, somewhere to the left of the middle. A shadowed rectangle labelled 'Button1' will appear. Click again on the Button icon in the Standard tab, and click on the Form1 somewhere to the right of centre: a second rectangle labelled 'Button2' will appear. | |
| 45 | 45 | ||
| 46 | 46 | Now click on Button1 to select it. The 'Object Inspector' window will now display the properties of the object Button1. Near the top is a property named 'Caption', with the displayed value 'Button1'. Click on that box, and change 'Button1' to 'Press'. If you hit `↵ Enter` or click in another box, you will see the label of the first button on Form1 change to 'Press'. Now click on the Events tab on the Object Inspector, to see the various events that can be associated with this button1. These include OnClick, OnEnter, OnExit etc. Select the box to the right of OnClick: a smaller box with three dots (... ellipsis) appears. When you click on this, you are taken automatically into the Source Editor and your cursor will be placed in a piece of code related to button1, starting: | |
| 47 | 47 | ``` | |
| 48 | 48 | procedure TForm1.Button1Click(Sender: TObject); | |
| 49 | 49 | begin | |
| 50 | 50 | {now type (or copy&paste):} Button1.caption := 'Press again'; | |
| 51 | 51 | {the editor has already completed the procedure with} | |
| 52 | 52 | end; | |
| 53 | 53 | ``` | |
| 54 | 54 | ||
| 55 | 55 | Press `F12` to select the Form1 window instead of the Source Editor. | |
| 56 | 56 | ||
| 57 | 57 | Now edit the properties of Button2: click on Button2 to display its properties in the Object Inspector. Change its Caption property to 'Exit' instead of 'Button2'. Now select the Events tab, and click on the box for OnClick. Click on the ... ellipsis, and you will be taken into the Source Editor, in the middle of another [[Procedure|procedure]] for button2: | |
| 58 | 58 | ``` | |
| 59 | 59 | procedure TForm1.Button2Click(Sender: TObject); | |
| 60 | 60 | begin | |
| 61 | 61 | {now type (or copy&paste):} Close; | |
| 62 | 62 | {the editor has already completed the procedure with} | |
| 63 | 63 | end; | |
| 64 | 64 | ``` | |
| 65 | 65 | ||
| 66 | 66 | Now Press `F12` to see the Form1 window again. You should save your work now (and frequently!!) by selecting from the Main Menu Project-Save Project As > your_selected_file_name.pas. Next, you will be asked to save a **L** azarus **P** roject **I** nformation file, with the suffix .lpi. (Note: For Lazarus-0.9.30 you will be asked for project name first and then file name). Choose a different name for this file, if both are identical you will get a "duplicate identifier" [[compile-time error|compile error]] (see chapter "The Lazarus files" at the end of this tutorial). | |
| 67 | 67 | ||
| 68 | 68 | You are now ready to try to compile. The simplest way to compile is to select 'Run' from the main menu at the top, and then the 'Run' option on the sub-menu. Alternatively you could simply press `F9`. This will first compile and then (if all is well) link and execute your program. | |
| 69 | 69 | ||
| 70 | 70 | Several text windows will appear and all sorts of compiler messages will be typed, but eventually your Form1 window will re-appear, but without the grid of dots; this is the actual main window of your application, and it is waiting for you to push buttons or otherwise interact with it. | |
| 71 | 71 | ||
| 72 | 72 | Try clicking on the button labelled 'Press'. You will notice that it changes to 'Press again'. If you press it again, it will still say 'Press again'!! | |
| 73 | 73 | ||
| 74 | 74 | Now click on the button marked 'Exit'. The window will close and the program will exit. The original Form1 window with the grid of dots will reappear, ready to accept more editing activity. | |
| 75 | 75 | ||
| 76 | 76 | ### Modify your Program | |
| 77 | 77 | ||
| 78 | 78 | Re-open your saved Project and on the Form1 window click on the 'Press' button (Button1) to select it. Select the 'Events' tab on the Object Inspector, click on the right side box next to OnClick, click on the ... ellipsis, to go back to the appropriate point in the Source Editor. | |
| 79 | 79 | ||
| 80 | 80 | Edit your code to read as follows: | |
| 81 | 81 | ``` | |
| 82 | 82 | procedure TForm1.Button1Click(Sender: TObject); | |
| 83 | 83 | { Makes use of the Tag property, setting it to either 0 or 1} | |
| 84 | 84 | begin | |
| 85 | 85 | if Button1.tag = 0 then | |
| 86 | 86 | begin | |
| 87 | 87 | Button1.caption := 'Press again'; | |
| 88 | 88 | Button1.tag := 1; | |
| 89 | 89 | end else | |
| 90 | 90 | begin | |
| 91 | 91 | Button1.caption := 'Press'; | |
| 92 | 92 | Button1.tag := 0; | |
| 93 | 93 | end; | |
| 94 | 94 | end; | |
| 95 | 95 | ``` | |
| 96 | 96 | ||
| 97 | 97 | Save your work, re-compile and run. The left button will now toggle between two alternative messages. | |
| 98 | 98 | ||
| 99 | 99 | The rest is up to you! | |
| 100 | 100 | ||
| 101 | 101 | If you prefer to write Console- or text-based Pascal programs (for example if you are following a basic Pascal programming course, or you need to write programs to use in batch mode or for system programming), you can still use Lazarus to edit, compile and run your programs. See [[Console Mode Pascal]]. | |
| 102 | 102 | ||
| 103 | 103 | ## The Editor Windows | |
| 104 | 104 | ||
| 105 | 105 | When you launch Lazarus for the first time, a series of separate disconnected or 'floating' windows will appear on your desk-top. | |
| 106 | 106 | ||
| 107 | 107 | The first, running right along the top of the desk-top, is titled **project1 - Lazarus IDE vXXXXXX** (which will subsequently be modified to reflect the name of your currently-open project). This is the main controlling window for your project, and contains the Main Menu and the [[Component Palette]]. | |
| 108 | 108 | ||
| 109 | 109 | [](</File:Lazarus-IDE.jpg>) | |
| 110 | 110 | ||
| 111 | 111 | On the line below the title bar is the _Main Menu_ with the usual entries for File, Edit, Search, View categories and so on, with a few selections that are specific to Lazarus. Below this on the left is a set of symbols (icons which take you rapidly to particular menu commands); and on the right is the Component Palette. | |
| 112 | 112 | ||
| 113 | 113 | Under the Lazarus Editor window will appear the 'Object Inspector' window on the left, and the Lazarus 'Source Editor' on the right. There may be another smaller window, labelled 'Form1', overlying the Lazarus Source Editor window. If this is not visible immediately, it can be made to appear by pressing the `F12` key, which toggles between the Source Editor view and the Form view. The Form window is the one on which you will construct the graphical interface for your application, while the Source Editor is the window which displays the Pascal code associated with the application which you are developing. The operation of the Object Inspector is discussed in more detail below while the Component Palette is described. Finally, there may also be a Message window in the lower of the screen: this one is used by Lazarus to show feedback to the programmer, for instance when compiling a program. | |
| 114 | 114 | ||
| 115 | 115 | When you start a new project (or when you first launch Lazarus) a default Form will be constructed, which consists of a box in which there is a grid of dots to help you to position the various components of the form, and a bar along the top which contains the usual **Minimise** , **Maximise** and **Close buttons**. If you click with your mouse cursor anywhere in this box, you will see the properties of this form displayed in the Object Inspector on the left side of the desk-top. | |
| 116 | 116 | ||
| 117 | 117 | Other windows that may become visible during your work: the 'Project Inspector', which contains details of the files included in your project, and allows you to add files to or delete files from your project; the **Messages** window, which displays compiler messages, errors or progress reports on your project; if Lazarus was launched from a terminal window, the original terminal remains visible and detailed compiler messages are also printed there. | |
| 118 | 118 | ||
| 119 | 119 | ## The Main Menu | |
| 120 | 120 | ||
| 121 | 121 | For a detailed description of every menu item which is accessible from the Lazarus IDE Main Menu, please refer to the [[Main menu]] page. | |
| 122 | 122 | ||
| 123 | 123 | ## The Toolbar | |
| 124 | 124 | ||
| 125 | 125 | [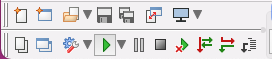](</File:ide_coolbar.png>) | |
| 126 | 126 | ||
| 127 | 127 | The small toolbar area, referred to as a Coolbar in the IDE options, to the left of the Component Palette, contains a set of buttons in two lines which replicate these frequently used Main Menu entries: | |
| 128 | 128 | ||
| 129 | 129 | **New unit** , **New form** , **Open** (with a down-arrow to display a drop-down list of recently used files), **Save** , **Save all** , **Toggle Form/Unit** (ie show either form or source code of Unit) | |
| 130 | 130 | ||
| 131 | 131 | **View Units** , **View Forms** , **Change Build Modes** , **Run** (ie compile and Run under the debugger), **Pause** , **Stop** , **Step Into** , **Step over** , **Step out** (the last three are debugger functions). | |
| 132 | 132 | ||
| 133 | 133 | The image above also shows an added button (the same as the Run button image but with a red X) which compiles and runs without using the debugger. You can add and remove buttons by right-clicking on the toolbar and choosing Options. See [[IDE Window: Environment Options|IDE Coolbar]] for more details. | |
| 134 | 134 | ||
| 135 | 135 | ## The Component Palette | |
| 136 | 136 | ||
| 137 | 137 | The **Component Palette** of the [[IDE]] is a tabbed toolbar which displays a large number of icons representing commonly used components for building forms. | |
| 138 | 138 | ||
| 139 | 139 | [](</File:Component_Palette_Standard.png> "size="100%") | |
| 140 | 140 | ||
| 141 | 141 | [[Component Palette]] | |
| 142 | 142 | --- | |
| 143 | 143 | [[Standard tab|Standard]] \- [[Additional tab|Additional]] \- [[Common Controls tab|Common Controls]] \- [[Dialogs tab|Dialogs]] \- [[Data Controls tab|Data Controls]] \- [[Data Access tab|Data Access]] \- [[System tab|System]] \- [[Misc tab|Misc]] \- [[LazControls tab|LazControls]] \- [[RTTI tab|RTTI]] \- [[SQLdb tab|SQLdb]] \- [[Pascal Script tab|Pascal Script]] \- [[SynEdit tab|SynEdit]] \- [[Chart tab|Chart]] \- [[IPro tab|IPro]] | |
| 144 | 144 | ||
| 145 | 145 | Each tab causes the display of a different set of icons, representing a functional group of components. The left-most icon in each tabbed group is an obliquely leftward-facing arrow, called the Selection Tool. | |
| 146 | 146 | ||
| 147 | 147 | If you allow the mouse cursor to hover over any of the icons on the Component Palette, without clicking on the icon, the title of that component will pop-up. Note that each title begins with a 'T' - this signifies 'Type' or more accurately 'Class' of the component. When you select a component for inclusion in a form, the [[Class]] is added to the **[[Type|type]] ** section of the **[[Interface|interface]] ** part of the [[Unit]] (usually as part of the overall TForm1), and an **instance** of that class is added to the **[[Var|var]] ** section (usually as the variable Form1). Any **[[Method|Methods]] ** that you design to be used by the Form or its Components (ie [[Procedure|Procedures]] or [[Function|Functions]]) will be placed in the **[[Implementation|implementation]] ** part of the Unit. | |
| 148 | 148 | ||
| 149 | 149 | #### How To Use the Palette | |
| 150 | 150 | ||
| 151 | 151 | To use the palette, there must be an open form on view in the editor (if there isn't one, select File -> New Form). Click on the icon in the appropriate tab of the palette for the component you want to use, then click on the form, near where you want the component to appear. When the desired component appears, you can select it by clicking with the mouse. Once selected on the form, the object is also selected in the Object Inspector window, where you can edit its properties and events. | |
| 152 | 152 | ||
| 153 | 153 | Adjustments to the visual appearance of an object can be made either by altering the picture itself on the Form using the mouse, or by changing the relevant Property in the Object Editor for that component. | |
| 154 | 154 | ||
| 155 | 155 | If you install additional components, either those you have written yourself, or some coming as a package from some other source, then extra tabs with the relevant icons will appear in your Component Palette. These new components can be selected and used on your forms in the same way as those supplied by default. | |
| 156 | 156 | ||
| 157 | 157 | In the following list of the Components, you will find links to files that contain descriptions of the Units in which they are found. If you want to find out about the properties of a particular component, it is often worth looking at the Inheritance of that component and then inspecting the properties of the base type from which it is derived. For example, to understand [[TMaskEdit]] it is also useful to examine [TCustomMaskEdit](</index.php?title=TCustomMaskEdit&action=edit&redlink=1> "TCustomMaskEdit \(page does not exist\)"). | |
| 158 | 158 | ||
| 159 | 159 | ### Customization | |
| 160 | 160 | ||
| 161 | 161 | Using the menu [Tools|Options] or `Crtl-Shift-O` it is possible to change layout and visibility of the component palette items. | |
| 162 | 162 | ||
| 163 | 163 | [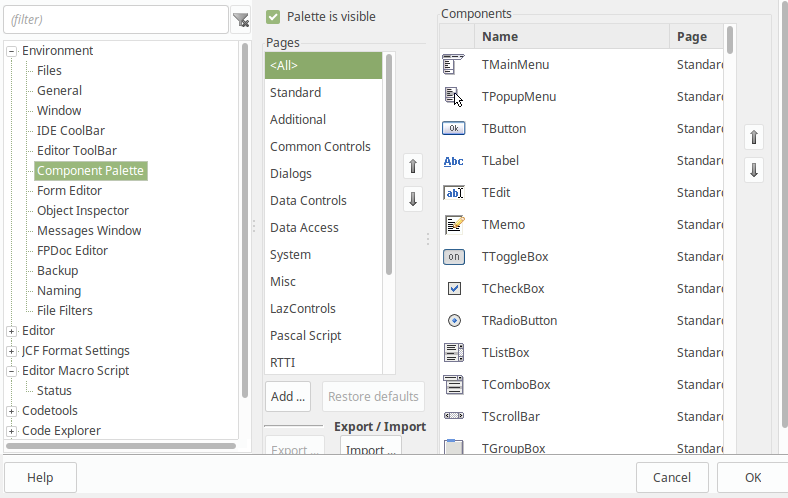](</File:IDE_Options_-_Environment_-_Component_Palette.png>) | |
| 164 | 164 | ||
| 165 | 165 | ### Examples | |
| 166 | 166 | ||
| 167 | 167 | Several useful [[Dialog Examples|dialog procedures or functions]] don't appear on the palette, but are easily used as direct calls from your [[Source code|source]] [[Program|program]]. | |
| 168 | 168 | ||
| 169 | 169 | For several good examples of the use of Components see the $LazarusPath/lazarus/examples subdirectory of your source installation. Many of the programs show how to use dialogs and other components directly without using the IDE and component palette or having a separate form definition file: all the components are fully and explicitly defined in the main Pascal program. Other example programs make full use of the IDE. | |
| 170 | 170 | ||
| 171 | 171 | Remember to open these examples as projects, with the .lpi file. Opening the .pas source code file and hitting RUN will just append this source file to whatever project you opened last. | |
| 172 | 172 | ||
| 173 | 173 | Some examples don't work straight away: you may need to play about with paths and permissions of files or directories. If you want to compile any of the examples, make sure that you have read/write/execute permissions for the files and directories, or copy the files to a directory where you do have the appropriate permissions. | |
| 174 | 174 | ||
| 175 | 175 | Try running the 'testall' program to see a menu of the available components together with small example test forms for most of them; then inspect the code to find out how they work! | |
| 176 | 176 | ||
| 177 | 177 | ## How to use Common Controls | |
| 178 | 178 | ||
| 179 | 179 | The Units **StdCtrls** , **ComCtrls** and **ExtCtrls** contain definitions and descriptions of many of the most commonly used controls for constructing Forms and other Objects in Lazarus Applications. | |
| 180 | 180 | ||
| 181 | 181 | Many of the final target controls that the application developer wants to use, such as **TButton** , **[[TMemo]]** , **[[TScrollBar]]** etc, have a corresponding ancestor class such as **TCustomButton** , **TCustomMemo** or **TCustomScrollBar**. Several of the properties and methods relevant to the final target control are defined (and explained) more fully in the **TCustomXXX** class, and are **inherited** by the final target control. | |
| 182 | 182 | ||
| 183 | 183 | If you drop a component on the form editor you don't need to add code explicitly to create it. The component is automatically created by the IDE together with the form, and destroyed when the form is destroyed. However, if you create the component yourself by code don't forget to free it when it is no longer needed. | |
| 184 | 184 | ||
| 185 | 185 | #### Ways to Set Properties | |
| 186 | 186 | ||
| 187 | 187 | If you place a component on the Form Designer and look at the Object Inspector, you can observe the properties change as you move the component around. | |
| 188 | 188 | ||
| 189 | 189 | For example, if you place a button (TButton) on the form, click on it to select it, then move it around the form with the mouse, you can watch the values of Top and Left change in the Object Inspector to reflect the new position. If you use the object's re-sizing bars to adjust its size, you can watch the Height and Width properties change as well. | |
| 190 | 190 | ||
| 191 | 191 | On the other hand, by using the Object Inspector, you can select the value associated with a property such as height, and type in a new value; you can watch the size of the object on the form change to reflect the new value. | |
| 192 | 192 | ||
| 193 | 193 | You can also explicitly change the properties of the object in code by typing (in the appropriate Implementation section of the Source editor), for example | |
| 194 | 194 | ``` | |
| 195 | 195 | Form1.Button1.Height := 48; | |
| 196 | 196 | ``` | |
| 197 | 197 | ||
| 198 | 198 | If you type this new value into the Source Editor and then look back at the Form Designer, you will see that the button on the Form has taken the new size. The new value will also be shown in the Object Inspector. | |
| 199 | 199 | ||
| 200 | 200 | In summary, there are usually about three different ways to determine each property of an object: | |
| 201 | 201 | ||
| 202 | 202 | * by using the mouse on the form, | |
| 203 | 203 | * by setting the values in the Object Inspector, | |
| 204 | 204 | * or explicitly by writing code in the editor. | |
| 205 | 205 | ||
| 206 | 206 | #### Common Properties | |
| 207 | 207 | ||
| 208 | 208 | The components defined in these Units have several properties that are common to most of them, and other properties that are specific to the individual components. We shall describe the most common ones here. Unusual or control-specific properties will be described for the individual controls. | |
| 209 | 209 | ||
| 210 | 210 | Additional Help can always be obtained by selecting a property or keyword, in either the Object Inspector or the Source Editor, and pressing `F1`. You will be taken by your Help browser to the appropriate page in the documentation. | |
| 211 | 211 | ||
| 212 | 212 | If the description of a property on that page is insufficient, you can navigate to the corresponding description in the ancestor classes, by selecting the links in the Inheritance listing or by selecting the ancestor Type in the declaration of the object. | |
| 213 | 213 | ||
| 214 | 214 | ||
| 215 | 215 | ||
| 216 | 216 | **Some commonly listed properties** **Property**| **Meaning** | |
| 217 | 217 | ---|--- | |
| 218 | 218 | Action | The main action or event associated with the object. For example selecting an 'Exit' Button might cause the 'Close' action | |
| 219 | 219 | Align | Defines the way in which an object is to be lined up with the parent object. Possible values are alTop (placed at the top and using the full available width), alBottom, alLeft (placed at the left and using the full available height), alRight. alNone (place anywhere on parent control) or alClient (takes all available space next to controls aligned to top, bottom, left or right) | |
| 220 | 220 | Anchor | Used to keep a control a certain distance from the defined edges of a parent control, when the parent is resized. For example **[akBottom, akRight]** will keep the control a fixed distance from the bottom right corner. | |
| 221 | 221 | AutoSelect | When True, an editing control will select all its text when it receives focus or when the Enter key is pressed. | |
| 222 | 222 | AutoSelected | True indicate that the edit or combobox control has just performed an AutoSelect operation so that subsequent mouse-clicks and keystrokes proceed normally without selecting the text. | |
| 223 | 223 | BorderSpacing | The space around the edge between an **Anchored** control and its parent. | |
| 224 | 224 | Caption | The text that is displayed on or near the control; it should preferably give some clue as to the function of the control, or an instruction such as 'Close' or 'Execute'. By default Caption is set to be the same as the 'Name' property, and the application programmer should substitute meaningful text instead of the default values. | |
| 225 | 225 | CharCase | Indicates how text is displayed in a text editing control: Normal (retaining the case of the letters typed by the user), converted to uppercase, or converted to lowercase | |
| 226 | 226 | Constraints | Sets the minimum and maximum sizes for a control. If a control is resized the new dimensions are always within the ranges given here. You should take care when setting these options that they do not conflict with the Anchors and Align settings. | |
| 227 | 227 | Color | The Colour to be used to draw the control or to write the text it contains. | |
| 228 | 228 | Enabled | A Boolean property to determine whether or not a control is capable of being selected and performing an action. If it is not **Enabled** , it is often **Grayed** out on the Form. | |
| 229 | 229 | Font | The Font to be used for writing the text associated with the control - either the caption or label, or the text-strings contained within the control. The entry on the Object Inspector usually has a (+) box on the left, and selecting this box reveals further options such as character set, colour and size. | |
| 230 | 230 | Hint | A short piece of informative pop-up text that appears if the mouse-cursor hovers over the control. See the ShowHint property. | |
| 231 | 231 | Items | The list of 'Things' that the object contains, such as a group of images, a series of lines of text, a number of actions in an actionlist, etc | |
| 232 | 232 | Lines | An array of strings, containing the textual data in controls with more than a single line of data, such as an Edit-Box or a Combo-Box. The array is zero-indexed, ie the lines are numbered [0..numLines-1] | |
| 233 | 233 | Name | The identifier by which the control is known in the program. The IDE gives it a default name based on the underlying type, for example successive instances of TBitButton would be named Form1.BitBitton1 and Form1.BitButton2; it is up to the application programmer to give them more meaningful names such as ExitButton or OKButton. By default the Name of the control is applied to the Caption for the control, but the text of the Caption may be changed separately. | |
| 234 | 234 | PopUpMenu | A window containing context-sensitive menu information that pops up when the right mouse button is clicked on the object. | |
| 235 | 235 | Position (or Top, Left) | Determines where the control is located on the parent form or window | |
| 236 | 236 | ReadOnly | Boolean property which, if True, signifies that the contents of the control can be read by the user or the calling routine, but cannot be written or changed. | |
| 237 | 237 | ShowHint | Allows a small window containing a context-sensitive Help or other description to be displayed when the mouse cursor 'hovers' over the control. See the Hint property. | |
| 238 | 238 | Size (or Height and Width) | The dimensions of the control | |
| 239 | 239 | Style | The options available for Style depend upon the sort of Control being considered: for instance the Style may be defined by TFormStyle, TBorderStyle, TButtonStyle etc. | |
| 240 | 240 | TabOrder | Integer defining where in the sequence of tabs on the Form this control is to lie | |
| 241 | 241 | TabStop | Boolean property which if True places this control in the sequence of objects that the user can reach by successively pressing the Tab key | |
| 242 | 242 | Text | The String of Text that represents the actual data that this control contains. Applies particularly to Text, Memo and StringList types of object. Most of the editing operations (such as **Select** , **Clear** , **Cut** , **Copy**) are performed in this part of the object, which holds the actual string being edited. If the control contains more than a single line of text, for example **TMemo** or **TComboBox** , then the textual elements are arranged as an array of strings (zero-indexed, ie numbered from [0..numLines-1]) in **Lines**. | |
| 243 | 243 | Visible | If true, the object can be seen on the Form; if False, object is hidden | |
| 244 | 244 | WordWrap | Logical flag to show whether or not word-wrap is enabled, ie if a word comes close to the end of a line and is going to be too long for the line, it is wrapped down to the next line. | |
| 245 | 245 | ||
| 246 | 246 | #### Event Actions | |
| 247 | 247 | ||
| 248 | 248 | Many actions are commonly listed in the 'Events' tab of the Object Inspector. If you select an entry in the list, a ComboBox appears with a DropDown list showing any actions that have aleady been defined, and allowing you to choose one to be associated with this event. Alternatively you can select the ellipsis (three dots ...) and you will be taken to an area of the Source Editor where you can begin typing your own action instructions for the selected event. | |
| 249 | 249 | ||
| 250 | 250 | While a large number of events is available for any given control, in practice it is only necessary to populate a few of them. For most controls, it is sufficient to provide coding for 'OnClick'; for more complex controls it may be necessary also to provide for 'OnEntry' (when the mouse cursor enters the Control and gives it focus) and 'OnExit' (when the mouse cursor leaves the Control; or you may need to write an event handler for 'OnChange' or 'OnScroll', depending on the nature of the particular control with which you are dealing. | |
| 251 | 251 | ||
| 252 | 252 | The pop-up menu that appears when you right-click an object in the Form Designer has, as its first item: 'Create default event' and selecting this option will have the same effect as selecting the ellipsis in the Object Inspector for the default event, usually OnClick: you are taken to the Implementation area of the Source Editor where you can type the code for the event handler. | |
| 253 | 253 | ||
| 254 | 254 | A common strategy in Object-Oriented programming is to provide an **[[TActionList|ActionList]]** with the facility for entering, removing or editing a number of pre-defined actions from which the most appropriate can be selected to use in any particular instance. | |
| 255 | 255 | ||
| 256 | 256 | **Some commonly listed Actions** **Action** | **Meaning** | |
| 257 | 257 | ---|--- | |
| 258 | 258 | OnChange | Action to be taken if any change is detected (eg mouse move, mouse click, key press, edit text, alter picture, etc) | |
| 259 | 259 | OnClick | Action to be taken when the (first, usually left) mouse button is clicked. This is commonly the main or default action of the control; for example clicking on a button or checkbox initiates the action associated with the checkbox. It may alternatively initate a process of selection, for instance in a TextBox or Memo, or signal the beginning of painting with a Pen or Brush. | |
| 260 | 260 | Click | A method to emulate in code the effect of clicking on a control. This method is most often found in Button-type controls (TButton, [[TBitBtn]], [[TSpeedButton]] etc). A procedure can be written that calls the same code as the OnClick action. This facility can be particularly useful if the activation of one control by clicking causes a cascade of other controls to be activated, and the Click method can be used to initiate the action rather than having the user explicitly click on a lot of controls. | |
| 261 | 261 | OnDragDrop | Action to be taken during Drag-Drop manoeuvres, ie when the mouse is used to 'capture' an item or some text etc and move it around the screen to a new location. | |
| 262 | 262 | OnEditingDone | Action to be taken when the user has finished all edits/modifications to the control. This is often used to validate the control content (e.g. check if an entered text is a valid IP address) | |
| 263 | 263 | OnEntry | Action to be taken when the mouse cursor enters the area occupied by the object, usually transfering focus to that object. This might include changes in the appearance of the object such as highlighting or raising the border. | |
| 264 | 264 | OnExit | Action to be taken when the mouse moves out of the area of the object, usually transferring focus out of the object. | |
| 265 | 265 | OnKeyPress | Action to be taken for any key-press. Subtly different from OnKeyDown, which simply responds to a key being down, whether or not it was already down when focus was given to this control. OnKeyPress requires that a key becomes pressed while focus is in this control. | |
| 266 | 266 | OnKeyDown | Action to be taken if a key is down while focus is in this control. Subtly different from OnKeyPress - for example the key might already have been down when focus entered this control, whereas OnKeyPress requires the key to become pressed while focus is in the control. | |
| 267 | 267 | OnKeyUp | Action to be taken if a key is up (ie not pressed) while focus is in this control. | |
| 268 | 268 | OnMouseMove | Action to be taken if the mouse cursor moves while focus is in this control. | |
| 269 | 269 | OnMouseDown | Action to be taken if the mouse button is down while focus is in this control. | |
| 270 | 270 | OnMouseUp | Action to be taken if the mouse button is up while the cursor is over this control. Implies that the mouse button was previously down and has been released. The case where the cursor enters the control but the mouse button has not yet been pressed is covered by OnEntry or OnMouseEnter. | |
| 271 | 271 | OnResize | Action to be taken when the control is resized. Might include re-alignment of text or selection of a different font size etc. | |
| 272 | 272 | ||
| 273 | 273 | #### Constructors & Destructors | |
| 274 | 274 | ||
| 275 | 275 | These are two special methods associated with each control: | |
| 276 | 276 | ||
| 277 | 277 | * **[[Constructor|Constructors]]:** such as **Create** allocate memory and system resources needed by the object. They also call the constructor of any sub-objects present in the class. | |
| 278 | 278 | * **[[Destructor|Destructors]]:** remove the object and de-allocate memory and other resources. If you call **Destroy** for an object which hasn't being initialized yet it will generate an error. Always use the **Free** method to deallocate objects, because it checks whether an object's value is **[[Nil|nil]]** before invoking **Destroy**. | |
| 279 | 279 | ||
| 280 | 280 | Take the following precautions when creating your own **Destroy** method: | |
| 281 | 281 | ||
| 282 | 282 | * Declare **Destroy** with the **override** directive, because it is a **virtual** method. | |
| 283 | 283 | * Always call '**inherited Destroy;'** as the last thing on the destructor code | |
| 284 | 284 | * Be aware that an **[[Exceptions|exception]]** may be raised on the **constructor** in case there is not enough memory to create an object, or something else goes wrong. If the **exception** is not handled inside the constructor, the object will be only partially built. In this case **Destroy** will be called when you weren't expecting it, so your destructor must check if the resources were really allocated before disposing of them. | |
| 285 | 285 | * Remember to call **Free** for all objects created on the constructor. | |
| 286 | 286 | ||
| 287 | 287 | ## Menu controls | |
| 288 | 288 | ||
| 289 | 289 | ### TMainMenu | |
| 290 | 290 | ||
| 291 | 291 | [[TMainMenu]] is the Main Menu that appears at the top of most forms; form designers can customise by choosing various menu items. | |
| 292 | 292 | ||
| 293 | 293 | [[TMainMenu]] is a non-visual component: that is, if the icon is selected from the [[Component Palette]] and placed on the form, it will not appear at [[runtime|run time]]. Instead, a menu bar with a structure defined by the [[IDE Window: Menu Editor|Menu Editor]] will appear. | |
| 294 | 294 | ||
| 295 | 295 | ### TPopupMenu | |
| 296 | 296 | ||
| 297 | 297 | [[TPopupMenu]] is a menu window that pops up with pertinent, usually context-sensitive, details and choices when the right mouse button is clicked on a control if the popupmenu is linked to the PopupMenu [[Property|property]] of that component, thus providing a context sensitive menu for that component. | |
| 298 | 298 | ||
| 299 | 299 | ### Menu editor | |
| 300 | 300 | ||
| 301 | 301 | To see the [[IDE Window: Menu Editor|Menu Editor]], right-click on the Main Menu or Popup Menu icon on your Form. A pop-up box appears that invites you to enter items into the Menu bar. | |
| 302 | 302 | ||
| 303 | 303 | An edit box is displayed, containing a button labeled "New Item1". If you right-click on that box, a pop-up menu is displayed that allows you to add a new item before or after (along the same level) or create a sub-menu with the opportunity to add further items below (or above) the new item in a downward column. | |
| 304 | 304 | ||
| 305 | 305 | Any of the [TMenuItems](</index.php?title=TMenuItem&action=edit&redlink=1> "TMenuItem \(page does not exist\)") that you add can be configured using the [[IDE Window: Object Inspector|Object Inspector]]. | |
| 306 | 306 | ||
| 307 | 307 | At the least you should give each item a _Caption_ which will appear on the Menu Bar. The caption should indicate the activity to be selected, such as "File Open" or "Close", "Run" or "Quit". You may also wish to give it a more meaningful _Name_. | |
| 308 | 308 | ||
| 309 | 309 | If you want a particular letter in the Caption to be associated with a shortcut key, that letter should be preceded by an [[&|ampersand (&)]]. The Menu item at run-time will appear with the shortcut letter underlined, and hitting that letter key will have the same effect as selecting the menu item. Alternatively you can choose a shortcut key sequence (such as `Ctrl`+`C` for Copy or `Ctrl`+`V` for Paste - the standard keyboard shortcuts) with the _ShortCut_ property of the [TMenuItem](</index.php?title=TMenuItem&action=edit&redlink=1> "TMenuItem \(page does not exist\)"). | |
| 310 | 310 | ||
| 311 | 311 | #### Setting Shortcuts Programmatically | |
| 312 | 312 | ||
| 313 | 313 | Two functions are provided that convert virtual key to shortcuts and visa versa, KeyToShortCut() and ShortCutToKey(). eg | |
| 314 | 314 | ``` | |
| 315 | 315 | MenuBold.ShortCut:= KeyToShortCut(VK_B, [ssMeta]); | |
| 316 | 316 | ``` | |
| 317 | 317 | ||
| 318 | 318 | ### ActionList use | |
| 319 | 319 | ||
| 320 | 320 | It is often helpful to use the Menu controls in conjunction with a [[TActionList]] which contains a series of standard or customised [[TAction|TActions]]. Menu items can be linked in the Object Inspector to _actions_ on the list, and the same actions can be linked to [[TButton|TButtons]], [[TToolButton|TToolButtons]], [[TSpeedButton|TSpeedButtons]] etc. It is obviously more efficient to re-use the same code to respond to the various events, rather than writing separate _OnClick_ event handlers for each individual control. | |
| 321 | 321 | ||
| 322 | 322 | By default, a number of standard actions are pre-loaded from _StdActns_ or, if DataAware controls are used, from _DBActns_. These actions can be chosen using the [ActionList editor](</index.php?title=ActionList_editor&action=edit&redlink=1> "ActionList editor \(page does not exist\)") which appears when you right-click on the [[TActionList]] icon on the Form Designer. | |
| 323 | 323 | ||
| 324 | 324 | ## The Debugger | |
| 325 | 325 | ||
| 326 | 326 | _Still to be written_. | |
| 327 | 327 | ||
| 328 | 328 | 1) Make sure you read the setup: [[Debugger Setup]] | |
| 329 | 329 | ||
| 330 | 330 | 2) See also [category: IDE Window - Debug](</Category:IDE_Window_-_Debug> "Category:IDE Window - Debug") | |
| 331 | 331 | ||
| 332 | 332 | 3) Read limitations: [[GDB Debugger Tips|GDB_Debugger_Tips#Inspecting_data_types_.28Watch.2FHint.29]] This page also helps with some platform/version specific issues | |
| 333 | 333 | ||
| 334 | 334 | ## The Lazarus files | |
| 335 | 335 | ``` | |
| 336 | 336 | (Thanks to Kevin Whitefoot.) | |
| 337 | 337 | (Additions by Giuseppe Ridinò, [User:Kirkpatc](</User:Kirkpatc> "User:Kirkpatc") and Tom Lisjac) | |
| 338 | 338 | ``` | |
| 339 | 339 | ||
| 340 | 340 | When you save you will actually be saving two files: | |
| 341 | 341 | ``` | |
| 342 | 342 | xxx.pas and yyy.lpr | |
| 343 | 343 | ``` | |
| 344 | 344 | ||
| 345 | 345 | (You save more than that but those are the ones you get to name). The project file (lpr) and the unit file (pas) must not have the same name because Lazarus will helpfully rename the unit (inside the source code) to the same as the unit file name and the program to the name of the project file (it needs to do this or the compiler will probably not be able to find the unit later when referred to in the project file). Of course to be consistent it changes all the occurrences of unit1 to xxx. | |
| 346 | 346 | ||
| 347 | 347 | So if you are saving a project called **again** , trying to save again.pas and again.lpr fails because unit names and program names are in the same name space resulting in a duplicate name error. | |
| 348 | 348 | ||
| 349 | 349 | So here is what I ended up with: | |
| 350 | 350 | ||
| 351 | 351 | e:/lazarus/kj/lazhello: | |
| 352 | 352 | ``` | |
| 353 | 353 | total 4740 free 76500 | |
| 354 | 354 | -rwxrwxrwx 1 kjwh root 4618697 Mar 24 11:19 again.exe | |
| 355 | 355 | -rw-rw-rw- 1 kjwh root 3002 Mar 24 11:21 again.lpi | |
| 356 | 356 | -rw-rw-rw- 1 kjwh root 190 Mar 24 11:18 again.lpr | |
| 357 | 357 | -rw-rw-rw- 1 kjwh root 506 Mar 24 11:08 againu.lfm | |
| 358 | 358 | -rw-rw-rw- 1 kjwh root 679 Mar 24 11:08 againu.lrs | |
| 359 | 359 | -rw-rw-rw- 1 kjwh root 677 Mar 24 11:08 againu.pas | |
| 360 | 360 | -rw-rw-rw- 1 kjwh root 2124 Mar 24 11:08 againu.ppu | |
| 361 | 361 | -rwxrwxrwx 1 kjwh root 335 Mar 24 11:07 ppas.bat | |
| 362 | 362 | ``` | |
| 363 | 363 | ||
| 364 | 364 | Note that there are many more files than the two that I thought I was saving. | |
| 365 | 365 | ||
| 366 | 366 | Here is a brief note about each file: | |
| 367 | 367 | ||
| 368 | 368 | **again.exe:** The main program binary executable. Win32 adds an "exe" extension. Linux has none (just the name of the program). This file will be huge in Linux due to the inclusion of debugging symbols. Run the "strip" utility to remove them and substantially shrink the executable size. | |
| 369 | 369 | ||
| 370 | 370 | **again.lpi:** (Lazarus Project Information). This is the main information file of a Lazarus project; the equivalent Delphi main file of an application will be the .dpr file. It is stored in an XML format and contains instructions about all the libraries and units required to build the executable file. | |
| 371 | 371 | ||
| 372 | 372 | **again.lpr:** The main program source file or master file. Despite its Lazarus specific extension it is in fact a perfectly normal Pascal source file. It has a uses clause that lets the compiler find all the units it needs. Note that the program statement does not have to name the program the same as the file name. This file is usually fairly small, with just a few statements to initialise, build the forms, run and close the application. Most of the work is done in the unit source files, with suffix '.pas' | |
| 373 | 373 | ||
| 374 | 374 | **againu.lfm:** This is where Lazarus stores the layout of the form unit, in human readable form. It reflects the properties of the various components, as set in the Object Inspector. Each object description starts with a line: | |
| 375 | 375 | ``` | |
| 376 | 376 | object xxxx | |
| 377 | 377 | then there follows a list of properties | |
| 378 | 378 | (including embedded or nested objects) then an | |
| 379 | 379 | end | |
| 380 | 380 | ``` | |
| 381 | 381 | ||
| 382 | 382 | line. Lazarus uses this file to generate a resource file (.lrs) that is included in the initialisation section of the againu.pas unit. Delphi dfm files can be converted to lfm format in the Lazarus IDE using the Tools->Convert DFM file to LFM utility. | |
| 383 | 383 | ||
| 384 | 384 | **againu.lrs:** This is the generated resource file which contains the instructions to the program for building the form (if you look in the main Unit file, you will see in the initialization section the line | |
| 385 | 385 | ``` | |
| 386 | 386 | {$i againu.lrs} | |
| 387 | 387 | ``` | |
| 388 | 388 | ||
| 389 | 389 | which instructs the program to load the resource file). Note that it is not a Windows resource file. | |
| 390 | 390 | ||
| 391 | 391 | **againu.pas:** The unit that contains the code for the form; this is usually the only file that the application programmer needs to edit or inspect, and contains any code specifically supplied by the programmer (especially event handlers). | |
| 392 | 392 | ||
| 393 | 393 | **againu.ppu:** This is the compiled unit which gets linked into the executable file together with any other units named in the Uses section. | |
| 394 | 394 | ||
| 395 | 395 | **ppas.bat:** This is a simple script that links the program to produce the executable. If compilation is successful, it is deleted by the compiler. | |
| 396 | 396 | ||
| 397 | 397 | ## See also | |
| 398 | 398 | ||
| 399 | 399 | * [[Lazarus Tutorial Part 2]] | |
| 400 | 400 | * [[Form Tutorial|Lazarus Form Tutorial]] | |
| 401 | 401 | * [[Howdy World \(Hello World on steroids\|Howdy World (Hello World on steroids)]]> "Howdy World \(Hello World on steroids\)") | |
| 402 | 402 | * [[Peg Solitaire tutorial]] | |
| 403 | 403 | * [[Lazarus IDE Tools]] | |
| 404 | 404 | * [[Lazarus project files]] | |
| 405 | 405 | ||
| 406 | 406 | --- | |
| 407 | - | ||
| 407 | + | *From the Free Pascal wiki, page " Lazarus Tutorial", as the Internet Archive kept it on 2024-06-20, last changed on 2021-12-08. Copyright stays with the author who wrote it, according to the old wiki's [[Licensing]] page. If you have concerns about this material, [message the admin](/wiki-contact).* |