

LazMapViewer: what changed
Revision 3 to 4. Removed lines have a minus sign; added lines have a plus sign.
| Old | New | Line | |
|---|---|---|---|
| 1 | - | ||
| 1 | + | [[Template:LazMapViewer]] | |
| 2 | 2 | ||
| 3 | 3 | [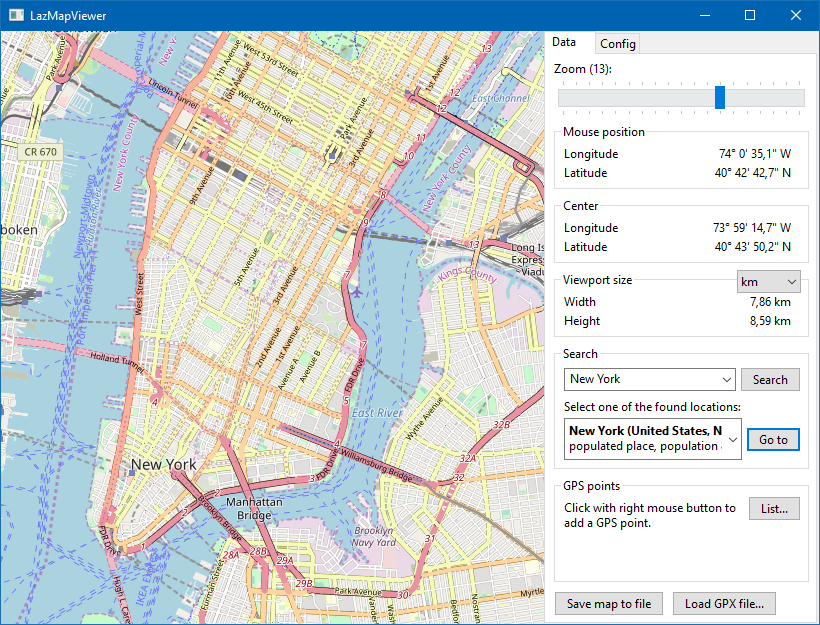](</File:lazmapviewer.png>) | |
| 4 | 4 | ||
| 5 | 5 | Map provider: [OpenStreatMap Mapnik](<https://www.openstreetmap.org>), [Open Data Commons Open Database License](<https://opendatacommons.org/licenses/odbl/>) | |
| 6 | 6 | ||
| 7 | 7 | ## About | |
| 8 | 8 | ||
| 9 | 9 | **LazMapViewer** is a component for embedding maps obtained from the internet, such as Google maps or OpenStreetView, into a Lazarus form. | |
| 10 | 10 | ||
| 11 | 11 | The initial version of the package was written by Maciej Kaczkowski and later improved by members of the Lazarus forum. The package is currently maintained by Werner Pamler (wp_xxyyzzz-at-gmx-dot-net). | |
| 12 | 12 | ||
| 13 | 13 | License: Modified LGPL (with linking exception, like Lazarus LCL). | |
| 14 | 14 | ||
| 15 | 15 | ## Download and Installation | |
| 16 | 16 | ||
| 17 | 17 | ### Development version | |
| 18 | 18 | ||
| 19 | 19 | **Download** | |
| 20 | 20 | ||
| 21 | 21 | Use an SVN client to download the current trunk version from <svn://svn.code.sf.net/p/lazarus-ccr/svn/components/lazmapviewer>. | |
| 22 | 22 | ||
| 23 | 23 | Alternatively download the zipped snapshot from <https://sourceforge.net/p/lazarus-ccr/svn/HEAD/tree/components/lazmapviewer/> and unpack it to some folder. | |
| 24 | 24 | ||
| 25 | 25 | **Installation** | |
| 26 | 26 | ||
| 27 | 27 | In Lazarus, go to "Package" > "Open Package File .lpk". Navigate to the folder with the LazMapViewer sources, and select `lazmapviewerpkg.lkp`. Click "Compile", then "Use" > "Install". This will rebuild the IDE (it may take some time). When the process is finished the IDE will restart, and you'll find the new components on the palette **MapViewer**. | |
| 28 | 28 | ||
| 29 | 29 | There are optional, supporting packages to extend the basic functionality. They must be installed in the same way, after `lazmapviewerpkg.lpk`. | |
| 30 | 30 | ||
| 31 | 31 | Package file name | Contained components | Purpose | |
| 32 | 32 | ---|---|--- | |
| 33 | 33 | lazmapviewerpkg.lpk | TMapView | Main component to display maps | |
| 34 | 34 | | TMvDEFpc | Default download engine using the internal fpc routines (fphttpclient). | |
| 35 | 35 | | TMvDECache | Offline-only access to map tiles | |
| 36 | 36 | | TMvPluginManager | Extends the functionality of TMapView by plugins | |
| 37 | 37 | | TMvGeoNames | Access to geo coordinates of cities | |
| 38 | 38 | lazmapviewer_synapse.lpk | TMvDESynapse | Alternative download engine based on the [[Synapse]] library which must be installed first. | |
| 39 | 39 | lazmapviewer_rgbgraphics.lpk | TMvRGBGraphicsDrawingEngine | Alternative drawing engine utilizing the [[LazRGBGraphics]] package which must be installed first. | |
| 40 | 40 | lazmapviewer_bgra.lpk | TMvBGRADrawingEngine | Alternative drawing engine based on the [[BGRABitmap]] package which must be installed first. | |
| 41 | 41 | ||
| 42 | 42 | ### Release version | |
| 43 | 43 | ||
| 44 | 44 | Occasionally, release versions are made available via the [[Online Package Manager]] for easy one-click-installation directly from Lazarus: Just check the package (and the sub-packages needed) in the OPM window and click on the "Install" button. | |
| 45 | 45 | ||
| 46 | 46 | ### Requirements | |
| 47 | 47 | ||
| 48 | 48 | Release v1.0.2 was tested successfully on Windows, Linux gtk2/gtk3/qt5/qt6, macOS Cocoa with Lazarus/FPC combinations from current Laz 4.99/FPC 3.3.1 back to Laz 2.0.10/FPC 3.2.0. | |
| 49 | 49 | ||
| 50 | 50 | ### Version changes | |
| 51 | 51 | ||
| 52 | 52 | * **Version 1.1** | |
| 53 | 53 | * Translation (i18n) enabled | |
| 54 | 54 | * **Version 1.0** | |
| 55 | 55 | * Signficantly improved graphics engine | |
| 56 | 56 | * Overlay layers | |
| 57 | 57 | * Adding layers, points of interest, tracks and areas at designtime | |
| 58 | 58 | * Plugin architecture | |
| 59 | 59 | * **Version 0.x** | |
| 60 | 60 | * Initial commits | |
| 61 | 61 | * Several drawing and download engines | |
| 62 | 62 | ||
| 63 | 63 | ## The Main Map Viewer: TMapView | |
| 64 | 64 | ||
| 65 | 65 | ### Getting Started | |
| 66 | 66 | ||
| 67 | 67 | Here is a short tutorial to create your first map. | |
| 68 | 68 | ||
| 69 | 69 | #### Preparation | |
| 70 | 70 | ||
| 71 | 71 | * Drop a `TMapView` component on the form and size it as needed. The component is on the _MapViewer_ tab of the Lazarus component palette. | |
| 72 | 72 | * With the `MapView` selected in the object inspector, pick one of the items from the `MapProvider` combobox, and set the `Active` property to `true` \- after a short time of loading you'll see your first map! | |
| 73 | 73 | * In the background the `MapView` component has established an internet connection to the specified map provider and downloaded the default map. The maps are delivered as a series of **tiled images** at given size, usually 256x256 pixels in png or jpeg format. | |
| 74 | 74 | * When property `CacheOnDisk` is set to `true` the tile images are stored in a cache directory and used primarily to reduce internet traffic; only when an image is not found another download from the internet is triggered again. Depending on the `CacheLocation` property the cache can be set up to be in the user profile (`clProfile`), the temp (`clTemp`) or a custom directory (`clCustom`, path `CachePath`). | |
| 75 | 75 | * It is recommended to turn off the `Active` property during normal work because the time to load the form with the `MapView` sometimes can be annoyingly long. In order to see the map at run time, you should add the following handler for the form's `OnShow` or `OnActivate` event and set the `Active` there: | |
| 76 | 76 | ||
| 77 | 77 | ``` | |
| 78 | 78 | procedure TForm1.FormActivate(Sender: TObject); | |
| 79 | 79 | begin | |
| 80 | 80 | MapView1.Active := true; | |
| 81 | 81 | end; | |
| 82 | 82 | ``` | |
| 83 | 83 | ||
| 84 | 84 | * Another important optimization is to make sure that the `UseThreads` property is `true`. This delegates downloading and drawing to several tasks and considerably speeds up viewing of the maps. | |
| 85 | 85 | * That's all. Compile, run and see your fist map! Use the left mouse button to drag the map to another location, and rotate the mouse wheel to change the magnfication. | |
| 86 | 86 | ||
| 87 | 87 | #### Magnification | |
| 88 | 88 | ||
| 89 | 89 | * The map images are provided in different magnifications depending on the `Zoom` level of the `MapView`. Each step in `Zoom` level corresponds to doubling the magnification. The lowest zoom level (`0`) displays the entire world in a single tile, level `1` holds a quarter in each tile, etc. The maximum `Zoom` level for most map providers is 18 -- this means that the most detailed maps cover a fraction of `1/2^18` of the earth circumference, about 150 m (at the equator). | |
| 90 | 90 | * So, if you want to see **more details** you must increase the `Zoom` value of the `MapView`. You can enter the requested value in the Object Inspector at **designtime** , or add a `TScrollbar` or `TTrackbar` to the form to change the magnfication interactively by using the following simple `OnChange` event handler (set the `Max` of the bar to, say, 18: | |
| 91 | 91 | ||
| 92 | 92 | ``` | |
| 93 | 93 | procedure TForm1.TrackBar1Change(Sender: TObject); | |
| 94 | 94 | begin | |
| 95 | 95 | MapView1.Zoom := TrackBar1.Position; | |
| 96 | 96 | end; | |
| 97 | 97 | ``` | |
| 98 | 98 | ||
| 99 | 99 | * Alternatively, zooming can also be achieved by rotating the **mouse wheel** provided that `mvoMouseZooming` is set in the `Options`. When `ZoomToCursor` is `true` the zoom operation is relative to the mouse cursor, otherwise to the map center. | |
| 100 | 100 | ||
| 101 | 101 | #### Location | |
| 102 | 102 | ||
| 103 | 103 | * By default the **center of the map** is the intersection of the 0-degree meridian with the equator - which is a bit off of the coast of western Africa. In order to focus onto a different location you must specify its longitude and latitude in the `Center` property of the `MapView`. This is a `TRealPoint` record having the longitude and latitude in the `Lon` and `Lat` record elements. Alternatively you can also use the `MapCenter` propery which is accessible directly in the object inspector at designtime. | |
| 104 | 104 | * Suppose we want to zoom into Manhattan. Use your favorite search engine to determine the geo coordinates of Manhattan: Longitude = -73.985130°, Latitude = 40.758896°. Alternatively you can also use the `TGeoNames` component which comes with the LazMapViewer package and provides access to a database of the geo coordinates of a huge number of locations via internet. | |
| 105 | 105 | ||
| 106 | 106 | ``` | |
| 107 | 107 | uses | |
| 108 | 108 | mvTypes; | |
| 109 | 109 | procedure TForm1.FormActivate(Sender: TObject); | |
| 110 | 110 | var | |
| 111 | 111 | P: TRealPoint; | |
| 112 | 112 | begin | |
| 113 | 113 | MapView1.Active := true; | |
| 114 | 114 | MapView1.Zoom := 13; // for the magnification used in the introductory screenshot | |
| 115 | 115 | ||
| 116 | 116 | // Geo-coordinates of the map center: | |
| 117 | 117 | P.Lat := 40.758896; | |
| 118 | 118 | P.Lon := -73.985130; | |
| 119 | 119 | MapView1.Center := P; | |
| 120 | 120 | ||
| 121 | 121 | // or: | |
| 122 | 122 | // MapView1.MapCenter.Latitude := 40.758896; | |
| 123 | 123 | // MapView1.Mapcenter.Longitude := -73.985130; | |
| 124 | 124 | ||
| 125 | 125 | // or: | |
| 126 | 126 | // MapView1.MapCenter.RealPt := RealPoint(40.758896, -73.985130); | |
| 127 | 127 | end; | |
| 128 | 128 | ``` | |
| 129 | 129 | ||
| 130 | 130 | * In addition to specifying the location numerically you can also change the location by **dragging the map with the mouse** (with `mvoMouseDragging` set in the `Options`): Just press the left mouse button and slowly move the mouse in the direction where you want to see more details - the map will follow. But you should be aware that usually neighboring maps will have to be loaded from the internet, and, depending on the speed of your internet connection, this may make the entire action a bit sluggish. | |
| 131 | 131 | * At **designtime** , you can enter the coordinates in the `MapCenter` property of the object inspector, and when `Active` is `true` you'll get immediate feedback in the map. | |
| 132 | 132 | ||
| 133 | 133 | ### Basic Documentation | |
| 134 | 134 | ||
| 135 | 135 | [](</File:tmapview_200.png>) | |
| 136 | 136 | ||
| 137 | 137 | #### Properties | |
| 138 | 138 | ||
| 139 | 139 | These are the main properties of the `TMapView` component: | |
| 140 | 140 | ||
| 141 | 141 | * `Active (boolean)`: | |
| 142 | 142 | ||
| 143 | - | ||
| 144 | - | ||
| 145 | - | ||
| 143 | + | Must be set to `true` before the `MapView` component can display maps. | |
| 146 | 144 | ||
| 147 | 145 | * `CacheLocation` (enumeration `clProfile`, `clTemp`, `clCustom`): | |
| 148 | 146 | ||
| 149 | - | ||
| 150 | - | ||
| 151 | - | ||
| 147 | + | Determines whether the directory for the tile image cache is the user profile, the temp directory or a custom directory specified by `CachePath` | |
| 152 | 148 | ||
| 153 | 149 | * `CacheMaxAge`: | |
| 154 | 150 | ||
| 155 | - | ||
| 156 | - | ||
| 157 | - | ||
| 151 | + | Is the maximum number of days after which files are reloaded from the provider. Default: quasi-infinite. | |
| 158 | 152 | ||
| 159 | 153 | * `CacheOnDisk (boolean)`: | |
| 160 | 154 | ||
| 161 | - | ||
| 162 | - | ||
| 163 | - | ||
| 155 | + | When set to `true` (default) dowloaded map tiles are stored in a directory to reduce internet traffic and for faster access. It is not recommended to turn this property off. If you want to delete the cache files and directories call the method `TMapView.DeleteCacheFiles` which deletes the cache directory of the currently used map provider. | |
| 164 | 156 | ||
| 165 | 157 | * `CachePath (string)`: | |
| 166 | 158 | ||
| 167 | - | ||
| 168 | - | ||
| 169 | - | ||
| 159 | + | Name of the directory in which downloaded map images are buffered when `CacheLocation` is set to `clCustom`. | |
| 170 | 160 | ||
| 171 | 161 | * `Cyclic (boolean)`: | |
| 172 | 162 | ||
| 173 | - | ||
| 174 | - | ||
| 175 | - | ||
| 163 | + | When switched to `true` the map is repeated at the date boundary to completely fill the width of the mapviewer. | |
| 176 | 164 | ||
| 177 | 165 | * `DownloadEngine (TMvCustomDownloadEngine)`: | |
| 178 | 166 | ||
| 179 | - | ||
| 180 | - | ||
| 181 | - | ||
| 167 | + | Determines the control which downloads the tile images from the map servers. In Windows, this is by default the `TMvDEWin` engine based on the _WinInet_ library. Linux and macOS, by default, use the `TMvDEFPC` engine which takes advantage of the `TFPHttpClient` class coming with FPC. If a different download engine is required the corresponding component can be hooked to this property. The alternative `TMvDESynapse` engine based on the _Synapse_ library can be installed as a separate component. Note that there is also a "download" engine `TMvDECache` which only loads images from the cache but does not actually access the internet - this is interesting of off-line applications. It is required that you already have pre-loaded tile images and your application covers only a small region at the highest magnification. | |
| 182 | 168 | ||
| 183 | 169 | * `DrawingEngine (TMvCustomDrawingEngine)`: | |
| 184 | 170 | ||
| 185 | - | ||
| 186 | - | ||
| 187 | - | ||
| 171 | + | Painting of the tiled images is a speed-critical task. By default, this is done using routines from the _IntfGraphics_ unit; the corresponding drawing engine is in the `TMvInfGraphicsDrawingEngine` class. However, it is possible to provide a different drawing engine here. The standard installation of _LazMapViewer_ comes with the alternative `TMvRGBGraphicsDrawingEngine` which is based on the _RGBGraphics_ package, and with the `TMvBGRADrawingEngine` utilizing the _BGRABitmap_ package. The external libraries required must be installed from separate packages. | |
| 188 | 172 | ||
| 189 | 173 | * `DrawPreviewTiles (boolean)`: | |
| 190 | 174 | ||
| 191 | - | ||
| 192 | - | ||
| 193 | - | ||
| 175 | + | When a tile currently is not available an existing tile is stretched to fit into the tile's place in the map. Otherwise, when `DrawPreviewTiles = false`, the missing tile's area is filled by the uniform background color of the `MapView`. | |
| 194 | 176 | ||
| 195 | 177 | * `Layers`: | |
| 196 | 178 | ||
| 197 | - | ||
| 198 | - | ||
| 199 | - | ||
| 179 | + | A collection of `TMapLayer` instances which can be drawn independently over the base map - see below. | |
| 200 | 180 | ||
| 201 | 181 | * `MapCenter`: | |
| 202 | 182 | ||
| 203 | - | ||
| 204 | - | ||
| 205 | - | ||
| 183 | + | A helper class needed for entering the geo coordinates of the map's center point (`MapCenter.Latitude` and `MapCenter.Longitude`) in the object inspector. When the option `mvoLatOnInDMS` is set the values can be entered in the degree-minute-second format, otherwise as standard fractional floating point numbers. | |
| 206 | 184 | ||
| 207 | 185 | * `MapProvider (string)`: | |
| 208 | 186 | ||
| 209 | - | ||
| 210 | - | ||
| 211 | - | ||
| 187 | + | This string identifies the provider from which the maps are downloaded. Built-in providers allow to choose between _OpenStreetMaps_ , _GoogleMaps_ , _Virtual Earth_ , _Yandex_ etc. Details are given in section Map Providers. | |
| 212 | 188 | ||
| 213 | 189 | * `Options`: | |
| 214 | 190 | ||
| 215 | - | ||
| 191 | + | A set with the following elements | |
| 216 | 192 | ||
| 217 | - | ||
| 218 | - | ||
| 219 | - | ||
| 220 | - | ||
| 221 | - | ||
| 193 | + | \- `mvoMouseDragging`: Allows to enable/disable dragging of the map by the mouse. Default: on | |
| 222 | 194 | ||
| 223 | - | ||
| 195 | + | \- `mvoMouseZooming`: Allows to enable/disable zooming by rotating the mouse wheel. Default: on | |
| 224 | 196 | ||
| 225 | - | ||
| 197 | + | \- `mvoEditorEnabled`: Allows to edit the position of points and tracks with the mouse. Default: off | |
| 226 | 198 | ||
| 227 | - | ||
| 199 | + | \- `mvoLatLonInDMS`: When set, geo coordinates can be displayed/entered in the degree-minute-seconds format, otherwise as standard float number of the degrees. Default: off | |
| 228 | 200 | ||
| 229 | - | ||
| 201 | + | * `UseThreads (boolean)`: | |
| 230 | 202 | ||
| 231 | - | ||
| 203 | + | When set to `true` downloading and drawing of maps is delegated to multiple threads in order to achieve a smoother response. It is not recommended to turn this property off. | |
| 232 | 204 | ||
| 233 | - | ||
| 205 | + | * `Zoom (integer)`: | |
| 234 | 206 | ||
| 235 | - | ||
| 207 | + | Magnfication of the map: 0 = coarsest magnification, earth view, 17 or 18 = highest magnification. Each zoom step results in doubling of the magnfication factor. | |
| 236 | 208 | ||
| 237 | - | ||
| 209 | + | * `ZoomMax (integer)` and `ZoomMin`: | |
| 238 | 210 | ||
| 239 | - | ||
| 211 | + | Specify the range in which the zoom can be varied. | |
| 240 | 212 | ||
| 241 | 213 | * `ZoomToCursor (boolean)`: | |
| 242 | 214 | ||
| 243 | - | ||
| 244 | - | ||
| 245 | - | ||
| 215 | + | When this is `true` zooming is relative to the mouse position, otherwise to the center of the map. This feature is interesting for zooming with the mouse wheel. | |
| 246 | 216 | ||
| 247 | 217 | Here are properties related to overlayed GPS objects (points of interest, tracks): | |
| 248 | 218 | ||
| 249 | 219 | * `GPSItems: TGPSObjectList`: | |
| 250 | 220 | ||
| 251 | - | ||
| 252 | - | ||
| 253 | - | ||
| 221 | + | List of GPS objects assigned to the MapView. See below for details. | |
| 254 | 222 | ||
| 255 | 223 | * `DefaultTrackColor: TColor`, `DefaultTrackWidth: Integer`: | |
| 256 | 224 | ||
| 257 | - | ||
| 258 | - | ||
| 259 | - | ||
| 225 | + | The default color and line width, respectively, of overlayed tracks. See below for details. | |
| 260 | 226 | ||
| 261 | 227 | * `POIImage: TBitmap`: | |
| 262 | 228 | ||
| 263 | - | ||
| 264 | - | ||
| 265 | - | ||
| 229 | + | Bitmap which will be overlayed to mark a "point of interest" (POI). | |
| 266 | 230 | ||
| 267 | 231 | * `POImages: TCustomImageList`: | |
| 268 | 232 | ||
| 269 | - | ||
| 270 | - | ||
| 271 | - | ||
| 233 | + | Image list from which images can be selected as markers for points-of-interest. Note that the _LazMapViewer_ installation comes with a large selection of POI icons in the folder _marker-images_. | |
| 272 | 234 | ||
| 273 | 235 | * `POITextBgColor: TColor`: | |
| 274 | 236 | ||
| 275 | - | ||
| 276 | - | ||
| 277 | - | ||
| 237 | + | Background color of the overlayed text describing a point of interest. The transparency of the background is determined by `POITextBgOpacity`. Turn off the text background by selecting `clNone` or `POITextBgOpacity = 0.0`. | |
| 278 | 238 | ||
| 279 | 239 | * `POITextBgOpacity: Single`: | |
| 280 | 240 | ||
| 281 | - | ||
| 282 | - | ||
| 283 | - | ||
| 241 | + | Opacity of the overlayed text background of a point of interest for better readability. The floating point value is expected to be between 0.0 (fully transparent) and 1.0 (fully opacque). Default: 0.55 | |
| 284 | 242 | ||
| 285 | 243 | #### Events | |
| 286 | 244 | ||
| 287 | 245 | * `OnAfterDrawObjects, OnBeforeDrawObjects`: | |
| 288 | 246 | ||
| 289 | - | ||
| 290 | - | ||
| 291 | - | ||
| 247 | + | Events which are executed after/before overlay objects of the map (points of interest, tracks) are drawn. | |
| 292 | 248 | ||
| 293 | 249 | * `OnAfterDrawTile`: | |
| 294 | 250 | ||
| 295 | - | ||
| 296 | - | ||
| 297 | - | ||
| 251 | + | Comes after a tile has been painted. Helpful for custom-drawing information about this specific tile since the event has the tile's x and y indices, as well as the zoom level as a parameter in the `TileID` record. | |
| 298 | 252 | ||
| 299 | 253 | * `OnAfterPaint`: | |
| 300 | 254 | ||
| 301 | - | ||
| 302 | - | ||
| 303 | - | ||
| 255 | + | Is triggered after the map has been drawn completely. | |
| 304 | 256 | ||
| 305 | 257 | * `OnCenterMove`: | |
| 306 | 258 | ||
| 307 | - | ||
| 308 | - | ||
| 309 | - | ||
| 259 | + | Fires whenever the `Center` of the `MapView` have been changed. | |
| 310 | 260 | ||
| 311 | 261 | * `OnCenterMoving`: | |
| 312 | 262 | ||
| 313 | - | ||
| 314 | - | ||
| 315 | - | ||
| 263 | + | Is executed before a request to move the map center is handled. It has parameters `NewCenter` and `Allow` which can be used to restrict panning to a given region only (useful for off-line mode). | |
| 316 | 264 | ||
| 317 | 265 | * `OnChange`: | |
| 318 | 266 | ||
| 319 | - | ||
| 320 | - | ||
| 321 | - | ||
| 267 | + | Fires whenever the `Center`, size or `Zoom` factor of the `MapView` change. | |
| 322 | 268 | ||
| 323 | 269 | * `OnDrawEditMark`: | |
| 324 | 270 | ||
| 325 | - | ||
| 326 | - | ||
| 327 | - | ||
| 271 | + | Can be used to override painting of the mark which is currently edited. By default, the edited mark is a red square with green background. | |
| 328 | 272 | ||
| 329 | 273 | * `OnDrawGpsPoint`: | |
| 330 | 274 | ||
| 331 | - | ||
| 332 | - | ||
| 333 | - | ||
| 275 | + | See below. | |
| 334 | 276 | ||
| 335 | 277 | * `OnDrawMissingTile`: | |
| 336 | 278 | ||
| 337 | - | ||
| 338 | - | ||
| 339 | - | ||
| 279 | + | Can be used primarily to custom-paint the background of missing tiles when `DrawPreviewTiles` is `false`. It is also helpful when the tiles contain (semi-) transparent areas where the background is supposed to shine through. | |
| 340 | 280 | ||
| 341 | 281 | * `OnEditStartDrag`, `OnEditEndDrag`, `OnEditDrag`, `OnEditSelectionCompleted`, `OnEditIsDirty`: | |
| 342 | 282 | ||
| 343 | - | ||
| 344 | - | ||
| 345 | - | ||
| 283 | + | Are mainly used for internal communication between mapview and editmark during editing. | |
| 346 | 284 | ||
| 347 | 285 | * `OnKeyDown`, `OnKeyPress`, `OnKeyUp`: standard keyboard events inherited from `TControl`. Useful, for example, if you want to move the map center by the keyboard. | |
| 348 | 286 | * `OnMouseDown`, `OnMouseUp`: | |
| 349 | 287 | ||
| 350 | - | ||
| 351 | - | ||
| 352 | - | ||
| 288 | + | Standard mouse events inherited from `TControl` fired when a mouse button is clicked. | |
| 353 | 289 | ||
| 354 | 290 | * `OnMouseEnter`, `OnMouseLeave`: | |
| 355 | 291 | ||
| 356 | - | ||
| 357 | - | ||
| 358 | - | ||
| 292 | + | standard mouse events inherited from `TControl` fired when the mouse is moved into/out of the map | |
| 359 | 293 | ||
| 360 | 294 | * `OnResize`: | |
| 361 | 295 | ||
| 362 | - | ||
| 363 | - | ||
| 364 | - | ||
| 296 | + | Becomes active after the size of the map window has changed. | |
| 365 | 297 | ||
| 366 | 298 | * `OnZoomChange`: | |
| 367 | 299 | ||
| 368 | - | ||
| 369 | - | ||
| 370 | - | ||
| 300 | + | Fires whenever the `Zoom` factor of the `MapView` changes. | |
| 371 | 301 | ||
| 372 | 302 | * `OnZoomChanging`: | |
| 373 | 303 | ||
| 374 | - | ||
| 375 | - | ||
| 376 | - | ||
| 304 | + | Is executed before a request to change to magnification is handled. It has parameters `ANewZoom` and `Allow` which can be used to restrict zooming only to specific ranges. | |
| 377 | 305 | ||
| 378 | 306 | #### Main methods | |
| 379 | 307 | ||
| 380 | 308 | * `procedure GetMapProviders(lstProviders: TStrings)`: | |
| 381 | 309 | ||
| 382 | - | ||
| 383 | - | ||
| 384 | - | ||
| 310 | + | Returns in `lstProviders` the names of all registered map providers. When one of these strings is assigned to the `MapProvider` property of the `MapVieew` the servers of the corresponding provider will become the source of the displayed maps. | |
| 385 | 311 | ||
| 386 | 312 | * `function GetVisibleArea: TRealArea`: | |
| 387 | 313 | ||
| 388 | - | ||
| 389 | - | ||
| 390 | - | ||
| 314 | + | Returns the top/left and bottom/right corner points of the displayed rectangle in geo coordinates. `TRealArea` is a record consisting of the `TRealPoint` records `TopLeft` and `BottomRight` (`TRealPoint = record Lon, Lat: Double`). | |
| 391 | 315 | ||
| 392 | 316 | * `function LatLonToScreen(aPt: TRealPoint): TPoint`: | |
| 393 | 317 | ||
| 394 | - | ||
| 395 | - | ||
| 396 | - | ||
| 318 | + | Maps a geo point (latitude, longititude) to screen pixels (relative to the `TMapView` instance). | |
| 397 | 319 | ||
| 398 | 320 | * `function ScreenToLatLon(aPt: TPoint): TRealPoint`: | |
| 399 | 321 | ||
| 400 | - | ||
| 401 | - | ||
| 402 | - | ||
| 322 | + | Maps the coordinates of a screen pixel (relative to the `MapView` instance) to geo coordinates (latitude, longitude). Here is an example how the geo coordinates of the mouse cursor can be updated in two labels by means of the `OnMouseMove` event of the `MapView`: | |
| 403 | 323 | ``` | |
| 404 | 324 | uses | |
| 405 | 325 | mvTypes, // for TRealPoint | |
| 406 | 326 | mvEngine; // for LonToStr() and LatToStr() funtions | |
| 407 | 327 | ||
| 408 | 328 | procedure TForm1.MapView1MouseMove(Sender: TObject; Shift: TShiftState; | |
| 409 | 329 | X, Y: Integer); | |
| 410 | 330 | var | |
| 411 | 331 | P: TRealPoint; | |
| 412 | 332 | begin | |
| 413 | 333 | P := MapView1.ScreenToLatLon(Point(X, Y)); | |
| 414 | 334 | Label1.Caption := 'Longitude: ' + LonToStr(P.Lon, true); | |
| 415 | 335 | Label2.Caption := 'Latitude: ' + LatToStr(P.Lat, true); | |
| 416 | 336 | end; | |
| 417 | 337 | ``` | |
| 418 | 338 | ||
| 419 | 339 | * `procedure SaveToFile(AClass: TRasterImageClass; const AFileName: String)`: | |
| 420 | 340 | ||
| 421 | - | ||
| 422 | - | ||
| 423 | - | ||
| 341 | + | Save the currently displayed map as bitmap of the given class to a file. Example for saving to a jpg image: | |
| 424 | 342 | ``` | |
| 425 | 343 | procedure TForm1.Button1Click(Sender: TObject); | |
| 426 | 344 | begin | |
| 427 | 345 | MapView1.SaveToFile(TJpegImage, 'mapview.jpg'); | |
| 428 | 346 | end; | |
| 429 | 347 | ``` | |
| 430 | 348 | ||
| 431 | 349 | * `procedure SaveToStream(AClass: TRasterImageClass; AStream: TStream)`: | |
| 432 | 350 | ||
| 433 | - | ||
| 434 | - | ||
| 435 | - | ||
| 351 | + | Similar to `SaveToFile`, but output is not in a file, but in the stream provided. | |
| 436 | 352 | ||
| 437 | 353 | * `function SaveToImage(AClass: TRasterImageClass): TRasterImage`: | |
| 438 | 354 | ||
| 439 | - | ||
| 440 | - | ||
| 441 | - | ||
| 355 | + | Creates an instance of the given image class and writes the currently visible view port image to it. | |
| 442 | 356 | ||
| 443 | 357 | * `procedure CenterOnObj(obj: TGPSObj)`: | |
| 444 | 358 | ||
| 445 | - | ||
| 446 | - | ||
| 447 | - | ||
| 359 | + | Centers the map on the provided GPS object. More on GPS objects below. | |
| 448 | 360 | ||
| 449 | 361 | * `function CyclicPointsOf(APoint: TPoint): TPointArray`: | |
| 450 | 362 | ||
| 451 | - | ||
| 452 | - | ||
| 453 | - | ||
| 363 | + | Calculates the positions of specified screen point which appear on the reapeted maps in "cyclic" mode. | |
| 454 | 364 | ||
| 455 | 365 | * `procedure ZoomOnArea(const aArea: TRealArea)`: | |
| 456 | 366 | ||
| 457 | - | ||
| 458 | - | ||
| 459 | - | ||
| 367 | + | Adjusts the `Zoom` level such that the given area is completely shown and fills the component bounds as much as possible. | |
| 460 | 368 | ||
| 461 | 369 | * `procedure ZoomOnObj(obj: TGPSObj)`: | |
| 462 | 370 | ||
| 463 | - | ||
| 464 | - | ||
| 465 | - | ||
| 371 | + | Adjusts the `Zoom` level such that the given GPS object is completely seen at highest magnification. More about GPS objects below. | |
| 466 | 372 | ||
| 467 | 373 | * `function ObjsAtScreenPt(X, Y: Integer; ATolerance: Integer = -1; AClass: TGPSObjClass = nil): TGPSObjArray`: | |
| 468 | 374 | ||
| 469 | - | ||
| 470 | - | ||
| 471 | - | ||
| 375 | + | Returns an array of all GPS objects found within the given tolerance (in pixels) at the screen point X, Y. The search can be restricted to a specified class of GPS objects (e.g. `TGPSPointOfInterest` only). | |
| 472 | 376 | ||
| 473 | 377 | * `function VisibleObjsAtScreenPt(X, Y: Integer; ATolerance: Integer = -1; AClass: TGPSObjClass = nil): TGPSObjArray`: | |
| 474 | 378 | ||
| 475 | - | ||
| 476 | - | ||
| 477 | - | ||
| 379 | + | Similar to `ObjsAtScreenPt`, but only visible objects are considered. | |
| 478 | 380 | ||
| 479 | 381 | * `function VisiblePointsAtScreenPt(X, Y: Integer; ATolerance: Integer = -1; APointTypes: TMvPointTypes = ptAll): TGPSObjArray`: | |
| 480 | 382 | ||
| 481 | - | ||
| 482 | - | ||
| 483 | - | ||
| 383 | + | Similar to `VisibleObjsAtScreenPt`, but now both GPS-type and map-type of points are found (`TMvPointType = (ptGPSPointOfInterest, ptGPSTrackPoint, ptGPSAreaPoint, ptMapPointOfInterest, ptMapTrackPoint, ptMapAreaPoint)`, see below). | |
| 484 | 384 | ||
| 485 | 385 | * `function VisiblePointsInArea(Area: TRealArea; APointTypes: TMvPointTypes = ptAll): TGPSObjArray`: | |
| 486 | 386 | ||
| 487 | - | ||
| 488 | - | ||
| 489 | - | ||
| 387 | + | Similar to `VisiblePointsAtScreenPt`, but now an area in geo coordinates is search for the points rather than the vicinity of a screen point. | |
| 490 | 388 | ||
| 491 | 389 | ### Map Providers | |
| 492 | 390 | ||
| 493 | 391 | The `MapView` component can display maps from various providers. To activate a given provider its name must be specified in the `MapProvider` property of the component. | |
| 494 | 392 | ||
| 495 | 393 | Here is a list of the names of the built-in map providers: | |
| 496 | 394 | ||
| 497 | 395 | * OpenStreetMap Mapnik ([Open Data Commons Open Database License](<https://opendatacommons.org/licenses/odbl/>), copyright <https://www.openstreetmap.org/copyright/en>; the introductory screenshot uses a map of this provider) | |
| 498 | 396 | * OpenStreetMap Wikipedia | |
| 499 | 397 | * OpenStreetMap Sputnik | |
| 500 | 398 | * OpenStreetMap.fr Hot | |
| 501 | 399 | * OpenStreetMap.fr Cycle Map | |
| 502 | 400 | * Open Topo Map | |
| 503 | 401 | * Google Maps (Terms and conditions: <https://www.google.com/intl/en_en/help/terms_maps/>) | |
| 504 | 402 | * Google Satellite | |
| 505 | 403 | * Yandex.Maps (Terms and conditions: <https://yandex.ru/legal/maps_termsofuse/index.html>) | |
| 506 | 404 | * Yandex.Maps Satellite | |
| 507 | 405 | * Virtual Earth Bing | |
| 508 | 406 | * Virtual Earth Aerial | |
| 509 | 407 | * Virtual Earth Hybrid | |
| 510 | 408 | ||
| 511 | 409 | The following providers require an API key to access their service. The API key can be obtained by registering at the provider sites. Usually the API keys are free, however, a charge may be required for commercial usage - please see the details on the provider sites. The strings received as API keys must be stored in global variables of your application. | |
| 512 | 410 | ||
| 513 | 411 | * **Thunderforest maps** : Registration at <https://www.thunderforest.com/docs/apikeys/>, store API key in the variable `ThunderForest_ApiKey` (Terms and conditions: <https://www.thunderforest.com/terms/>) | |
| 514 | 412 | * ThunderForest Open Cycle Map | |
| 515 | 413 | * ThunderForest OpenStreetMap Transport | |
| 516 | 414 | * ThunderForest Neighbourhood | |
| 517 | 415 | * ThunderForest Atlas | |
| 518 | 416 | * ThunderForest Pioneer | |
| 519 | 417 | * ThunderForest Outdoors | |
| 520 | 418 | * ThunderForest Landscape | |
| 521 | 419 | * ThunderForest Mobile-Atlas | |
| 522 | 420 | * ThunderForest Transport-Dark | |
| 523 | 421 | * ThunderForest Spinal-Map | |
| 524 | 422 | * **Stadia maps** : Registration at <https://client.stadiamaps.com>, store the API key in the variable `StadiaMaps_ApiKey` (Terms and coditions: <https://stadiamaps.com/terms-of-service/>) | |
| 525 | 423 | * Stadia Alidate Smooth | |
| 526 | 424 | * Stadia Alidate Smooth Dark | |
| 527 | 425 | * Stadia Alidate Satellite | |
| 528 | 426 | * Stadia Outdoors | |
| 529 | 427 | * Stadia Stamen Toner | |
| 530 | 428 | * Stadia Stamen Terrain | |
| 531 | 429 | * Stadia OSM Bright | |
| 532 | 430 | * **Here WeGo maps** : Registration at [https://developer.here.com/?create=Freemium-Basic&keepState=true&step=account](<https://developer.here.com/?create=Freemium-Basic&keepState=true&step=account>), store the received APP ID and APP CODE in the variables `HERE_AppID` and `HERE_AppCode`, respectively. Terms and conditions: <https://legal.here.com/us-en/terms/here-end-user-terms> | |
| 533 | 431 | * Here WeGo Map | |
| 534 | 432 | * Here WeGo Grey Map | |
| 535 | 433 | * Here WeGo Reduced Map | |
| 536 | 434 | * Here WeGo Transit Map | |
| 537 | 435 | * Here WeGo POI Map | |
| 538 | 436 | * Here WeGo Pedestrian Map | |
| 539 | 437 | * Here WeGo DreamWorks Map | |
| 540 | 438 | * **OpenWeatherMap** : Registration at <https://home.openweathermap.org/users/sign_up>, store the API Key in variable `OpenWeatherMap_ApiKey`: | |
| 541 | 439 | * OpenWeatherMap Clouds | |
| 542 | 440 | * OpenWeatherMap Precipitation | |
| 543 | 441 | * OpenWeatherMap Pressure | |
| 544 | 442 | * OpenWeatherMap Temperature | |
| 545 | 443 | * OpenWeatherMap Wind | |
| 546 | 444 | ||
| 547 | 445 | More providers can be found in the include file _mvengine_mapreg.inc_. | |
| 548 | 446 | ||
| 549 | 447 | Please respect the license requirements of the map providers. | |
| 550 | 448 | ||
| 551 | 449 | ### The Drawing Engine | |
| 552 | 450 | ||
| 553 | 451 | For flexible output, all the drawing operations are handled by a dedicated class, the "drawing engine". The basic ancestor is `TMvCustomDrawingEngine` which provides methods for the elemental drawing operations, such as drawing (scaled) bitmaps, writing text, drawing graphics primitives (line, polygon, rectangle, ellipse). This is similar to what `TCanvas` does in the LCL, but it is more general because basically any graphics library can be interfaced to the mapviewer. | |
| 554 | 452 | ``` | |
| 555 | 453 | type | |
| 556 | 454 | TMvCustomDrawingEngine = class(TComponent) | |
| 557 | 455 | public | |
| 558 | 456 | function GetCacheItemClass: TPictureCacheItemClass; virtual; abstract; | |
| 559 | 457 | procedure CreateBuffer(AWidth, AHeight: Integer); virtual; abstract; | |
| 560 | 458 | procedure DrawBitmap(X, Y: Integer; ABitmap: TCustomBitmap; UseAlphaChannel: Boolean); virtual; abstract; | |
| 561 | 459 | procedure DrawCacheItem(X, Y: Integer; AImg: TPictureCacheItem; ADrawMode: TItemDrawMode = idmDraw; AOpacity: Single = 1.0); virtual; abstract; | |
| 562 | 460 | procedure DrawScaledCacheItem(DestRect, SrcRect: TRect; AImg: TPictureCacheItem); virtual; abstract; | |
| 563 | 461 | procedure Ellipse(X1, Y1, X2, Y2: Integer); virtual; abstract; | |
| 564 | 462 | procedure FillPixels(X1, Y1, X2, Y2: Integer; AColor: TColor); virtual; abstract; | |
| 565 | 463 | procedure FillRect(X1, Y1, X2, Y2: Integer); virtual; abstract; | |
| 566 | 464 | function GetFont: TMvFont; | |
| 567 | 465 | function GetPen: TMvPen; | |
| 568 | 466 | procedure Line(X1, Y1, X2, Y2: Integer); virtual; abstract; | |
| 569 | 467 | procedure Polyline(const Points: array of TPoint); virtual; abstract; | |
| 570 | 468 | procedure Polygon(const Points: array of TPoint); virtual; abstract; | |
| 571 | 469 | procedure PolyBezier(const Points: array of TPoint; Filled: Boolean = False; Continuous: Boolean = True); virtual; abstract; | |
| 572 | 470 | procedure PaintToCanvas(ACanvas: TCanvas); overload; | |
| 573 | 471 | procedure PaintToCanvas(ACanvas: TCanvas; Origin: TPoint); overload; virtual; abstract; | |
| 574 | 472 | procedure Rectangle(X1, Y1, X2, Y2: Integer); virtual; abstract; | |
| 575 | 473 | function SaveToImage(AClass: TRasterImageClass): TRasterImage; virtual; abstract; | |
| 576 | 474 | procedure SetFont(AFont: TMvFont); | |
| 577 | 475 | procedure SetFont(AFontName: String; AFontSize: Integer; AFontStyle: TFontStyles; AFontColor: TColor); | |
| 578 | 476 | procedure SetPen(APen: TMvPen); | |
| 579 | 477 | procedure SetPen(APenStyle: TPenStyle; APenWidth: Integer; APenColor: TColor); | |
| 580 | 478 | function TextExtent(const AText: String): TSize; virtual; abstract; | |
| 581 | 479 | function TextHeight(const AText: String): Integer; | |
| 582 | 480 | procedure TextOut(X, Y: Integer; const AText: String); virtual; abstract; | |
| 583 | 481 | function TextWidth(const AText: String): Integer; | |
| 584 | 482 | ||
| 585 | 483 | property BrushColor: TColor read GetBrushColor write SetBrushColor; | |
| 586 | 484 | property BrushStyle: TBrushStyle read GetBrushStyle write SetBrushStyle; | |
| 587 | 485 | property FontColor: TColor read GetFontColor write SetFontColor; | |
| 588 | 486 | property FontName: String read GetFontName write SetFontName; | |
| 589 | 487 | property FontSize: Integer read GetFontSize write SetFontSize; | |
| 590 | 488 | property FontStyle: TFontStyles read GetFontStyle write SetFontStyle; | |
| 591 | 489 | property PenColor: TColor read GetPenColor write SetPenColor; | |
| 592 | 490 | property PenStyle: TPenStyle read GetPenStyle write SetPenStyle; | |
| 593 | 491 | property PenWidth: Integer read GetPenWidth write SetPenWidth; | |
| 594 | 492 | property Opacity: Single read GetOpacity write SetOpacity; | |
| 595 | 493 | end; | |
| 596 | 494 | ``` | |
| 597 | 495 | ||
| 598 | 496 | Since an arbitrary graphics engine does not store images in the LCL classes (TBitmap etc) a more general `TPictureCacheItem` class was introduced which must be implemented by each drawing engine class. | |
| 599 | 497 | ||
| 600 | 498 | The default drawing engine is `TMvIntfImageDrawingEngine` which is based on the routines of `FCL-Image` and `TLazIntfImage`. It does not require installation of any third-party packages because everything comes with Lazarus and FPC. However, drawing may be a bit sluggish from time to time. Better performance can be achieved with the `TMvRGBGraphicsDrawingEngine` or with the `TMvBGRADrawingEngine`; they require installation of the _RGBGraphics_ or _BGRABitmap_ packages, respectively. They are external, but can be installed from the Online-Package-Manager. Note that the `TMvRGBGraphicsDrawingEngine` currently (Sept 2025) has rendering issues (false colors, image upside-down) for the cocoa widgetset (mac OS). | |
| 601 | 499 | ||
| 602 | 500 | ### Map Overlays | |
| 603 | 501 | ||
| 604 | 502 | `TMapView` is able to overlay various objects on the basic map discussed so far: Points of interest, tracks, areas, even other tile maps. For historical reasons, this can be achieved at two levels of access: \- a RAD-like approach at designtime in the Object Inspector (`TMapXXX` classes) \- a more direct approach requiring some code (`TGPSXXX` classes) | |
| 605 | 503 | ||
| 606 | 504 | #### Basic overlay architecture | |
| 607 | 505 | ||
| 608 | 506 | ##### Classes | |
| 609 | 507 | ||
| 610 | 508 | The public `TMapView` property `GPSItems` collects data on points of interest and tracks to be overlayed on the map. The common ancestor type of these overlay items is **`TGPSObj`** : | |
| 611 | 509 | ``` | |
| 612 | 510 | type | |
| 613 | 511 | TGPSObj = class | |
| 614 | 512 | ... | |
| 615 | 513 | public | |
| 616 | 514 | destructor Destroy; override; | |
| 617 | 515 | property Name: String read FName write FName; | |
| 618 | 516 | property ExtraData: TObject read FExtraData write SetExtraData; | |
| 619 | 517 | property IdOwner: Integer read FIdOwner; | |
| 620 | 518 | property BoundingBox: TRealArea read GetBoundingBox write SetBoundingBox; | |
| 621 | 519 | property Visible: Boolean read FVisible write FVisible; | |
| 622 | 520 | property ZOrder: Integer read FZOrder; | |
| 623 | 521 | ||
| 624 | 522 | end; | |
| 625 | 523 | ``` | |
| 626 | 524 | ||
| 627 | 525 | * The `Name` can be displayed near the item in the map. | |
| 628 | 526 | * `ExtraData` can be used freely, for example to define the color of a track. An example how this could be done is found in unit `mvExtraData`, classes `TDrawingExtraData` and `TTrackExtraData`. | |
| 629 | 527 | * `IdOwner` is the ID of the owner TGPSObj instance to which the current item belongs. | |
| 630 | 528 | * `BoundingBox` gives the geo coordinates of the top/left and bottom/right corner points of the rectangle over which the object extends. | |
| 631 | 529 | * `Visible` allows to show/hide a `TGPSObj` instance. | |
| 632 | 530 | * `ZOrder` determines the order in which various `TGPSObj` instances are drawn. | |
| 633 | 531 | ||
| 634 | 532 | A specialized `TGPSObj` class is a **`TGPSPoint`** , for example a scenic "Point-of-Interest" (POI), a way point along a hiking path etc. | |
| 635 | 533 | ``` | |
| 636 | 534 | TGPSPoint = class(TGPSObj) | |
| 637 | 535 | public | |
| 638 | 536 | constructor Create(ALon,ALat: double; AEle: double=NO_ELE; ADateTime: TDateTime=NO_DATE); | |
| 639 | 537 | class function CreateFrom(aPt: TRealPoint): TGPSPoint; | |
| 640 | 538 | ||
| 641 | 539 | function HasEle: boolean; | |
| 642 | 540 | function HasDateTime: Boolean; | |
| 643 | 541 | function DistanceInKmFrom(OtherPt: TGPSPoint; UseEle: boolean=true): double; | |
| 644 | 542 | ||
| 645 | 543 | property Lon: Double read GetLon; | |
| 646 | 544 | property Lat: Double read GetLat; | |
| 647 | 545 | property Ele: double read FEle; | |
| 648 | 546 | property DateTime: TDateTime read FDateTime; | |
| 649 | 547 | property RealPoint: TRealPoint read FRealPt; | |
| 650 | 548 | end; | |
| 651 | 549 | ``` | |
| 652 | 550 | ||
| 653 | 551 | In its constructor, the geo coordinates longitude and latitude must be specified. They are also available as read-only properties `Lon` and `Lat`, as well as a record `RealPoint`. Optional parameters are the elevation of the point (property `Ele` as well as some date/time information (property `DateTime`), for example the date and time when this point was visited. A special function, `DistanceInKmFrom`, is available to calculate the on-earth distance from another GPS point. | |
| 654 | 552 | ||
| 655 | 553 | **`TGPSPointOfInterest`** is a further specialization of `TGPSPoint`. It provides an `ImageIndex` property to select a marker image from the `TMapView`'s `POIImages`: | |
| 656 | 554 | ``` | |
| 657 | 555 | type | |
| 658 | 556 | TGPSPointOfInterest = class(TGPSPoint) | |
| 659 | 557 | public | |
| 660 | 558 | property ImageIndex: Integer read FImageIndex write FImageIndex default -1; | |
| 661 | 559 | end; | |
| 662 | 560 | ``` | |
| 663 | 561 | ||
| 664 | 562 | A sequence of `TGPSPoint` instances sets up a **`TGPSPolyLine`** , like a polygon. The individual vertices are collected in the list `Points`. The `TGPSPolyLine` provides the method `GetArea` to determine the enclosing rectangle `Area` (`TRealArea` is a record with the top/left and bottom/right corner points in geo coordinates). | |
| 665 | 563 | ``` | |
| 666 | 564 | type | |
| 667 | 565 | TGPSPolyLine = class(TGPSObj) | |
| 668 | 566 | private | |
| 669 | 567 | FPoints: TGPSPointList; | |
| 670 | 568 | function GetAllObjs: TGPSObjEnumerator; override; | |
| 671 | 569 | public | |
| 672 | 570 | constructor Create; | |
| 673 | 571 | destructor Destroy; override; | |
| 674 | 572 | procedure GetArea(out Area: TRealArea); override; | |
| 675 | 573 | property Points: TGPSPointList read FPoints; | |
| 676 | 574 | end; | |
| 677 | 575 | ``` | |
| 678 | 576 | ||
| 679 | 577 | The descendant class **`TGPSTrack`** inherits the `Points` property which is to be understood as the points along a path, for example points of a hike. There is also a `DateTime` property usable for example to hold the date of the hike; by default it is taken from the `DateTime` value of the first track point. The function `TrackLengthInKm` calculates the length of the entire path with the points being connected by straight line segments. There are also properties to determine the order the track is painted on the map: | |
| 680 | 578 | ``` | |
| 681 | 579 | type | |
| 682 | 580 | TGPSTrack = class(TGPSPolyLine) | |
| 683 | 581 | public | |
| 684 | 582 | function TrackLengthInKm(UseEle: Boolean=true): double; | |
| 685 | 583 | property DateTime: TDateTime read GetDateTime write FDateTime; | |
| 686 | 584 | property LineColor: TColor read FLineColor write FLineColor; | |
| 687 | 585 | property LineWidth: Double read FLineWidth write FLineWidth; | |
| 688 | 586 | property ConnectColor: TColor read FConnectColor write FConnectColor; | |
| 689 | 587 | property ConnectWidth: Double read FConnectWidth write FConnectWidth; | |
| 690 | 588 | property Opacity: Single read FOpacity write FOpacity; | |
| 691 | 589 | end; | |
| 692 | 590 | ``` | |
| 693 | 591 | ||
| 694 | 592 | There is also a **`TGPSArea`** which is a closed polygon (`TGPSLine`) and can be filled by a specified color. Note the parameter `Opacity` for semitransparent rendering so that the underlying map shines through. The user can take advantage of this feature to highlight some areas in the original map. | |
| 695 | 593 | ``` | |
| 696 | 594 | type | |
| 697 | 595 | TGPSArea = class(TGPSPolyLine) | |
| 698 | 596 | public | |
| 699 | 597 | property FillColor: TColor read FFillColor write FFillColor; | |
| 700 | 598 | property LineColor: TColor read FLineColor write FLineColor; | |
| 701 | 599 | property LineWidth: Double read FLineWidth write FLineWidth; | |
| 702 | 600 | property Opacity: Single read FOpacity write FOpacity; | |
| 703 | 601 | end; | |
| 704 | 602 | ``` | |
| 705 | 603 | ||
| 706 | 604 | The **`TGPSTileLayer`** , finally, which also descends from `TGPSObj`, is able to display an entire map of tiles, just like the `TMapView`. It can have its own setting for the `MapProvider` and the `UseThreads` property. The enumerated property `DrawMode` determines the way how the layer is drawn over the background: | |
| 707 | 605 | ||
| 708 | 606 | * `idmDraw` \- fully overwrites the background | |
| 709 | 607 | * `idmUseOpacity` \- uses the `Opacity` value (a `single` between `0`=transparent) and `1`=opaque) for semi-transparent rendering | |
| 710 | 608 | * `idmUseSourceAlpha` \- some map providers deliver tile images with alpha channel, e.g. _OpenRailwayMap_ which only contains the tracks of railway lines on a transparent background. In this setting the overlay map is perfectly mixed with the background map. | |
| 711 | 609 | ||
| 712 | 610 | ``` | |
| 713 | 611 | type | |
| 714 | 612 | TGPSTileLayer = class(TGPSTileLayerBase) // TGPSTileLayerBase inherits from TGPSObj | |
| 715 | 613 | public | |
| 716 | 614 | // all the following properties are inherited from the ancestor, TGPSTileLayerBase | |
| 717 | 615 | property MapProvider; // String | |
| 718 | 616 | property DrawMode; // TItemDrawMode = (idmDraw, idmUseOpacity, idmUseSourceAlpha) | |
| 719 | 617 | property Opacity; // Single | |
| 720 | 618 | property UseThreads; // boolean | |
| 721 | 619 | ``` | |
| 722 | 620 | ||
| 723 | 621 | All these GPS objects are be stored in a **`TGPSObjectList`** : | |
| 724 | 622 | ``` | |
| 725 | 623 | type | |
| 726 | 624 | TGPSObjectList = class(TGPSObj) | |
| 727 | 625 | ... | |
| 728 | 626 | constructor Create; | |
| 729 | 627 | destructor Destroy; override; | |
| 730 | 628 | Procedure ClearAll; | |
| 731 | 629 | Procedure Clear(OwnedBy: integer); | |
| 732 | 630 | procedure ClearExcept(OwnedBy: integer; const ExceptLst: TIdArray; out Notfound: TIdArray); | |
| 733 | 631 | procedure GetArea(out Area: TRealArea); override; | |
| 734 | 632 | function GetObjectsInArea(const Area: TRealArea): TGPSObjList; | |
| 735 | 633 | function GetIdsArea(const Ids: TIdArray; AIdOwner: integer): TRealArea; | |
| 736 | 634 | ||
| 737 | 635 | function Add(aItem: TGpsObj; AIdOwner: integer; AZOrder: integer = 0): integer; | |
| 738 | 636 | function ChangeZOrder(AItem: TGPSObj; ANewZOrder: Integer): Integer; | |
| 739 | 637 | procedure Delete(AObj: TGPSObj); | |
| 740 | 638 | procedure DeleteById(const Ids: Array of integer); | |
| 741 | 639 | function FindTrackById(const ID: Integer): TGPSTrack; | |
| 742 | 640 | ||
| 743 | 641 | procedure BeginUpdate; | |
| 744 | 642 | procedure EndUpdate; | |
| 745 | 643 | ||
| 746 | 644 | property Count: integer read GetCount; | |
| 747 | 645 | property Items[AIndex: Integer]: TGpsObj read GetItem; default; | |
| 748 | 646 | ||
| 749 | 647 | property OnModified: TModifiedEvent read FOnModified write FOnModified; | |
| 750 | 648 | end; | |
| 751 | 649 | ``` | |
| 752 | 650 | ||
| 753 | 651 | Objects can be added to the list by calling the `Add` method. Since each addition is accompanied by a repaint of the `MapView` you should call `BeginUpdate` before and `EndUpdate` after adding the objects. Every added object must be accompanied by an arbitrary numeric ID which is used to group similar objects. | |
| 754 | 652 | ||
| 755 | 653 | Method `DeleteByID` deletes all objects sharing the same ID. `Clear`, on the other hand, clears all the objects which are owned by object having the specified ID. An extension is `ClearExcept` which does the same but skips IDs listed in the `ExceptLst` array. Clearing a list with many objects, may take a painful long time, caused by the internal notification handling. The methode `ClearAll` will shorten this time to a minimum, by the price of lacking the notification, which may, if used, cause exception on accessing deleted items. So if using this method, make sure all other instances (e.g. marker-related plugins) which access the list are treated subsequently. | |
| 756 | 654 | ||
| 757 | 655 | `GetObjectsInArea` creates a TFPObjectlist (of type `TGpsObjList` here) with all the objects enclosed by the given rectangle (`Area`). `GetIDsArea`, conversely, returns the rectangle enclosing all the objects with the IDs listed in parameter `IDs` (which is a simple array here). | |
| 758 | 656 | ||
| 759 | 657 | The `TMapView` component provides 10 pre-allocated `TGPSObjectList` instances which are accessible via the array property `GPSLayer[L: Integer]`. They serve like a stack of layers drawn the in order of their Z value (see `TGPSObj`). For historic reasons, the center layer `GPSLayer[5]` is also made available as property `GPSItems`. | |
| 760 | 658 | ||
| 761 | 659 | ##### Examples | |
| 762 | 660 | ||
| 763 | 661 | ###### Adding a point-of-interest | |
| 764 | 662 | ||
| 765 | 663 | Suppose you want to mark a special point in the map by a mouse click and identify it with some descriptive text. Write a handler for the OnMouseUp event in which you query the description and then take the pixel coordinates of the clicked point, convert it to geo coordinates and create a `TGpsPoint` from it which you add to the `GpsItems` of the `MapView`: | |
| 766 | 664 | ``` | |
| 767 | 665 | uses | |
| 768 | 666 | mvTypes, mvGPSObj; | |
| 769 | 667 | ||
| 770 | 668 | const | |
| 771 | 669 | _POI_ = 10; | |
| 772 | 670 | ||
| 773 | 671 | procedure TForm1.MapView1MouseUp(Sender: TObject; Button: TMouseButton; | |
| 774 | 672 | Shift: TShiftState; X, Y: Integer); | |
| 775 | 673 | var | |
| 776 | 674 | pt: TRealPoint; | |
| 777 | 675 | gpsPt: TGpsPoint; | |
| 778 | 676 | ptName: String; | |
| 779 | 677 | begin | |
| 780 | 678 | ptName := ''; | |
| 781 | 679 | if InputQuery('Point of Interest', 'Enter name:', ptName) then | |
| 782 | 680 | begin | |
| 783 | 681 | pt := MapView1.ScreenToLatLon(Point(Y, X)); | |
| 784 | 682 | gpsPt := TGpsPoint.CreateFrom(pt, NO_ELE, Now() ); | |
| 785 | 683 | gpsPt.Name := ptName; | |
| 786 | 684 | Mapview1.GPSItems.Add(gpsPt, _POI_); | |
| 787 | 685 | end; | |
| 788 | 686 | end; | |
| 789 | 687 | ``` | |
| 790 | 688 | ||
| 791 | 689 | In this example the constant `_POI_` is used as ID of the added point. By default, the point is drawn as a red cross, the name is drawn underneath it. You can highlight the text by changing its background color in property `POITextBgColor` of the `MapView`; for semi-transparent text background adjust the `POITextBgOpacity` property. You can also replace the default red cross by an arbitrary bitmap which must be loaded into the `POIImage` property (the folder _marker-images_ of the LazMapViewer installation contains a larger number of ready-to-use pin-cushion-like icons). And when the point is created as an instance of `TGPSPointOfInterest` rather than `TGPSPoint` you can select for it an image from the `MapView.POIImages` image list. | |
| 792 | 690 | ||
| 793 | 691 | There is also an event, `OnDrawGpsPoint`, which can be used to replace the entire drawing process by custom routines. The event has the `GpsPoint` as parameter. The other event parameter is the `DrawingEngine` which provides methods for drawing as explained above. Here is an example in which at first the screen coordinates of the point are calculated; and then a blue circle is drawn at this position as a marker and labeled by a large bold font: | |
| 794 | 692 | ``` | |
| 795 | 693 | procedure TForm1.MapView1DrawGpsPoint(Sender: TObject; | |
| 796 | 694 | ADrawer: TMvCustomDrawingEngine; APoint: TGpsPoint); | |
| 797 | 695 | const | |
| 798 | 696 | R = 8; // Circle radius, in pixels | |
| 799 | 697 | var | |
| 800 | 698 | p: TPoint; | |
| 801 | 699 | begin | |
| 802 | 700 | // Screen coordinates of the GPS point | |
| 803 | 701 | p := MapView1.LatLonToScreen(APoint.RealPoint); | |
| 804 | 702 | ||
| 805 | 703 | // Draw a blue circle | |
| 806 | 704 | ADrawer.PenColor := clBlack; | |
| 807 | 705 | ADrawer.BrushColor := clBlue; | |
| 808 | 706 | ADrawer.BrushStyle := bsSolid; | |
| 809 | 707 | ADrawer.Ellipse(p.X-R, p.Y-R, P.X+R, p.Y+R); | |
| 810 | 708 | ||
| 811 | 709 | // Draw the point label | |
| 812 | 710 | ADrawer.BrushStyle := bsClear; | |
| 813 | 711 | ADrawer.FontName := 'SegoeUI'; | |
| 814 | 712 | ADrawer.FontSize := 16; | |
| 815 | 713 | ADrawer.FontStyle := [fsBold]; | |
| 816 | 714 | ADrawer.TextOut( | |
| 817 | 715 | p.X - ADrawer.TextWidth(APoint.Name) div 2, | |
| 818 | 716 | p.Y + R + 4, | |
| 819 | 717 | APoint.Name | |
| 820 | 718 | ); | |
| 821 | 719 | end; | |
| 822 | 720 | ``` | |
| 823 | 721 | ||
| 824 | 722 | ###### Overlaying another tile layer | |
| 825 | 723 | ||
| 826 | 724 | The following code displays central Europe and overlays the railway lines from the _OpenRailwayMap Standard_ provider. The usual steps are: | |
| 827 | 725 | ||
| 828 | 726 | * Create a instance of `TGPSTileLayer`. | |
| 829 | 727 | * Set its `MapProvider` and `DrawMode` as needed; the `DrawMode` `idmUseSourceAlpha` respects the alpha channel of the layer tile images (if available) and makes the bottom layer shine through. | |
| 830 | 728 | * Add it to one of the `MapView`'s `GPSLayer`s. Provide an appropriate ID to identify the layer. | |
| 831 | 729 | ||
| 832 | 730 | ``` | |
| 833 | 731 | uses | |
| 834 | 732 | mvGPSObj, mvDrawingEngine; | |
| 835 | 733 | ||
| 836 | 734 | const | |
| 837 | 735 | _TILELAYERS_ID_ = 42; | |
| 838 | 736 | ||
| 839 | 737 | procedure TForm1.FormCreate(Sender: TObject); | |
| 840 | 738 | var | |
| 841 | 739 | layer: TGPSTileLayer; | |
| 842 | 740 | begin | |
| 843 | 741 | MapView1.MapProvider := 'OpenStreetMap Standard'; | |
| 844 | 742 | MapView1.Zoom := 5; | |
| 845 | 743 | MapView1.MapCenter.Longitude := 10; | |
| 846 | 744 | MapView1.MapCenter.Latitude := 49; | |
| 847 | 745 | layer := TGPSTilelayer.Create; | |
| 848 | 746 | layer.MapProvider := 'OpenRailwayMap Standard'; | |
| 849 | 747 | layer.DrawMode := idmUseSourceAlpha; | |
| 850 | 748 | MapView1.GPSLayer[0].Add(layer, _TILELAYERS_ID_); | |
| 851 | 749 | MapView1.Active := true; | |
| 852 | 750 | end; | |
| 853 | 751 | ``` | |
| 854 | 752 | ||
| 855 | 753 | ###### Creating a custom track | |
| 856 | 754 | ||
| 857 | 755 | The following code creates a track and defines its points by adding instances of `TGPSPoint` to it. Then the track is added to the `GPSItems` of the `MapView`. For identification it is given a unique ID value (`TRACK_ID`). Finally the smallest area enclosing all track points is calculated so that the `MapView` can zoom to it: | |
| 858 | 756 | ``` | |
| 859 | 757 | uses | |
| 860 | 758 | ..., mvMapViewer, mvGpsObj, mvTypes; | |
| 861 | 759 | const | |
| 862 | 760 | TRACK_ID = 293; // unique number | |
| 863 | 761 | ||
| 864 | 762 | procedure CreateGPSTrack; | |
| 865 | 763 | var | |
| 866 | 764 | track: TGPSTrack; | |
| 867 | 765 | area: TRealArea; | |
| 868 | 766 | begin | |
| 869 | 767 | track := TGPSTrack.Create; | |
| 870 | 768 | track.Points.Add(TGPSPoint.Create(-16.123, 65.491)); // Latitude, Longitude pairs | |
| 871 | 769 | track.Points.Add(TGPSPoint.Create(-18.34, 64.374)); | |
| 872 | 770 | track.Points.Add(TGPSPoint.Create(-19.979, 63.895)); | |
| 873 | 771 | ||
| 874 | 772 | MapView.GPSItems.Add(track, TRACK_ID); | |
| 875 | 773 | track.GetArea(area); | |
| 876 | 774 | MapView.ZoomOnArea(area); | |
| 877 | 775 | end; | |
| 878 | 776 | ``` | |
| 879 | 777 | ||
| 880 | 778 | ###### Reading and displaying a track from a gpx file | |
| 881 | 779 | ||
| 882 | 780 | Suppose you recorded your nice mountain hike by means of a gps tracker, and now you want to use the MapView to display the path in a map. In unit _mvGPX_ , you find a reader class for gpx files which directly loads the track into the `GPSItems` of the `MapView` component: | |
| 883 | 781 | ``` | |
| 884 | 782 | uses | |
| 885 | 783 | ..., mvMapViewer, mvTypes, mvGPX; | |
| 886 | 784 | ||
| 887 | 785 | procedure TMainForm.BtnLoadGPXFileClick(Sender: TObject); | |
| 888 | 786 | var | |
| 889 | 787 | reader: TGpxReader; | |
| 890 | 788 | b: TRealArea; | |
| 891 | 789 | begin | |
| 892 | 790 | if OpenDialog.Execute then begin | |
| 893 | 791 | reader := TGpxReader.Create; | |
| 894 | 792 | try | |
| 895 | 793 | reader.LoadFromFile(OpenDialog.FileName, MapView.GPSItems, b); | |
| 896 | 794 | MapView.Engine.ZoomOnArea(b); | |
| 897 | 795 | finally | |
| 898 | 796 | reader.Free; | |
| 899 | 797 | end; | |
| 900 | 798 | end; | |
| 901 | 799 | end; | |
| 902 | 800 | ``` | |
| 903 | 801 | ||
| 904 | 802 | #### Creating overlays at designtime | |
| 905 | 803 | ||
| 906 | 804 | ##### Classes | |
| 907 | 805 | ||
| 908 | 806 | In order to facilitate using overlay objects several collections were added to the `TMapView` so that objects can be added, edited and deleted at designtime. For this reason, the basic list elements descend from `TCollection` and the elements themselves descend from `TCollectionItem`. The most fundamental collection here is `TMapCollectionBase` and its descendant `TMapCollection`. The most fundamental collection item classes are `TMapItem` and the derived `TMapPoint` (corresponding to `TGPSPoint`) with these most important properties: | |
| 909 | 807 | ``` | |
| 910 | 808 | type | |
| 911 | 809 | TMapItem = class(TCollectionItem) | |
| 912 | 810 | ... | |
| 913 | 811 | public | |
| 914 | 812 | property View: TMapView read GetView; | |
| 915 | 813 | property Layer: TMapLayer read GetLayer; | |
| 916 | 814 | property GPSObj: TGPSObj read GetGPSObj; | |
| 917 | 815 | published | |
| 918 | 816 | property Caption: TCaption read FCaption write SetCaption; | |
| 919 | 817 | property Visible: Boolean read FVisible write SetVisible default True; | |
| 920 | 818 | end; | |
| 921 | 819 | ||
| 922 | 820 | TMapPoint = class(TMapItem) | |
| 923 | 821 | ... | |
| 924 | 822 | public | |
| 925 | 823 | property LatLonInDMS: Boolean read GetLatLonInDMS; | |
| 926 | 824 | property RealPoint: TRealPoint read GetRealPoint write SetRealPoint; | |
| 927 | 825 | property ToScreen: TPoint read GetToScreen; | |
| 928 | 826 | published | |
| 929 | 827 | property Longitude: Double read FLongitude write SetLongitude; | |
| 930 | 828 | property Latitude: Double read FLatitude write SetLatitude; | |
| 931 | 829 | property Elevation: Double read FElevation write SetElevation stored IsElevationStored; | |
| 932 | 830 | property DateTime: TDateTime read FDateTime write SetDateTime stored IsDateTimeStored; | |
| 933 | 831 | end; | |
| 934 | 832 | ``` | |
| 935 | 833 | ||
| 936 | 834 | More specialized classes are `TMapPointOfInterest`, `TMapTrackPoint` and `TMapAreaPoint` | |
| 937 | 835 | ||
| 938 | 836 | * `TMapPointOfInterest` is equivalent to `TGPSPointOfInterest` and introduces the `ImageIndex` property. | |
| 939 | 837 | * `TMapTrackPoint` publishes a new property `Mark` which determines whether this point is at the begin, end, somewhere in the middle, or between track segments (`smStart`, `smEnd`, `smMid`, `smNone`, respectively). | |
| 940 | 838 | * `TMapAreaPoint` is a vertex of a polygon (`TMapArea`); it has no additional properties. | |
| 941 | 839 | ||
| 942 | 840 | Another imporant descendant of `TMapItem` is `TMapLayer`. Similarly to `TGPSTileLayer` it refers to each one of the layer stacks in the map. Like `TGPSTileLayer` it can contain a complete tile map (based on its `MapProvider` setting). But it can also consist of points-of-interest, tracks or areas (or a combination of them). The points-of-interest are administrated by the `PointsOfInterest` collection (type `TMapPointsOfInterest`), the tracks in the `Tracks` collection (type TMapTracks), and the areas in the `Areas` collection (type `TMapAreas`). The link between the `TMapLayer` and the GPS-type of objects is established by the class `TGPSComboLayer` which consists of a `TGPSTileLayer` for its background and a collection of other objects to draw on top. Actually, the `Draw` method is overridden to draw first the background and then - the rest of the objects contained into. | |
| 943 | 841 | ||
| 944 | 842 | The layers themselves are collected in a `TMapLayers` collection which descends from `TMapCollection`. The instance `Layers` is a direct member of `TMapView`. | |
| 945 | 843 | ``` | |
| 946 | 844 | type | |
| 947 | 845 | TMapLayer = class(TMapItem) | |
| 948 | 846 | ... | |
| 949 | 847 | public | |
| 950 | 848 | function HitTest(constref Area: TRealArea): TMapObjectList; override; | |
| 951 | 849 | function AddPointOfInterest(APoint: TRealPoint; ACaption: String = ''): TMapPointOfInterest; | |
| 952 | 850 | procedure AssignFromGPSList(AList: TGPSObjectList); | |
| 953 | 851 | property ComboLayer: TGPSComboLayer read FComboLayer; | |
| 954 | 852 | published | |
| 955 | 853 | property MapProvider: String read GetMapProvider write SetMapProvider; | |
| 956 | 854 | property UseThreads: Boolean read GetUseThreads write SetUseThreads default True; | |
| 957 | 855 | property DrawMode: TItemDrawMode read FDrawMode write SetDrawMode default idmUseOpacity; | |
| 958 | 856 | property Opacity: Single read FOpacity write SetOpacity default 0.25; | |
| 959 | 857 | property PointsOfInterest: TMapPointsOfInterest read GetPointsOfInterest write SetPointsOfInterest; | |
| 960 | 858 | property Areas: TMapAreas read GetAreas write SetAreas; | |
| 961 | 859 | property Tracks: TMapTracks read GetTracks write SetTracks; | |
| 962 | 860 | end; | |
| 963 | 861 | ``` | |
| 964 | 862 | ||
| 965 | 863 | ##### Examples | |
| 966 | 864 | ||
| 967 | 865 | ###### Overlaying a second map as a layer | |
| 968 | 866 | ||
| 969 | 867 | * Click on the '...' button next to the `Layers` property (or double-click on the map, or right-click on the map and select "Layer Editor...") to open the layer editor. | |
| 970 | 868 | * Click on '+ Add' to create a new layer and to add it. | |
| 971 | 869 | * Specify the map provider in the `MapProvider` property. | |
| 972 | 870 | * Moreover, select the `DrawMode`: If the images received from the map server have their own transparency in an alpha channel the option `idmUseSourceAlpha` is the correct one. Otherwise, maybe you want the original map base layer to shine through the overlay layer - select `idmUseOpacity` and adjust the `Opacity` property as needed. | |
| 973 | 871 | ||
| 974 | 872 | If you want to overlay a TMapLayer by code you can do it this way: | |
| 975 | 873 | ``` | |
| 976 | 874 | function AddMapLayer(AMapView: TMapView): TMapLayer; | |
| 977 | 875 | begin | |
| 978 | 876 | Result := AMapView.Layers.Add as TMapLayer; | |
| 979 | 877 | end; | |
| 980 | 878 | ``` | |
| 981 | 879 | ||
| 982 | 880 | ###### Overlaying a layer with points-of-interest | |
| 983 | 881 | ||
| 984 | 882 | * Open the layer editor and add a new layer. Or, if you want to add the points to an existing layer, select this layer in the layer editor. | |
| 985 | 883 | * Click on the '...' button next to the `PointsOfInterest` item among the layer's properties in the object inspector. | |
| 986 | 884 | * This opens the points editor where you can enter the point properties, in particular the `Latitude` and `Longitude`. `Caption` specifies the text to be displayed below the point symbol. If an imagelist is attached to the `MapView`'s `POIImages` property you can also pick one of these icons by means of the `ItemIndex` property. | |
| 987 | 885 | * Repeat with all other points that you want to add. | |
| 988 | 886 | ||
| 989 | 887 | The following code shows how a point-of-interest can be added to an existing MapLayer at runtime: | |
| 990 | 888 | ``` | |
| 991 | 889 | function AddMapPointOfInterest(AMapView: TMapView; ALayerIndex: Integer; ALatitude, ALongitude: Double; ACaption: String; AImageIndex: Integer): TMapPointOfInterest; | |
| 992 | 890 | var | |
| 993 | 891 | layer: TMapLayer; | |
| 994 | 892 | begin | |
| 995 | 893 | layer := AMapView.Layers[ALayerIndex]; | |
| 996 | 894 | Result := layer.PointsOfInterest.Add as TMapPointOfInterest; // or := TMapPointOfInterest.Create(layer.PointsOfInterest); | |
| 997 | 895 | Result.RealPoint := RealPoint(ALatitude, ALongitude); | |
| 998 | 896 | Result.Caption := ACaption; | |
| 999 | 897 | Result.ImageIndex := AImageIndex; | |
| 1000 | 898 | end; | |
| 1001 | 899 | ``` | |
| 1002 | 900 | ||
| 1003 | 901 | ###### Displaying a track in a layer | |
| 1004 | 902 | ||
| 1005 | 903 | Suppose you have an array of GPS coordinates (type `TRealPointArray = array of TRealPoint`) which you want to display in the map as a track. As before, create or select a layer for the track. Then the track points can be added like in the following function: | |
| 1006 | 904 | ``` | |
| 1007 | 905 | funtion AddTrackToLayer(AMapView: TMapView; ALayerIndex: Integer; const APoints: TRealPointArray): TMapTrack; | |
| 1008 | 906 | var | |
| 1009 | 907 | layer: TMapLayer; | |
| 1010 | 908 | i: Integer; | |
| 1011 | 909 | trackPt: TMapTrackPoint; | |
| 1012 | 910 | begin | |
| 1013 | 911 | layer := AMapView.Layers[ALayerIndex]; | |
| 1014 | 912 | Result := layer.Tracks.Add as TMapLayer; // or: TMapLayer.Create(layer.Tracks); | |
| 1015 | 913 | for i := Low(APoints) to High(APoints) do | |
| 1016 | 914 | begin | |
| 1017 | 915 | for realPt in APoints do begin | |
| 1018 | 916 | trackPt := Result.Points.Add as TMapTrackPoint; | |
| 1019 | 917 | trackPt.Point := APoints[i]; | |
| 1020 | 918 | end; | |
| 1021 | 919 | end; | |
| 1022 | 920 | ``` | |
| 1023 | 921 | ||
| 1024 | 922 | In an analogous way you can also define the vertex points of an area. | |
| 1025 | 923 | ||
| 1026 | 924 | ###### Reading and displaying a track from a gpx file | |
| 1027 | 925 | ||
| 1028 | 926 | * Again open the layer editor | |
| 1029 | 927 | * Select the layer to which you want to add the track, or add a new layer. | |
| 1030 | 928 | * In the toolbar of the layer editor, there is a "Load GPX" button to select the gpx file to be loaded. There is a dropdown menu with two options: | |
| 1031 | 929 | * Load... -- this simply loads the gpx file, the viewport does not change. | |
| 1032 | 930 | * Load and zoom ... -- does the same, but also adjusts the zoom and center of the viewport to fully see the loaded gpx objects. | |
| 1033 | 931 | ||
| 1034 | 932 | If you want to load a gpx file into a MapLayer by code you can do it this way: | |
| 1035 | 933 | ``` | |
| 1036 | 934 | uses | |
| 1037 | 935 | mvMapViewer, mvTypes, mvGPSObj, mvGPX; | |
| 1038 | 936 | ||
| 1039 | 937 | procedure TMainForm.LoadGPXFileInMapLayer(AFileName: string; AMapView: TMapView; ALayerIndex: Integer); | |
| 1040 | 938 | var | |
| 1041 | 939 | reader: TGpxReader; | |
| 1042 | 940 | b: TRealArea; | |
| 1043 | 941 | begin | |
| 1044 | 942 | list := TGPSObjectList.Create; | |
| 1045 | 943 | try | |
| 1046 | 944 | reader := TGpxReader.Create; | |
| 1047 | 945 | try | |
| 1048 | 946 | reader.LoadFromFile(AFileName, list, b); | |
| 1049 | 947 | AMapView.Engine.ZoomOnArea(b); | |
| 1050 | 948 | AMapView.MapCenter.Longitude := (b.TopLeft.Lon - b.BottomRight.Lon) / 2; | |
| 1051 | 949 | AMapView.MapCenter.Latitude := (b.TopLeft.Lat - b.BottomRight.Lat) / 2; | |
| 1052 | 950 | AMapView.Layers[ALayerIndex].AssignFromGPSList(list); | |
| 1053 | 951 | finally | |
| 1054 | 952 | reader.Free; | |
| 1055 | 953 | end; | |
| 1056 | 954 | finally | |
| 1057 | 955 | list.Free; | |
| 1058 | 956 | end; | |
| 1059 | 957 | end; | |
| 1060 | 958 | ``` | |
| 1061 | 959 | ||
| 1062 | 960 | ###### Editing points by using the built-in points editor | |
| 1063 | 961 | ||
| 1064 | 962 | A points editor has been incorporated into the mapviewer to give the user the opportunity to edit map points at design-time. In order to activate the editor add the element `mvoEditorEnabled` to the `MapView.Options`. When now the mouse is moved over map points (points of interest, area points, track points) the point is highlighted by a green square with red border which can be dragged to the new location. The points editor is available also at run-time (see _points_of_interest_demo_ in the _examples_ folder of the MapViewer installation). | |
| 1065 | 963 | ||
| 1066 | 964 | Additionally, the window of the points editor can be opened by selecting the option "Edit MapView Points" from the context menu of the `MapView` component at design-time. At run-time, you must invoke the following code: | |
| 1067 | 965 | ``` | |
| 1068 | 966 | uses | |
| 1069 | 967 | mvMapViewerPathEditForm; | |
| 1070 | 968 | ||
| 1071 | 969 | procedure TMainForm.FormCreate(Sender: TObject); | |
| 1072 | 970 | begin | |
| 1073 | 971 | with TMapViewerPathEditForm.Create(Self) do | |
| 1074 | 972 | begin | |
| 1075 | 973 | MapView := Self.MapView; | |
| 1076 | 974 | Show; | |
| 1077 | 975 | end; | |
| 1078 | 976 | end; | |
| 1079 | 977 | ``` | |
| 1080 | 978 | ||
| 1081 | 979 | [](</File:mapviewer_pointseditor.png>) | |
| 1082 | 980 | ||
| 1083 | 981 | * When the editor opens, it is in **Select/drag mode** (the first toolbar button displaying the arrow icon is pressed): | |
| 1084 | 982 | * You can **select** an individual point (from a track, area or POIs) by clicking on it. Click and pull a rubber-band to select multiple points. Ctrl+Click adds to the selection. | |
| 1085 | 983 | * You can click and **drag** selected points with the mouse (Ctrl+Click to drag multiple selected points). | |
| 1086 | 984 | * When you have points on top of each other then you can use Alt+Click to select the next one. | |
| 1087 | 985 | * For adding new points you have several options: | |
| 1088 | 986 | * Selecting the "orange marker" icon (2nd toolbutton from the left) brings you into **POI mode**. Now a click into the map adds a new point-of-interest. The caption of the POI can be specified in the "Caption" box the points of the editor. If you need exact locations of the point you can enter its GPS coordinates numerically. | |
| 1089 | 987 | * The third icon ("curve with end-points") enters **Track mode** for adding a new track of points. Each subsequent click into the map adds a point to the track. Add the last point of the track by holding the CTRL key down during clicking. Or click on the "arrow" icon (1st toolbutton) to return to selection mode. At least two points are required for a track. | |
| 1090 | 988 | * In the same way, the corner points of an area can be specified after selecting the fourth button with the "area" symbol (**Area mode**). Note that at least three points are required to define an area. | |
| 1091 | 989 | * The next two icons ("curve icon" with "+"/"x" overlay) are for editing existing points: In order to **add a point** to a track or area you must select two points of the shape and then click on the "curve +" icon. In order to **delete a point** you first select the point to be deleted and then click on the "curve x" symbol (in case of multiple selections, only the last selected point is deleted). | |
| 1092 | 990 | * The final two buttons with the magnifier icons are **zoom** buttons. | |
| 1093 | 991 | ||
| 1094 | 992 |  **Note:** This kind of editing is possible only for points descending from `TMapPoint`, but not for points descending from `TGPSPoint`. | |
| 1095 | 993 | ||
| 1096 | 994 | ## Plugins | |
| 1097 | 995 | ||
| 1098 | 996 | Plugins are an easy way to extend the functionality of the MapViewer, without the need to change the source of the component itself. Together with the PluginManager which is the glue between the MapView and the plugins, and the RAD-method of connecting existing parts within the IDE, the system becomes a powerful and user friendly tool. For a more detailed explanation see the [[LazMapViewer-Plugins]] page. | |
| 1099 | 997 | ||
| 1100 | 998 | ### What is a plugin and what can I do with it? | |
| 1101 | 999 | ||
| 1102 | 1000 | The question could be answered by describing an example. | |
| 1103 | 1001 | ||
| 1104 | 1002 | Let's assume that your application needs the capability to measure the linear distance between two points on the map. The user will click on the map with the mouse to define the anchor-point and then hover the mouse around to see the distance between the anchor and the place indicated by the mouse cursor. If the user clicks again, the measurement mode is left. | |
| 1105 | 1003 | ||
| 1106 | 1004 | Without the use of a plugin you would need to implement three event methods for the MapView: `OnMouseUp`, `OnMouseMove` and `OnAfterPaint`. | |
| 1107 | 1005 | ||
| 1108 | 1006 | * In the `OnMouseUp`-event, you would toggle the measurement mode and if entered you store the current position as the anchor-position. | |
| 1109 | 1007 | * In the `OnMouseMove`-event, you have to store the actual position and calculate distance. And you will invalidate the MapView to initiate a redraw of the map. | |
| 1110 | 1008 | * In the `OnAfterPaint`-event, you would paint two circles as markers, one on the anchor-position and one on the current position and draw a text with the distance. | |
| 1111 | 1009 | ||
| 1112 | 1010 | In total you have four additional form fields and three additional event methods in your form. For this simple example this may be a simple and suitable way, but if you think about other extensions, you will bloat the form's source file with code which could be better encapsulated somewhere else. And if another project needs the same functionality you will have to write the code again. | |
| 1113 | 1011 | ||
| 1114 | 1012 | The plugin approach provides handlers for these three events in a re-usable way. There is no need to write any code to get the wanted behaviour. | |
| 1115 | 1013 | ||
| 1116 | 1014 | ### Using existing plugins | |
| 1117 | 1015 | ||
| 1118 | 1016 | [](</File:tmvpluginmanager_200.png>) | |
| 1119 | 1017 | ||
| 1120 | 1018 | The key component for the MapViewer's plugin technology is the `TMvPluginManager`. It contains a list of all registered plugins from which the user can select the needed one at design-time. | |
| 1121 | 1019 | ||
| 1122 | 1020 | #### Creating plugins at design-time | |
| 1123 | 1021 | ||
| 1124 | 1022 | Follow these steps to activate plugins in your map application: | |
| 1125 | 1023 | ||
| 1126 | 1024 | * Drop a `TMvPluginManager` component on the form. | |
| 1127 | 1025 | * Link it to the MapView requiring a plugin. This is done in the Object Inspector by assigning it to the `PluginManager` property of the MapView. | |
| 1128 | 1026 | * Double-click on the PluginManager component (or click on the '...' next to the `PluginManger` property) to open the plugin editor. | |
| 1129 | 1027 | * Click on the '+ Add' button to see the list of the available plugins. | |
| 1130 | 1028 | * Select the plugin needed. | |
| 1131 | 1029 | * It is possible to have multiple plugins in the PluginManager. They are processed from top to bottom. You may adjust their order by means of the arrow buttons. | |
| 1132 | 1030 | * Every plugin type has its own set of properties. They can be altered in the object inspector after selecting the plugin in the plugin editor's list (or in the object tree of the object inspector). | |
| 1133 | 1031 | ||
| 1134 | 1032 | The same PluginManager can be shared between several maps. All plugins and their properties are applied to each of these maps in the same way. While this is a useful feature for some plugin types (e.g. the `TMapGridPlugin`, `TLinkedMapsPlugin` or `TCenterMarkerPlugin`, see below), it can result in undesired behaviour in other cases. To avoid this, it may be required to duplicate plugins in the PluginManager for each map, set properties accordingly and specify in the plugin's `MapView` property the map on which it will be active (with each own set of properties). But there are also plugin types which can handle multiple maps automatically (`TDraggableMarkerPlugin, TSpreadMarkerPlugin`, see below). | |
| 1135 | 1033 | ||
| 1136 | 1034 | #### Creating plugins at run-time | |
| 1137 | 1035 | ||
| 1138 | 1036 | Of course plugins can be used also at run-time: | |
| 1139 | 1037 | ||
| 1140 | 1038 | * Since plugins work only in compbination with the plugin manager you must create a `TMvPluginManager` instance first - either use the one dropped from the component palette, or create a new one by code (see below), | |
| 1141 | 1039 | * Create the plugin by calling its constructor and add it to the plugin manager. There are several ways to do this: | |
| 1142 | 1040 | * Specify the plugin manager as Owner in the plugin constructor. | |
| 1143 | 1041 | * Or, if you prefer to specify another owner, call `PluginManager.AddPlugin(plugin)`, or `PluginManager.Plugins.Add(plugin)` after creation | |
| 1144 | 1042 | ||
| 1145 | 1043 | The following code creates a `TLegalNoticePlugin` (see below). | |
| 1146 | 1044 | ``` | |
| 1147 | 1045 | uses | |
| 1148 | 1046 | mvPluginCommon; | |
| 1149 | 1047 | ||
| 1150 | 1048 | procedure TForm1.FormCreate(Sender: TObject); | |
| 1151 | 1049 | var | |
| 1152 | 1050 | PluginManager: TMvPluginManager; | |
| 1153 | 1051 | plugin: TLegalNoticePlugin; | |
| 1154 | 1052 | begin | |
| 1155 | 1053 | // Create the plugin manager | |
| 1156 | 1054 | PluginManager := TMvPluginManager.Create(Self); | |
| 1157 | 1055 | ||
| 1158 | 1056 | // Link the plugin manager to the MapView which is assumed to exist already. | |
| 1159 | 1057 | MapView.PluginManager := PluginManager; | |
| 1160 | 1058 | ||
| 1161 | 1059 | // Create the plugin and add it to the plugin manager | |
| 1162 | 1060 | plugin := TLegalNoticePlugin.Create(PluginManager); | |
| 1163 | 1061 | ||
| 1164 | 1062 | // Set plugin properties | |
| 1165 | 1063 | plugin.LegalNotice := 'Map data from [https://www.openstreetmap.org/copyright OpenStreetMap and contributors]'; | |
| 1166 | 1064 | end; | |
| 1167 | 1065 | ``` | |
| 1168 | 1066 | ||
| 1169 | 1067 | ### Available plugins | |
| 1170 | 1068 | ||
| 1171 | 1069 | Here is a list of the built-in plugins: | |
| 1172 | 1070 | ||
| 1173 | 1071 | * `**TCenterMarkerPlugin**` | |
| 1174 | 1072 | ||
| 1175 | - | ||
| 1176 | - | ||
| 1177 | - | ||
| 1073 | + | It simply draws a cross in the center of the map. The size and color of the cross can be controlled by properties. | |
| 1178 | 1074 | ||
| 1179 | 1075 | * `**TTileInfoPlugin**` | |
| 1180 | 1076 | ||
| 1181 | - | ||
| 1182 | - | ||
| 1183 | - | ||
| 1077 | + | Draws a border around the picture tiles from which the total map is composed. The zoom level as well as the x/y indices are indicated for each tile. The displayed info text can be modified by the `InfoMask` property which is a mask string for the `Format()` function accepting the `x`/`y`/`zoom` parameters as argument indices 0..2, respectively. Example: `InfoMark := 'x=%0:d, y=%1:d, zoom=%2:d'` | |
| 1184 | 1078 | ||
| 1185 | 1079 | * `**TLegalNoticePlugin**` | |
| 1186 | 1080 | ||
| 1187 | - | ||
| 1081 | + | Draws a copyright text in a corner of the map. The text can be specified in the property `LegalNotice`. Using square brackets the clickable URL of the map provider's copyright page can be inserted by means of a wiki-like syntax: | |
| 1188 | 1082 | ||
| 1189 | - | ||
| 1083 | + | `Map data from [https://www.openstreetmap.org/copyright OpenStreetMap and contributors]` | |
| 1190 | 1084 | ||
| 1191 | - | ||
| 1192 | - | ||
| 1085 | + | displays the text _"Map data from OpenStreetMap and contributors"_. The text in brackets consists of two parts separated by the first space character: The first part (_"https://www.openstreetmap.org/copyright"_) denotes the URL of the link, and the second part (_"OpenStreetMap and contributors"_) is shown instead of the URL for better readability and formatted like a html link (property `URLFontColor`). When the user clicks on this text, the URL is opened in the web browser of the system. | |
| 1193 | 1086 | ||
| 1194 | 1087 | * `**TLinkedMapsPlugin**` | |
| 1195 | 1088 | ||
| 1196 | - | ||
| 1197 | - | ||
| 1198 | - | ||
| 1089 | + | When a form contains two (or more) maps and the user changes the viewport by zooming or panning in one map the same changes are applied to the other maps sharing this plugin. | |
| 1199 | 1090 | ||
| 1200 | 1091 | * `**TMarkerHintPlugin**` | |
| 1201 | 1092 | ||
| 1202 | - | ||
| 1203 | - | ||
| 1204 | - | ||
| 1093 | + | Displays a hint popup window when the mouse pointer hovers above a point-of-interest. Both GPS type and Map-type points are supported. By default, the hint text is composed of the POI's caption and geo-coordiates, but there is also an `OnHint` event in which any text can be prepared. | |
| 1205 | 1094 | ||
| 1206 | 1095 | * `**TMarkerClickPlugin**` | |
| 1207 | 1096 | ||
| 1208 | - | ||
| 1209 | - | ||
| 1210 | - | ||
| 1097 | + | Fires an `OnMarkerClick` event when the user click on a point-of-interest of both GPS type and Map-type. When markers are very close together or even overlapping you can activate the `ExtendedClicks` options of this plugin which allows to click on the marker's caption or icon. Or you can use a `TSpreadMarkerPlugin` instead which temporarily separates the overlapping markers when the mouse comes close enough - see below. | |
| 1211 | 1098 | ||
| 1212 | 1099 | * `**TMarkerEditorPlugin**` | |
| 1213 | 1100 | ||
| 1214 | - | ||
| 1215 | - | ||
| 1216 | - | ||
| 1101 | + | The user can add new points-of-interest to the map. Existing POIs can be selected by several methods and dragged to different locations. Again both GPS type and Map-type points are supported. | |
| 1217 | 1102 | ||
| 1218 | 1103 | * `**TDraggableMarkerPlugin**` | |
| 1219 | 1104 | ||
| 1220 | - | ||
| 1221 | - | ||
| 1222 | - | ||
| 1105 | + | Allows the user to drag points of the GPS type to another location. The mouse button to be used for dragging is specified in the `DragMouseButton` property, and the accuracy required to hit the point by clicking is determined by the `Tolerance` property. The main difference to the `TMarkerEditorPlugin` is that it can handle multiple maps without further measures. | |
| 1223 | 1106 | ||
| 1224 | 1107 | * `**TSpreadMarkerPlugin**` | |
| 1225 | 1108 | ||
| 1226 | - | ||
| 1227 | - | ||
| 1228 | - | ||
| 1109 | + | This is a very complex plugin which is useful when several GPS points are on the same location. When the mouse is moved over this stack of points and remains there for longer than `MarkerSpreadDelayMS` milliseconds the individual points are "exploded" so that every point is visible and, for example, can be dragged by a `TDraggableMarkerPlugin` if present. After `MarkerCollapseDelayMS` milliseconds, the point cloud collapses to a single point again. | |
| 1229 | 1110 | ||
| 1230 | 1111 | * `**TMapGridPlugin**` | |
| 1231 | 1112 | ||
| 1232 | - | ||
| 1233 | - | ||
| 1234 | - | ||
| 1113 | + | Draws a grid of constant longitude/latitude lines over the map | |
| 1235 | 1114 | ||
| 1236 | 1115 | * `**TMapScalePlugin**` | |
| 1237 | 1116 | ||
| 1238 | - | ||
| 1239 | - | ||
| 1240 | - | ||
| 1117 | + | Draws a horizontal scale bar over the map. The units of the scale bar labels are kilometers/meters, or, when `Imperial` is true, miles/feet. The position of the bar depends of the elements in the `AlignSet` (`alTop, alBottom, alLeft, alRight`). The maximum length of the bar (in pixels) is given by `WidthMax`. Note that due to the projection of the earth onto a plane the length scale may be different across the latitudes of viewport; the length of the displayed bar always refers to the center of the map. The property `ZoomMin` is used to turn off the scale bar for smaller zoom levels so that confusion due to a noticeable difference in scaling over the viewport latitudes can be avoided. | |
| 1241 | 1118 | ||
| 1242 | 1119 | * `**TAreaSelectionPlugin**` | |
| 1243 | 1120 | ||
| 1244 | - | ||
| 1245 | - | ||
| 1246 | - | ||
| 1121 | + | Allows the user to select an area (rectangular in terms of latitude and longitude) on the map. | |
| 1247 | 1122 | ||
| 1248 | 1123 | * `**TGreatCirclePainterPlugin**` | |
| 1249 | 1124 | ||
| 1250 | - | ||
| 1251 | - | ||
| 1252 | - | ||
| 1125 | + | Draws a great circle and/or the orthodrome (=shortest line) between two points on the map. | |
| 1253 | 1126 | ||
| 1254 | 1127 | * `**TUserDefinedPlugin**` | |
| 1255 | 1128 | ||
| 1256 | - | ||
| 1257 | - | ||
| 1258 | - | ||
| 1129 | + | This plugin does not have a predefined behaviour, but provides all events handled for specific code. | |
| 1259 | 1130 | ||
| 1260 | 1131 | The folder _examples/plugin_demos_ contains sample projects for these built-in plugins, as well as additional plugin samples. | |
| 1261 | 1132 | ||
| 1262 | 1133 | ### Creating a new plugin class | |
| 1263 | 1134 | ||
| 1264 | 1135 | All plugins must be derived from the `TMvCustomPlugin` class (`unit mvPluginCore`) or from one of it's descendands. | |
| 1265 | 1136 | ||
| 1266 | 1137 | These classes could be added to an instance of a `TMvPluginManager`. | |
| 1267 | 1138 | ||
| 1268 | 1139 | In the derived class you override all needed methods. According to the example above this would be | |
| 1269 | 1140 | ``` | |
| 1270 | 1141 | TMyFirstPlugin = class(TMvPlugin) | |
| 1271 | 1142 | ... | |
| 1272 | 1143 | protected | |
| 1273 | 1144 | procedure AfterPaint(AMapView: TMapView; var Handled: Boolean); override; | |
| 1274 | 1145 | procedure MouseMove(AMapView: TMapView; AShift: TShiftState; X,Y: Integer; | |
| 1275 | 1146 | var Handled: Boolean); override; | |
| 1276 | 1147 | procedure MouseUp(AMapView: TMapView; Button: TMouseButton; Shift: TShiftState; | |
| 1277 | 1148 | X,Y: Integer; var Handled: Boolean); override; | |
| 1278 | 1149 | ``` | |
| 1279 | 1150 | ||
| 1280 | 1151 | As you see, the methods are very similar to the events in the example. The parameter `Sender` is replaced by `AMapView` and additionally you will find a boolean var parameter `Handled`. This parameter could be used to control the interaction between plugins, since the system allows more than one plugin to be attached. For example, if our plugin has found a marker (either in `MouseMove` or `MouseDown`) and change some state(s) it may set the `Handled`-parameter to True and signalize the following plugins that the event is already processed. And also the plugin itself should check the parameter to keep hands of actions consumed by previous plugins. | |
| 1281 | 1152 | ||
| 1282 | 1153 | In the Form with the `MapView` you have to attach a `PluginManager` to the `MapView`. | |
| 1283 | 1154 | ||
| 1284 | 1155 | * The `TMvPluginManager` is found in the component gallery (tab "Misc"), drop him to the form. | |
| 1285 | 1156 | * In the ObjectEditor of the `MapView` select the PluginManager in the corresponding field | |
| 1286 | 1157 | * Create a `FormCreate`-method of the form and create an instance of your plugin and add it to the plugin manager. | |
| 1287 | 1158 | ||
| 1288 | 1159 | ``` | |
| 1289 | 1160 | procedure TForm1.FormCreate(Sender: TObject); | |
| 1290 | 1161 | begin | |
| 1291 | 1162 | FMyFirstPlugin := TMyFirstPlugin.Create(Self); | |
| 1292 | 1163 | FMyFirstPlugin.MapView := MapView1; | |
| 1293 | 1164 | MvPluginManager1.PluginList.Add(FMyFirstPlugin); | |
| 1294 | 1165 | end; | |
| 1295 | 1166 | ``` | |
| 1296 | 1167 | ||
| 1297 | 1168 | As soon as the mouse is interacting with the MapView, the overridden methods are called. | |
| 1298 | 1169 | ||
| 1299 | 1170 | You can include your own plugins into the IDE by using the | |
| 1300 | 1171 | ``` | |
| 1301 | 1172 | RegisterPluginClass(FMyFirstPlugin, 'My fiorst plugin'); | |
| 1302 | 1173 | ``` | |
| 1303 | 1174 | ||
| 1304 | 1175 | method. You have to create your own package and install it. (The details will be added a a later time). | |
| 1305 | 1176 | ||
| 1306 | 1177 | ## Finding Geo Locations: TMvGeoNames | |
| 1307 | 1178 | ||
| 1308 | 1179 | [](</File:tmvgeonames_200.png>) | |
| 1309 | 1180 | ||
| 1310 | 1181 | `TMvGeoNames` is a component which searches the geo coordinates (longitude, latitude) of many cities or other locations in the world. Using the download engine of the `MapView` component it sends a query to the site <http://geonames.org/search.html> and analyzes the returned html string. | |
| 1311 | 1182 | ||
| 1312 | 1183 | ### Getting Started | |
| 1313 | 1184 | ||
| 1314 | 1185 | * Assuming that you already have set up an application for the `TMapView` component as described above, you simply drop a `TMvGeoNames` component on the form; it is located next to the `TMapView` icon in the _Misc_ component palette. | |
| 1315 | 1186 | * Add a button which is supposed to trigger the search. | |
| 1316 | 1187 | * Write an `OnClick` handler for the button which calls the `TMvGeoNames` method `Search`. Enter the search destination as first parameter, and the download engine to be used as second parameter. The function returns the found longitude and latitude as a `TRealPoint` record which can be passed immediately to the `Center` property of the `MapView` component. This way, the viewer can immediately jump to the found location: | |
| 1317 | 1188 | ||
| 1318 | 1189 | ``` | |
| 1319 | 1190 | procedure TForm1.Button1Click(Sender: TObject); | |
| 1320 | 1191 | begin | |
| 1321 | 1192 | MapView1.Center := MvGeoNames1.Search('Grand Canyon National Park', MapView1.DownloadEngine); | |
| 1322 | 1193 | end; | |
| 1323 | 1194 | ``` | |
| 1324 | 1195 | ||
| 1325 | 1196 | ### Documentation | |
| 1326 | 1197 | ||
| 1327 | 1198 | #### Methods | |
| 1328 | 1199 | ||
| 1329 | 1200 | * `function Search(ALocationName: String; ADownloadEngine: TMvCustomDownloadEngine): TRealPoint`: | |
| 1330 | 1201 | ||
| 1331 | - | ||
| 1332 | - | ||
| 1333 | - | ||
| 1202 | + | Searches the requested location using the specified download engine. Return value is a `TRealPoint` with the geo coordinates of the location. The search returns also locations with similar names, however, they must be extracted by handling the `OnNameFound` event. | |
| 1334 | 1203 | ||
| 1335 | 1204 | #### Properties | |
| 1336 | 1205 | ||
| 1337 | 1206 | * `LocationName: string`: | |
| 1338 | 1207 | ||
| 1339 | - | ||
| 1340 | - | ||
| 1341 | - | ||
| 1208 | + | Is the name of the (first) found location as listed by the _geonames_ site. | |
| 1342 | 1209 | ||
| 1343 | 1210 | #### Events | |
| 1344 | 1211 | ||
| 1345 | 1212 | * `OnNameFound`: | |
| 1346 | 1213 | ||
| 1347 | - | ||
| 1348 | - | ||
| 1349 | - | ||
| 1214 | + | This event is triggered while the received response of the _geonames_ server is being analyzed. The html string usually contains a variety of locations. Whenver a location has been extracted from the received string the event is fired and tells the name, a description, and the longitude/latitude `TRealPoint` record for this location. Handling this event makes it possible to list all the found locations for example in a combobox or listbox to give the user the opportunity to select any one of them: | |
| 1350 | 1215 | ``` | |
| 1351 | 1216 | type | |
| 1352 | 1217 | TGeoLocation = class | |
| 1353 | 1218 | Name: String; | |
| 1354 | 1219 | Descr: String; | |
| 1355 | 1220 | Coords: TRealPoint; | |
| 1356 | 1221 | end; | |
| 1357 | 1222 | ||
| 1358 | 1223 | procedure TForm1.MVGeoNames1NameFound(const AName: string; | |
| 1359 | 1224 | const ADescr: String; const ALoc: TRealPoint); | |
| 1360 | 1225 | var | |
| 1361 | 1226 | loc: TGeoLocation; | |
| 1362 | 1227 | begin | |
| 1363 | 1228 | loc := TGeoLocation.Create; | |
| 1364 | 1229 | loc.Name := AName; | |
| 1365 | 1230 | loc.Descr := ADescr; | |
| 1366 | 1231 | loc.Coords := ALoc; | |
| 1367 | 1232 | ComboBox1.Items.AddObject(AName, loc); | |
| 1368 | 1233 | end; | |
| 1369 | 1234 | ``` | |
| 1370 | 1235 | ||
| 1371 | 1236 | --- | |
| 1372 | 1237 | *From the Free Pascal wiki, page "LazMapViewer", as the Internet Archive kept it on 2026-01-12, last changed on 2025-10-26. Copyright stays with the author who wrote it, according to the old wiki's [[Licensing]] page. If you have concerns about this material, [message the admin](/wiki-contact).* |