

Howdy World (Hello World on steroids)/pt: what changed
Revision 2 to 3. Removed lines have a minus sign; added lines have a plus sign.
| Old | New | Line | |
|---|---|---|---|
| 1 | 1 | Este capítulo é um tutorial para Lazarus. Ele explica os primeiros passos para obter um software funcional e também algumas das melhores práticas. O resultado final (esperado) é duplo: o leitor entende os conceitos básicos para construir um software com Lazarus e obtém um verdadeiro programa funcional. Uma calculadora é algo razoavelmente fácil de implementar e todo mundo entende seus conceitos, sem necessidade de explicações de antemão. Esta calculadora é limitada a cálculos com números inteiros, mas pode facilmente ser estendida. | |
| 2 | 2 | ||
| 3 | 3 | Este tutorial não descreve o processo de instalação do Lazarus. Ele assume que o Lazarus está instalado e pronto para uso (preferivelmente a última versão estável, que no momento é a 0.9.30 com FreePascal 2.4.2). Este tutorial é mais ou menos independente de plataforma. Todos os screenshots foram feitos em Windows XP, portanto com o esquema de cores azul/vermelho/cinza. | |
| 4 | 4 | ||
| 5 | 5 | Leitura recomendada antes de começar: uma introdução abrangente da [Lazarus IDE](http://wiki.lazarus.freepascal.org/Lazarus_Tutorial). | |
| 6 | 6 | ||
| 7 | 7 | ## Vamos começar | |
| 8 | 8 | ||
| 9 | 9 | É melhor criar um diretório separado para cada projeto. Portanto, vamos criar um diretório para salvar o projeto da nossa Calculadora. Este diretório será a raiz de todos os arquivos criados para o projeto. | |
| 10 | 10 | ||
| 11 | 11 | - Criar um novo diretório para o projeto de demonstração (digamos, \$HOME/CalculatorDemo). | |
| 12 | 12 | ||
| 13 | 13 | (*Texto que descreve ações que precisam ser executadas é marcado, como a linha anterior*) | |
| 14 | 14 | ||
| 15 | 15 | Com isto resolvido, é hora de iniciar um novo projeto Lazarus. | |
| 16 | 16 | ||
| 17 | 17 | - Inicie o Lazarus. | |
| 18 | 18 | - Escolha Projeto/Novo Projeto… do menu. | |
| 19 | 19 | - Na caixa de diálogo que é apresentada selecione Aplicação e pressione OK (if the IDE reclama sobre modificações não salvas, pressione Não). | |
| 20 | 20 | ||
| 21 | 21 | Para ter certeza de que todos os arquivos do nosso novo projeto estarão no diretório certo, o projeto precisa ser salvo primeiro. | |
| 22 | 22 | ||
| 23 | 23 | - Do menu, escolha Arquivo/Salvar Tudo. | |
| 24 | 24 | - Selecione o diretório que foi criado previamente (\$HOME/CalculatorDemo). | |
| 25 | 25 | - Insira um novo nome de projeto: CalculatorDemo. | |
| 26 | 26 | - Pressione Salvar (ou o que corresponder a isto em seu idioma). | |
| 27 | 27 | - A IDE quer salvar o formulário principal também: insira ’’ufrmMain’’ como o nome da unidade do formulário. | |
| 28 | 28 | - A IDE pergunta se o nome do arquivo deve ser modificado para minúsculas. Confirme isto pressionando o botão 'Renomear para minúsculas'. | |
| 29 | 29 | ||
| 30 | 30 | Em teoria, o programa que é assim criado é um software válido que pode ser executado. Antes de compilá-lo pela primeira vez, duas modificações são recomendadas: atribuição de novos locais (diretórios) para as unidades de destino e nome do arquivo compilado. | |
| 31 | 31 | ||
| 32 | 32 | - Do menu, escolha Projeto/Opções de Projeto. | |
| 33 | 33 | - Selecione Opções do Compilador/Caminhos (clique no nó da TreeView). | |
| 34 | 34 | - Insira o texto ‘‘bin\\’‘ antes do nome de arquivo alvo (ou ‘‘bin/’‘ ´para ambientes *nix). | |
| 35 | 35 | - Note também o prefixo ‘‘lib’‘ para ‘diretório de saída das unidades’ (não o modifique). | |
| 36 | 36 | - Pressione OK. | |
| 37 | 37 | ||
| 38 | 38 | A imagem abaixo mostra como isto ficaria em uma máquina Windows. 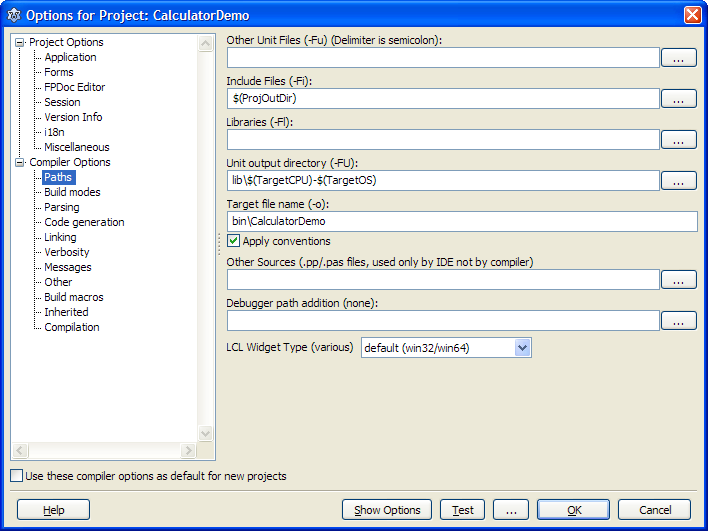 | |
| 39 | 39 | ||
| 40 | 40 | Fazendo isto, a pasta do projeto não será desordenada com a saída gerada pelo compilador. Os arquivos da pasta do projeto são necessárias para construir o programa. Tudo nos diretórios ’’lib’’ e ’’bin’’ podem ser eliminados quando do arquivamento do projeto. | |
| 41 | 41 | ||
| 42 | 42 | Agora, como um primeiro teste, o projeto pode ser compilado e executado. | |
| 43 | 43 | ||
| 44 | 44 | - Pressione F9 (o atalho para compilar, construir e executar o programa). Se tudo sair bem, uma tela em branco será mostrada. Agora sabemos que foi criada uma base sólida sobre a qual podemos começar a construir o programa. | |
| 45 | 45 | - Finalize a execução clicando no ícone Fechar (isto depende do OS). | |
| 46 | 46 | ||
| 47 | 47 | ## O primeiro componente | |
| 48 | 48 | ||
| 49 | 49 | O Lazarus tem uma assim chamada 'paleta de componentes': | |
| 50 | 50 | ||
| 51 | 51 |  | |
| 52 | 52 | ||
| 53 | 53 | Todos os componentes que estão disponíveis para construir uma interface do usuário estão logicamente agrupados nas abas de componentes. O número real de abas depende dos pacotes instalados, mas a paleta básica se parece com a imagem acima. A primeira aba é a Standard, seguida pela Aditional, Common controls, etc. | |
| 54 | 54 | ||
| 55 | 55 | Para retornar o nome do tipo de um componente, passe o mouse sobre o ícone do componente e um aviso será mostrado (mais precisamente, o nome de classe do componente). Para uma explanação sobre todos os controles, veja esta [Lazarus introduction](http://wiki.lazarus.freepascal.org/Lazarus_Tutorial) | |
| 56 | 56 | ||
| 57 | 57 | A primeira coisa que é preciso ser feita para o programa de Calculadora é criar uma área de display, onde estão os números. Para isto, um controle TEdit é usado. | |
| 58 | 58 | ||
| 59 | - | ||
| 60 | - | ||
| 59 | + | ```text | |
| 60 | + | # Nota: os componentes visuais são referidos como Controles. | |
| 61 | + | Para o nosso propósito, a diferença entre um "componente" e um "controle" não é relevante. | |
| 62 | + | ``` | |
| 61 | 63 | ||
| 62 | 64 | Para colocar um controle no formulário, este precisa ter o foco. Pressionar F12 no teclado muda o foco do editor de formulários para o editor de código e vice-versa. | |
| 63 | 65 | ||
| 64 | 66 | - Pressione F12 uma vez ou duas para posicionar a janela do formulário no topo (veja imagem abaixo). | |
| 65 | 67 | ||
| 66 | 68 | 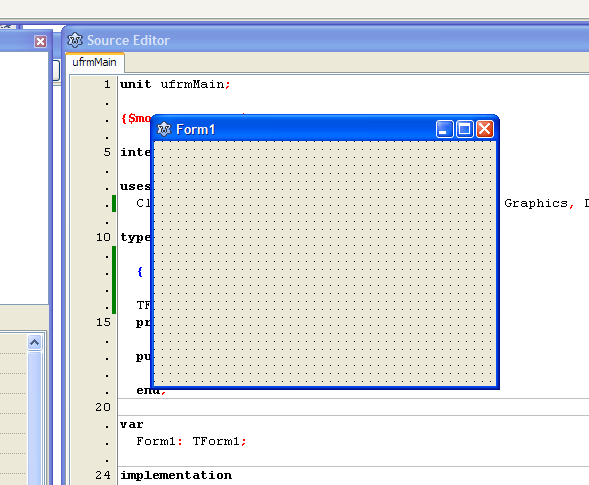 | |
| 67 | 69 | ||
| 68 | 70 | - Selecione a aba Standard na palete de componentes. Esta é a aba que é selecionada por padrão. | |
| 69 | 71 | - Clique sobre o componente TEdit (passe o mouse sobre os ícones de componentes para obter os nomes de classe). | |
| 70 | 72 | - Clique em algum lugar no formulário. Isto colocará um controle TEdit no formulário com um nome que é o mesmo nome da classe do componente sem a letra "T" e com um número no final (por exemplo, Edit1). Quando um segunto TEdit for colocado no formulário, será nomeado como Edit2, e assim por diante. Isto se aplica a todos os componentes. | |
| 71 | 73 | ||
| 72 | 74 | Agora que o controle está colocado no formulário, ele pode ser personalizado como você precisar. Esta personalização tem lugar no Inspetor de Objetos. Esta é a janela à esquerda da tela, com a lista de propriedades para o controle TEdit que são personalizáveis. 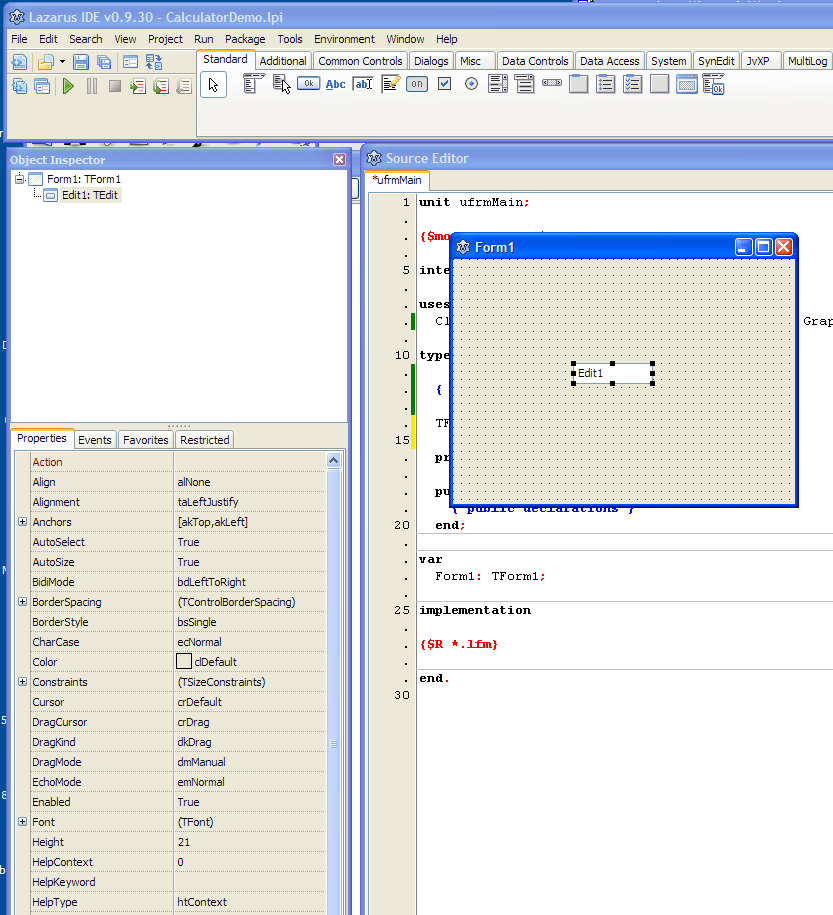 | |
| 73 | 75 | ||
| 74 | 76 | As propriedades determinam a aparência e o comportamento do controle. É fácil modificá-las: apenas clique em uma delas, insira um novo valor e pressione Enter. O efeito no controle é imediatamente visível. As propriedades no Inspetor de Objetos são todas propriedades para um único controle, particularmente o controle que tem o foco ou está selecionado. Portanto, a maneira de modificar propriedades de um controle é primeiramente selecioná-lo e então fazer as modificações no Inspetor de Objetos. Se nenhum controle for selecionado, as propriedades do formulário serão mostradas. | |
| 75 | 77 | ||
| 76 | 78 | Faça as seguintes modificações nas propriedades de Edit1: | |
| 77 | 79 | ||
| 78 | 80 | - Mude o nome para *edDisplay*. | |
| 79 | 81 | - Mude Align para *alTop* (não confundir com Alignment). | |
| 80 | 82 | - Mude Alignment para *alRightJustify* (não confundir com Align). | |
| 81 | 83 | - Mude BorderSpacing.Around para *6*. | |
| 82 | 84 | - Mude Text para *0* (o número zero, não a letra "O"). | |
| 83 | 85 | ||
| 84 | 86 | Estas propriedades são bastante autoexplicativas, especialmente quando as modificações acima são feitas e o efeito é monitorado no formulário. | |
| 85 | 87 | ||
| 86 | 88 | Como um toque final, a fonte que é usada para mostrar textos em todos os controles será mudada. A fonte pode ser mudada de duas maneiras: na propriedade Font de edDisplay ou na mesma propriedade do formulário. Mudando a fonte do formulário tem o benefício de que todos os componentes anteriormente criados 'herdarão' a nova fonte, e é aí que nós faremos a nossa modificação. | |
| 87 | 89 | ||
| 88 | 90 | - Clique em algum lugar do formulário. Isto desselecionará o controle edDisplay e selecionará o próprio formulário. As propriedades do formulário são agora mostradas no Inspetor de Objetos. | |
| 89 | 91 | - No Inspetor de Objetos, clique na propriedade Font. A linha da propriedade Font será realçada e um botão com três pontos será mostrado. | |
| 90 | 92 | - Clique no botão com três pontos. Isto abre a caixa de diálogo Fonts. | |
| 91 | 93 | - Selecione Verdana, Bold, Tamanho 10. | |
| 92 | 94 | - Pressione OK. | |
| 93 | 95 | ||
| 94 | 96 | O título do formulário não é muito significativo. O padrão é 'Form1'. | |
| 95 | 97 | ||
| 96 | 98 | - No Inspetor de Objetos, clique na propriedade Caption. | |
| 97 | 99 | - Mude o texto para *Calculator Demo*. | |
| 98 | 100 | ||
| 99 | 101 | O resultado de todas estas ações será um formulário que se parece com este: 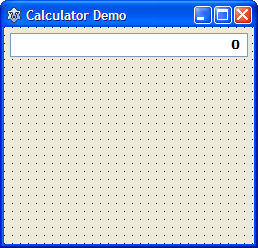 | |
| 100 | 102 | ||
| 101 | 103 | Agora é uma boa hora para salvar o formulário. | |
| 102 | 104 | ||
| 103 | 105 | - Selecione do menu Arquivo/Salvar ou pressione a combinação de teclas Ctrl+S. | |
| 104 | 106 | ||
| 105 | 107 | Lembre-se de salvá-lo e o salve com frequência! | |
| 106 | 108 | ||
| 107 | 109 | ## Botões | |
| 108 | 110 | ||
| 109 | 111 | Para que serve uma calculadora se não puderem ser inseridos números? Portanto o próximo passo será adicionar botões para os dígitos 0..9. Antes de posicionar os botões para os dígitos, um assim chamado "contêiner" é colocado no formulário. Um TPanel é outro contêiner que podem ser colocados no formulário. Contêineres podem ser colocados dentro de outros, mas isto é para outro tutorial. | |
| 110 | 112 | ||
| 111 | 113 | - Na paleta de componentes, selecione um controle TPanel. | |
| 112 | 114 | - Clique no formulário para criar o painel. Um novo painel está agora visível no formulário com largura, altura e rótulo padronizados. Note que a fonte do painel é herdade do formulário. Este painel será usado para agrupar todos os botões, então algumas propriedades devem ser modificadas. | |
| 113 | 115 | - Remova o texto *Panel1* da propriedade Caption. | |
| 114 | 116 | - Modifique Align par a *alClient*. | |
| 115 | 117 | - Modifique Borderspacing.Around para *6*. | |
| 116 | 118 | - Aumente a largura (width) do formulário para *300* (primeiro clique no formulário na TreeView do Inspetor de Objetos). | |
| 117 | 119 | - Aumente a altura (height) do formulário para *350*. | |
| 118 | 120 | ||
| 119 | 121 | (Aumentando o tamanho do formulário nos dará algum espaço para mover os controles.) | |
| 120 | 122 | ||
| 121 | 123 | Agora os botões dos dígitos serão adicionados. | |
| 122 | 124 | ||
| 123 | 125 | - Na paleta de componentes, selecione um controle TButton. | |
| 124 | 126 | - Clique no formulário para posicioná-lo. O botão é colocado no painel. Isto é visível no Inspetor de Objetos: Button1 é chamado *filho* (child) de Panel1. Isto efetivamente significa que, se o painel for movido, todos os controles filhos serão movidos, e quando Panel1 for eliminado, todos os controles-filhos o serão também. | |
| 125 | 127 | - No Inspetor de Objetos, modifique o valor de Caption para *0* (o número zero). | |
| 126 | 128 | - Modifique a largura (width) para *32*. | |
| 127 | 129 | - Modifique a altura (height) para *30*. | |
| 128 | 130 | - Modifique o nome (name) para *btnDigit0*. | |
| 129 | 131 | ||
| 130 | 132 | Isto precisa ser repetido para os dígitos 1..9. A forma mais rápida de fazê-lo é copiando e colando o botão já criado. | |
| 131 | 133 | ||
| 132 | 134 | - Clique com o botão direito do mouse no botão do dígito *0* e selecione Copiar do menu popup. | |
| 133 | 135 | - Clique com o botão direito do mouse em algum lugar de Panel1 e selelcione Colar. Um segundo botão é adicionado ao painel. A única diferença do primeiro botão é o nome *btnDigit1*. | |
| 134 | 136 | - Modifique a propriedade Caption (rótulo) no Inspetor de Objetos para *1*. | |
| 135 | 137 | - Repita a ação de Colar mais oito vezes para os botões seguintes. | |
| 136 | 138 | - Mova os botões no formulário para obter um layout que se pareça com uma calculadora: | |
| 137 | 139 | ||
| 138 | 140 | 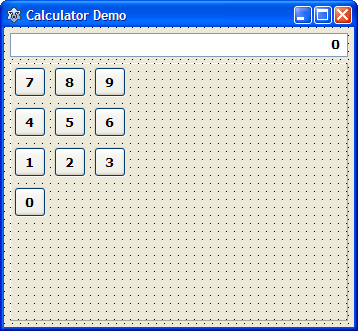 | |
| 139 | 141 | ||
| 140 | 142 | Os próximos são os quatro botões para operações matemáticas (soma, subtração, etc). | |
| 141 | 143 | ||
| 142 | 144 | - Coloque um novo TButton no formulário. | |
| 143 | 145 | - Modifique a largura para *32*. | |
| 144 | 146 | - Modifique a altura para *30*. | |
| 145 | 147 | - Modifique a propriedade Caption para *+*. | |
| 146 | 148 | - Modifique o nome para *btnFunction*. | |
| 147 | 149 | - Copie e Cole este botão mais três vezes, modificando o rótulo (caption) para *-*, *** e */*. | |
| 148 | 150 | - Alinhe os botões verticalmente, ao lado dos botões dos dígitos. | |
| 149 | 151 | ||
| 150 | 152 | E os botões especiais: | |
| 151 | 153 | ||
| 152 | 154 | - Copie e Cole o botão *+*. | |
| 153 | 155 | - Modifique o rótulo para *+/-* | |
| 154 | 156 | - Modifique o nome para *btnPlusMinus*. | |
| 155 | 157 | - Posicione o botão bem embaixo do botão *3*. | |
| 156 | 158 | - Copie e Cole o botão *+*. | |
| 157 | 159 | - Modifique o rótulo para *C*. | |
| 158 | 160 | - Modifique o nome para *btnClear*. | |
| 159 | 161 | - Posicione o botão à direita do botão *+*. | |
| 160 | 162 | - Copie e Cole o botão *+*. | |
| 161 | 163 | - Modifique o rótulo para *=*. | |
| 162 | 164 | - Modifique o nome para *btnCalculate*. | |
| 163 | 165 | - Posicione o botão à direita do botão */*. | |
| 164 | 166 | ||
| 165 | 167 | Redimensione o formulário para que se ajuste aos botões. | |
| 166 | 168 | ||
| 167 | 169 | Isto deve resultar em algo assim: | |
| 168 | 170 | ||
| 169 | 171 | 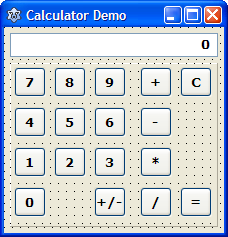 | |
| 170 | 172 | ||
| 171 | 173 | Lembre-se de salvar e salve com frequência! | |
| 172 | 174 | ||
| 173 | 175 | ## Respondendo a eventos | |
| 174 | 176 | ||
| 175 | 177 | Uma aplicação GUI muitas vezes é uma aplicação baseada em eventos. Isto significa que a aplicação não faz nada até que digamos a ela o que fazer. Por exemplo, inserindo dados através do teclado, pressionando botões, etc. Uma das coisas que a calculadora precisa fazer é responder a cliques do mouse nos botões 0..9. É nisto que a IDE nos ajuda. Acrescentar um *manipulador de eventos* para um botão é fácil. | |
| 176 | 178 | ||
| 177 | 179 | - Certifique-se de que o formulário com todos os botões está visível (se necessário, pressione F12 uma ou duas vezes). | |
| 178 | 180 | - Dê um duplo-clique no botão com o rótulo *0*: a IDE automaticamente cria um procedimento que manipulará eventos de cliques do mouse: procedure TForm1.btnDigit0Click(Sender :TObject); | |
| 179 | 181 | - Digite o seguinte código entre as palavras-chave *begin* e *end*: | |
| 180 | 182 | ||
| 181 | 183 | ``` pascal | |
| 182 | 184 | edDisplay.Text := edDisplay.Text + '0' | |
| 183 | 185 | ``` | |
| 184 | 186 | ||
| 185 | 187 | edtDisplay é uma caixa de edição. A forma de modificar o conteúdo de uma caixa de edição é modificando a propriedade *Text*. A declaração acima acrescenta o número '0' ao texto e isto é visível na tela imediatamente. | |
| 186 | 188 | ||
| 187 | 189 | - Dê um duplo-clique no botão com o rótulo *1*. | |
| 188 | 190 | - Digite o seguinte código entre as palavras-chave *begin* e *end*: | |
| 189 | 191 | ||
| 190 | 192 | ``` pascal | |
| 191 | 193 | edDisplay.Text := edDisplay.Text + '1' | |
| 192 | 194 | ``` | |
| 193 | 195 | ||
| 194 | 196 | É uma boa ideia compilar o código a intervalos para verificar erros de sintaxe. | |
| 195 | 197 | ||
| 196 | 198 | - Selecione do menu: Executar/Executar (ou pressione F9). O projeto é compilado e a aplicação se inicia. | |
| 197 | 199 | - Clique nos dígitos 0 e 1 algumas vezes e veja o que acontece na tela. Os outros botões ainda não fazem nada obviamente porque os manipuladores de eventos ainda não foram acrescentados. | |
| 198 | 200 | - Pare o programa de Calculadora. | |
| 199 | 201 | ||
| 200 | 202 | É claro que agora é fácil acrescentar manipuladores de eventos para os dígitos 2..9, mas isto vai resultar em muito código redundante. Cada manipulador de eventos faz exatamente a mesma coisa, apenas os dígitos são diferentes. A forma de eliminar esta redundãncia é criar um procedimento que faça o processamento e acrescentar uma variável (os dígitos 0..9) como parâmetro. | |
| 201 | 203 | ||
| 202 | 204 | - No editor, localize as linhas em que a classe TForm1 é declarada. Ele vai se parecer com isto: | |
| 203 | 205 | ||
| 204 | 206 | ``` pascal | |
| 205 | 207 | { TForm1 } | |
| 206 | 208 | ||
| 207 | 209 | TForm1 = class(TForm) | |
| 208 | 210 | btnDigit0: TButton; | |
| 209 | 211 | btnDigit1: TButton; | |
| 210 | 212 | btnDigit2: TButton; | |
| 211 | 213 | btnDigit3: TButton; | |
| 212 | 214 | btnDigit4: TButton; | |
| 213 | 215 | btnDigit5: TButton; | |
| 214 | 216 | btnDigit6: TButton; | |
| 215 | 217 | btnDigit7: TButton; | |
| 216 | 218 | btnDigit8: TButton; | |
| 217 | 219 | btnDigit9: TButton; | |
| 218 | 220 | btnFunction: TButton; | |
| 219 | 221 | btnFunction1: TButton; | |
| 220 | 222 | btnFunction2: TButton; | |
| 221 | 223 | btnFunction3: TButton; | |
| 222 | 224 | btnCalculate: TButton; | |
| 223 | 225 | btnPlusMinus: TButton; | |
| 224 | 226 | btnClear: TButton; | |
| 225 | 227 | edDisplay: TEdit; | |
| 226 | 228 | Panel1: TPanel; | |
| 227 | 229 | procedure btnDigit0Click(Sender: TObject); | |
| 228 | 230 | procedure btnDigit1Click(Sender: TObject); | |
| 229 | 231 | private | |
| 230 | 232 | { private declarations } | |
| 231 | 233 | public | |
| 232 | 234 | { public declarations } | |
| 233 | 235 | end; | |
| 234 | 236 | ``` | |
| 235 | 237 | ||
| 236 | 238 | Note que, na definição de classe acima, todos os controles e procedimentos declarados foram adicionados ao formulário automaticamente. ***Não faça qualquer modificação manual aí!!*** A IDE vai ficar nervosa que você o fizer. O lugar para acrescentar variáveis, procedientos e funções personalizadas são as seções *private* e *public*. Como regra geral, variáveis personalizadas são adicionadas à seção *private*. Procedimentos e funções são acrescentadas à seção *private* também, exceto quando outros formulários precisam chamar estes procedimentos ou funções (o que deve acontecer com frequência). | |
| 237 | 239 | ||
| 238 | 240 | De volta para o nosso problema de dígitos: precisamos de um procedimento que acrescente dígitos ao display em que os dígitos possam variar. | |
| 239 | 241 | ||
| 240 | 242 | - Acrescente o procedimento AddDigit à seção *private* do formulário. | |
| 241 | 243 | ||
| 242 | 244 | ``` pascal | |
| 243 | 245 | private | |
| 244 | 246 | { private declarations } | |
| 245 | 247 | procedure AddDigit(const pDigit: byte); | |
| 246 | 248 | public | |
| 247 | 249 | { public declarations } | |
| 248 | 250 | end; | |
| 249 | 251 | ``` | |
| 250 | 252 | ||
| 251 | 253 | Em seguida, o código efetivo para o procedimento AddDigit precisa ser inserido. Novamente a IDE vem em nosso auxílio: | |
| 252 | 254 | ||
| 253 | 255 | - Posicione o caret na linha AddDigit. | |
| 254 | 256 | - Pressione a combinação de teclas Ctrl+Shift+C. | |
| 255 | 257 | ||
| 256 | 258 | A IDE gerará a definição deste novo método e posicionará o cursor de texto dentro do procedimento vazio. Podemos imediatamente começar a digitar. | |
| 257 | 259 | ||
| 258 | 260 | - Acrescente o seguinte código ao procedimento AddDigit: | |
| 259 | 261 | ||
| 260 | 262 | ``` pascal | |
| 261 | 263 | edDisplay.Text := edDisplay.Text + IntToStr(pDigit) | |
| 262 | 264 | ``` | |
| 263 | 265 | ||
| 264 | 266 | Note que a função *IntToStr()* traduz o valor numérico, o digito, para um valor de sequência de caracteres de modo que possa ser mostrado no display. | |
| 265 | 267 | ||
| 266 | 268 | E para usar este procedimento para todos os dígitos: | |
| 267 | 269 | ||
| 268 | 270 | - Abra o formulário (se necessário, pressione F12 uma ou duas vezes). | |
| 269 | 271 | - Dê um duplo-clique no botão do dígito '0': isto abrirá o editor no manipulador de eventos para o botão 0. | |
| 270 | 272 | - Substituia o código no manipulador de eventos por: AddDigit(0). O procedimento se parecerá com isto: | |
| 271 | 273 | ||
| 272 | 274 | ``` pascal | |
| 273 | 275 | procedure TForm1.btnDigit0Click(Sender: TObject); | |
| 274 | 276 | begin | |
| 275 | 277 | AddDigit(0) | |
| 276 | 278 | end; | |
| 277 | 279 | ``` | |
| 278 | 280 | ||
| 279 | 281 | - Faça o mesmo para o botão do dígito 1: | |
| 280 | 282 | ||
| 281 | 283 | ``` pascal | |
| 282 | 284 | procedure TForm1.btnDigit1Click(Sender: TObject); | |
| 283 | 285 | begin | |
| 284 | 286 | AddDigit(1) | |
| 285 | 287 | end; | |
| 286 | 288 | ``` | |
| 287 | 289 | ||
| 288 | 290 | Antes de completar esta sequência para todos os outros botões de dígitos, certifique-se de que ele realmente faz o que queremos. | |
| 289 | 291 | ||
| 290 | 292 | - Execute o programa (pressione F9). | |
| 291 | 293 | - Clique nos botões 0 e 1 algumas vezes e veja se ele realmente funciona. | |
| 292 | 294 | - Finalize o programa. | |
| 293 | 295 | ||
| 294 | 296 | *Um bom programador é um programador preguiçoso* | |
| 295 | 297 | ||
| 296 | 298 | Agora podemos acrescentar manipuladores de eventos para os botões 2..9. Mas agora novamente temos o mesmo problema de criar código redundante: AddDigit(2), AddDigit(3), etc. E se houvesse uma maneira de contar os botões separadamente? Felizmente existe. | |
| 297 | 299 | ||
| 298 | 300 | Todos os componentes têm uma propriedade de valor inteiro chamada *Tag* (lembre-se: um controle é apenas um tipo especial de componente que herda esta propriedade *Tag*. É uma propriedade que não tem uma função verdadeira. Está lá para usarmos como acharmos melhor. E se cada botão pudesse ter seu valor de dígito armazenado na propriedade *Tag*... | |
| 299 | 301 | ||
| 300 | 302 | - Abra o formulário (se necessário, pressione F12 uma ou duas vezes). | |
| 301 | 303 | - Selecione o botão do dígito 1 (clique nele uma vez). | |
| 302 | 304 | - No Inspetor de Objetos, localize a propriedade *Tag* e modifique seu valor par *1*. | |
| 303 | 305 | - Selecione o botão do dígito 2 (clique nele uma vez). | |
| 304 | 306 | - No Inspetor de Objetos, localize a propriedade *Tag* e modifique seu valor para *2*. | |
| 305 | 307 | - Repita isto para os botões dos dígitos 3..9. | |
| 306 | 308 | ||
| 307 | 309 | Agora todos os botões de dígitos têm um valor de Tag único. Não modificamos o botão do dígito 0 porque o valor padrão de Tag já é 0. Agora, para fazer uso deste valor de Tag: | |
| 308 | 310 | ||
| 309 | 311 | - Abra o formulário. | |
| 310 | 312 | - Dê um duplo-clique no botão do dígito 0 (isto abrirá o editor no manipulador de eventos para o botão do dígito 0). | |
| 311 | 313 | - Note que o procedimento *btnDigit0Click* tem um parâmetro *Sender* de tipo *TObject*. | |
| 312 | 314 | ||
| 313 | 315 | ``` pascal | |
| 314 | 316 | procedure TForm1.btnDigit0Click(Sender: TObject); | |
| 315 | 317 | ``` | |
| 316 | 318 | ||
| 317 | 319 | O parâmetro *Sender* é na verdade uma referência ao botão que foi pressionado. Através de conversão de tipo, podemos usar o parâmetro como se fosse um TButton. | |
| 318 | 320 | ||
| 319 | 321 | - Modifique o código assim: | |
| 320 | 322 | ||
| 321 | 323 | ``` pascal | |
| 322 | 324 | procedure TForm1.btnDigit0Click(Sender: TObject); | |
| 323 | 325 | begin | |
| 324 | 326 | AddDigit(TButton(Sender).Tag) | |
| 325 | 327 | end; | |
| 326 | 328 | ``` | |
| 327 | 329 | ||
| 328 | 330 | Não parece que tenhamos feito muito, substituindo uma linha de código por outra. No entanto, Se tivéssemos de adicionar código para os outros dígitos (1..9), ele ficaria exatamente igual. Assim, todos os outros dígitos podem reusar este método! | |
| 329 | 331 | ||
| 330 | 332 | Vamos olhar melhor para o Inspetor de Objetos. | |
| 331 | 333 | ||
| 332 | 334 | - Abra o formulário. | |
| 333 | 335 | - Selecione o botão do dígito 0 (btnDigit0). | |
| 334 | 336 | - No Inspetor de Objetos, selecione a aba Events (veja abaixo). | |
| 335 | 337 | ||
| 336 | 338 | 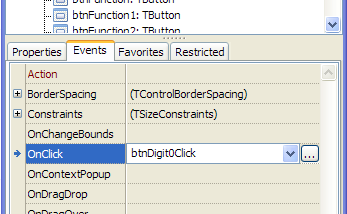 | |
| 337 | 339 | ||
| 338 | 340 | No Inspetor de Objetos, podemos não somente mudar as propriedades do controle, mas também os manipuladores de eventos. No Inspetor de Objetos podemos ver que, tão logo o botão do dígito 0 for clicado, o método *btnDigit0Click* seá chamado (este é o manipulador de eventos *OnClick*). | |
| 339 | 341 | ||
| 340 | 342 | - No formulário: selecione o botão do dígito 2. No Inspetor de Objetos podemos agora ver que não há qualquer manipulador de eventos OnClick para o botão 2. | |
| 341 | 343 | - Abra a lista dropdown para o evento OnClick e selecione *btnDigit0Click*. | |
| 342 | 344 | - Faça o mesmo para todos os outros botões de dígitos 3..9. | |
| 343 | 345 | ||
| 344 | 346 | Now all buttons share one common procedure that does exactly what we want except for digit button 1. Remember that for digit button 1 we created an event handler *btnDigit1Click* that we don't really need anymore. | |
| 345 | 347 | ||
| 346 | 348 | - On the form: select digit button 1. In the Object Inspector we can now see that the event handler indeed is *btnDigit1Click*. | |
| 347 | 349 | - Open the drop down list for the OnClick event and select btnDigit0Click. | |
| 348 | 350 | ||
| 349 | 351 | Now all buttons share the same event handler to add digits to the display box. | |
| 350 | 352 | ||
| 351 | 353 | - Run the program (press F9). | |
| 352 | 354 | - Click all buttons 0..9 a couple of times and see that it actually works. | |
| 353 | 355 | - End the program. | |
| 354 | 356 | ||
| 355 | 357 | For the digit buttons one final thing needs to be done: event handler *btnDigit1Click* still exists but is not used anymore and should be deleted. The safest way to do this (for now) is to let the IDE handle it. For this to work the option *Auto remove empty methods* must be enabled. | |
| 356 | 358 | ||
| 357 | 359 | - In the menu select Environment/Options. | |
| 358 | 360 | - Click on Editor/Completion and Hints. | |
| 359 | 361 | - Enable the option 'Auto remove empty methods' (see image below). | |
| 360 | 362 | - Press OK. | |
| 361 | 363 | ||
| 362 | 364 | 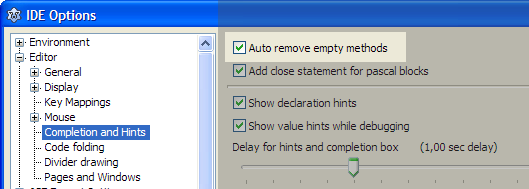 | |
| 363 | 365 | ||
| 364 | 366 | From now on all empty methods are automatically deleted as soon as the source file is saved. | |
| 365 | 367 | ||
| 366 | 368 | - Locate method *procedure TForm1.btnDigit1Click(Sender: TObject)* | |
| 367 | 369 | - Delete the line 'AddDigit(1)' | |
| 368 | 370 | - Save the file (press Ctrl-S or select from the menu File/Save). The now empty procedure is automatically deleted. | |
| 369 | 371 | ||
| 370 | 372 | ## Tuning | |
| 371 | 373 | ||
| 372 | 374 | So far so good: the calculator program compiles, runs and responds to clicks on digit buttons 0..9. But it doesn't behave exactly as we want: there's always this annoying zero at the beginning of the number and the number of allowed digits is too large. | |
| 373 | 375 | ||
| 374 | 376 | ### Removing leading zeroes | |
| 375 | 377 | ||
| 376 | 378 | Normally an integer number that's bigger (or smaller) than zero does not start with a leading zero. So our calculator should compensate for this. Luckily this is easy to implement. Remember that we have one and only one method that handles the addition of digits: AddDigit. This is the place to add logic to suppress the leading zero. | |
| 377 | 379 | ||
| 378 | 380 | - Locate method *procedure TForm1.AddDigit(const pDigit: byte)* | |
| 379 | 381 | - Change the code to: | |
| 380 | 382 | ||
| 381 | 383 | ``` pascal | |
| 382 | 384 | procedure TForm1.AddDigit(const pDigit: byte); | |
| 383 | 385 | begin | |
| 384 | 386 | // Suppress leading zeroes when adding digits | |
| 385 | 387 | if edDisplay.Text = '0' then | |
| 386 | 388 | edDisplay.Text := IntToStr(pDigit) | |
| 387 | 389 | else | |
| 388 | 390 | edDisplay.Text := edDisplay.Text + IntToStr(pDigit) | |
| 389 | 391 | end; | |
| 390 | 392 | ``` | |
| 391 | 393 | ||
| 392 | 394 | ### Limit the number of digits | |
| 393 | 395 | ||
| 394 | 396 | This demo calculator cannot handle numbers that are too large. So we need to limit the number of digits that can be entered. Again the logical place to do this is the AddDigit method: | |
| 395 | 397 | ||
| 396 | 398 | - Locate method *procedure TForm1.AddDigit(const pDigit: byte)* | |
| 397 | 399 | - Change the code to: | |
| 398 | 400 | ||
| 399 | 401 | ``` pascal | |
| 400 | 402 | procedure TForm1.AddDigit(const pDigit: byte); | |
| 401 | 403 | begin | |
| 402 | 404 | // Limit the number of digits | |
| 403 | 405 | if length(edDisplay.Text) < 8 then | |
| 404 | 406 | begin | |
| 405 | 407 | // Suppress leading zeroes when adding digits | |
| 406 | 408 | if edDisplay.Text = '0' then | |
| 407 | 409 | edDisplay.Text := IntToStr(pDigit) | |
| 408 | 410 | else | |
| 409 | 411 | edDisplay.Text := edDisplay.Text + IntToStr(pDigit) | |
| 410 | 412 | end; | |
| 411 | 413 | end; | |
| 412 | 414 | ``` | |
| 413 | 415 | ||
| 414 | 416 | ## Operations | |
| 415 | 417 | ||
| 416 | 418 | Now it's time to look at the actual operations we want to implement: adding, subtracting, multiplying and dividing. The way the user is going to use the calculator goes something like this: | |
| 417 | 419 | ||
| 418 | 420 | 1. The user enters a number | |
| 419 | 421 | 2. The user presses a function button (e.g. '+') | |
| 420 | 422 | 3. The user enters a second number | |
| 421 | 423 | 4. The user presses '=' | |
| 422 | 424 | 5. The program responds with the addition of the first and second number | |
| 423 | 425 | ||
| 424 | 426 | As soon as the user presses the '=' button the program has to know three things: | |
| 425 | 427 | ||
| 426 | 428 | 1. What was the operation? | |
| 427 | 429 | 2. What was the first number? | |
| 428 | 430 | 3. What was the second number? | |
| 429 | 431 | ||
| 430 | 432 | ### What was the operation? | |
| 431 | 433 | ||
| 432 | 434 | Somehow we need to register that a certain operation type was selected. And for that we need to know what operation types are available. One way to implement this is to create an enumeration type (or user defined scalar type) that contains all valid operations. | |
| 433 | 435 | ||
| 434 | 436 | - In the Source Editor, find the location where the form is declared. | |
| 435 | 437 | - Just above the form add the type declaration *TOperationType* for all supported operations: | |
| 436 | 438 | ||
| 437 | 439 | ``` pascal | |
| 438 | 440 | type | |
| 439 | 441 | ||
| 440 | 442 | { All supported operations for our calculator } | |
| 441 | 443 | TOperationType = (otNone, otPlus, otMinus, otMultiply, otDivide); | |
| 442 | 444 | ||
| 443 | 445 | { TForm1 } | |
| 444 | 446 | ||
| 445 | 447 | TForm1 = class(TForm) | |
| 446 | 448 | ``` | |
| 447 | 449 | ||
| 448 | 450 | - To temporarily store the operation, a variable is added to the private section of the form's class declaration. | |
| 449 | 451 | ||
| 450 | 452 | ``` pascal | |
| 451 | 453 | private | |
| 452 | 454 | { private declarations } | |
| 453 | 455 | SelectedOperation: TOperationType; | |
| 454 | 456 | procedure AddDigit(const pDigit: byte); | |
| 455 | 457 | ``` | |
| 456 | 458 | ||
| 457 | 459 | ### What was the first number? | |
| 458 | 460 | ||
| 459 | 461 | To temporarily store the first number that was entered we need a variable. | |
| 460 | 462 | ||
| 461 | 463 | - Add a variable to the form's private section. | |
| 462 | 464 | ||
| 463 | 465 | ``` pascal | |
| 464 | 466 | private | |
| 465 | 467 | { private declarations } | |
| 466 | 468 | SelectedOperation: TOperationType; | |
| 467 | 469 | FirstNumber: longint; | |
| 468 | 470 | procedure AddDigit(const pDigit: byte); | |
| 469 | 471 | ``` | |
| 470 | 472 | ||
| 471 | 473 | ### What was the second number? | |
| 472 | 474 | ||
| 473 | 475 | - Add variable SecondNumber to the form's private section (the same as FirstNumber) and make it a longint as well. | |
| 474 | 476 | ||
| 475 | 477 | ## What's on your mind | |
| 476 | 478 | ||
| 477 | 479 | Now it's time to implement the actions for the function buttons: add, subtract, multiply and divide. Let's start with the '+' button. As mentioned in one of the previous sections: when the '+' button is pressed, we need to store the first number and the operation type. So that's what we are going to do. | |
| 478 | 480 | ||
| 479 | 481 | - Open the form. | |
| 480 | 482 | - Double click on button '+'. The IDE creates an event handler and the text cursor is placed inside the empty begin/end block. | |
| 481 | 483 | ||
| 482 | 484 | Hold on! Before adding all the code here and doing the same for the three other operation buttons, remember what was said when the digit buttons 0..9 were added: do not add redundant code! It's reasonable to assume that the code for the other three operation buttons will be the same as for the '+' button, except for the operation itself. So let's save ourselves some work. | |
| 483 | 485 | ||
| 484 | 486 | - Locate the form's private section and add a new procedure: StoreOperation. | |
| 485 | 487 | ||
| 486 | 488 | ``` pascal | |
| 487 | 489 | private | |
| 488 | 490 | { private declarations } | |
| 489 | 491 | SelectedOperation: TOperationType; | |
| 490 | 492 | FirstNumber: longint; | |
| 491 | 493 | SecondNumber: longint; | |
| 492 | 494 | procedure AddDigit(const pDigit: byte); | |
| 493 | 495 | procedure StoreOperation(const pOperation: TOperationType); | |
| 494 | 496 | ``` | |
| 495 | 497 | ||
| 496 | 498 | - Place the blinking text cursor on the newly inserted line. | |
| 497 | 499 | - Press Ctrl-Shift-C (you know the drill by now…). | |
| 498 | 500 | ||
| 499 | 501 | The StoreOperation procedure must do two things: store the operation and store the number that was entered in the display, so it can be used afterwards. | |
| 500 | 502 | ||
| 501 | 503 | - Add the following code to the newly created procedure: | |
| 502 | 504 | ||
| 503 | 505 | ``` pascal | |
| 504 | 506 | procedure TForm1.StoreOperation(const pOperation: TOperationType); | |
| 505 | 507 | begin | |
| 506 | 508 | // Store the operation so it can be used later | |
| 507 | 509 | SelectedOperation := pOperation; | |
| 508 | 510 | ||
| 509 | 511 | // Store the number that was entered by the user | |
| 510 | 512 | FirstNumber := StrToInt(edDisplay.Text); | |
| 511 | 513 | end; | |
| 512 | 514 | ``` | |
| 513 | 515 | ||
| 514 | 516 | Ok, now back to the '+' button: | |
| 515 | 517 | ||
| 516 | 518 | - Open the form. | |
| 517 | 519 | - Double click on button '+'. | |
| 518 | 520 | - Add the following code: StoreOperation(otPlus); | |
| 519 | 521 | - Open the form. | |
| 520 | 522 | - Double click on button '-'. | |
| 521 | 523 | - Add the following code: StoreOperation(otMinus); | |
| 522 | 524 | - Open the form. | |
| 523 | 525 | - Double click on button '*'. | |
| 524 | 526 | - Add the following code: StoreOperation(otMultiply); | |
| 525 | 527 | - Open the form. | |
| 526 | 528 | - Double click on button '/'. | |
| 527 | 529 | - Add the following code: StoreOperation(otDivide); | |
| 528 | 530 | ||
| 529 | 531 | Now test the program and see what happens: | |
| 530 | 532 | ||
| 531 | 533 | - Run the program (press F9) | |
| 532 | 534 | - Enter a number (e.g. 21267) | |
| 533 | 535 | - Press the '+' button | |
| 534 | 536 | - Enter the second number (e.g. 31170) | |
| 535 | 537 | ||
| 536 | 538 | What happens is that after pressing the '+' button, or any other operation button for that matter, the display is not cleared. We must find a way to make sure that the display is cleared, as soon as an operation button is pressed. Because we have used procedures to group similar actions, this again is an easy change. | |
| 537 | 539 | ||
| 538 | 540 | - Locate the form's private section and add a new variable: doClearDisplay. This variable will be the trigger for erasing the display. | |
| 539 | 541 | ||
| 540 | 542 | ``` pascal | |
| 541 | 543 | private | |
| 542 | 544 | { private declarations } | |
| 543 | 545 | SelectedOperation: TOperationType; | |
| 544 | 546 | FirstNumber: longint; | |
| 545 | 547 | SecondNumber: longint; | |
| 546 | 548 | doClearDisplay: boolean; | |
| 547 | 549 | procedure AddDigit(const pDigit: byte); | |
| 548 | 550 | procedure StoreOperation(const pOperation: TOperationType); | |
| 549 | 551 | ``` | |
| 550 | 552 | ||
| 551 | 553 | - Position the blinking text cursor on the line StoreOperation. | |
| 552 | 554 | - Press Ctrl-Shift-CursorDown: this moves the cursor to the body of the StoreOperation procedure. | |
| 553 | 555 | - In the StoreOperation procedure we must update the doClearDisplay variable, so we know that the display must be cleared as soon as a new number is entered. Change the code to this: | |
| 554 | 556 | ||
| 555 | 557 | ``` pascal | |
| 556 | 558 | procedure TForm1.StoreOperation(const pOperation: TOperationType); | |
| 557 | 559 | begin | |
| 558 | 560 | // Store the operation so it can be used later | |
| 559 | 561 | SelectedOperation := pOperation; | |
| 560 | 562 | ||
| 561 | 563 | // Store the number that was entered by the user | |
| 562 | 564 | FirstNumber := StrToInt(edDisplay.Text); | |
| 563 | 565 | ||
| 564 | 566 | // The display must start with a new number | |
| 565 | 567 | doClearDisplay := true; | |
| 566 | 568 | end; | |
| 567 | 569 | ``` | |
| 568 | 570 | ||
| 569 | 571 | - And where better to clear the display than in the AddDigit procedure? Change the code to: | |
| 570 | 572 | ||
| 571 | 573 | ``` pascal | |
| 572 | 574 | procedure TForm1.AddDigit(const pDigit: byte); | |
| 573 | 575 | begin | |
| 574 | 576 | // Must the display be cleared first? | |
| 575 | 577 | if doClearDisplay then | |
| 576 | 578 | begin | |
| 577 | 579 | edDisplay.Text := '0'; // Reset the display to zero | |
| 578 | 580 | doClearDisplay := false; // Once is enough... | |
| 579 | 581 | end; | |
| 580 | 582 | ||
| 581 | 583 | // Limit the number of digits | |
| 582 | 584 | if length(edDisplay.Text) < 8 then | |
| 583 | 585 | begin | |
| 584 | 586 | // Suppress leading zeroes when adding digits | |
| 585 | 587 | if edDisplay.Text = '0' then | |
| 586 | 588 | edDisplay.Text := IntToStr(pDigit) | |
| 587 | 589 | else | |
| 588 | 590 | edDisplay.Text := edDisplay.Text + IntToStr(pDigit) | |
| 589 | 591 | end; | |
| 590 | 592 | end; | |
| 591 | 593 | ``` | |
| 592 | 594 | ||
| 593 | 595 | Now let's see what happens: | |
| 594 | 596 | ||
| 595 | 597 | - Run the program (press F9). | |
| 596 | 598 | - Enter a number. | |
| 597 | 599 | - Press an operation button. | |
| 598 | 600 | - Enter another number. | |
| 599 | 601 | - End the program. | |
| 600 | 602 | ||
| 601 | 603 | We're almost there: we can enter numbers and select an operation. Now it's time to do the actual calculations. | |
| 602 | 604 | ||
| 603 | 605 | ## Doing the math | |
| 604 | 606 | ||
| 605 | 607 | Now that we have stored a number and an operation, it's time to do the actual calculations. Let's start easy with additions. | |
| 606 | 608 | ||
| 607 | 609 | - Open the form. | |
| 608 | 610 | - Double click on button '=' (the event handler is created). | |
| 609 | 611 | - Change the procedure: | |
| 610 | 612 | ||
| 611 | 613 | ``` pascal | |
| 612 | 614 | procedure TForm1.btnCalculateClick(Sender: TObject); | |
| 613 | 615 | var result: longint; | |
| 614 | 616 | begin | |
| 615 | 617 | case SelectedOperation of | |
| 616 | 618 | otPlus: begin | |
| 617 | 619 | // Retrieve the second number | |
| 618 | 620 | SecondNumber := StrToInt(edDisplay.Text); | |
| 619 | 621 | // Do the math | |
| 620 | 622 | result := FirstNumber + SecondNumber; | |
| 621 | 623 | // Display the resulting value | |
| 622 | 624 | edDisplay.Text := IntToStr(result); | |
| 623 | 625 | end; | |
| 624 | 626 | end; | |
| 625 | 627 | end; | |
| 626 | 628 | ``` | |
| 627 | 629 | ||
| 628 | 630 | The above code is pretty straightforward: if the user presses the '+' button, the first and second number are added up and the result is stored in the edit control on screen. | |
| 629 | 631 | ||
| 630 | 632 | We now have a working calculator (that can only add two numbers): | |
| 631 | 633 | ||
| 632 | 634 | - Run the program (press F9). | |
| 633 | 635 | - Enter a number. | |
| 634 | 636 | - Press '+' | |
| 635 | 637 | - Enter another number. | |
| 636 | 638 | - Press '=' : the sum of the two numbers is displayed. | |
| 637 | 639 | - End the program. | |
| 638 | 640 | ||
| 639 | 641 | We now could add the 3 missing operations ('-', '*' and '/'). But hold on, there is room for improvement. Let's have a look at the following statement: | |
| 640 | 642 | ||
| 641 | 643 | ``` pascal | |
| 642 | 644 | SecondNumber := StrToInt(edDisplay.Text); | |
| 643 | 645 | ``` | |
| 644 | 646 | ||
| 645 | 647 | We have seen such a statement before: the StoreOperation procedure contains something similar: | |
| 646 | 648 | ||
| 647 | 649 | ``` pascal | |
| 648 | 650 | FirstNumber := StrToInt(edDisplay.Text); | |
| 649 | 651 | ``` | |
| 650 | 652 | ||
| 651 | 653 | Calculating the number the user entered now happens in two different locations. We do not want to repeat ourselves so it's a good idea to create a new function that does the calculation. | |
| 652 | 654 | ||
| 653 | 655 | - Locate the form's private section and add a new function: GetDisplayValue. | |
| 654 | 656 | ||
| 655 | 657 | ``` pascal | |
| 656 | 658 | private | |
| 657 | 659 | { private declarations } | |
| 658 | 660 | SelectedOperation: TOperationType; | |
| 659 | 661 | FirstNumber: longint; | |
| 660 | 662 | SecondNumber: longint; | |
| 661 | 663 | doClearDisplay: boolean; | |
| 662 | 664 | procedure AddDigit(const pDigit: byte); | |
| 663 | 665 | procedure StoreOperation(const pOperation: TOperationType); | |
| 664 | 666 | function GetDisplayValue: longint; | |
| 665 | 667 | ``` | |
| 666 | 668 | ||
| 667 | 669 | - Position the blinking text cursor on the line GetDisplayValue. | |
| 668 | 670 | - Press Ctrl-Shift-C. | |
| 669 | 671 | - Add this code to extract the value that is in the display field: | |
| 670 | 672 | ||
| 671 | 673 | ``` pascal | |
| 672 | 674 | function TForm1.GetDisplayValue: longint; | |
| 673 | 675 | begin | |
| 674 | 676 | result := StrToInt(edDisplay.Text); | |
| 675 | 677 | end; | |
| 676 | 678 | ``` | |
| 677 | 679 | ||
| 678 | 680 | - Locate the statement: FirstNumber := StrToInt(edDisplay.Text); | |
| 679 | 681 | - Change it to: FirstNumber := GetDisplayValue; | |
| 680 | 682 | ||
| 681 | 683 | So much for refactoring, back to the calculations. | |
| 682 | 684 | ||
| 683 | 685 | - Locate the statement: SecondNumber := StrToInt(edDisplay.Text); | |
| 684 | 686 | - Change it to: SecondNumber := GetDisplayValue; | |
| 685 | 687 | ||
| 686 | 688 | Now look at the following statements: | |
| 687 | 689 | ||
| 688 | 690 | ``` pascal | |
| 689 | 691 | // Retrieve the second number | |
| 690 | 692 | SecondNumber := GetDisplayValue; | |
| 691 | 693 | // Do the math | |
| 692 | 694 | result := FirstNumber + SecondNumber; | |
| 693 | 695 | ``` | |
| 694 | 696 | ||
| 695 | 697 | Variable *SecondNumber* is used to store the value in the display box. However it is not really necessary. The above code can be simplified: | |
| 696 | 698 | ||
| 697 | 699 | ``` pascal | |
| 698 | 700 | // Do the math | |
| 699 | 701 | result := FirstNumber + GetDisplayValue; | |
| 700 | 702 | ``` | |
| 701 | 703 | ||
| 702 | 704 | Now look at the following statements: | |
| 703 | 705 | ||
| 704 | 706 | ``` pascal | |
| 705 | 707 | // Do the math | |
| 706 | 708 | result := FirstNumber + GetDisplayValue; | |
| 707 | 709 | // Display the resulting value | |
| 708 | 710 | edDisplay.Text := IntToStr(result); | |
| 709 | 711 | ``` | |
| 710 | 712 | ||
| 711 | 713 | The same now applies to the *result* variable. The above code can be simplified to: | |
| 712 | 714 | ||
| 713 | 715 | ``` pascal | |
| 714 | 716 | // Display the resulting value | |
| 715 | 717 | edDisplay.Text := IntToStr(FirstNumber + GetDisplayValue); | |
| 716 | 718 | ``` | |
| 717 | 719 | ||
| 718 | 720 | Now we can add the 3 remaining operations. | |
| 719 | 721 | ||
| 720 | 722 | - Open the form. | |
| 721 | 723 | - Double click on button '=' (the event handler is created). | |
| 722 | 724 | - Change the code: | |
| 723 | 725 | ||
| 724 | 726 | ``` pascal | |
| 725 | 727 | procedure TForm1.btnCalculateClick(Sender: TObject); | |
| 726 | 728 | begin | |
| 727 | 729 | case SelectedOperation of | |
| 728 | 730 | otPlus : edDisplay.Text := IntToStr(FirstNumber + GetDisplayValue); | |
| 729 | 731 | otMinus : edDisplay.Text := IntToStr(FirstNumber - GetDisplayValue); | |
| 730 | 732 | otMultiply : edDisplay.Text := IntToStr(FirstNumber * GetDisplayValue); | |
| 731 | 733 | otDivide : edDisplay.Text := IntToStr(FirstNumber div GetDisplayValue); | |
| 732 | 734 | end; | |
| 733 | 735 | end; | |
| 734 | 736 | ``` | |
| 735 | 737 | ||
| 736 | 738 | We now have a working calculator for all 4 operations: | |
| 737 | 739 | ||
| 738 | 740 | - Run the program (press F9). | |
| 739 | 741 | - Enter a number. | |
| 740 | 742 | - Press an operation button. | |
| 741 | 743 | - Enter another number. | |
| 742 | 744 | - Press '=' : the result is displayed. | |
| 743 | 745 | - End the program. | |
| 744 | 746 | ||
| 745 | 747 | ## Intermezzo | |
| 746 | 748 | ||
| 747 | 749 | After all this work we now have a useable calculator. But some things are not quite right. The obvious thing to try is dividing a number by zero. And the buttons 'C' and '+/-' don't work yet. These things will be addressed in the next section. | |
| 748 | 750 | ||
| 749 | 751 | First let's add another procedure, just for the fun of it (well, there's more to it of course:-)): | |
| 750 | 752 | ||
| 751 | 753 | - Locate the form's private section and add a new procedure: SetDisplayValue. | |
| 752 | 754 | ||
| 753 | 755 | ``` pascal | |
| 754 | 756 | private | |
| 755 | 757 | { private declarations } | |
| 756 | 758 | SelectedOperation: TOperationType; | |
| 757 | 759 | FirstNumber: longint; | |
| 758 | 760 | SecondNumber: longint; | |
| 759 | 761 | doClearDisplay: boolean; | |
| 760 | 762 | procedure AddDigit(const pDigit: byte); | |
| 761 | 763 | procedure StoreOperation(const pOperation: TOperationType); | |
| 762 | 764 | function GetDisplayValue: longint; | |
| 763 | 765 | procedure SetDisplayValue(const pValue: longint); | |
| 764 | 766 | ``` | |
| 765 | 767 | ||
| 766 | 768 | - Position the blinking text cursor on the line SetDisplayValue. | |
| 767 | 769 | - Press Ctrl-Shift-C. | |
| 768 | 770 | - Add the code below to give the display a new value, as the procedure name suggests: | |
| 769 | 771 | ||
| 770 | 772 | ``` pascal | |
| 771 | 773 | procedure TForm1.SetDisplayValue(const pValue: longint); | |
| 772 | 774 | begin | |
| 773 | 775 | edDisplay.Text := IntToStr(pValue); | |
| 774 | 776 | end; | |
| 775 | 777 | ``` | |
| 776 | 778 | ||
| 777 | 779 | The above code should look pretty familiar. Have a look at the procedure that does all calculations: | |
| 778 | 780 | ||
| 779 | 781 | ``` pascal | |
| 780 | 782 | procedure TForm1.btnCalculateClick(Sender: TObject); | |
| 781 | 783 | begin | |
| 782 | 784 | case SelectedOperation of | |
| 783 | 785 | otPlus : edDisplay.Text := IntToStr(FirstNumber + GetDisplayValue); | |
| 784 | 786 | otMinus : edDisplay.Text := IntToStr(FirstNumber - GetDisplayValue); | |
| 785 | 787 | otMultiply : edDisplay.Text := IntToStr(FirstNumber * GetDisplayValue); | |
| 786 | 788 | otDivide : edDisplay.Text := IntToStr(FirstNumber div GetDisplayValue); | |
| 787 | 789 | end; | |
| 788 | 790 | end; | |
| 789 | 791 | ``` | |
| 790 | 792 | ||
| 791 | 793 | This procedure can now be simplified. | |
| 792 | 794 | ||
| 793 | 795 | - Change the code to: | |
| 794 | 796 | ||
| 795 | 797 | ``` pascal | |
| 796 | 798 | procedure TForm1.btnCalculateClick(Sender: TObject); | |
| 797 | 799 | begin | |
| 798 | 800 | case SelectedOperation of | |
| 799 | 801 | otPlus : SetDisplayValue(FirstNumber + GetDisplayValue); | |
| 800 | 802 | otMinus : SetDisplayValue(FirstNumber - GetDisplayValue); | |
| 801 | 803 | otMultiply : SetDisplayValue(FirstNumber * GetDisplayValue); | |
| 802 | 804 | otDivide : SetDisplayValue(FirstNumber div GetDisplayValue); | |
| 803 | 805 | end; | |
| 804 | 806 | end; | |
| 805 | 807 | ``` | |
| 806 | 808 | ||
| 807 | 809 | ## Loose ends | |
| 808 | 810 | ||
| 809 | 811 | There's a couple of things that need to be done: implement the two loose buttons and make the calculator a bit more robust. | |
| 810 | 812 | ||
| 811 | 813 | ### The +/- button | |
| 812 | 814 | ||
| 813 | 815 | - Open the form. | |
| 814 | 816 | - Double click on button '+/-' (the event handler is created). | |
| 815 | 817 | - Add the following code: | |
| 816 | 818 | ||
| 817 | 819 | ``` pascal | |
| 818 | 820 | procedure TForm1.btnPlusMinusClick(Sender: TObject); | |
| 819 | 821 | begin | |
| 820 | 822 | SetDisplayValue(0 - GetDisplayValue); | |
| 821 | 823 | end; | |
| 822 | 824 | ``` | |
| 823 | 825 | ||
| 824 | 826 | See here the fruits of our labor. We have reused the procedure SetDisplayValue and GetDisplayValue to implement the negate function. | |
| 825 | 827 | ||
| 826 | 828 | Try it by running the program and press the '+/-' button. | |
| 827 | 829 | ||
| 828 | 830 | ### The Clear button | |
| 829 | 831 | ||
| 830 | 832 | - Open the form. | |
| 831 | 833 | - Double click on button 'C' (the event handler is created). | |
| 832 | 834 | - Add the following code: | |
| 833 | 835 | ||
| 834 | 836 | ``` pascal | |
| 835 | 837 | procedure TForm1.btnClearClick(Sender: TObject); | |
| 836 | 838 | begin | |
| 837 | 839 | SetDisplayValue(0); // Start from scratch | |
| 838 | 840 | SelectedOperation := otNone; // No operation selected yet | |
| 839 | 841 | doClearDisplay := false; // The display is already cleared | |
| 840 | 842 | end; | |
| 841 | 843 | ``` | |
| 842 | 844 | ||
| 843 | 845 | The above code is pretty self-explanatory: the display is cleared (the first line), we 'forget' about any pending operation by clearing the SelectedOperation variable and there is no need to clear the display when adding new digits, because it was already cleared by the first statement. | |
| 844 | 846 | ||
| 845 | 847 | ### Divide by zero | |
| 846 | 848 | ||
| 847 | 849 | Let's go crazy: run the application and try to divide 10 by 0. This will make the application crash horribly. We have to make sure that this will not happen. The place to check this of course is the place where all calculations are performed (TForm1.btnCalculateClick). | |
| 848 | 850 | ||
| 849 | 851 | - Open the form. | |
| 850 | 852 | - Double click on button '='. | |
| 851 | 853 | - Update the otDivide section: | |
| 852 | 854 | ||
| 853 | 855 | ``` pascal | |
| 854 | 856 | procedure TForm1.btnCalculateClick(Sender: TObject); | |
| 855 | 857 | begin | |
| 856 | 858 | case SelectedOperation of | |
| 857 | 859 | otPlus : SetDisplayValue(FirstNumber + GetDisplayValue); | |
| 858 | 860 | otMinus : SetDisplayValue(FirstNumber - GetDisplayValue); | |
| 859 | 861 | otMultiply : SetDisplayValue(FirstNumber * GetDisplayValue); | |
| 860 | 862 | otDivide : if GetDisplayValue <> 0 then | |
| 861 | 863 | SetDisplayValue(FirstNumber div GetDisplayValue) | |
| 862 | 864 | else | |
| 863 | 865 | begin | |
| 864 | 866 | // Display an error message to the user | |
| 865 | 867 | MessageDlg('It is not possible to divide a number by 0!', mtWarning, [mbCancel],0); | |
| 866 | 868 | // Reset the calculator to start with a clean slate | |
| 867 | 869 | btnClearClick(nil); | |
| 868 | 870 | end | |
| 869 | 871 | end; | |
| 870 | 872 | end; | |
| 871 | 873 | ``` | |
| 872 | 874 | ||
| 873 | 875 | Things noteworthy: | |
| 874 | 876 | ||
| 875 | 877 | 1. *MessageDlg* is a function for displaying a short warning/error/informative message to the user. *ShowMessage* can also be used. It is a bit easier to use but cannot display warning/error icons. | |
| 876 | 878 | 2. *btnClearClick(nil)*: as soon as an error condition occurs we must reset the calculator. That's basically the same as pressing the 'C' button. We simulate pressing the 'C' button by directly calling the event handler. | |
| 877 | 879 | ||
| 878 | 880 | ### Overflows | |
| 879 | 881 | ||
| 880 | 882 | - Start the calculator | |
| 881 | 883 | - Enter 99999999 as the first number (8 digits) | |
| 882 | 884 | - Press button '*' | |
| 883 | 885 | - Enter 99999999 as the second number | |
| 884 | 886 | - Press button '=' | |
| 885 | 887 | ||
| 886 | 888 | Now two things could have happened: | |
| 887 | 889 | ||
| 888 | 890 | 1. The application gives an incorrect result (something like 1674919425). | |
| 889 | 891 | 2. The application raises an error. | |
| 890 | 892 | ||
| 891 | 893 | If it's the first option then overflow errors have been disabled for the project. Enable them by ticking the Overflow option box: | |
| 892 | 894 | ||
| 893 | 895 | - Select from the menu Project/Project Options… | |
| 894 | 896 | - Select in the treeview Compiler Options/Code Generation. | |
| 895 | 897 | - Tick the box *Overflow (-Co)* (see image below). | |
| 896 | 898 | - Click OK. | |
| 897 | 899 | ||
| 898 | 900 | 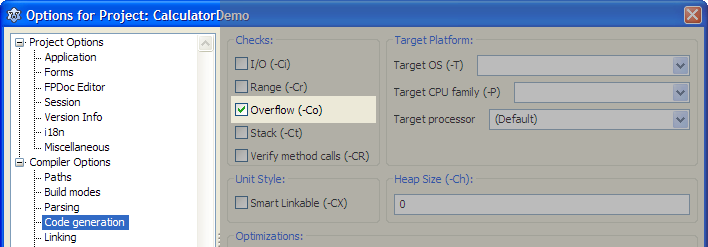 | |
| 899 | 901 | ||
| 900 | 902 | Now run the program again and see what happens with overflows. | |
| 901 | 903 | ||
| 902 | 904 | If it was the second (and expected) option then this means we have to add exception handling to our little calculator. Exception handling is used to prevent an application from crashing when errors occur. In our case we want to handle the arithmetic overflow error that might occur. Because all calculations are done in one place, it's easy to catch any overflow errors. | |
| 903 | 905 | ||
| 904 | 906 | - Open the form. | |
| 905 | 907 | - Double click on button '='. | |
| 906 | 908 | - Change the code in the procedure to this: | |
| 907 | 909 | ||
| 908 | 910 | ``` pascal | |
| 909 | 911 | procedure TForm1.btnCalculateClick(Sender: TObject); | |
| 910 | 912 | begin | |
| 911 | 913 | // Catch any overflow errors | |
| 912 | 914 | try | |
| 913 | 915 | case SelectedOperation of | |
| 914 | 916 | otPlus : SetDisplayValue(FirstNumber + GetDisplayValue); | |
| 915 | 917 | otMinus : SetDisplayValue(FirstNumber - GetDisplayValue); | |
| 916 | 918 | otMultiply : SetDisplayValue(FirstNumber * GetDisplayValue); | |
| 917 | 919 | otDivide : if GetDisplayValue <> 0 then | |
| 918 | 920 | SetDisplayValue(FirstNumber div GetDisplayValue) | |
| 919 | 921 | else | |
| 920 | 922 | begin | |
| 921 | 923 | // Display an error message to the user | |
| 922 | 924 | MessageDlg('It is not possible to divide a number by 0!', mtWarning, [mbCancel],0); | |
| 923 | 925 | // Reset the calculator to start with a clean slate | |
| 924 | 926 | btnClearClick(nil); | |
| 925 | 927 | end | |
| 926 | 928 | end; | |
| 927 | 929 | except | |
| 928 | 930 | on E: EIntOverflow do | |
| 929 | 931 | begin | |
| 930 | 932 | // Display an error message | |
| 931 | 933 | MessageDlg('The result of the calculation was too big for the calculator to process!', mtWarning, [mbCancel], 0); | |
| 932 | 934 | // Reset the calculator | |
| 933 | 935 | btnClearClick(nil); | |
| 934 | 936 | end | |
| 935 | 937 | end | |
| 936 | 938 | end; | |
| 937 | 939 | ``` | |
| 938 | 940 | ||
| 939 | 941 | Note that even with the exception handling in place, the application will still halt when run from inside the IDE. However the application is only paused and still active. Press F9 to continue. This will display another pop up window, a debugger notification window. Press Continue. Now our own exception handler will kick in with the expected message. If you were to run the application stand alone (i.e. outside the IDE) then you would only see the message box that we added to the exception handler. | |
| 940 | 942 | ||
| 941 | 943 | ## Final tweaks | |
| 942 | 944 | ||
| 943 | 945 | Remember that at a certain point a variable called *SecondNumber* was introduced. If you choose Run/Build All from the menu, then after building the application the compiler will display a message in the Messages window that this particular variable is never used. If you click on the message text the IDE opens the exact location in the editor where the variable is declared. | |
| 944 | 946 | ||
| 945 | 947 | - Click on message *Note: Private field "TForm1.SecondNumber" is never used*. | |
| 946 | 948 | - Delete longint variable *SecondNumber*. | |
| 947 | 949 | ||
| 948 | 950 | As soon as our demo Calculator is started we see that the number 0 in the display has the focus (see image below). | |
| 949 | 951 | ||
| 950 | 952 | 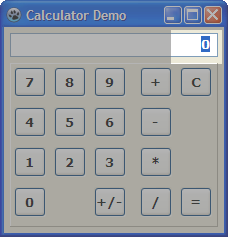 | |
| 951 | 953 | ||
| 952 | 954 | This is counter intuitive because a user should not be able to enter anything in that box. Even worse as soon as she would type something in there that is not a number, our calculator would crash! So it's better not to give access to the that control at all. We are going to fix that. | |
| 953 | 955 | ||
| 954 | 956 | - Open the form. | |
| 955 | 957 | - Select the display control (click on edDisplay). | |
| 956 | 958 | - In the Object Inspector change ReadOnly to *True* (if the Events tab is still visible, select the Properties tab first to gain access to all properties). From now on it's impossible to enter any data manually. | |
| 957 | 959 | - Change TabStop to *False*. Now it's impossible to get to the display field via the keyboard and the display field will not be highlighted anymore. | |
| 958 | 960 | ||
| 959 | 961 | Run the program to see the result of these changes. | |
| 960 | 962 | ||
| 961 | 963 | (Under construction: OO-ify the program) | |
| 962 | 964 | ||
| 963 | 965 | --- | |
| 964 | 966 | *From the Free Pascal wiki, page "Howdy World (Hello World on steroids)/pt", as it stood on 2020-02-17 after a change by Trev, out of the wiki's dump of 2024-05-26. Copyright stays with the author who wrote it, according to the old wiki's [[Licensing]] page. If you have concerns about this material, [message the admin](/wiki-contact).* |