

Graphics - Working with TCanvas: what changed
Revision 1 to 2. Removed lines have a minus sign; added lines have a plus sign.
| Old | New | Line | |
|---|---|---|---|
| 1 | 1 | ## Drawing shapes | |
| 2 | 2 | ||
| 3 | 3 | ### Drawing a rectangle | |
| 4 | 4 | ||
| 5 | 5 | Many controls expose their canvas as a public Canvas property (or via an OnPaint event). Such controls include [[TForm]], [[TPanel]] and [[TPaintBox]]. Let's use TForm as an example to demonstrate how to paint on a canvas. | |
| 6 | 6 | ||
| 7 | 7 | Suppose we want to draw a red rectangle with a 5-pixel-thick blue border in the center of the form, and the the rectangle should be half the size of the form. For this purpose we must add code to the OnPaint event of the form. Never paint in an OnClick handler, because this painting is not persistent and will be erased whenever the operating system requests a repaint. Always paint in the OnPaint event! | |
| 8 | 8 | ||
| 9 | 9 | The TCanvas method for painting a rectangle is named very logically: `Rectangle()`. You can pass rectangle's edge coordinates to the method either as four separate x/y values, or as a single `TRect` record. The fill color is determined by the color of the canvas's Brush, and the border color is given by the color of the canvas's Pen: | |
| 10 | 10 | ||
| 11 | 11 | ``` pascal | |
| 12 | 12 | procedure TForm1.FormPaint(Sender: TObject); | |
| 13 | 13 | var | |
| 14 | 14 | w, h: Integer; // Width and height of the rectangle | |
| 15 | 15 | cx, cy: Integer; // center of the form | |
| 16 | 16 | R: TRect; // record containing the coordinates of the rectangle's left, top, right, bottom corners | |
| 17 | 17 | begin | |
| 18 | 18 | // Calculate form center | |
| 19 | 19 | cx := Width div 2; | |
| 20 | 20 | cy := Height div 2; | |
| 21 | 21 | ||
| 22 | 22 | // Calculate the size of the rectangle | |
| 23 | 23 | w := Width div 2; | |
| 24 | 24 | h := Height div 2; | |
| 25 | 25 | ||
| 26 | 26 | // Calculate the corner points of the rectangle | |
| 27 | 27 | R.Left := cx - w div 2; | |
| 28 | 28 | R.Top := cy - h div 2; | |
| 29 | 29 | R.Right := cx + w div 2; | |
| 30 | 30 | R.Bottom := cy + h div 2; | |
| 31 | 31 | ||
| 32 | 32 | // Set the fill color | |
| 33 | 33 | Canvas.Brush.Color := clRed; | |
| 34 | 34 | Canvas.Brush.Style := bsSolid; | |
| 35 | 35 | ||
| 36 | 36 | // Set the border color | |
| 37 | 37 | Canvas.Pen.Color := clBlue; | |
| 38 | 38 | Canvas.Pen.Width := 5; | |
| 39 | 39 | Canvas.Pen.Style := psSolid; | |
| 40 | 40 | ||
| 41 | 41 | // Draw the rectangle | |
| 42 | 42 | Canvas.Rectangle(R); | |
| 43 | 43 | end; | |
| 44 | 44 | ``` | |
| 45 | 45 | ||
| 46 | 46 | ### Drawing a circle | |
| 47 | 47 | ||
| 48 | 48 | The canvas does not have a direct method to draw a circle. But there is a method to draw an ellipse. Knowing that a circle is a special case of an ellipse with equal half-axes we can draw a circle as follows: | |
| 49 | 49 | ||
| 50 | 50 | ``` pascal | |
| 51 | 51 | procedure TForm1.FormPaint(Sender: TObject); | |
| 52 | 52 | var | |
| 53 | 53 | radius: Integer; // Radius of the circle | |
| 54 | 54 | center: TPoint; // Center point of the circle | |
| 55 | 55 | R: TRect; // Rectangle enclosing the circle | |
| 56 | 56 | begin | |
| 57 | 57 | // Set the fill color | |
| 58 | 58 | Canvas.Brush.Color := clYellow; | |
| 59 | 59 | Canvas.Brush.Style := bsSolid; | |
| 60 | 60 | ||
| 61 | 61 | // Set the border color | |
| 62 | 62 | Canvas.Pen.Color := clBlue; | |
| 63 | 63 | Canvas.Pen.Width := 3; | |
| 64 | 64 | Canvas.Pen.Style := psSolid; | |
| 65 | 65 | ||
| 66 | 66 | // We want the circle to be centered in the form | |
| 67 | 67 | center.X := Width div 2; | |
| 68 | 68 | center.Y := Height div 2; | |
| 69 | 69 | ||
| 70 | 70 | // The diameter should be 90% of the width or the height, whichever is smaller. | |
| 71 | 71 | // The radius, then, is half of this value. | |
| 72 | 72 | if Width > Height then | |
| 73 | 73 | radius := round(Height * 0.45) | |
| 74 | 74 | else | |
| 75 | 75 | radius := round(Width * 0.45); | |
| 76 | 76 | ||
| 77 | 77 | // The circle then will be enclosed by the rectangle between center.X +/- radius | |
| 78 | 78 | // and center.Y +/- radius | |
| 79 | 79 | R := Rect(center.X - radius, center.Y - radius, center.X + radius, center.Y + radius); | |
| 80 | 80 | ||
| 81 | 81 | // Draw the circle | |
| 82 | 82 | Canvas.Ellipse(R); | |
| 83 | 83 | end; | |
| 84 | 84 | ``` | |
| 85 | 85 | ||
| 86 | 86 | ### Drawing a polygon | |
| 87 | 87 | ||
| 88 | 88 | #### Simple polygon | |
| 89 | 89 | ||
| 90 | 90 | A polygon is drawn by the `Polygon` method of the canvas. The polygon is defined by an array of points (`TPoint`) which are connected by straight lines drawn with the current `Pen`, and the inner area is filled by the current `Brush`. The polygon is closed automatically, i.e. the last array point does not necessarily need to coincide with the first point (although there are cases where this is required -- see below). | |
| 91 | 91 | ||
| 92 | 92 | 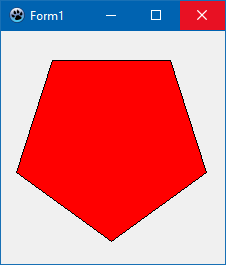 **Example:** Pentagon | |
| 93 | 93 | ||
| 94 | 94 | ``` Pascal | |
| 95 | 95 | procedure TForm1.FormPaint(Sender: TObject); | |
| 96 | 96 | var | |
| 97 | 97 | P: Array[0..4] of TPoint; | |
| 98 | 98 | i: Integer; | |
| 99 | 99 | phi: Double; | |
| 100 | 100 | ||
| 101 | 101 | begin | |
| 102 | 102 | for i := 0 to 4 do | |
| 103 | 103 | begin | |
| 104 | 104 | phi := 2.0 * pi / 5 * i + pi * 0.5;; | |
| 105 | 105 | P[i].X := round(100 * cos(phi) + 110); | |
| 106 | 106 | P[i].Y := round(100 * sin(phi) + 110); | |
| 107 | 107 | end; | |
| 108 | 108 | Canvas.Brush.Color := clRed; | |
| 109 | 109 | Canvas.Polygon(P); | |
| 110 | 110 | end; | |
| 111 | 111 | ``` | |
| 112 | 112 | ||
| 113 | 113 | #### Self-overlapping polygons | |
| 114 | 114 | ||
| 115 | 115 | Here is a modification of the polygon example: Let's rearrange the polygon points so that the first point is connected to the 3rd initial point, the 3rd point is connected to the 5th point, the 5th point to the 2nd point and the 2nd point to to 4th point. This is a self-overlapping polygon and results in a star-shape. However, owing to the overlapping, different effects can be obtained which depend on the optional `Winding` parameter of the `Polygon()` method. When `Winding` is `False` an area is filled by the "even-odd rule" (https://en.wikipedia.org/wiki/Even%E2%80%93odd_rule), otherwise by the "non-zero winding rule" (https://en.wikipedia.org/wiki/Nonzero-rule). The following code example compares both cases: | |
| 116 | 116 | ||
| 117 | - | ||
| 118 | - | ||
| 119 | - | ||
| 120 | - | ||
| 117 | + | 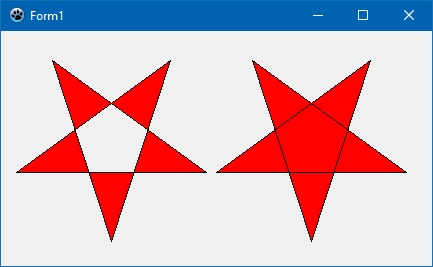 | |
| 121 | 118 | ||
| 122 | 119 | ``` Pascal | |
| 123 | 120 | procedure TForm1.FormPaint(Sender: TObject); | |
| 124 | 121 | var | |
| 125 | 122 | P: Array[0..4] of TPoint; | |
| 126 | 123 | P1, P2: Array[0..4] of TPoint; | |
| 127 | 124 | i: Integer; | |
| 128 | 125 | phi: Double; | |
| 129 | 126 | begin | |
| 130 | 127 | for i := 0 to 4 do | |
| 131 | 128 | begin | |
| 132 | 129 | phi := 2.0 * pi / 5 * i + pi * 0.5;; | |
| 133 | 130 | P[i].X := round(100 * cos(phi) + 110); | |
| 134 | 131 | P[i].Y := round(100 * sin(phi) + 110); | |
| 135 | 132 | end; | |
| 136 | 133 | P1[0] := P[0]; | |
| 137 | 134 | P1[1] := P[2]; | |
| 138 | 135 | P1[2] := P[4]; | |
| 139 | 136 | P1[3] := P[1]; | |
| 140 | 137 | P1[4] := P[3]; | |
| 141 | 138 | for i:= 0 to 4 do P2[i] := Point(P1[i].X + 200, P1[i].Y); // offset polygon | |
| 142 | 139 | Canvas.Brush.Color := clRed; | |
| 143 | 140 | Canvas.Polygon(P1, false); // false --> Even-odd rule | |
| 144 | 141 | Canvas.Polygon(P2, true); // true ---> Non-zero winding rule | |
| 145 | 142 | end; | |
| 146 | 143 | ``` | |
| 147 | 144 | ||
| 148 | 145 | #### Polygon with a hole | |
| 149 | 146 | ||
| 150 | 147 | Suppose you want to draw the shape of a country with a large lake inside from both of which you have some boundary points. Basically the `Polygon()` method of the LCL canvas is ready for this task. However, you need to consider several important points: | |
| 151 | 148 | ||
| 152 | 149 | - You must prepare the array of polygon vertices such that each polygon is closed (i.e. last point = first point), and that both first and last polygon points are immediately adjacent in the array. | |
| 153 | 150 | - The order of the inner and outer polygon points in the array does not matter. | |
| 154 | 151 | - Make sure that both polygons have opposite orientations, i.e. if the outer polygon has its vertices in **clockwise** order, then the inner polygon must have the points in **counter-clockwise** order. | |
| 155 | 152 | ||
| 156 | 153 | 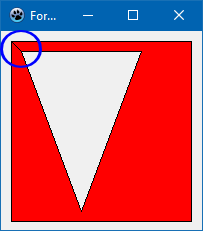 Example: | |
| 157 | 154 | ||
| 158 | 155 | ``` Pascal | |
| 159 | 156 | const | |
| 160 | 157 | P: array of [0..8] of TPoint = ( | |
| 161 | 158 | // outer polygon: a rectangle | |
| 162 | 159 | (X: 10; Y: 10), // <--- first point of the rectangle | |
| 163 | 160 | (X:190; Y: 10), | |
| 164 | 161 | (X:190; Y:190), // (clockwise orientation) | |
| 165 | 162 | (X: 10; Y:190), | |
| 166 | 163 | (X: 10; Y: 10), // <--- last point of the rectangle = first point | |
| 167 | 164 | ||
| 168 | 165 | // inner polygon: a triangle | |
| 169 | 166 | (X: 20; Y: 20), // <--- first point of the triangle | |
| 170 | 167 | (X: 40; Y:180), // ( counter-clockwise orientation) | |
| 171 | 168 | (X: 60; Y: 20), | |
| 172 | 169 | (X: 20; Y: 20) // <--- last point of the triangle = first point | |
| 173 | 170 | ); | |
| 174 | 171 | ||
| 175 | 172 | procedure TForm1.FormPaint(Sender: TObject); | |
| 176 | 173 | begin | |
| 177 | 174 | Canvas.Brush.Color := clRed; | |
| 178 | 175 | Canvas.Polygon(Pts); | |
| 179 | 176 | end; | |
| 180 | 177 | ``` | |
| 181 | 178 | ||
| 182 | 179 | You may notice that there is a line connecting the starting point of the inner triangle back to the starting point of the outer rectangle (marked by a blue circle in the screenshot). This is because the `Polygon()` method closes the entire polygon, i.e. it connects the very first with the very last array point. You can avoid this by drawing the polygon and the border separately. To draw the fill the `Pen.Style` should be set to `psClear` to hide the outline. The `PolyLine()` method can be used to draw the border; this method needs arguments for the starting point index and also a count of the array points to be drawn. 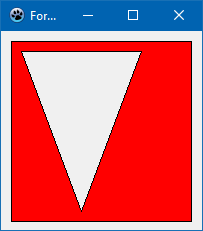 | |
| 183 | 180 | ||
| 184 | 181 | ``` Pascal | |
| 185 | 182 | procedure TForm1.FormPaint(Sender: TObject); | |
| 186 | 183 | begin | |
| 187 | 184 | Canvas.Brush.Color := clRed; | |
| 188 | 185 | Canvas.Pen.Style := psClear; | |
| 189 | 186 | Canvas.Polygon(Pts); | |
| 190 | 187 | ||
| 191 | 188 | Canvas.Pen.Style := psSolid; | |
| 192 | 189 | Canvas.Pen.Color := clBlack; | |
| 193 | 190 | Canvas.Polyline(Pts, 0, 5); // rectangle starts at index 0 and consists of 5 array elements | |
| 194 | 191 | Canvas.Polyline(Pts, 5, 4); // triangle starts at index 5 and consists of 4 array elements | |
| 195 | 192 | end; | |
| 196 | 193 | ``` | |
| 197 | 194 | ||
| 198 | 195 | #### Polygon with several holes | |
| 199 | 196 | ||
| 200 | 197 | Applying the rules for the single hole in a polygon, we extend the example from the previous section by adding two more triangles inside the outer rectangle. These triangles have the same orientation as the first triangle, opposite to the outer rectangle, and thus should be considered to be holes. 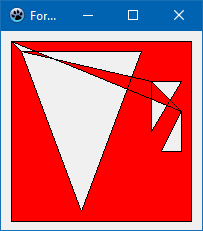 | |
| 201 | 198 | ||
| 202 | 199 | ``` Pascal | |
| 203 | 200 | const | |
| 204 | 201 | Pts: array[0..16] of TPoint = ( | |
| 205 | 202 | // outer polygon: a rectangle | |
| 206 | 203 | (X: 10; Y: 10), // clockwise | |
| 207 | 204 | (X:190; Y: 10), | |
| 208 | 205 | (X:190; Y:190), | |
| 209 | 206 | (X: 10; Y:190), | |
| 210 | 207 | (X: 10; Y: 10), | |
| 211 | 208 | ||
| 212 | 209 | // inner polygon: a triangle | |
| 213 | 210 | (X: 20; Y: 20), // counter-clockwise | |
| 214 | 211 | (X: 80; Y:180), | |
| 215 | 212 | (X: 140; Y: 20), | |
| 216 | 213 | (X: 20; Y: 20), | |
| 217 | 214 | ||
| 218 | 215 | // 2nd inner triangle | |
| 219 | 216 | (X: 150; Y: 50), // counter-clockwise | |
| 220 | 217 | (X: 150; Y:100), | |
| 221 | 218 | (X: 180; Y: 50), | |
| 222 | 219 | (X: 150; Y: 50), | |
| 223 | 220 | ||
| 224 | 221 | // 3rd inner triangle | |
| 225 | 222 | (X: 180; Y: 80), // counter-clockwise | |
| 226 | 223 | (X: 160; Y:120), | |
| 227 | 224 | (X: 180; Y:120), | |
| 228 | 225 | (X: 180; Y: 80) | |
| 229 | 226 | ); | |
| 230 | 227 | ``` | |
| 231 | 228 | ||
| 232 | 229 | Rendering this by a simple `Polygon()` fill is disappointing because there are new additional areas with are not expected. The reason is that this model does not return to the starting point correctly. The trick is to add two further points (one per shape). These are added to the above single-hole-in-polygon case: the first additional point duplicates the first point of the 2nd inner triangle, and the second additional point duplicates the first point of the 1st inner triangle. By so doing, the polygon is closed along the imaginary path the holes were connected by initially, and no additional areas are introduced: 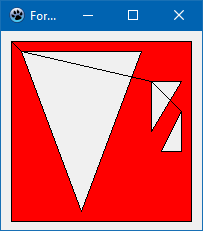 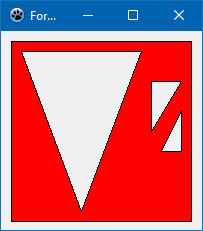 | |
| 233 | 230 | ||
| 234 | 231 | ``` Pascal | |
| 235 | 232 | const | |
| 236 | 233 | Pts: array[0..18] of TPoint = ( | |
| 237 | 234 | // outer polygon: a rectangle | |
| 238 | 235 | (X: 10; Y: 10), // clockwise | |
| 239 | 236 | (X:190; Y: 10), | |
| 240 | 237 | (X:190; Y:190), | |
| 241 | 238 | (X: 10; Y:190), | |
| 242 | 239 | (X: 10; Y: 10), | |
| 243 | 240 | ||
| 244 | 241 | // 1st inner triangle | |
| 245 | 242 | (X: 20; Y: 20), // counter-clockwise --> hole | |
| 246 | 243 | (X: 80; Y:180), | |
| 247 | 244 | (X: 140; Y: 20), | |
| 248 | 245 | (X: 20; Y: 20), | |
| 249 | 246 | ||
| 250 | 247 | // 2nd inner triangle | |
| 251 | 248 | (X: 150; Y: 50), // counter-clockwise --> hole | |
| 252 | 249 | (X: 150; Y:100), | |
| 253 | 250 | (X: 180; Y: 50), | |
| 254 | 251 | (X: 150; Y: 50), | |
| 255 | 252 | ||
| 256 | 253 | // 3rd inner triangle | |
| 257 | 254 | (X: 180; Y: 80), // counter-clockwise --> hole | |
| 258 | 255 | (X: 160; Y:120), | |
| 259 | 256 | (X: 180; Y:120), | |
| 260 | 257 | (X: 180; Y: 80), | |
| 261 | 258 | ||
| 262 | 259 | (X: 150; Y: 50), // duplicates 1st point of 2nd inner triangle | |
| 263 | 260 | (X: 20; Y: 20) // duplicates 1st point of 1st inner triangle | |
| 264 | 261 | ); | |
| 265 | 262 | ``` | |
| 266 | 263 | ||
| 267 | 264 | The last image at the right is drawn again with separate `Polygon()` and `PolyLine()` calls. | |
| 268 | 265 | ||
| 269 | 266 | ## Drawing Text | |
| 270 | 267 | ||
| 271 | 268 | ### Text painting methods | |
| 272 | 269 | ||
| 273 | 270 | There are two basic methods how to draw text by means of Canvas methods: | |
| 274 | 271 | ||
| 275 | 272 | ``` Pascal | |
| 276 | 273 | TCanvas.TextOut(x, y: Integer; const AText: String) | |
| 277 | 274 | ``` | |
| 278 | 275 | ||
| 279 | 276 | This is the simplest way to draw the given text. Its top/left corner is at the position x/y. | |
| 280 | 277 | ||
| 281 | 278 | ``` Pascal | |
| 282 | 279 | TCanvas.TextRect(R: TRect; x, y: Integer; const AText: String; const Style: TTextStyle) | |
| 283 | 280 | ``` | |
| 284 | 281 | ||
| 285 | 282 | The (optional) `TTextStyle` parameter allows to apply various options to control the text output: | |
| 286 | 283 | ||
| 287 | 284 | - `Alignment: TAlignment = (taLeftJustify, taRightJustify, taCenter)`: horizontal alignment of the text within the rectangle given as parameter R. When `Alignment` is `taLeftJustify` the text begins at \<x\> (measured relative to the canvas); otherwise the text is centered or right-aligned in the rectangle (x is ignored now). | |
| 288 | 285 | - `Layout: TTextLayout = (tlTop, tlCenter, tlBottom)`: Analogous to `Alignment`, but for the vertical direction. | |
| 289 | 286 | - `SingleLine: Boolean`: If WordBreak is false then process \#13, \#10 as standard chars and perform no line breaking. | |
| 290 | 287 | - `Wordbreak: boolean`: If line of text is too long to fit between left and right boundaries, it is attempted to break the text between words into multiple lines. See also `EndEllipsis`. | |
| 291 | 288 | - `EndEllipsis: Boolean`: If line of text is too long to fit between left and right boundaries, the text is truncated the text and an ellipsis (`'...'`) is added. If `Wordbreak` is set as well, `Workbreak` will dominate. | |
| 292 | 289 | - `Clipping: boolean`: Clips the text to the passed rectangle. | |
| 293 | 290 | - `ExpandTabs: boolean`: Replaces \#9 by appropriate amount of spaces (default is usually 8). | |
| 294 | 291 | - `ShowPrefix: boolean`: Processes the first single '&' per line as an underscore and draws '&&' as '&'. | |
| 295 | 292 | - `Opaque: boolean`: Fills background with the current Brush | |
| 296 | 293 | - `SystemFont: Boolean`: Uses the system font instead of Canvas Font | |
| 297 | 294 | - `RightToLeft: Boolean`: For RightToLeft text reading (Text Direction) | |
| 298 | 295 | ||
| 299 | 296 | Alternatively there is also the Windows-like `DrawText` function. Although it follows Windows syntax the procedure in unit `LCLIntf` is cross-platform. | |
| 300 | 297 | ||
| 301 | 298 | ``` Pascal | |
| 302 | 299 | function DrawText(DC: HDC; Str: PChar; Count: Integer; var Rect: TRect; Flags: Cardinal): Integer | |
| 303 | 300 | ``` | |
| 304 | 301 | ||
| 305 | 302 | - `DC`: Handle of the canvas, e.g. `Paintbox1.Canvas.Handle` | |
| 306 | 303 | - `Str`: Text to be written, cast to `PChar` | |
| 307 | 304 | - `Count`: Number of bytes to be sent to the `DrawText` function, use `Length(Str)` | |
| 308 | 305 | - `Rect`: Rectangle within the output should occur. Returns the smallest rectangle occupied by the text. | |
| 309 | 306 | - `Flags`: Can contain a long list of values combined by logical "or" representing options to control the output. Among them `DT_LEFT, DT_CENTER, DT_RIGHT` for horizontal, `DT_TOP, DT_VCENTER, DT_BOTTOM` for vertical alignment, or `DT_SINGLELINE, DT_WORDBREAK, DT_END_ELLIPSIS` to control multiline behaviour. An important option is `DT_CALCRECT` which suppresses painting but returns the size needed for the text output in the `TRect` parameter. See <https://learn.microsoft.com/en-us/windows/win32/api/winuser/nf-winuser-drawtext> for a complete list. | |
| 310 | 307 | ||
| 311 | 308 | ### Using the default GUI font | |
| 312 | 309 | ||
| 313 | 310 | This can be done with the following simple code: | |
| 314 | 311 | ||
| 315 | 312 | ``` pascal | |
| 316 | 313 | SelectObject(Canvas.Handle, GetStockObject(DEFAULT_GUI_FONT)); | |
| 317 | 314 | ``` | |
| 318 | 315 | ||
| 319 | 316 | or: | |
| 320 | 317 | ||
| 321 | 318 | ``` pascal | |
| 322 | 319 | Canvas.Font.Name := 'default'; | |
| 323 | 320 | ``` | |
| 324 | 321 | ||
| 325 | 322 | ### Drawing text to an exactly fitting width | |
| 326 | 323 | ||
| 327 | 324 | Use the DrawText routine, first with DT_CALCRECT and then without it. | |
| 328 | 325 | ||
| 329 | 326 | ``` pascal | |
| 330 | 327 | // First calculate the text size then draw it | |
| 331 | 328 | TextBox := Rect(0, currentPos.Y, Width, High(Integer)); | |
| 332 | 329 | DrawText(ACanvas.Handle, PChar(Text), Length(Text), | |
| 333 | 330 | TextBox, DT_WORDBREAK or DT_INTERNAL or DT_CALCRECT); | |
| 334 | 331 | ||
| 335 | 332 | DrawText(ACanvas.Handle, PChar(Text), Length(Text), | |
| 336 | 333 | TextBox, DT_WORDBREAK or DT_INTERNAL); | |
| 337 | 334 | ``` | |
| 338 | 335 | ||
| 339 | 336 | ### Drawing text with sharp edges (non antialiased) | |
| 340 | 337 | ||
| 341 | 338 | Some widgetsets support this via | |
| 342 | 339 | ||
| 343 | 340 | ``` pascal | |
| 344 | 341 | Canvas.Font.Quality := fqNonAntialiased; | |
| 345 | 342 | ``` | |
| 346 | 343 | ||
| 347 | 344 | Some widgetsets like the gtk2 do not support this and always paint antialiased. Here is a simple procedure to draw text with sharp edges under gtk2. It does not consider all cases, but it should give an idea: | |
| 348 | 345 | ||
| 349 | 346 | ``` pascal | |
| 350 | 347 | procedure PaintAliased(Canvas: TCanvas; x, y: integer; const TheText: string); | |
| 351 | 348 | var | |
| 352 | 349 | w, h, dx, dy: Integer; | |
| 353 | 350 | IntfImg: TLazIntfImage; | |
| 354 | 351 | Img: TBitmap; | |
| 355 | 352 | col: TFPColor; | |
| 356 | 353 | FontColor, c: TColor; | |
| 357 | 354 | begin | |
| 358 | 355 | w := 0; | |
| 359 | 356 | h := 0; | |
| 360 | 357 | Canvas.GetTextSize(TheText, w, h); | |
| 361 | 358 | if (w <= 0) or (h <= 0) then exit; | |
| 362 | 359 | Img := TBitmap.Create; | |
| 363 | 360 | IntfImg := nil; | |
| 364 | 361 | try | |
| 365 | 362 | // paint text to a bitmap | |
| 366 | 363 | Img.Masked := true; | |
| 367 | 364 | Img.SetSize(w,h); | |
| 368 | 365 | Img.Canvas.Brush.Style := bsSolid; | |
| 369 | 366 | Img.Canvas.Brush.Color := clWhite; | |
| 370 | 367 | Img.Canvas.FillRect(0, 0, w, h); | |
| 371 | 368 | Img.Canvas.Font := Canvas.Font; | |
| 372 | 369 | Img.Canvas.TextOut(0, 0, TheText); | |
| 373 | 370 | // get memory image | |
| 374 | 371 | IntfImg := Img.CreateIntfImage; | |
| 375 | 372 | // replace gray pixels | |
| 376 | 373 | FontColor := ColorToRGB(Canvas.Font.Color); | |
| 377 | 374 | for dy := 0 to h - 1 do begin | |
| 378 | 375 | for dx := 0 to w - 1 do begin | |
| 379 | 376 | col := IntfImg.Colors[dx, dy]; | |
| 380 | 377 | c := FPColorToTColor(col); | |
| 381 | 378 | if c <> FontColor then | |
| 382 | 379 | IntfImg.Colors[dx, dy] := colTransparent; | |
| 383 | 380 | end; | |
| 384 | 381 | end; | |
| 385 | 382 | // create bitmap | |
| 386 | 383 | Img.LoadFromIntfImage(IntfImg); | |
| 387 | 384 | // paint | |
| 388 | 385 | Canvas.Draw(x, y, Img); | |
| 389 | 386 | finally | |
| 390 | 387 | IntfImg.Free; | |
| 391 | 388 | Img.Free; | |
| 392 | 389 | end; | |
| 393 | 390 | end; | |
| 394 | 391 | ``` | |
| 395 | 392 | ||
| 396 | 393 | --- | |
| 397 | 394 | *From the Free Pascal wiki, page "Graphics - Working with TCanvas", as it stood on 2023-06-27 after a change by Wp, out of the wiki's dump of 2024-05-26. Copyright stays with the author who wrote it, according to the old wiki's [[Licensing]] page. If you have concerns about this material, [message the admin](/wiki-contact).* |