

Deploying Your Application: what changed
Revision 2 to 3. Removed lines have a minus sign; added lines have a plus sign.
| Old | New | Line | |
|---|---|---|---|
| 1 | 1 | You've created your application in Lazarus, tested within the IDE. Now it's time to deploy it to test it on a specific platform. | |
| 2 | 2 | ||
| 3 | 3 | ## Windows Deployment | |
| 4 | 4 | ||
| 5 | 5 | ### InnoSetup | |
| 6 | 6 | ||
| 7 | 7 | [[Inno Setup]] [1](http://www.jrsoftware.org/) is a free installer for Windows programs. It may be used completely free of charge, even when deploying commercial applications, full Delphi source code is available. See [[Inno Setup]] for more details and links to the Lazarus installer that is written using Inno. | |
| 8 | 8 | ||
| 9 | 9 | Features: | |
| 10 | 10 | ||
| 11 | 11 | - Inno supports all versions of Windows in use today -- Windows 95, 98, ME, NT4, 2000, 2003, XP, Vista, 7, 8. The latest version that can create installers for Windows versions before Windows 2000 is version 5.4. See [2](http://www.jrsoftware.org/files/is5-whatsnew.htm) | |
| 12 | 12 | - It can compare file version info, replace in-use files, use shared file counting. | |
| 13 | 13 | - It can register DLL/OCXs and type libraries | |
| 14 | 14 | - It can install fonts. | |
| 15 | 15 | - It can create shortcuts anywhere, including in the Start Menu and on the desktop. | |
| 16 | 16 | - It can create registry and .INI entries | |
| 17 | 17 | - It has integrated Pascal scripting engine that allows e.g. manipulation of COM/ActiveX objects (e.g. MS Word), setting firewall rules etc. | |
| 18 | 18 | - It supports multilingual installs | |
| 19 | 19 | - It supports passworded and encrypted installs | |
| 20 | 20 | - It supports silent install and uninstall. | |
| 21 | 21 | ||
| 22 | 22 | While it is free for use, Inno Setup is copyrighted software, not public domain software. There are some restrictions on distribution and use; see the <http://www.jrsoftware.org/files/is/license.txt> file for details. | |
| 23 | 23 | ||
| 24 | 24 | Inno Setup is used to create the Lazarus installer for Windows. | |
| 25 | 25 | ||
| 26 | 26 | ### HJ-Install | |
| 27 | 27 | ||
| 28 | 28 | HJ-Install is a freeware installer for Windows 95, 98, ME, NT 4.0, 2000 and XP. It is created with Internet distributed, CD-Rom, single-floppy and multi-floppy installations in mind, but it can also be used in network situations and as a stand-alone scripting engine. The installer is small and adds only 138 Kb. It doesn't support changing the registry and ini files, and un-install. See <http://www.freebyte.com/hjinstall/> | |
| 29 | 29 | ||
| 30 | 30 | ### LizaJet Installer | |
| 31 | 31 | ||
| 32 | 32 | LizaJet Installer is a commercial installer, but a free edition is available. Uses Object Pascal for scripting. See <http://www.lizajet.com> | |
| 33 | 33 | ||
| 34 | 34 | ### NSIS (Nullsoft Scriptable Install System) | |
| 35 | 35 | ||
| 36 | 36 | A professional open source system to create Windows installers. A full-featured NSIS installer has an overhead of only 34 KB. See <http://nsis.sourceforge.net/Main_Page> and <http://hmne.sourceforge.net/> | |
| 37 | 37 | ||
| 38 | 38 | ### Windows Installer XML (WiX) toolset | |
| 39 | 39 | ||
| 40 | 40 | A toolset that builds Windows installation packages from XML source code. The toolset supports a command line environment that developers may integrate into their build processes to build MSI and MSM setup packages. See <http://wix.sourceforge.net/> | |
| 41 | 41 | ||
| 42 | 42 | ### Code signing | |
| 43 | 43 | ||
| 44 | 44 | For details of code signing Windows executables to avoid your end users receiving warnings that the publisher of the software is "unknown" when attempting to run your executable, see [[Code Signing for Windows]]. | |
| 45 | 45 | ||
| 46 | 46 | ## Linux Deployment | |
| 47 | 47 | ||
| 48 | 48 | ### Creating a RPM Package on Linux | |
| 49 | 49 | ||
| 50 | 50 | On Linux, the best way to deploy applications is by using the native package system. Of the many package systems available, RPM (RedHat Package Manager) is the most commonly utilized format, and is defined as the standard one in the Linux Standard Base. | |
| 51 | 51 | ||
| 52 | 52 | To create a RPM file, you need to create a spec text file with the information necessary to build the software, and also an environment to build that spec. The best editor to create RPM packages is Emacs, because it recognizes the spec extension, highlights the text appropriately and even has a menu option to build rpm packages. | |
| 53 | 53 | ||
| 54 | 54 | To build the rpm file use either the emacs menu or this command line (man rpmbuild for more information): | |
| 55 | 55 | ||
| 56 | - | ||
| 56 | + | ```text | |
| 57 | + | rpmbuild -ba --clean $HOME/RPM/SPECS/myprogram.spec | |
| 58 | + | ``` | |
| 57 | 59 | ||
| 58 | 60 | #### Setting up your build environment | |
| 59 | 61 | ||
| 60 | 62 | RPM Packages are installed as root to the base system (/ directory), but an accident as root can destroy your machine. To avoid this, packages can be build as a normal user. The build process includes a real install, to make sure the package works, but this install is made to a fake root directory represented by the \$RPM_BUILD_ROOT variable. | |
| 61 | 63 | ||
| 62 | 64 | First, go to your home directory (or another directory inside it) and create the following directory structure: | |
| 63 | 65 | ||
| 64 | 66 | - RPM | |
| 65 | 67 | - RPM/BUILD - This directory is utilized by RPM to build the package. | |
| 66 | 68 | - RPM/RPMS - Here you can find binary RPMs after you build them. | |
| 67 | 69 | - RPM/SOURCES - Place your compressed tar files and patches here. | |
| 68 | 70 | - RPM/SPECS - Place all your spec files here. | |
| 69 | 71 | - RPM/SRPMS - Here you can find source RPMs after you build them. | |
| 70 | 72 | ||
| 71 | 73 | Next you will need to create a configuration file to tell rpm builder software where he can find your build directories. Go to your home directory and create a file named .rpmmacros and place the text below on it. Make sure to change the directories to the correct ones on your system. | |
| 72 | 74 | ||
| 73 | 75 | %_topdir /home/felipe/RPM/ | |
| 74 | 76 | %_tmppath /home/felipe/tmp | |
| 75 | 77 | ||
| 76 | 78 | %_signature gpg | |
| 77 | 79 | %_gpg_name Mandrakelinux | |
| 78 | 80 | %_gpg_path ~/.gnupg | |
| 79 | 81 | ||
| 80 | 82 | #### Creating a binary only package | |
| 81 | 83 | ||
| 82 | 84 | The easiest way to create a RPM package is to make it install already compiled software. There are some reason why we might want to avoid compiling the software in the spec file: | |
| 83 | 85 | ||
| 84 | 86 | - It requires creating a Makefile and makefiles are complex | |
| 85 | 87 | ||
| 86 | 88 | - Some packages don't have any binary software in them, so they don't need to be built. | |
| 87 | 89 | ||
| 88 | 90 | Each RPM Package contains a single compressed tar archive. Place the archive under the RPM/SOURCES directory. Zip, gz and bz2 compressions should work ok. The file can either contain the full source of the project if you with to create a source and a binary package or a directory with the files already in place, like if they were installed in the user machine, if you with to create a binary only package. | |
| 89 | 91 | ||
| 90 | 92 | To build a binary package open a spec file with Emacs text editor. On Emacs open the menu "RPM spec" --\> "RPM Build" --\> "Build Binary Package". This will create a .rpm file under the directory RPM/RPMS | |
| 91 | 93 | ||
| 92 | 94 | Below is a spec file that doesn't build the software. In this case the software is a Braille Course composed of html and Macromedia Flash files. Flash files cannot be build on Linux, so it's not possible to create a source package in this case. | |
| 93 | 95 | ||
| 94 | 96 | %define name braillevirtual | |
| 95 | 97 | %define version 1.0 | |
| 96 | 98 | %define release mdk | |
| 97 | 99 | %define dir braillevirtual | |
| 98 | 100 | %define root /home/felipe/tmp/ROOT/ | |
| 99 | 101 | ||
| 100 | 102 | Summary: Curso On-Line de Braille | |
| 101 | 103 | Name: %{name} | |
| 102 | 104 | Version: %{version} | |
| 103 | 105 | Release: %{release} | |
| 104 | 106 | Vendor: Laboratório de Brinquedos da Faculdade de Educação da USP | |
| 105 | 107 | URL: www.braillevirtual.fe.usp.br | |
| 106 | 108 | License: Distribuível livremente | |
| 107 | 109 | Group: Books/Other | |
| 108 | 110 | Packager: Felipe Monteiro de Carvalho | |
| 109 | 111 | Source0: home/felipe/Programacao/SOURCES/braillevirtual.tar.bz2 | |
| 110 | 112 | BuildRoot: %{root} | |
| 111 | 113 | ||
| 112 | 114 | %description | |
| 113 | 115 | O Braille Virtual é um curso on-line público e gratuito destinado à difusão e ensino do sistema Braille de leitura e escrita para cegos a pessoas que vêem. É orientado especialmente a pais, crianças, professores e funcionários de escolas inclusivas e pretende facilitar a comunicação entre estas pessoas e as pessoas com cegueira. | |
| 114 | 116 | ||
| 115 | 117 | %prep | |
| 116 | 118 | cd $RPM_SOURCE_DIR | |
| 117 | 119 | cp braillevirtual.tar.bz2 $RPM_BUILD_DIR | |
| 118 | 120 | cd $RPM_BUILD_DIR | |
| 119 | 121 | rm -rf %{dir} | |
| 120 | 122 | rm -f braillevirtual.tar | |
| 121 | 123 | bunzip2 -d braillevirtual.tar.bz2 | |
| 122 | 124 | tar -xvf braillevirtual.tar | |
| 123 | 125 | ||
| 124 | 126 | %install | |
| 125 | 127 | mkdir -p $RPM_BUILD_ROOT/usr/share/ | |
| 126 | 128 | rm -rf $RPM_BUILD_ROOT/usr/share/%{dir} | |
| 127 | 129 | cp -r $RPM_BUILD_DIR/%{dir} $RPM_BUILD_ROOT/usr/share/ | |
| 128 | 130 | ||
| 129 | 131 | %clean | |
| 130 | 132 | rm -rf $RPM_BUILD_DIR/*.* | |
| 131 | 133 | ||
| 132 | 134 | %files | |
| 133 | 135 | /usr/share/%{dir}/ | |
| 134 | 136 | ||
| 135 | 137 | %changelog | |
| 136 | 138 | ||
| 137 | 139 | * Mon Oct 24 2005 1.0-mdk.noarch.rpm | |
| 138 | 140 | ||
| 139 | 141 | - Nova atualização do pacote de instalação. Inclusão dos exercícios avançados. | |
| 140 | 142 | ||
| 141 | 143 | * Wed May 12 2005 1.0-mdk.noarch.rpm | |
| 142 | 144 | ||
| 143 | 145 | - Atualizei o pacote para refletir as mudanças no site. Várias pequenas mudanças. | |
| 144 | 146 | ||
| 145 | 147 | * Sun May 05 2005 1.0-1mdk.i586.rpm | |
| 146 | 148 | ||
| 147 | 149 | - O pacote de instalação do braille Virtual para linux é criado. | |
| 148 | 150 | ||
| 149 | 151 | ##### Tip: | |
| 150 | 152 | ||
| 151 | 153 | The following packages are required for an very basic GUI Application in GTK+ (binary only): | |
| 152 | 154 | ||
| 153 | - | ||
| 154 | - | ||
| 155 | - | ||
| 156 | - | ||
| 157 | - | ||
| 158 | - | ||
| 159 | - | ||
| 160 | - | ||
| 155 | + | ```text | |
| 156 | + | libc6 libx11-6 libgdk-pixbuf2.0-0 libgtk2.0-0 libglib2.0-0 | |
| 157 | + | libpango-1.0-0 libcairo2 libatk1.0-0 libxcb1 libglib2.0-0 | |
| 158 | + | libpangocairo-1.0-0 libxfixes3 libpangoft2-1.0-0 libfontconfig1 libxrender1 | |
| 159 | + | libxinerama1 libxi6 libxrandr2 libxcursor1 libxcomposite1 | |
| 160 | + | libxdamage1 libxext6 libffi6 libpcre3 libthai0 | |
| 161 | + | libpixman-1-0 libfreetype6 libpng12-0 libxcb-shm0 libxcb-render0 | |
| 162 | + | zlib1g libxau6 libxdmcp6 libselinux1 libharfbuzz0b | |
| 163 | + | libexpat1 libdatrie1 libgraphite2-3 | |
| 164 | + | ``` | |
| 161 | 165 | ||
| 162 | 166 | You can get a list of used libraries with: `ldd [executable of your project]`. | |
| 163 | 167 | ||
| 164 | 168 | And find the packages in which it belongs: | |
| 165 | 169 | ||
| 166 | 170 | RPM based: `rpm -qf <lib name>` | |
| 167 | 171 | ||
| 168 | 172 | DEB based: `dpkg -S <lib name>` | |
| 169 | 173 | ||
| 170 | 174 | Where \<lib name\> is the name of library, before =\> or ")" in list | |
| 171 | 175 | ||
| 172 | 176 | Example: `rpm -qf libgtk-x11-2.0.so.0` | |
| 173 | 177 | ||
| 174 | 178 | A script (DEB based) using pipes, in order to join all these commands in a single command line, could be (replace 'amd64' by 'i386' if you install 32 bits packages): | |
| 175 | 179 | ||
| 176 | - | ||
| 180 | + | ```text | |
| 181 | + | $ ldd yourAppli | awk '/=>/{print $(NF-1)}' | while read n; do dpkg -S $n; done | awk '{print $1}' | sed 's/:amd64://' | sort | uniq | while read n; do echo "-- -- -- -- -- -- -- -- -- -- -- -- -- -- -- -- -- -- -- -- --> Usefullness of the package named $n:"; apt-cache search ^$n; echo "...which installs the following libraries on the system:"; dpkg -L $n |grep .so; echo "...and which depends itself on the following packages on the system:"; apt show $n | grep Depends; done; | |
| 182 | + | ``` | |
| 177 | 183 | ||
| 178 | 184 | #### Creating a source and binary package | |
| 179 | 185 | ||
| 180 | 186 | Linux distributions only accept RPM packages that can build the software. This will probably require creating build scripts and/or a Makefile. For more information see the section Creating a Makefile for your Lazarus software. | |
| 181 | 187 | ||
| 182 | 188 | You need to use the %build section to compile the software. Below is an example of a spec file capable of building the software. Be very careful when studying this as every little detail is important and follows a precise pattern. | |
| 183 | 189 | ||
| 184 | 190 | ```text | |
| 185 | 191 | Name: magnifier | |
| 186 | 192 | Version: 3.2.1 | |
| 187 | 193 | Release: 1 | |
| 188 | 194 | Summary: Virtual Magnifying Glass | |
| 189 | 195 | Group: Accessibility | |
| 190 | 196 | License: GPL Version 2 | |
| 191 | 197 | URL: http://magnifier.sourceforge.net | |
| 192 | 198 | Source0: http://internap.dl.sourceforge.net/sourceforge/magnifier/magnifier-3.2.1.zip | |
| 193 | 199 | BuildRoot: %{_tmppath}/%{name}-%{version}-%{release}-root-%(%{__id_u} -n) | |
| 194 | 200 | BuildRequires: fpc >= 2.0.2, lazarus >= 0.9.12 | |
| 195 | 201 | Requires: ImageMagick | |
| 196 | 202 | ||
| 197 | 203 | %description | |
| 198 | 204 | Virtual Magnifying Glass is a free, open source, multiplatform, screen magnification tool. It is simple, customizable, and easy-to-use. | |
| 199 | 205 | ||
| 200 | 206 | %prep | |
| 201 | 207 | %setup -q magnifier | |
| 202 | 208 | %build | |
| 203 | 209 | make TARGET=%{_target_cpu} | |
| 204 | 210 | ||
| 205 | 211 | %install | |
| 206 | 212 | ./install.sh DESTDIR=$RPM_BUILD_ROOT | |
| 207 | 213 | ||
| 208 | 214 | %clean | |
| 209 | 215 | rm -rf $RPM_BUILD_ROOT/ | |
| 210 | 216 | ||
| 211 | 217 | %files | |
| 212 | 218 | %defattr(-,root,root,-) | |
| 213 | 219 | /usr/share/magnifier/ | |
| 214 | 220 | /usr/bin/magnifier | |
| 215 | 221 | ||
| 216 | 222 | %changelog | |
| 217 | 223 | * Wed Feb 15 2006 Felipe Monteiro de Carvalho <felipemonteiro.carvalho at gmail.com> - 3.2-mdk.i386.rpm | |
| 218 | 224 | - The Linux RPM package is created. | |
| 219 | 225 | ``` | |
| 220 | 226 | ||
| 221 | 227 | ### Creating a Debian Package on Linux | |
| 222 | 228 | ||
| 223 | 229 | Debian packages are similar to installers. They can be downloaded by users from a website or ftp. You can craft them manually from the binary file by using their [[Debian package structure|specific structure]] and a .deb extension. However, they will not be automatically included in Debian distributions. | |
| 224 | 230 | ||
| 225 | 231 | If you want to make a package available into Debian distributions, you need to provide a [[Debian upstream|source upstream]] that can generate the Debian package as well as other files like the .orig.tar.gz and .dsc file. Those will be necessary for anybody to build your package for their target platform. | |
| 226 | 232 | ||
| 227 | 233 | There is an IDE plugin here: <https://github.com/prof7bit/LazPackager> | |
| 228 | 234 | ||
| 229 | 235 | ### Creating a Pacman (Arch) Package | |
| 230 | 236 | ||
| 231 | 237 | Please see <https://wiki.freepascal.org/pacman> | |
| 232 | 238 | ||
| 233 | 239 | ### Automating the creation of RPM and DEB packages | |
| 234 | 240 | ||
| 235 | 241 | To simplify the work of creating RPM and DEB packages one can create a script which generates them, just like is done here: | |
| 236 | 242 | ||
| 237 | 243 | <http://sourceforge.net/p/magnifier/code/HEAD/tree/trunk/build/build_package.sh> | |
| 238 | 244 | ||
| 239 | 245 | ### Snap | |
| 240 | 246 | ||
| 241 | 247 | See [[Create snap package]]. | |
| 242 | 248 | ||
| 243 | 249 | ### Flatpak | |
| 244 | 250 | ||
| 245 | 251 | See [[Flatpak]]. | |
| 246 | 252 | ||
| 247 | 253 | ### GUInseng | |
| 248 | 254 | ||
| 249 | 255 | [GUInseng](http://www.guinseng.de/) is a a GTK+ based installer for Linux released under GPL. | |
| 250 | 256 | ||
| 251 | 257 | ### The Zero Install system | |
| 252 | 258 | ||
| 253 | 259 | [The Zero Install system](http://0install.net/) is a Python based install system that aims to provide a better way of installing software than traditional systems (tarballs, apt-get, bundles, setup.exe, etc). | |
| 254 | 260 | ||
| 255 | 261 | ### Simple deployment of Lazarus application directly to Desktop Environment (e.g., KDE Plasma 5/Manjaro) | |
| 256 | 262 | ||
| 257 | 263 | One of the first things anyone coming from Delphi/Windows environment wants to know is how to QUICKLY deploy a newly-created Linux GUI program outside of the IDE, without spending a lot of time having to first study various package management systems. Unlike Windows, Linux is a disparate collection of Distributions ("Distros" - e.g., Debian, Arch, Ubuntu, etc.) and Desktop Environments ("DE" - e.g., KDE, Gnome, XFCE, Mate, etc.) Deployment entails some knowledge of one's Disto and DE, however the learning curve and effort is a tiny fraction of the effort required to set up and use an installation package system (e.g., DEB or RPM installation systems). The following focuses on Manjaro (ArchLinux) Distribution running the KDE Plasma 5 Desktop Environment. Before getting started, the following are required. | |
| 258 | 264 | ||
| 259 | 265 | *Prerequisites* | |
| 260 | 266 | ||
| 261 | 267 | **You must know the Path to your application's Binary.** It will be located in the Target directory that you specified under *Project Options*. If you just left default settings, the Binary will be located for example for Linux x86-64 target at: *\[...\]/MyProgram/lib/x86_64-linux*. The file will generally not have any extension (no *.exe*) and will have the same name as your Project. Linux executable binaries typically either have .bin extension or no extension. | |
| 262 | 268 | ||
| 263 | 269 | **You must have sufficient rights to the file.** By default, Lazarus should have created the file with your username and group as owner. If not for some reason, change ownership using *chown* terminal command or file manager, if available. (KDE Dolphin no longer allows *sudo* changes within the file manager.) | |
| 264 | 270 | ||
| 265 | 271 | **The file must be executable.** Lazarus should have already set the file to be executable, but if not, change this using *chmod* or file manager, if available. | |
| 266 | 272 | ||
| 267 | 273 | **As inital test, make sure your application can be launched directly from the Terminal.** For example, within the same directory as you application binary (e.g., MyProgram) execute: | |
| 268 | 274 | ||
| 269 | 275 | ``` bash | |
| 270 | 276 | $ ./MyProgram | |
| 271 | 277 | ``` | |
| 272 | 278 | ||
| 273 | 279 | Make sure you can launch your application from Terminal before proceeding. | |
| 274 | 280 | ||
| 275 | 281 | *Desktop entries* | |
| 276 | 282 | ||
| 277 | 283 | To get your application to correctly launch in your Desktop Environment, you have to tell it some information by way of creating a *Desktop Entry* file ending in *.desktop* extension. This is simply a text file located in a particular directory and having specific keys. For Manjaro/ArchLinux, the following is helpful reference material: | |
| 278 | 284 | ||
| 279 | 285 | ArchLinux Desktop Entries [3](https://wiki.archlinux.org/index.php/Desktop_Entries) | |
| 280 | 286 | ||
| 281 | 287 | The foregoing is simply a guide, not to be taken too literally. For example, for KDE Plasma 5 on Manjaro, use of separate Path and Exec keys does NOT work. Instead, a single Exec with the application binary's full path is required. You can uncover such details and quirks by examining the existing .desktop files of other applications already installed for your particular Distro and DE. | |
| 282 | 288 | ||
| 283 | 289 | Using the example of KDE Plasma 5 on Manjaro, proceed as follows, using hypothetical *MyApp* application program just created with Lazarus. Determine the location for *.desktop* files. For Manjaro, these were found to be at */usr/share/applications/*. Now, create your *.desktop* file: | |
| 284 | 290 | ||
| 285 | 291 | ``` bash | |
| 286 | 292 | $ sudo nano /usr/share/applications/myapp.desktop | |
| 287 | 293 | ``` | |
| 288 | 294 | ||
| 289 | 295 | By convention, use lowercase for the foregoing file name. Now, enter your application details (using hypothetical "MyApp" application binary). | |
| 290 | 296 | ||
| 291 | 297 | ``` bash | |
| 292 | 298 | [Desktop Entry] | |
| 293 | 299 | Type=Application | |
| 294 | 300 | # Change Name to your application | |
| 295 | 301 | Name=My Application | |
| 296 | 302 | # Change icon to your icon - leave OFF any file extension | |
| 297 | 303 | Icon=myappicon | |
| 298 | 304 | Comment=My First App | |
| 299 | 305 | # The FULL path to the folder in which the executable is run | |
| 300 | 306 | # Change to your actual application binary's full path | |
| 301 | 307 | Exec=/mysamplepath/Lazarus/MyApp/lib/x86_64-linux/MyApp | |
| 302 | 308 | Terminal=false | |
| 303 | 309 | # Sample Category - will determine where it is listed in Menu tree | |
| 304 | 310 | Categories=Office; | |
| 305 | 311 | ``` | |
| 306 | 312 | ||
| 307 | 313 | You will be storing your icon separately, as required by your DE, so that it may be displayed in the DE's menu along with your application name. In Manjaro, icons are required to be placed at */usr/share/pixmaps*. If needed, a good source for icons is available at: Open Icon Library [4](https://sourceforge.net/projects/openiconlibrary/) For KDE Plasma 5 on Manjaro, 48x48 PNGs work well. Note that you must leave .png extension off above icon reference to avoid validation errors. Now validate your Desktop Entry file: | |
| 308 | 314 | ||
| 309 | 315 | ``` bash | |
| 310 | 316 | $ sudo desktop-file-validate /usr/share/applications/myapp.desktop | |
| 311 | 317 | ``` | |
| 312 | 318 | ||
| 313 | 319 | Correct any errors. Finally, complete installation by updating the DE's desktop database: | |
| 314 | 320 | ||
| 315 | 321 | ``` bash | |
| 316 | 322 | $ sudo update-desktop-database | |
| 317 | 323 | ``` | |
| 318 | 324 | ||
| 319 | 325 | Your application should now be listed in KDE's menu tree and easily launched with mouse click. If you need to clean up KDE's menu (e.g., delete incorrect menu item), launch *kmenuedit* from Terminal or right click (if available) directly on menu item. | |
| 320 | 326 | ||
| 321 | 327 | ### See also | |
| 322 | 328 | ||
| 323 | 329 | - [[Create snap package|How to create an Ubuntu snap package]] | |
| 324 | 330 | - [[Publish project on Launchpad]] | |
| 325 | 331 | ||
| 326 | 332 | ## Creating a Makefile for your Lazarus software | |
| 327 | 333 | ||
| 328 | 334 | The following is a command line build system for a Lazarus software. This is particularly useful if you wish to create an RPM package suitable for including on GNU/Linux distributions. The comments on the files should explain what each part does. | |
| 329 | 335 | ||
| 330 | 336 | make.sh | |
| 331 | 337 | ||
| 332 | 338 | ``` bash | |
| 333 | 339 | # Detects and parses the architecture | |
| 334 | 340 | ARCH=$(uname -m) | |
| 335 | 341 | ||
| 336 | 342 | case "$ARCH" in | |
| 337 | 343 | "i686") ARCH="i386";; | |
| 338 | 344 | "i586") ARCH="i386";; | |
| 339 | 345 | "i486") ARCH="i386";; | |
| 340 | 346 | esac | |
| 341 | 347 | ||
| 342 | 348 | echo "Target architecture: $ARCH" | |
| 343 | 349 | ||
| 344 | 350 | # Detects and parses the OS | |
| 345 | 351 | OS="linux" | |
| 346 | 352 | ||
| 347 | 353 | echo "Target operating system: $OS" | |
| 348 | 354 | ||
| 349 | 355 | # Command line to build the sofware | |
| 350 | 356 | fpc -S2cgi -OG1 -gl -WG -vewnhi -l -Fu/usr/lib/lazarus/components/opengl/gtk2x11/ -Fi/usr/lib/lazarus/components/opengl/gtk2x11/include/ -Fu/usr/lib/lazarus/components/jpeg/ -Fu/usr/lib/lazarus/lcl/units/$ARCH-$OS/ -Fu/usr/lib/lazarus/lcl/units/$ARCH-$OS/ -Fu/usr/lib/lazarus/lcl/units/$ARCH-$OS/gtk2/ -Fu/usr/lib/lazarus/packager/units/$ARCH-$OS/ -Fu. -o./magnifier -dLCL -dLCLgtk2 magnifier.dpr | |
| 351 | 357 | ``` | |
| 352 | 358 | ||
| 353 | 359 | install.sh | |
| 354 | 360 | ||
| 355 | 361 | ``` bash | |
| 356 | 362 | # Parses command line options. Currently supported options are: | |
| 357 | 363 | # DESTDIR Destination root directory | |
| 358 | 364 | ||
| 359 | 365 | DESTDIR="" | |
| 360 | 366 | ||
| 361 | 367 | for arg; do | |
| 362 | 368 | case $arg in | |
| 363 | 369 | DESTDIR=*) DESTDIR=${arg#DESTDIR=};; | |
| 364 | 370 | esac; | |
| 365 | 371 | done | |
| 366 | 372 | ||
| 367 | 373 | # Does the install | |
| 368 | 374 | # "mkdir -p" is equivalent to ForceDirectories Pascal function | |
| 369 | 375 | ||
| 370 | 376 | mkdir -p $DESTDIR/usr/share/magnifier | |
| 371 | 377 | ||
| 372 | 378 | cp ./topleft.bmp $DESTDIR/usr/share/magnifier/ | |
| 373 | 379 | cp ./topright.bmp $DESTDIR/usr/share/magnifier/ | |
| 374 | 380 | cp ./bottomleft.bmp $DESTDIR/usr/share/magnifier/ | |
| 375 | 381 | cp ./bottomright.bmp $DESTDIR/usr/share/magnifier/ | |
| 376 | 382 | cp ./top.bmp $DESTDIR/usr/share/magnifier/ | |
| 377 | 383 | cp ./left.bmp $DESTDIR/usr/share/magnifier/ | |
| 378 | 384 | cp ./bottom.bmp $DESTDIR/usr/share/magnifier/ | |
| 379 | 385 | cp ./right.bmp $DESTDIR/usr/share/magnifier/ | |
| 380 | 386 | cp ./icon3.ico $DESTDIR/usr/share/magnifier/ | |
| 381 | 387 | ||
| 382 | 388 | mkdir -p $DESTDIR/usr/bin | |
| 383 | 389 | ||
| 384 | 390 | cp ./magnifier $DESTDIR/usr/bin/ | |
| 385 | 391 | ``` | |
| 386 | 392 | ||
| 387 | 393 | clean.sh | |
| 388 | 394 | ||
| 389 | 395 | ``` bash | |
| 390 | 396 | rm -rf *.o | |
| 391 | 397 | rm -rf *.ppu | |
| 392 | 398 | rm -rf *.pas~ | |
| 393 | 399 | rm -rf *.sh~ | |
| 394 | 400 | rm -rf *.bak | |
| 395 | 401 | rm -rf *~ | |
| 396 | 402 | rm -rf magnifier | |
| 397 | 403 | ``` | |
| 398 | 404 | ||
| 399 | 405 | uninstall.sh | |
| 400 | 406 | ||
| 401 | 407 | ``` bash | |
| 402 | 408 | # | |
| 403 | 409 | # Don´t use "rm -rf" in here, because you should only remove the files you created | |
| 404 | 410 | rm -f /usr/share/magnifier/topleft.bmp | |
| 405 | 411 | rm -f /usr/share/magnifier/topright.bmp | |
| 406 | 412 | rm -f /usr/share/magnifier/bottomleft.bmp | |
| 407 | 413 | rm -f /usr/share/magnifier/bottomright.bmp | |
| 408 | 414 | rm -f /usr/share/magnifier/top.bmp | |
| 409 | 415 | rm -f /usr/share/magnifier/left.bmp | |
| 410 | 416 | rm -f /usr/share/magnifier/bottom.bmp | |
| 411 | 417 | rm -f /usr/share/magnifier/right.bmp | |
| 412 | 418 | rm -f /usr/share/magnifier/icon3.ico | |
| 413 | 419 | rm -f /usr/share/magnifier/magnifier | |
| 414 | 420 | rm -f /usr/bin/magnifier | |
| 415 | 421 | rmdir /usr/share/magnifier | |
| 416 | 422 | ``` | |
| 417 | 423 | ||
| 418 | 424 | Makefile | |
| 419 | 425 | ||
| 420 | 426 | ``` bash | |
| 421 | 427 | # Targets | |
| 422 | 428 | # The First target is the one build when there is nothing on make command line | |
| 423 | 429 | all: | |
| 424 | 430 | ./make.sh | |
| 425 | 431 | clean: | |
| 426 | 432 | ./clean.sh | |
| 427 | 433 | install: | |
| 428 | 434 | ./install.sh | |
| 429 | 435 | uninstall: | |
| 430 | 436 | ./uninstall.sh | |
| 431 | 437 | ``` | |
| 432 | 438 | ||
| 433 | 439 | ## macOS Deployment | |
| 434 | 440 | ||
| 435 | 441 | ### An Application Bundle | |
| 436 | 442 | ||
| 437 | 443 | See [[Application Bundle]] for information on how to create an application bundle (a directory with application files that is treated by macOS as an executable). | |
| 438 | 444 | ||
| 439 | 445 | Most macOS applications are distributed as a disk image file (.dmg extension). Normally you download or copy a program's disk image to your Mac and double-click it. This mounts the disk image and opens a window on the desktop, where you'll typically see an application bundle as described in the previous point. To install, a user simply drags the bundle to the hard drive, typically into his or the general Applications folder. Therefore, many disk images present a link to the general Applications folder for easier dragging. "Uninstalling" is by deleting the bundle. | |
| 440 | 446 | ||
| 441 | 447 | Once the installation is complete, you eject (unmount) the mounted disk image, for example by dragging it to the trash. You can also delete the .dmg file by dragging it to the trash as well. | |
| 442 | 448 | ||
| 443 | 449 | Your bonus point is, if the application can also run directly from the (read-only) disk image. | |
| 444 | 450 | ||
| 445 | 451 | Here is the `app2dmg.sh` script which I use to create a .dmg file for an application bundle: | |
| 446 | 452 | ||
| 447 | 453 | ``` sh | |
| 448 | 454 | #!/bin/sh | |
| 449 | 455 | ||
| 450 | 456 | if [ "${1}" = "" ] | |
| 451 | 457 | then | |
| 452 | 458 | echo "Usage: app2dmg.sh app_name.app disk_size_in_mb" | |
| 453 | 459 | exit | |
| 454 | 460 | fi | |
| 455 | 461 | ||
| 456 | 462 | if [ "${2}" = "" ] | |
| 457 | 463 | then | |
| 458 | 464 | echo "Usage: app2dmg.sh app_name.app disk_size_in_mb" | |
| 459 | 465 | exit | |
| 460 | 466 | fi | |
| 461 | 467 | ||
| 462 | 468 | if [ ! -r "${1}" ] | |
| 463 | 469 | then | |
| 464 | 470 | echo "${1} is not in the current directory!" | |
| 465 | 471 | exit | |
| 466 | 472 | fi | |
| 467 | 473 | ||
| 468 | 474 | APP=`echo "${1}" | sed "s/\.app//"` | |
| 469 | 475 | DATE=`date "+%d%m%Y"` | |
| 470 | 476 | VOLUME="${APP}_${DATE}" | |
| 471 | 477 | ||
| 472 | 478 | echo "Application name: ${APP}" | |
| 473 | 479 | echo "Volume name: ${VOLUME}" | |
| 474 | 480 | ||
| 475 | 481 | if [ -r ${APP}*.dmg.sparseimage ] | |
| 476 | 482 | then | |
| 477 | 483 | rm ${APP}*.dmg.sparseimage | |
| 478 | 484 | fi | |
| 479 | 485 | ||
| 480 | 486 | hdiutil create -size ${2}M -type SPARSE -volname "${VOLUME}" -fs HFS+ ${VOLUME}.dmg | |
| 481 | 487 | ||
| 482 | 488 | hdiutil attach ${VOLUME}.dmg.sparseimage | |
| 483 | 489 | cp -R ${APP}.app "/Volumes/${VOLUME}/" | |
| 484 | 490 | cp README_FIRST.TXT "/Volumes/${VOLUME}/" | |
| 485 | 491 | hdiutil detach -force "/Volumes/${VOLUME}" | |
| 486 | 492 | ||
| 487 | 493 | hdiutil convert "${VOLUME}.dmg.sparseimage" -format UDBZ -o "${VOLUME}.dmg" -ov -imagekey zlib-level=9 | |
| 488 | 494 | rm ${VOLUME}*.dmg.sparseimage | |
| 489 | 495 | ``` | |
| 490 | 496 | ||
| 491 | 497 | You can also read [this guide](http://el-tramo.be/guides/fancy-dmg) for how to create a fancy disk image. | |
| 492 | 498 | ||
| 493 | 499 | ### Using Packages on macOS | |
| 494 | 500 | ||
| 495 | 501 | The Apple `pkgbuild` and `productbuild` command line tools can produce package .pkg files or the aptly named, third party GUI [`Packages`](http://s.sudre.free.fr/Software/Packages/about.html) application which builds flat packages (cf bundle-style packages built by the same author's GUI [`Iceberg`](http://s.sudre.free.fr/Software/Iceberg.html) application. | |
| 496 | 502 | ||
| 497 | 503 | If you absolutely require that several files are installed in different locations, then (and only then!) should you create a package file (.pkg extension) for the Apple Installer. This package file can then be moved, downloaded or emailed. Once the end user has it, they can double-click the package and the `Installer.app`, which will perform the installation, is launched. | |
| 498 | 504 | ||
| 499 | 505 | Package files have certain advantages: | |
| 500 | 506 | ||
| 501 | 507 | - You have control over permissions; | |
| 502 | 508 | - Multiple files can be placed in different locations; | |
| 503 | 509 | - You can run scripts as part of the installation process; | |
| 504 | 510 | - A logged-in user is not needed to install a package; | |
| 505 | 511 | - Most, if not all, Mac management systems can install Apple installer packages. | |
| 506 | 512 | ||
| 507 | 513 | The installer .pkg file is actually a directory, as is the resulting application bundle (.app extension) that it copies to the Applications folder. To the user, .pkg and .app files look and act like ordinary files, but they're really directories whose details have been hidden from the user. You can see what's inside a .pkg or .app file by entering normal `cd` commands in a Terminal window (for example, `cd progname.app`) or by Ctrl-Clicking the file and choosing *Show Package Contents* from the popup menu. | |
| 508 | 514 | ||
| 509 | 515 | To create a .dmg file, run the macOS Disk Utility (located in Applications \> Utilities). Select Images \> New \> Image from Folder and choose the folder containing your .pkg file and any other files you want to include in the disk image. In the Convert Image dialog, enter the name of the .dmg file to create, select where it should be saved, and select "compressed" as the image format. The .dmg file that Disk Utility creates is then ready for distribution. | |
| 510 | 516 | ||
| 511 | 517 | ### Installing X11 and GTK on macOS | |
| 512 | 518 | ||
| 513 | 519 | GUI apps created with Lazarus that use the GTK widgetset require X11 and the GTK libraries to run. The [XQuartz open source project](https://www.xquartz.org) `X11.app` was shipped with Leopard 10.5 through Lion 10.7 as an optional installation. After Lion 10.7, Apple stopped providing X11 but it can still be downloaded from the XQuartz project website. | |
| 514 | 520 | ||
| 515 | 521 | To install the GTK libraries on a user's system, you should include instructions for using [Fink](http://www.finkproject.org/) or [MacPorts](http://www.macports.org/). Do *not* manually package the libraries and install those in the default Fink/MacPorts locations, because then they may be overwritten in case the user decides to install one of these distributions. A good practice is to put those libraries in the application bundle itself, which requires [using the install_name_tool](http://qin.laya.com/tech_coding_help/dylib_linking.html) program. Putting them somewhere else is possible, but in most cases not conform to the Apple Guidelines as well as not what users expect. Before simply using directories common to other systems, you should carefully read the guidelines about the file system layout [File System Overview](http://developer.apple.com/library/mac/#documentation/MacOSX/Conceptual/BPFileSystem/BPFileSystem.html). | |
| 516 | 522 | ||
| 517 | 523 | ### Code signing and Notarization | |
| 518 | 524 | ||
| 519 | 525 | See [[Code Signing for macOS]] (required from macOS 10.7+) and [[Notarization for macOS 10.14.5+|Notarization for macOS]] (required from macOS 10.14.5+). | |
| 520 | 526 | ||
| 521 | 527 | Note: It is still possible not to code sign and notarise your applications if you do not mind your endusers facing scary warning dialogs from Apple - Gatekeeper can (still) be by-passed by Conctrol-Clicking on the application or right clicking on the application for the context menu, and then choosing *Open* and not *Move to trash* or *Cancel*. Notarization requires you to enrol in the [Apple Developer Program](https://developer.apple.com/programs/) (\$US 99 annually). | |
| 522 | 528 | ||
| 523 | 529 | ### See also | |
| 524 | 530 | ||
| 525 | 531 | - [Apple's Software Delivery Legacy Guide](https://developer.apple.com/library/archive/documentation/DeveloperTools/Conceptual/SoftwareDistribution4/Introduction/Introduction.html). | |
| 526 | 532 | ||
| 527 | 533 | - [The Luggage](https://github.com/unixorn/luggage/wiki) Uses a Makefile describing where you want each file in the package to end up on the target machines with rules that will generate a package root with appropriate permissions, copy the files into place, create a package version-stamped with the date, then wrap the package in a disk image file. This allows packages to be built in a consistent and repeatable way using source files and scripts. | |
| 528 | 534 | ||
| 529 | 535 | - [munkipkg](https://github.com/munki/munki-pkg) is a simple tool for building packages in a consistent, repeatable manner from source files and scripts in a project directory. Files, scripts, and metadata are stored in a way that is easy to track and manage using a version control system like git. | |
| 530 | 536 | ||
| 531 | 537 | - [[macOS PackageMaker]] - legacy - discontinued after Xcode 4.4. | |
| 532 | 538 | ||
| 533 | 539 | ## Android Deployment | |
| 534 | 540 | ||
| 535 | 541 | (This information needs to be consolidated here and the below links adjusted) | |
| 536 | 542 | ||
| 537 | 543 | - [[Android]] | |
| 538 | 544 | - [[FPC JVM Android Development]] | |
| 539 | 545 | - [[Android Programming]] | |
| 540 | 546 | ||
| 541 | 547 | ## Apple iOS Deployment | |
| 542 | 548 | ||
| 543 | 549 | (This information needs to be consolidated here and the below links adjusted) | |
| 544 | 550 | ||
| 545 | 551 | - [[iOS Designer]] | |
| 546 | 552 | - [[Portal:iOS|iOS Portal]] | |
| 547 | 553 | - [[iPhone/iPod development]] | |
| 548 | 554 | ||
| 549 | 555 | ## Other, General Cross-Platform Deployment | |
| 550 | 556 | ||
| 551 | 557 | ### BitRock | |
| 552 | 558 | ||
| 553 | 559 | 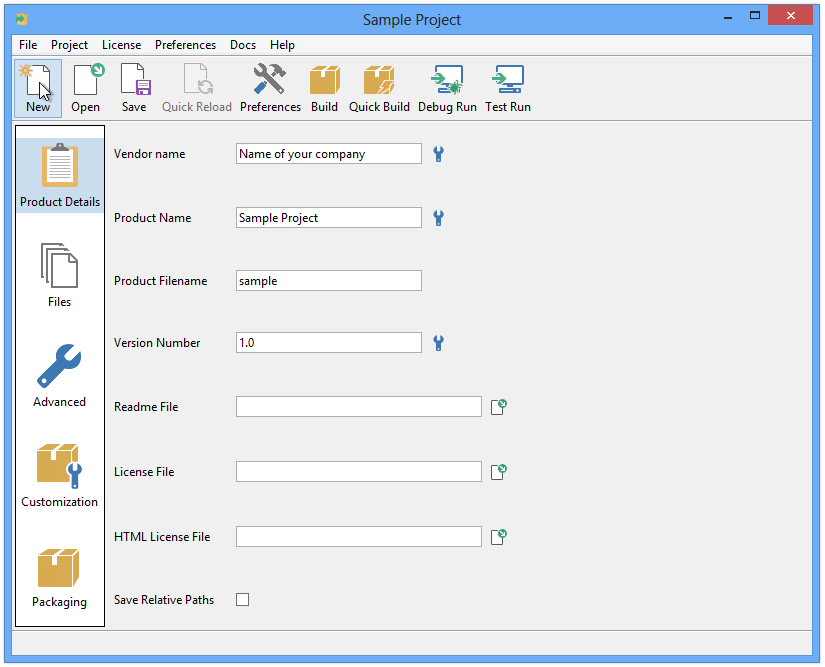 | |
| 554 | 560 | ||
| 555 | 561 | [[BitRockInstallBuilder|Bitrock]] (website www.bitrock.com) make an installer that will deploy to Windows, Mac OS and many flavors of Linux. If your application is open-source, they will give you a full license to download and use their 'InstallBuilder' application.[[http://installbuilder.bitrock.com/open-source-licenses.html Application form link]]. Commercial application licenses are available. | |
| 556 | 562 | ||
| 557 | 563 | ### fpGUI Installer | |
| 558 | 564 | ||
| 559 | 565 | This is a cross-platform CLI and GUI installer. It is loosely based on the concept of the Loki Installer (implemented in the C programming language) created by [Loki Games](http://www.lokigames.com/). The difference being that fpGUI Installer is implemented from scratch using Object Pascal and the fpGUI Toolkit for the GUI parts. This installer is still under active development, but to date no public release has been made. A public release is planned though. No official name has been given to this project either - thus the not ideal "fpGUI Installer" name. | |
| 560 | 566 | ||
| 561 | 567 | Here is a screenshot of fpGUI Installer replacing the original Kylix 3 installer: 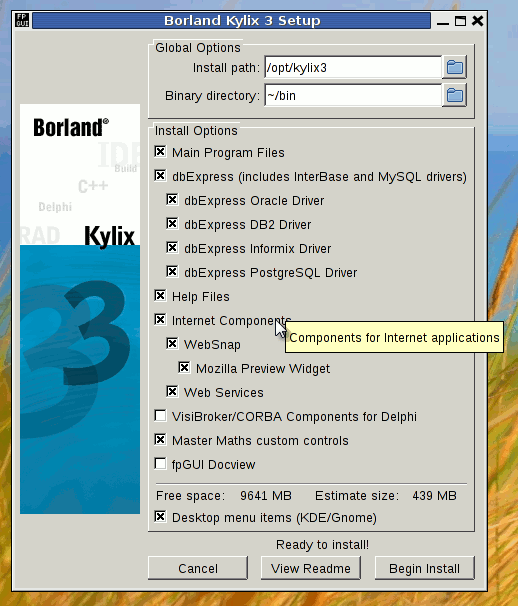 | |
| 562 | 568 | ||
| 563 | 569 | Features: | |
| 564 | 570 | ||
| 565 | 571 | - Installer setup is done via an easily managed XML file. A GUI front-end is used to edit the XML, but it can be done by hand too. | |
| 566 | 572 | - CD-ROM or Downloadable installers. The difference being that the CD-ROM installer is normally unpacked and multiple languages, tools etc are included. A Downloadable installer is a single file download and normally packaged for a specific language. | |
| 567 | 573 | - Automatic icon shortcut generation | |
| 568 | 574 | - No external libraries or runtime environments required. The idea is that a installer must not have system requirements (eg: a JVM or the Qt library etc), hence fpGUI toolkit was used for the GUI installer, because it talks directly to GDI or X11. | |
| 569 | 575 | - Command Line Installer and GUI Installer included as standard. | |
| 570 | 576 | - Support uninstall as well | |
| 571 | 577 | - fpGUI Installer has been tested on Windows (Win98 thru Win7), Linux (various distros), FreeBSD and OpenSolaris. | |
| 572 | 578 | - Supports 32-bit and 64-bit setup files. | |
| 573 | 579 | - Group installer mode: The installer can present a user friendly interface to install multiple other projects. | |
| 574 | 580 | - Customisable graphics banner and UI theme. | |
| 575 | 581 | ||
| 576 | 582 | ### InstallJammer | |
| 577 | 583 | ||
| 578 | 584 | InstallJammer is a multiplatform GUI installer designed to be completely cross-platform and function on Windows and most all versions of UNIX. | |
| 579 | 585 | ||
| 580 | 586 | InstallJammer features a very powerful install builder with support for multiple themes and a high level of configurability for installers. Installers are built as single executable files for easy distribution over the web and handle installing everything you need for your application in a simple, cross-platform way. | |
| 581 | 587 | ||
| 582 | 588 | - Active development of InstallJammer has been discontinued. The source is available for all versions and will always remain so, but your efforts might be better spent on an installer that is active in its development. | |
| 583 | 589 | - Download: <https://sourceforge.net/projects/installjammer/files/InstallJammer/> | |
| 584 | 590 | - Documentation: <http://installjammer.com/docs/> | |
| 585 | 591 | ||
| 586 | 592 | ### CMake/CPack | |
| 587 | 593 | ||
| 588 | 594 | CMake is a multiplatform build system that manages the compilation, linking, testing, and setup creation process. It is mainly intended for C/C++ software development, but can also be used for creating setups for Lazarus/FPC projects. The part of CMake that creates the setups is called CPack and is actually a front-end for other software packages that do the real work. In an FPC context, you would write a CMakeLists.txt file that contains lists of files to be installed and then have CPack call NSIS/WiX/... to perform the actual work. | |
| 589 | 595 | ||
| 590 | 596 | Features: | |
| 591 | 597 | ||
| 592 | 598 | - Windows (32+64 Bit), Linux, macOS support | |
| 593 | 599 | - Works with all important back-ends (NSIS, WiX, DEB...) | |
| 594 | 600 | - Just one text file CMakeLists.txt needs to be mainained for all target platforms | |
| 595 | 601 | - Multi-platform setups can be created with minimal work | |
| 596 | 602 | - Download: <http://www.cmake.org/> | |
| 597 | 603 | ||
| 598 | 604 | Using CMake/CPack makes most sense if you have a mixed-language project with Pascal and C/C++ parts that all go into one installer, and you need a platform-independent solution for both parts. If you have a pure FPC project, the overhead might be too much for you. | |
| 599 | 605 | ||
| 600 | 606 | --- | |
| 601 | 607 | *From the Free Pascal wiki, page "Deploying Your Application", as it stood on 2023-11-20 after a change by Chronos, out of the wiki's dump of 2024-05-26. Copyright stays with the author who wrote it, according to the old wiki's [[Licensing]] page. If you have concerns about this material, [message the admin](/wiki-contact).* |