

BGRABitmap tutorial 9/ru: what changed
Revision 0 to 1. Removed lines have a minus sign; added lines have a plus sign.
Title: BGRABitmap tutorial 9/ru
| Old | New | Line | |
|---|---|---|---|
| 1 | + | В этом уроке показано, как использовать затенение по Фонгу (фонгирование) для создания текстур. | |
| 2 | + | ||
| 3 | + | ### Создаём новый проект | |
| 4 | + | ||
| 5 | + | Создайте новый проект и добавьте ссылку на модуль [[BGRABitmap]], так же, как в [[BGRABitmap tutorial 1/ru|первом уроке]]. | |
| 6 | + | ||
| 7 | + | ### Затенение по Фонгу и освещённость | |
| 8 | + | ||
| 9 | + | Для использования фонгирования, Вам необходимо создать экземпляр класса TPhongShading. Он находится в модуле BGRAGradients. | |
| 10 | + | ||
| 11 | + | Давайте добавим переменную в определение формы: | |
| 12 | + | ||
| 13 | + | ``` pascal | |
| 14 | + | TForm1 = class(TForm) | |
| 15 | + | ... | |
| 16 | + | phong: TPhongShading; | |
| 17 | + | ``` | |
| 18 | + | ||
| 19 | + | Теперь в обработчике события создания формы (OnCreate) создадим необходимый класс и укажем параметры: | |
| 20 | + | ||
| 21 | + | ``` pascal | |
| 22 | + | procedure TForm1.FormCreate(Sender: TObject); | |
| 23 | + | begin | |
| 24 | + | phong := TPhongShading.Create; | |
| 25 | + | phong.LightPositionZ := 150; | |
| 26 | + | phong.SpecularIndex := 20; | |
| 27 | + | phong.AmbientFactor := 0.4; | |
| 28 | + | phong.LightSourceIntensity := 250; | |
| 29 | + | phong.LightSourceDistanceTerm := 200; | |
| 30 | + | end; | |
| 31 | + | ``` | |
| 32 | + | ||
| 33 | + | SpecularIndex "индекс зеркальности" указывает на концентрацию отраженного света. | |
| 34 | + | ||
| 35 | + | А в обработчике события уничтожения формы (OnDestroy) освободим память, выделенную под класс: | |
| 36 | + | ||
| 37 | + | ``` pascal | |
| 38 | + | procedure TForm1.FormDestroy(Sender: TObject); | |
| 39 | + | begin | |
| 40 | + | phong.Free; | |
| 41 | + | end; | |
| 42 | + | ``` | |
| 43 | + | ||
| 44 | + | Когда форма будет прорисовываться, добавим некоторый фонгированный объект: | |
| 45 | + | ||
| 46 | + | ``` pascal | |
| 47 | + | procedure TForm1.FormPaint(Sender: TObject); | |
| 48 | + | var | |
| 49 | + | image: TBGRABitmap; | |
| 50 | + | ||
| 51 | + | begin | |
| 52 | + | image := TBGRABitmap.Create(ClientWidth,ClientHeight,ColorToBGRA(ColorToRGB(clBtnFace))); | |
| 53 | + | ||
| 54 | + | phong.DrawSphere(image,rect(20,20,120,120),50,BGRA(255,0,0)); | |
| 55 | + | ||
| 56 | + | image.Draw(Canvas,0,0,True); | |
| 57 | + | image.free; | |
| 58 | + | end; | |
| 59 | + | ``` | |
| 60 | + | ||
| 61 | + | Параметры DrawSphere - это: целевое изображение, границы объекта, максимальная высота и цвет. Диаметр сферы равен 100, поэтому максимальная высота полушария равна 50. | |
| 62 | + | ||
| 63 | + | Наконец, когда мышь перемещается, было бы неплохо, чтобы источник света следовал за курсором: | |
| 64 | + | ||
| 65 | + | ``` pascal | |
| 66 | + | procedure TForm1.FormMouseMove(Sender: TObject; Shift: TShiftState; X, | |
| 67 | + | Y: Integer); | |
| 68 | + | begin | |
| 69 | + | phong.LightPosition := point(X,Y); //координаты источника | |
| 70 | + | FormPaint(Sender); //перепрорисовка формы | |
| 71 | + | end; | |
| 72 | + | ``` | |
| 73 | + | ||
| 74 | + | ### Запустим программу | |
| 75 | + | ||
| 76 | + | Вы должны получить возможность играть со светом на сфере: | |
| 77 | + | ||
| 78 | + | <figure> | |
| 79 | + | <img src="BGRATutorial9a.png" title="BGRATutorial9a.png" /> | |
| 80 | + | <figcaption>BGRATutorial9a.png</figcaption> | |
| 81 | + | </figure> | |
| 82 | + | ||
| 83 | + | ### Используем фонгирование для создания текстур | |
| 84 | + | ||
| 85 | + | Следующая процедура создает кусок шоколада: | |
| 86 | + | ||
| 87 | + | ``` pascal | |
| 88 | + | function CreateChocolateTexture(tx,ty: integer): TBGRABitmap; | |
| 89 | + | var | |
| 90 | + | square,map: TBGRABitmap; | |
| 91 | + | phong: TPhongShading; | |
| 92 | + | margin: integer; | |
| 93 | + | begin | |
| 94 | + | margin := tx div 20; //empty space around the square | |
| 95 | + | square := CreateRectangleMap(tx-2*margin,ty-2*margin,tx div 8); | |
| 96 | + | ||
| 97 | + | //создаём карту с квадратом посередине | |
| 98 | + | map := TBGRABitmap.Create(tx,ty,BGRABlack); | |
| 99 | + | map.PutImage(margin,margin,square,dmDrawWithTransparency); | |
| 100 | + | ||
| 101 | + | //применим размытие, чтобы сделать его более гладким | |
| 102 | + | BGRAReplace(map,map.FilterBlurRadial(tx div 40,rbFast)); | |
| 103 | + | square.free; | |
| 104 | + | ||
| 105 | + | //создаём результирующий растровый рисунок | |
| 106 | + | result := TBGRABitmap.Create(tx,ty); | |
| 107 | + | ||
| 108 | + | //используем фонгирование | |
| 109 | + | phong := TPhongShading.Create; | |
| 110 | + | phong.LightSourceDistanceFactor := 0; | |
| 111 | + | phong.LightDestFactor := 0; | |
| 112 | + | phong.LightSourceIntensity := 200; | |
| 113 | + | phong.AmbientFactor := 0.5; | |
| 114 | + | phong.LightPosition := Point(-50,-100); | |
| 115 | + | phong.LightPositionZ := 80; | |
| 116 | + | ||
| 117 | + | //нарисуем кусок шоколада с максимальной высотой 20 | |
| 118 | + | phong.Draw(result,map,20,0,0,BGRA(86,41,38)); | |
| 119 | + | map.Free; | |
| 120 | + | phong.Free; | |
| 121 | + | end; | |
| 122 | + | ``` | |
| 123 | + | ||
| 124 | + | Фонгировщик использует карту высот для визуализации световых эффектов. Здесь карта содержит квадрат. | |
| 125 | + | ||
| 126 | + | Среди свойств фонгировщика есть LightSourceDistanceFactor и LightDestFactor. Приведение этих значений в ноль делает результат неровным. Действительно, когда коэффициент расстояния равен нулю, расстояние между светом и объектом не учитывается, а когда коэффициент назначения света равен нулю, позиция объекта не учитывается при вычислении угла света. | |
| 127 | + | ||
| 128 | + | Теперь, когда форма создана, создадим текстуру шоколада: | |
| 129 | + | ||
| 130 | + | ``` pascal | |
| 131 | + | chocolate := CreateChocolateTexture(80,80); | |
| 132 | + | ``` | |
| 133 | + | ||
| 134 | + | А когда форма уничтожается: | |
| 135 | + | ||
| 136 | + | ``` pascal | |
| 137 | + | chocolate.Free; | |
| 138 | + | ``` | |
| 139 | + | ||
| 140 | + | Перед phong.DrawSphere в OnPaint событии, добавим следующую строку: | |
| 141 | + | ||
| 142 | + | ``` pascal | |
| 143 | + | image.FillRect(0,0,80*7,80*4,chocolate,dmSet); | |
| 144 | + | ``` | |
| 145 | + | ||
| 146 | + | ### Весь код | |
| 147 | + | ||
| 148 | + | ``` pascal | |
| 149 | + | unit UMain; | |
| 150 | + | ||
| 151 | + | {$mode objfpc}{$H+} | |
| 152 | + | ||
| 153 | + | interface | |
| 154 | + | ||
| 155 | + | uses | |
| 156 | + | Classes, SysUtils, FileUtil, LResources, Forms, Controls, Graphics, Dialogs, | |
| 157 | + | ExtCtrls, Buttons, BGRABitmap, BGRABitmapTypes, BGRAGradients; | |
| 158 | + | ||
| 159 | + | type | |
| 160 | + | { TForm1 } | |
| 161 | + | ||
| 162 | + | TForm1 = class(TForm) | |
| 163 | + | Timer1: TTimer; | |
| 164 | + | procedure FormCreate(Sender: TObject); | |
| 165 | + | procedure FormDestroy(Sender: TObject); | |
| 166 | + | procedure FormMouseMove(Sender: TObject; Shift: TShiftState; X, Y: Integer); | |
| 167 | + | procedure FormPaint(Sender: TObject); | |
| 168 | + | private | |
| 169 | + | { private declarations } | |
| 170 | + | public | |
| 171 | + | { public declarations } | |
| 172 | + | phong: TPhongShading; | |
| 173 | + | chocolate: TBGRABitmap; | |
| 174 | + | end; | |
| 175 | + | ||
| 176 | + | var | |
| 177 | + | Form1: TForm1; | |
| 178 | + | ||
| 179 | + | implementation | |
| 180 | + | ||
| 181 | + | function CreateChocolateTexture(tx,ty: integer): TBGRABitmap; | |
| 182 | + | var | |
| 183 | + | square,map: TBGRABitmap; | |
| 184 | + | phong: TPhongShading; | |
| 185 | + | margin: integer; | |
| 186 | + | begin | |
| 187 | + | margin := tx div 20; | |
| 188 | + | square := CreateRectangleMap(tx-2*margin,ty-2*margin,tx div 8); | |
| 189 | + | map := TBGRABitmap.Create(tx,ty,BGRABlack); | |
| 190 | + | map.PutImage(margin,margin,square,dmDrawWithTransparency); | |
| 191 | + | BGRAReplace(map,map.FilterBlurRadial(tx div 40,rbFast)); | |
| 192 | + | square.free; | |
| 193 | + | ||
| 194 | + | result := TBGRABitmap.Create(tx,ty); | |
| 195 | + | phong := TPhongShading.Create; | |
| 196 | + | phong.LightSourceDistanceFactor := 0; | |
| 197 | + | phong.LightDestFactor := 0; | |
| 198 | + | phong.LightSourceIntensity := 200; | |
| 199 | + | phong.AmbientFactor := 0.5; | |
| 200 | + | phong.LightPosition := Point(-50,-100); | |
| 201 | + | phong.LightPositionZ := 80; | |
| 202 | + | phong.Draw(result,map,20,0,0,BGRA(86,41,38)); | |
| 203 | + | map.Free; | |
| 204 | + | phong.Free; | |
| 205 | + | end; | |
| 206 | + | ||
| 207 | + | { TForm1 } | |
| 208 | + | ||
| 209 | + | procedure TForm1.FormCreate(Sender: TObject); | |
| 210 | + | begin | |
| 211 | + | phong := TPhongShading.Create; | |
| 212 | + | phong.LightPositionZ := 150; | |
| 213 | + | phong.SpecularIndex := 20; | |
| 214 | + | phong.AmbientFactor := 0.4; | |
| 215 | + | phong.LightSourceIntensity := 250; | |
| 216 | + | phong.LightSourceDistanceTerm := 200; | |
| 217 | + | ||
| 218 | + | chocolate := CreateChocolateTexture(80,80); | |
| 219 | + | end; | |
| 220 | + | ||
| 221 | + | procedure TForm1.FormDestroy(Sender: TObject); | |
| 222 | + | begin | |
| 223 | + | phong.Free; | |
| 224 | + | chocolate.Free; | |
| 225 | + | end; | |
| 226 | + | ||
| 227 | + | procedure TForm1.FormMouseMove(Sender: TObject; Shift: TShiftState; X, | |
| 228 | + | Y: Integer); | |
| 229 | + | begin | |
| 230 | + | phong.LightPosition := point(X,Y); | |
| 231 | + | FormPaint(Sender); | |
| 232 | + | end; | |
| 233 | + | ||
| 234 | + | procedure TForm1.FormPaint(Sender: TObject); | |
| 235 | + | var | |
| 236 | + | image: TBGRABitmap; | |
| 237 | + | begin | |
| 238 | + | image := TBGRABitmap.Create(ClientWidth,ClientHeight,ColorToBGRA(ColorToRGB(clBtnFace))); | |
| 239 | + | ||
| 240 | + | image.FillRect(0,0,80*7,80*4,chocolate,dmSet); | |
| 241 | + | phong.DrawSphere(image,rect(20,20,120,120),50,BGRA(255,0,0)); | |
| 242 | + | ||
| 243 | + | image.Draw(Canvas,0,0,True); | |
| 244 | + | image.free; | |
| 245 | + | end; | |
| 246 | + | ||
| 247 | + | initialization | |
| 248 | + | {$I UMain.lrs} | |
| 249 | + | ||
| 250 | + | end. | |
| 251 | + | ``` | |
| 252 | + | ||
| 253 | + | ### Запустим программу | |
| 254 | + | ||
| 255 | + | Вы должны увидеть хорошую плитку шоколада с большой вишней: 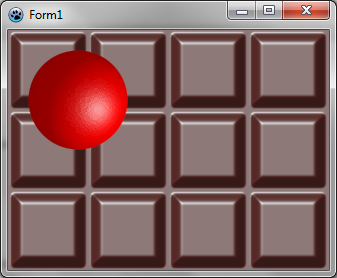 | |
| 256 | + | ||
| 257 | + | ### Совместное использование шума Перлина и затенения Фонга | |
| 258 | + | ||
| 259 | + | Идея состоит в том, чтобы создать карту с шумом Перлина, а затем использовать фонгирование для рендеринга. Вот как создать каменную текстуру: | |
| 260 | + | ||
| 261 | + | ``` pascal | |
| 262 | + | function CreateStoneTexture(tx,ty: integer): TBGRABitmap; | |
| 263 | + | var | |
| 264 | + | temp: TBGRABitmap; | |
| 265 | + | phong: TPhongShading; | |
| 266 | + | begin | |
| 267 | + | result := CreateCyclicPerlinNoiseMap(tx,ty,1,1,0.6); | |
| 268 | + | temp:= result.GetPart(rect(-2,-2,tx+2,ty+2)) as TBGRABitmap; | |
| 269 | + | ||
| 270 | + | phong := TPhongShading.Create; | |
| 271 | + | phong.LightSourceDistanceFactor := 0; | |
| 272 | + | phong.LightDestFactor := 0; | |
| 273 | + | phong.LightSourceIntensity := 100; | |
| 274 | + | phong.LightPositionZ := 100; | |
| 275 | + | phong.NegativeDiffusionFactor := 0.3; | |
| 276 | + | phong.AmbientFactor := 0.5; | |
| 277 | + | phong.Draw(result,temp,30,-2,-2,BGRA(170,170,170)); | |
| 278 | + | ||
| 279 | + | phong.Free; | |
| 280 | + | temp.Free; | |
| 281 | + | end; | |
| 282 | + | ``` | |
| 283 | + | ||
| 284 | + | First, we create a cyclic map. It's important that it be cyclic in order to make a tilable texture. But then, when we will apply phong shading, we need to make the shader aware of the cycle. So, with GetPart, we extract the generated map with 2 more pixels on each border, so the shader can be applied to the map with the cycle. | |
| 285 | + | ||
| 286 | + | The call to phong.Draw with offset (-2,-2) renders the map at the correct location, taking into account that we've added two pixels. | |
| 287 | + | ||
| 288 | + | Now in the OnPaint event : | |
| 289 | + | ||
| 290 | + | ``` pascal | |
| 291 | + | procedure TForm1.FormPaint(Sender: TObject); | |
| 292 | + | var | |
| 293 | + | image: TBGRABitmap; | |
| 294 | + | stone: TBGRABitmap; | |
| 295 | + | begin | |
| 296 | + | image := TBGRABitmap.Create(ClientWidth,ClientHeight,ColorToBGRA(ColorToRGB(clBtnFace))); | |
| 297 | + | ||
| 298 | + | stone := CreateStoneTexture(100,100); | |
| 299 | + | image.FillEllipseAntialias(200,100,150,50,stone); | |
| 300 | + | stone.free; | |
| 301 | + | ||
| 302 | + | image.Draw(Canvas,0,0,True); | |
| 303 | + | image.free; | |
| 304 | + | end; | |
| 305 | + | ``` | |
| 306 | + | ||
| 307 | + | ### Run the program | |
| 308 | + | ||
| 309 | + | You should see a form with a stoned background. | |
| 310 | + | ||
| 311 | + | <figure> | |
| 312 | + | <img src="BGRATutorial9c.png" title="BGRATutorial9c.png" /> | |
| 313 | + | <figcaption>BGRATutorial9c.png</figcaption> | |
| 314 | + | </figure> | |
| 315 | + | ||
| 316 | + | ### Rendering water | |
| 317 | + | ||
| 318 | + | It is almost the same procedure to generate water texture : | |
| 319 | + | ||
| 320 | + | ``` pascal | |
| 321 | + | function CreateWaterTexture(tx,ty: integer): TBGRABitmap; | |
| 322 | + | const blurSize = 5; | |
| 323 | + | var | |
| 324 | + | temp: TBGRABitmap; | |
| 325 | + | phong: TPhongShading; | |
| 326 | + | begin | |
| 327 | + | result := CreateCyclicPerlinNoiseMap(tx,ty,1,1,1.2); | |
| 328 | + | temp:= result.GetPart(rect(-blurSize,-blurSize,tx+blurSize,ty+blurSize)) as TBGRABitmap; | |
| 329 | + | BGRAReplace(temp,temp.FilterBlurRadial(blurSize,rbFast)); | |
| 330 | + | ||
| 331 | + | phong := TPhongShading.Create; | |
| 332 | + | phong.LightSourceDistanceFactor := 0; | |
| 333 | + | phong.LightDestFactor := 0; | |
| 334 | + | phong.LightSourceIntensity := 150; | |
| 335 | + | phong.LightPositionZ := 80; | |
| 336 | + | phong.LightColor := BGRA(105,233,240); | |
| 337 | + | phong.NegativeDiffusionFactor := 0.3; | |
| 338 | + | phong.SpecularIndex := 20; | |
| 339 | + | phong.AmbientFactor := 0.4; | |
| 340 | + | ||
| 341 | + | phong.Draw(result,temp,20,-blurSize,-blurSize,BGRA(28,139,166)); | |
| 342 | + | phong.Free; | |
| 343 | + | temp.Free; | |
| 344 | + | end; | |
| 345 | + | ``` | |
| 346 | + | ||
| 347 | + | The main difference is that we apply a blur filter to make it the water smooth and set the light color. | |
| 348 | + | ||
| 349 | + | <figure> | |
| 350 | + | <img src="BGRATutorial9d.png" title="BGRATutorial9d.png" /> | |
| 351 | + | <figcaption>BGRATutorial9d.png</figcaption> | |
| 352 | + | </figure> | |
| 353 | + | ||
| 354 | + | ### Using thresholds to render snow prints | |
| 355 | + | ||
| 356 | + | It is possible to keep only a small subrange of altitudes, to have a texture that shows foot prints in the snow. | |
| 357 | + | ||
| 358 | + | ``` pascal | |
| 359 | + | function CreateSnowPrintTexture(tx,ty: integer): TBGRABitmap; | |
| 360 | + | var | |
| 361 | + | v: integer; | |
| 362 | + | p: PBGRAPixel; | |
| 363 | + | i: Integer; | |
| 364 | + | ||
| 365 | + | temp: TBGRABitmap; | |
| 366 | + | phong: TPhongShading; | |
| 367 | + | begin | |
| 368 | + | //here a random map is generated | |
| 369 | + | result := CreateCyclicPerlinNoiseMap(tx,ty,1,1,1.2); | |
| 370 | + | ||
| 371 | + | //now we apply thresholds | |
| 372 | + | p := result.Data; | |
| 373 | + | for i := 0 to result.NbPixels-1 do | |
| 374 | + | begin | |
| 375 | + | v := p^.red; | |
| 376 | + | //if the value is above 80 or under 50, then we divide it by 10 to make it almost horizontal | |
| 377 | + | if v > 80 then v := (v-80) div 10+80; | |
| 378 | + | if v < 50 then v := 50-(50-v) div 10; | |
| 379 | + | p^.red := v; | |
| 380 | + | p^.green := v; | |
| 381 | + | p^.blue := v; | |
| 382 | + | inc(p); | |
| 383 | + | end; | |
| 384 | + | ||
| 385 | + | //to make phong shader aware of the cycle | |
| 386 | + | temp:= result.GetPart(rect(-2,-2,tx+2,ty+2)) as TBGRABitmap; | |
| 387 | + | //apply a radial blur | |
| 388 | + | BGRAReplace(temp,temp.FilterBlurRadial(2,rbFast)); | |
| 389 | + | phong := TPhongShading.Create; | |
| 390 | + | phong.LightSourceDistanceFactor := 0; | |
| 391 | + | phong.LightDestFactor := 0; | |
| 392 | + | phong.LightSourceIntensity := 100; | |
| 393 | + | phong.LightPositionZ := 100; | |
| 394 | + | phong.NegativeDiffusionFactor := 0.3; //want shadows | |
| 395 | + | phong.Draw(result,temp,30,-2,-2,BGRAWhite); | |
| 396 | + | phong.Free; | |
| 397 | + | temp.Free; | |
| 398 | + | end; | |
| 399 | + | ``` | |
| 400 | + | ||
| 401 | + | We obtain this : | |
| 402 | + | ||
| 403 | + | <figure> | |
| 404 | + | <img src="BGRATutorial9e.png" title="BGRATutorial9e.png" /> | |
| 405 | + | <figcaption>BGRATutorial9e.png</figcaption> | |
| 406 | + | </figure> | |
| 407 | + | ||
| 408 | + | [[BGRABitmap tutorial 8|Previous tutorial (textures)]] [[BGRABitmap tutorial 10|Next tutorial (texture mapping)]] | |
| 409 | + | ||
| 410 | + | --- | |
| 411 | + | *From the Free Pascal wiki, page "BGRABitmap tutorial 9/ru", as it stood on 2020-02-10 after a change by Trev, out of the wiki's dump of 2024-05-26. Copyright stays with the author who wrote it, according to the old wiki's [[Licensing]] page. If you have concerns about this material, [message the admin](/wiki-contact).* |