

BGRABitmap tutorial 8/es: what changed
Revision 2 to 3. Removed lines have a minus sign; added lines have a plus sign.
| Old | New | Line | |
|---|---|---|---|
| 1 | - | ||
| 2 | - | ||
| 3 | - | ||
| 4 | - | ||
| 5 | - | ||
| 6 | - | ||
| 7 | - | ||
| 8 | - | ||
| 9 | - | ||
| 1 | + | [[BGRABitmap tutorial/es|**Home**]] | [[BGRABitmap tutorial 1/es|**Tutorial 1**]] | [[BGRABitmap tutorial 2/es|**Tutorial 2**]] | [[BGRABitmap tutorial 3/es|**Tutorial 3**]] | [[BGRABitmap tutorial 4/es|**Tutorial 4**]] | [[BGRABitmap tutorial 5/es|**Tutorial 5**]] | [[BGRABitmap tutorial 6/es|**Tutorial 6**]] | [[BGRABitmap tutorial 7/es|**Tutorial 7**]] | **Tutorial 8** | [[BGRABitmap tutorial 9/es|**Tutorial 9**]] | [[BGRABitmap tutorial 10/es|**Tutorial 10**]] | [[BGRABitmap tutorial 11/es|**Tutorial 11**]] | [[BGRABitmap tutorial 12/es|**Tutorial 12**]] | [Edit](<http://wiki.lazarus.freepascal.org/index.php?title=Template:BGRABitmap_tutorial_index/es&action=edit>) | |
| 10 | 2 | ||
| 11 | - | ||
| 3 | + | Esta tutoría muestra como usar texturas. | |
| 12 | 4 | ||
| 13 | - | ||
| 14 | - | ||
| 15 | - | ||
| 16 | - | ||
| 17 | - | ||
| 18 | - | ||
| 5 | + | ## Contents | |
| 19 | 6 | ||
| 20 | - | ||
| 21 | - | ||
| 22 | - | ||
| 7 | + | * 1 Crear un nuevo proyecto | |
| 8 | + | * 2 Usando pinceles de textura | |
| 9 | + | * 3 Ejecuta el programa | |
| 10 | + | * 4 Generating textures | |
| 11 | + | * 4.1 Basic Perlin noise map | |
| 12 | + | * 4.2 Changing color | |
| 13 | + | * 4.3 Using thresholds | |
| 14 | + | * 4.4 Sine function | |
| 15 | + | * 4.5 Wood texture | |
| 23 | 16 | ||
| 24 | - | ||
| 25 | - | ||
| 26 | - | ||
| 27 | - | ||
| 28 | - | ||
| 17 | + | ### Crear un nuevo proyecto | |
| 29 | 18 | ||
| 30 | - | ||
| 31 | - | ||
| 19 | + | Crea un nuevo proyecto y añade referencia a [[BGRABitmap]], de la misma forma que en [[BGRABitmap tutorial/es|la primer tutoría]]. | |
| 32 | 20 | ||
| 33 | - | ||
| 34 | - | ||
| 21 | + | ### Usando pinceles de textura | |
| 35 | 22 | ||
| 36 | - | ||
| 23 | + | La textura mas simple es un pincel eclosionado. | |
| 37 | 24 | ||
| 38 | - | ||
| 39 | - | ||
| 40 | - | ||
| 25 | + | Con el inspector de objetos, añade un manejador OnPaint y escribe : | |
| 41 | 26 | ``` | |
| 42 | - | ||
| 43 | - | ||
| 27 | + | procedure TForm1.FormPaint(Sender: TObject); | |
| 28 | + | var | |
| 29 | + | image,tex: TBGRABitmap; | |
| 30 | + | c: TBGRAPixel; | |
| 31 | + | x,y,rx,ry: single; | |
| 32 | + | ||
| 33 | + | begin | |
| 34 | + | image := TBGRABitmap.Create(ClientWidth,ClientHeight,ColorToBGRA(ColorToRGB(clBtnFace))); | |
| 35 | + | c := ColorToBGRA(ColorToRGB(clWindowText)); | |
| 36 | + | ||
| 37 | + | //ellipse coordinates | |
| 38 | + | x := 150; | |
| 39 | + | y := 100; | |
| 40 | + | rx := 100; | |
| 41 | + | ry := 50; | |
| 42 | + | ||
| 43 | + | // carga un pincel "diagcross" con un patron blanco y fondo naranja | |
| 44 | + | tex := image.CreateBrushTexture(bsDiagCross,BGRAWhite,BGRA(255,192,0)) as TBGRABitmap; | |
| 45 | + | ||
| 46 | + | image.FillEllipseAntialias(x,y,rx-0.5,ry-0.5,tex); | |
| 47 | + | image.EllipseAntialias(x,y,rx,ry,c,1); //draw outline | |
| 48 | + | ||
| 49 | + | tex.Free; | |
| 50 | + | ||
| 51 | + | image.Draw(Canvas,0,0,True); | |
| 52 | + | image.free; | |
| 53 | + | end; | |
| 54 | + | ``` | |
| 44 | 55 | ||
| 45 | - | ||
| 56 | + | Como puedes ver, una textura es un bitmap. Para rellenar un elipse con una textura, pasa la textura como parametro en vez del color. | |
| 46 | 57 | ||
| 47 | - | ||
| 58 | + | Dos comandos definen el elipse. El primero es el rellenado, y el segundo el contorno. Ten en cuenta que el radio es 0.5 píxeles mas pequeños que el rellenado. De todas fromas, cuando el ancho de la pluma es 1, el radio interior es 0.5 mas pequeño y el radio exterior es 0.5 mas grande. Sin embargo, incluso si se presta atención a esto, el resultado no será perfecto. Si desea una unión suavizado entre polígonos, es necesario utilizar TBGRAMultishapeFiller en la unidad de BGRAPolygon y sacar todo de una vez. | |
| 48 | 59 | ||
| 49 | - | ||
| 60 | + | Uso de un comando para el esquema, logramos establecer una elipse con textura con un borde. Pero si la función de esquema no está disponible, también puede utilizar otro comando se llenan de un radio mayor con el color del borde, y luego un radio más pequeño para el interior. | |
| 50 | 61 | ||
| 51 | - | ||
| 52 | - | ||
| 53 | - | ||
| 62 | + | Agregue las líneas siguientes antes de tex.Free: | |
| 54 | 63 | ``` | |
| 64 | + | image.RoundRectAntialias(x-rx-10,y-ry-10,x+rx+10,y+ry+10,20,20,c,11); | |
| 65 | + | image.RoundRectAntialias(x-rx-10,y-ry-10,x+rx+10,y+ry+10,20,20,tex,9); | |
| 66 | + | ``` | |
| 55 | 67 | ||
| 56 | - | ||
| 68 | + | El primer comando dibuja un rectángulo alrededor de ancho (ancho de 11) que incluye la frontera. El segundo comando se llenan de la textura con un ancho menor (9). Esto funciona perfectamente, siempre y cuando la textura no es transparente. | |
| 57 | 69 | ||
| 58 | 70 | ### Ejecuta el programa | |
| 59 | 71 | ||
| 60 | - | ||
| 72 | + | Deberías obtener un rectángulo redondeado con un elipse dentro. Cada capa está rellenada con una textura naranja. | |
| 61 | 73 | ||
| 62 | - | ||
| 74 | + | [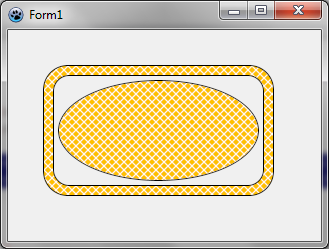](</File:BGRATutorial8.png>) | |
| 63 | 75 | ||
| 64 | 76 | ### Generating textures | |
| 65 | 77 | ||
| 66 | 78 | #### Basic Perlin noise map | |
| 67 | 79 | ||
| 68 | - | ||
| 69 | - | ||
| 70 | - | ||
| 80 | + | It is possible to generate tilable random textures using CreateCyclicPerlinNoiseMap that can be found in the BGRAGradient unit. | |
| 71 | 81 | ||
| 72 | - | ||
| 82 | + | With the object inspector, define the OnPaint handler with : | |
| 83 | + | ``` | |
| 73 | 84 | procedure TForm1.FormPaint(Sender: TObject); | |
| 74 | - | ||
| 75 | - | ||
| 76 | - | ||
| 77 | - | ||
| 78 | - | ||
| 79 | - | ||
| 80 | - | ||
| 81 | - | ||
| 82 | - | ||
| 83 | - | ||
| 84 | - | ||
| 85 | - | ||
| 86 | - | ||
| 85 | + | var | |
| 86 | + | image,tex: TBGRABitmap; | |
| 87 | + | ||
| 88 | + | begin | |
| 89 | + | image := TBGRABitmap.Create(ClientWidth,ClientHeight); | |
| 90 | + | ||
| 91 | + | tex := CreateCyclicPerlinNoiseMap(100,100); | |
| 92 | + | image.FillRect(0,0,image.Width,image.Height, tex); | |
| 93 | + | tex.free; | |
| 94 | + | ||
| 95 | + | image.Draw(Canvas,0,0,True); | |
| 96 | + | image.free; | |
| 97 | + | end; | |
| 87 | 98 | ``` | |
| 88 | 99 | ||
| 89 | - | ||
| 100 | + | This creates a 100x100 texture, and fills the form with it. You should obtain something like this : | |
| 90 | 101 | ||
| 91 | - | ||
| 102 | + | [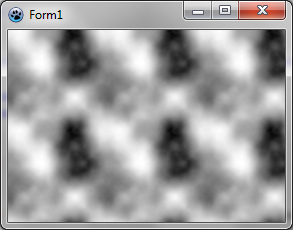](</File:BGRATutorial8b.png>) | |
| 92 | 103 | ||
| 93 | 104 | #### Changing color | |
| 94 | 105 | ||
| 95 | - | ||
| 96 | - | ||
| 97 | - | ||
| 98 | - | ||
| 99 | - | ||
| 100 | - | ||
| 101 | - | ||
| 106 | + | This is very black and white. We can add some colors. For this, we will need some function to interpolate values. Here it is : | |
| 102 | 107 | ``` | |
| 103 | - | ||
| 104 | - | ||
| 108 | + | function Interp256(value1,value2,position: integer): integer; inline; | |
| 109 | + | begin | |
| 110 | + | result := (value1*(256-position) + value2*position) shr 8; | |
| 111 | + | end; | |
| 112 | + | ``` | |
| 105 | 113 | ||
| 106 | - | ||
| 114 | + | This function computes a value going from value1 to value2. Position is a number between 0 and 256 which indicates how close the result is to the second value. The expression "shr 8" is an optimized equivalent to "div 256" for positive values. It is a binary shift of 8 digits. | |
| 107 | 115 | ||
| 108 | - | ||
| 109 | - | ||
| 110 | - | ||
| 111 | - | ||
| 112 | - | ||
| 113 | - | ||
| 114 | - | ||
| 115 | - | ||
| 116 | + | We want to interpolate colors, so let's write a function to interpolate colors : | |
| 116 | 117 | ``` | |
| 117 | - | ||
| 118 | - | ||
| 118 | + | function Interp256(color1,color2: TBGRAPixel; position: integer): TBGRAPixel; inline; | |
| 119 | + | begin | |
| 120 | + | result.red := Interp256(color1.red,color2.red, position); | |
| 121 | + | result.green := Interp256(color1.green,color2.green, position); | |
| 122 | + | result.blue := Interp256(color1.blue,color2.blue, position); | |
| 123 | + | result.alpha := Interp256(color1.alpha,color2.alpha, position); | |
| 124 | + | end; | |
| 125 | + | ``` | |
| 119 | 126 | ||
| 120 | - | ||
| 127 | + | It is straightforward : each color component is interpolated between color1 and color2 values. | |
| 121 | 128 | ||
| 122 | - | ||
| 123 | - | ||
| 124 | - | ||
| 125 | - | ||
| 126 | - | ||
| 127 | - | ||
| 128 | - | ||
| 129 | + | Now we have everything to make some colors. After CreatePerlinNoiseMap, add the following lines : | |
| 129 | 130 | ``` | |
| 131 | + | p := tex.Data; | |
| 132 | + | for i := 0 to tex.NbPixels-1 do | |
| 133 | + | begin | |
| 134 | + | p^ := Interp256( BGRA(0,128,0), BGRA(192,255,0), p^.red ); | |
| 135 | + | inc(p); | |
| 136 | + | end; | |
| 137 | + | ``` | |
| 130 | 138 | ||
| 131 | - | ||
| 139 | + | You'll need variables 'p' and 'i', so click on each and press Ctrl-Shift-C. | |
| 132 | 140 | ||
| 133 | - | ||
| 141 | + | This loop takes each pixel and creates a color from dark green to light green-yellow. | |
| 134 | 142 | ||
| 135 | - | ||
| 143 | + | We obtain a tree-like green color : | |
| 136 | 144 | ||
| 137 | - | ||
| 145 | + | [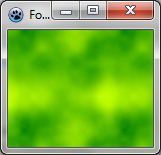](</File:BGRATutorial8c.png>) | |
| 138 | 146 | ||
| 139 | 147 | #### Using thresholds | |
| 140 | 148 | ||
| 141 | - | ||
| 142 | - | ||
| 143 | - | ||
| 144 | - | ||
| 145 | - | ||
| 146 | - | ||
| 147 | - | ||
| 148 | - | ||
| 149 | - | ||
| 150 | - | ||
| 151 | - | ||
| 149 | + | Instead of varying continuously, the color can be changed with a threshold. For example, we can delimit sea and islands : | |
| 152 | 150 | ``` | |
| 153 | - | ||
| 154 | - | ||
| 151 | + | p := tex.Data; | |
| 152 | + | for i := 0 to tex.NbPixels-1 do | |
| 153 | + | begin | |
| 154 | + | if p^.red > 196 then | |
| 155 | + | p^ := BGRA(192,160,96) else //island | |
| 156 | + | p^ := BGRA(0,128,196); //sea | |
| 157 | + | inc(p); | |
| 158 | + | end; | |
| 159 | + | ``` | |
| 155 | 160 | ||
| 156 | - | ||
| 157 | - | ||
| 158 | - | ||
| 159 | - | ||
| 160 | - | ||
| 161 | - | ||
| 162 | - | ||
| 163 | - | ||
| 164 | - | ||
| 165 | - | ||
| 166 | - | ||
| 161 | + | We can use more thresholds. Here is a camouflage : | |
| 167 | 162 | ``` | |
| 163 | + | p := result.Data; | |
| 164 | + | for i := 0 to result.NbPixels-1 do | |
| 165 | + | begin | |
| 166 | + | v := p^.red; | |
| 167 | + | if v < 64 then p^:= BGRA(31,33,46) else | |
| 168 | + | if v < 128 then p^:= BGRA(89,71,57) else | |
| 169 | + | if v < 192 then p^:= BGRA(80,106,67) else | |
| 170 | + | p^:= BGRA(161,157,121); | |
| 171 | + | inc(p); | |
| 172 | + | end; | |
| 173 | + | ``` | |
| 168 | 174 | ||
| 169 | - | ||
| 175 | + | [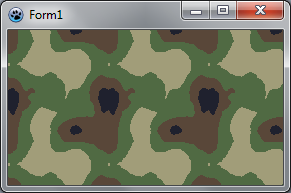](</File:BGRATutorial8d.png>) | |
| 170 | 176 | ||
| 171 | 177 | #### Sine function | |
| 172 | 178 | ||
| 173 | - | ||
| 174 | - | ||
| 175 | - | ||
| 176 | - | ||
| 177 | - | ||
| 178 | - | ||
| 179 | - | ||
| 180 | - | ||
| 181 | - | ||
| 182 | - | ||
| 183 | - | ||
| 184 | - | ||
| 185 | - | ||
| 186 | - | ||
| 187 | - | ||
| 188 | - | ||
| 189 | - | ||
| 190 | - | ||
| 179 | + | We will apply here a sine function to noise values. Let's create a procedure for this : | |
| 191 | 180 | ``` | |
| 192 | - | ||
| 193 | - | ||
| 181 | + | function CreateCustomTexture(tx,ty: integer): TBGRABitmap; | |
| 182 | + | var | |
| 183 | + | colorOscillation: integer; | |
| 184 | + | p: PBGRAPixel; | |
| 185 | + | i: Integer; | |
| 186 | + | begin | |
| 187 | + | result := CreateCyclicPerlinNoiseMap(tx,ty,1,1,1); | |
| 188 | + | p := result.Data; | |
| 189 | + | for i := 0 to result.NbPixels-1 do | |
| 190 | + | begin | |
| 191 | + | colorOscillation := round(((sin(p^.red*Pi/32)+1)/2)*256); | |
| 192 | + | p^ := Interp256(BGRA(181,157,105),BGRA(228,227,180),colorOscillation); | |
| 193 | + | inc(p); | |
| 194 | + | end; | |
| 195 | + | end; | |
| 196 | + | ``` | |
| 194 | 197 | ||
| 195 | - | ||
| 198 | + | The color oscillation is a value between 0 and 256. It is calculated out of the intensity (p^.red). Here we apply a sine function with a half-period of 32. This gives a number between -1 and 1. To put it in the range 0..1, we add 1 and divide by 2. Finally, we multiply by 256 to have an integer for Interp256. | |
| 196 | 199 | ||
| 197 | - | ||
| 200 | + | The OnPaint procedure becomes simpler : | |
| 201 | + | ``` | |
| 198 | 202 | var | |
| 199 | - | ||
| 200 | - | ||
| 201 | - | ||
| 202 | - | ||
| 203 | - | ||
| 204 | - | ||
| 205 | - | ||
| 206 | - | ||
| 207 | - | ||
| 208 | - | ||
| 209 | - | ||
| 210 | - | ||
| 211 | - | ||
| 203 | + | image,tex: TBGRABitmap; | |
| 204 | + | ||
| 205 | + | begin | |
| 206 | + | image := TBGRABitmap.Create(ClientWidth,ClientHeight,ColorToBGRA(ColorToRGB(clBtnFace))); | |
| 207 | + | ||
| 208 | + | tex := CreateCustomTexture(100,100); | |
| 209 | + | image.FillRoundRectAntialias(20,20,300,200,20,20,tex); | |
| 210 | + | image.RoundRectAntialias(20,20,300,200,20,20,BGRABlack,1); | |
| 211 | + | tex.free; | |
| 212 | + | ||
| 213 | + | image.Draw(Canvas,0,0,True); | |
| 214 | + | image.free; | |
| 215 | + | end; | |
| 212 | 216 | ``` | |
| 213 | 217 | ||
| 214 | - | ||
| 215 | - | ||
| 216 | - | ||
| 218 | + | You should obtain something like this : | |
| 217 | 219 | ||
| 218 | - | ||
| 220 | + | [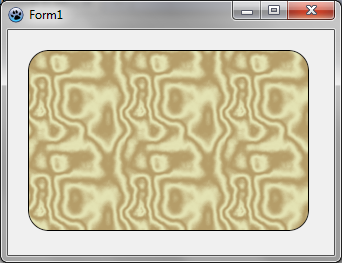](</File:BGRATutorial8e.png>) | |
| 219 | 221 | ||
| 220 | - | ||
| 221 | - | ||
| 222 | + | Now, if we want it to look like marble, we need less oscillations. For example, we can use a half-period of 80. On marble, the black parts are very thin. We can distort the oscillation by applying the power function : an exponent between 0 and 1 will make the values closer to 1 and an exponent greater than 1 will make the values closer to 0. Let's change the oscillation like this in CreateCustomTexture : | |
| 222 | 223 | ``` | |
| 224 | + | colorOscillation := round(power((sin(p^.red*Pi/80)+1)/2,0.2)*256); | |
| 225 | + | ``` | |
| 223 | 226 | ||
| 224 | - | ||
| 227 | + | Now we have something much more like marble : | |
| 225 | 228 | ||
| 226 | - | ||
| 229 | + | [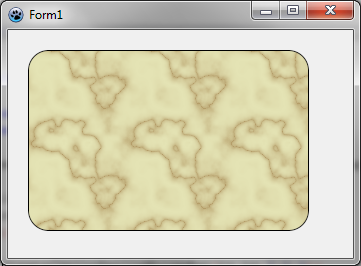](</File:BGRATutorial8f.png>) | |
| 227 | 230 | ||
| 228 | 231 | #### Wood texture | |
| 229 | 232 | ||
| 230 | - | ||
| 231 | - | ||
| 232 | - | ||
| 233 | - | ||
| 234 | - | ||
| 235 | - | ||
| 236 | - | ||
| 237 | - | ||
| 238 | - | ||
| 239 | - | ||
| 240 | - | ||
| 241 | - | ||
| 242 | - | ||
| 243 | - | ||
| 244 | - | ||
| 245 | - | ||
| 246 | - | ||
| 247 | - | ||
| 248 | - | ||
| 249 | - | ||
| 233 | + | Wood texture can be achieved with sine functions too. Wood texture contains two oscillations, one with light colors, and another one with dark colors. So we need to apply a global variation between these oscillations : | |
| 250 | 234 | ``` | |
| 251 | - | ||
| 252 | - | ||
| 235 | + | function CreateWoodTexture(tx,ty: integer): TBGRABitmap; | |
| 236 | + | var | |
| 237 | + | colorOscillation, globalColorVariation: integer; | |
| 238 | + | p: PBGRAPixel; | |
| 239 | + | i: Integer; | |
| 240 | + | begin | |
| 241 | + | result := CreateCyclicPerlinNoiseMap(tx,ty); | |
| 242 | + | p := result.Data; | |
| 243 | + | for i := 0 to result.NbPixels-1 do | |
| 244 | + | begin | |
| 245 | + | colorOscillation := round(sqrt((sin(p^.red*Pi/16)+1)/2)*256); | |
| 246 | + | globalColorVariation := p^.red; | |
| 247 | + | p^:= Interp256( Interp256(BGRA(247,188,120),BGRA(255,218,170),colorOscillation), | |
| 248 | + | Interp256(BGRA(157,97,60),BGRA(202,145,112),colorOscillation), globalColorVariation); | |
| 249 | + | inc(p); | |
| 250 | + | end; | |
| 251 | + | end; | |
| 252 | + | ``` | |
| 253 | 253 | ||
| 254 | - | ||
| 254 | + | Here the half-period is 16, and the global variation is simply the intensity. The result is something like this : | |
| 255 | 255 | ||
| 256 | - | ||
| 256 | + | [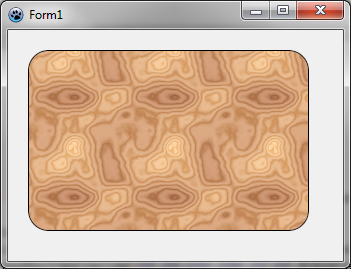](</File:BGRATutorial8g.png>) | |
| 257 | 257 | ||
| 258 | - | ||
| 259 | - | ||
| 260 | - | ||
| 261 | - | ||
| 262 | - | ||
| 263 | - | ||
| 264 | - | ||
| 265 | - | ||
| 266 | - | ||
| 267 | - | ||
| 268 | - | ||
| 269 | - | ||
| 270 | - | ||
| 271 | - | ||
| 272 | - | ||
| 273 | - | ||
| 274 | - | ||
| 275 | - | ||
| 276 | - | ||
| 277 | - | ||
| 278 | - | ||
| 279 | - | ||
| 280 | - | ||
| 281 | - | ||
| 258 | + | Most of the time, a wood texture is oriented along an axis. To do this, instead of using intensity only as a global position, we need to combine it with the x position : | |
| 282 | 259 | ``` | |
| 260 | + | function CreateVerticalWoodTexture(tx,ty: integer): TBGRABitmap; | |
| 261 | + | var | |
| 262 | + | globalPos: single; | |
| 263 | + | colorOscillation, globalColorVariation: integer; | |
| 264 | + | p: PBGRAPixel; | |
| 265 | + | i: Integer; | |
| 266 | + | x: integer; | |
| 267 | + | begin | |
| 268 | + | result := CreateCyclicPerlinNoiseMap(tx,ty); | |
| 269 | + | p := result.Data; | |
| 270 | + | x := 0; | |
| 271 | + | for i := 0 to result.NbPixels-1 do | |
| 272 | + | begin | |
| 273 | + | globalPos := p^.red*Pi/32+x*2*Pi/tx*8; | |
| 274 | + | colorOscillation := round(sqrt((sin(globalPos)+1)/2)*256); | |
| 275 | + | globalColorVariation := round(sin(globalPos/8)*128+128); | |
| 276 | + | p^:= Interp256( Interp256(BGRA(247,188,120),BGRA(255,218,170),colorOscillation), | |
| 277 | + | Interp256(BGRA(157,97,60),BGRA(202,145,112),colorOscillation), globalColorVariation); | |
| 278 | + | inc(p); | |
| 279 | + | inc(x); | |
| 280 | + | if x = tx then x := 0; | |
| 281 | + | end; | |
| 282 | + | end; | |
| 283 | + | ``` | |
| 283 | 284 | ||
| 284 | - | ||
| 285 | + | We obtain this : | |
| 285 | 286 | ||
| 286 | - | ||
| 287 | + | [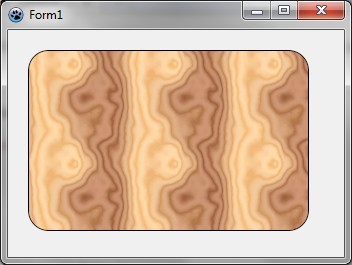](</File:Tutorial8h.png>) | |
| 287 | 288 | ||
| 288 | - | ||
| 289 | + | ||
| 290 | + | [[BGRABitmap tutorial 7/es|Tutoría anterior (splines)]] | [[BGRABitmap tutorial 9/es|Siguiente tutoría (phong shading y texturas)]] | |
| 289 | 291 | ||
| 290 | 292 | --- | |
| 291 | - | ||
| 292 | - | ||
| 293 | - | ||
| 293 | + | *From the Free Pascal wiki, page "BGRABitmap tutorial 8/es", as the Internet Archive kept it on 2022-07-03. Copyright stays with the author who wrote it, according to the old wiki's [[Licensing]] page. If you have concerns about this material, [message the admin](/wiki-contact).* |