

BGRABitmap tutorial 6: what changed
Revision 1 to 2. Removed lines have a minus sign; added lines have a plus sign.
| Old | New | Line | |
|---|---|---|---|
| 1 | 1 | This tutorial shows you how to use different line styles and shapes. | |
| 2 | 2 | ||
| 3 | 3 | ### Create a new project | |
| 4 | 4 | ||
| 5 | 5 | Create a new project and add a reference to [[BGRABitmap]], the same way as in [[BGRABitmap tutorial|the first tutorial]]. | |
| 6 | 6 | ||
| 7 | 7 | ### Add a painting handler | |
| 8 | 8 | ||
| 9 | 9 | With the object inspector, add an OnPaint handler and write: | |
| 10 | 10 | ||
| 11 | 11 | ``` pascal | |
| 12 | 12 | procedure TForm1.FormPaint(Sender: TObject); | |
| 13 | 13 | var image: TBGRABitmap; | |
| 14 | 14 | c: TBGRAPixel; | |
| 15 | 15 | begin | |
| 16 | 16 | image := TBGRABitmap.Create(ClientWidth, ClientHeight, clBtnFace); | |
| 17 | 17 | c := clWindowText; | |
| 18 | 18 | ||
| 19 | 19 | image.RectangleAntialias(80,80,300,200, c, 50); | |
| 20 | 20 | ||
| 21 | 21 | image.Draw(Canvas,0,0,True); | |
| 22 | 22 | image.free; | |
| 23 | 23 | end; | |
| 24 | 24 | ``` | |
| 25 | 25 | ||
| 26 | 26 | ### Run the program | |
| 27 | 27 | ||
| 28 | 28 | This should draw a rectangle with a wide black pen. | |
| 29 | 29 | ||
| 30 | - | ||
| 31 | - | ||
| 32 | - | ||
| 33 | - | ||
| 30 | + | 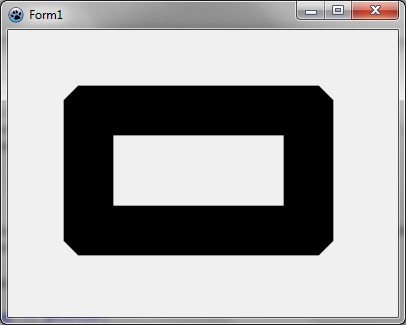 | |
| 34 | 31 | ||
| 35 | 32 | ### Change join style | |
| 36 | 33 | ||
| 37 | 34 | If you want round corners, you can specify: | |
| 38 | 35 | ||
| 39 | 36 | ``` pascal | |
| 40 | 37 | image.JoinStyle := pjsRound; | |
| 41 | 38 | ``` | |
| 42 | 39 | ||
| 43 | 40 | ### Run the program | |
| 44 | 41 | ||
| 45 | 42 | This should draw a rectangle with a wide black pen with rounded corners. | |
| 46 | 43 | ||
| 47 | - | ||
| 48 | - | ||
| 49 | - | ||
| 50 | - | ||
| 44 | + | 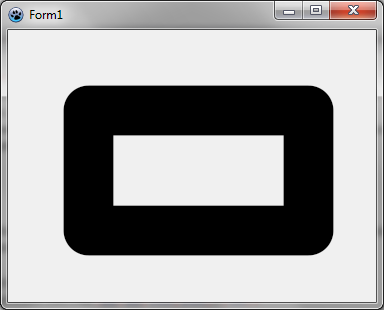 | |
| 51 | 45 | ||
| 52 | 46 | ### Mix join styles | |
| 53 | 47 | ||
| 54 | 48 | You can mix join styles for a rectangle like this: | |
| 55 | 49 | ||
| 56 | 50 | ``` pascal | |
| 57 | 51 | image.FillRoundRectAntialias(80,80,300,200, 20,20, c, [rrTopRightSquare,rrBottomLeftSquare]); | |
| 58 | 52 | ``` | |
| 59 | 53 | ||
| 60 | 54 | This function use round corners by default, but you can override it with square corners or bevel corners. You should obtain the following image. | |
| 61 | 55 | ||
| 62 | - | ||
| 63 | - | ||
| 64 | - | ||
| 65 | - | ||
| 56 | + | 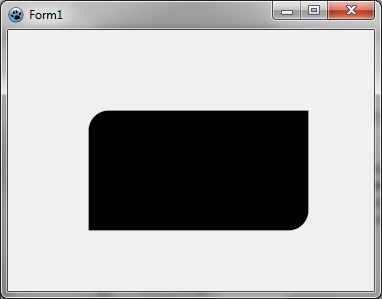 | |
| 66 | 57 | ||
| 67 | 58 | ### Change pen style | |
| 68 | 59 | ||
| 69 | 60 | You can draw a dotted line like this: | |
| 70 | 61 | ||
| 71 | 62 | ``` pascal | |
| 72 | 63 | image.JoinStyle := pjsBevel; | |
| 73 | 64 | image.PenStyle := psDot; | |
| 74 | 65 | image.DrawPolyLineAntialias([PointF(40,200), PointF(120,100), PointF(170,140), PointF(250,60)],c,10); | |
| 75 | 66 | ``` | |
| 76 | 67 | ||
| 77 | - | ||
| 78 | - | ||
| 79 | - | ||
| 80 | - | ||
| 81 | - | ||
| 82 | - | ||
| 83 | 68 | Note that the pen style can be defined independently of a bitmap by using the TBGRAPenStroker class of the BGRAPen[1](https://github.com/bgrabitmap/bgrabitmap/blob/master/bgrabitmap/bgrapen.pas) unit. | |
| 84 | 69 | ||
| 85 | - | ||
| 86 | - | ||
| 87 | - | ||
| 88 | - | ||
| 89 | - | ||
| 90 | - | ||
| 91 | 70 | You should obtain the following image. Notice that line begins with a round cap. | |
| 92 | 71 | ||
| 93 | - | ||
| 94 | - | ||
| 95 | - | ||
| 96 | - | ||
| 72 | + | 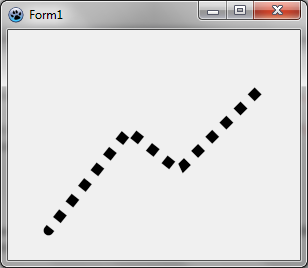 | |
| 97 | 73 | ||
| 98 | 74 | ### Change line cap | |
| 99 | 75 | ||
| 100 | 76 | You can draw a polyline with a square cap like this: | |
| 101 | 77 | ||
| 102 | 78 | ``` pascal | |
| 103 | 79 | image.JoinStyle := pjsBevel; | |
| 104 | 80 | image.LineCap := pecSquare; | |
| 105 | 81 | image.PenStyle := psSolid; | |
| 106 | 82 | image.DrawPolyLineAntialias([PointF(40,200), PointF(120,100), PointF(170,140), PointF(250,60)],c,10); | |
| 107 | 83 | ``` | |
| 108 | 84 | ||
| 109 | - | ||
| 110 | - | ||
| 111 | - | ||
| 112 | - | ||
| 85 | + | 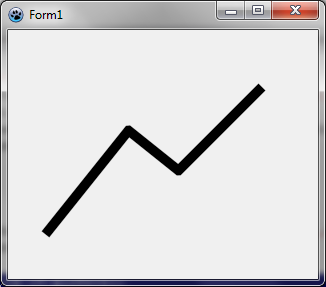 | |
| 113 | 86 | ||
| 114 | 87 | ### Opened line drawing | |
| 115 | 88 | ||
| 116 | 89 | You can draw a line which is opened, i.e. the end of the line is rounded inside. | |
| 117 | 90 | ||
| 118 | 91 | ``` pascal | |
| 119 | 92 | image.DrawPolyLineAntialias([PointF(40,200), PointF(120,100), PointF(170,140), PointF(250,60)],c,10,False); | |
| 120 | 93 | ``` | |
| 121 | 94 | ||
| 122 | - | ||
| 123 | - | ||
| 124 | - | ||
| 125 | - | ||
| 95 | + | 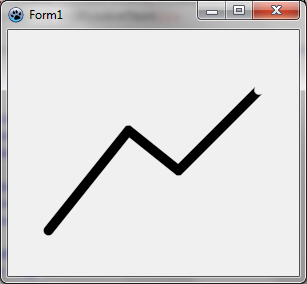 | |
| 126 | 96 | ||
| 127 | 97 | This way you can connect lines one after another without drawing the junction twice, which is useful with semi-transparent drawing. You can compare it like this: | |
| 128 | 98 | ||
| 129 | 99 | ``` pascal | |
| 130 | 100 | c := BGRA(0,0,0,128); | |
| 131 | 101 | ||
| 132 | 102 | image.DrawLineAntialias(40,150, 120,50, c, 10); | |
| 133 | 103 | image.DrawLineAntialias(120,50, 170,90, c, 10); | |
| 134 | 104 | image.DrawLineAntialias(170,90, 250,10, c, 10); | |
| 135 | 105 | ||
| 136 | 106 | image.DrawLineAntialias(40,250, 120,150, c, 10, False); | |
| 137 | 107 | image.DrawLineAntialias(120,150, 170,190, c, 10, False); | |
| 138 | 108 | image.DrawLineAntialias(170,190, 250,110, c, 10, True); | |
| 139 | 109 | ``` | |
| 140 | 110 | ||
| 141 | - | ||
| 142 | - | ||
| 143 | - | ||
| 144 | - | ||
| 111 | + | 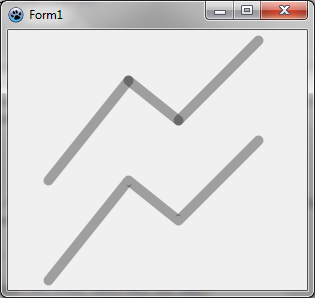 | |
| 145 | 112 | ||
| 146 | 113 | [[BGRABitmap tutorial 5|Previous tutorial (layers and masks)]] [[BGRABitmap tutorial 7|Next tutorial (splines)]] | |
| 147 | 114 | ||
| 148 | 115 | --- | |
| 149 | 116 | *From the Free Pascal wiki, page "BGRABitmap tutorial 6", as it stood on 2024-02-15 after a change by Circular, out of the wiki's dump of 2024-05-26. Copyright stays with the author who wrote it, according to the old wiki's [[Licensing]] page. If you have concerns about this material, [message the admin](/wiki-contact).* | |
| 150 | 117 | Category: BGRABitmap | |
| 151 | 118 | Category: Graphics |