

BGRABitmap tutorial 6/fr: what changed
Revision 1 to 2. Removed lines have a minus sign; added lines have a plus sign.
| Old | New | Line | |
|---|---|---|---|
| 1 | - | ||
| 1 | + | [[BGRABitmap tutorial/fr|**Accueil**]] | [[BGRABitmap tutorial 1/fr|**Tutoriel 1**]] | [[BGRABitmap tutorial 2/fr|**Tutoriel 2**]] | [[BGRABitmap tutorial 3/fr|**Tutoriel 3**]] | [[BGRABitmap tutorial 4/fr|**Tutoriel 4**]] | [[BGRABitmap tutorial 5/fr|**Tutoriel 5**]] | **Tutoriel 6** | [[BGRABitmap tutorial 7/fr|**Tutoriel 7**]] | [[BGRABitmap tutorial 8/fr|**Tutoriel 8**]] | [[BGRABitmap tutorial 9/fr|**Tutoriel 9**]] | [[BGRABitmap tutorial 10/fr|**Tutoriel 10**]] | [[BGRABitmap tutorial 11/fr|**Tutoriel 11**]] | [[BGRABitmap tutorial 12/fr|**Tutoriel 12**]] | [Edit](<http://wiki.lazarus.freepascal.org/index.php?title=Template:BGRABitmap_tutorial_index/fr&action=edit>) | |
| 2 | 2 | ||
| 3 | - | ||
| 3 | + | Ce tutoriel montre comment utiliser les différents styles de lignes et les formes. | |
| 4 | 4 | ||
| 5 | - | ||
| 5 | + | ## Contents | |
| 6 | 6 | ||
| 7 | - | ||
| 7 | + | * 1 Création d'un nouveau projet | |
| 8 | + | * 2 Ajout d'un dessin | |
| 9 | + | * 3 Exécution du programme | |
| 10 | + | * 4 Changer le style de jointures | |
| 11 | + | * 5 Exécution du programme | |
| 12 | + | * 6 Mélanger les styles de jointures | |
| 13 | + | * 7 Changer le style de ligne | |
| 14 | + | * 8 Changer les extrémités des lignes | |
| 15 | + | * 9 Dessin d'une ligne ouverte | |
| 8 | 16 | ||
| 9 | - | ||
| 17 | + | ### Création d'un nouveau projet | |
| 10 | 18 | ||
| 11 | - | ||
| 12 | - | ||
| 13 | - | ||
| 14 | - | ||
| 15 | - | ||
| 16 | - | ||
| 17 | - | ||
| 19 | + | Créez un nouveau projet et ajoutez la référence à [[BGRABitmap]], de la même façon que dans [[BGRABitmap tutorial/fr|le premier tutoriel]]. | |
| 18 | 20 | ||
| 19 | - | ||
| 21 | + | ### Ajout d'un dessin | |
| 20 | 22 | ||
| 21 | - | ||
| 22 | - | ||
| 23 | - | ||
| 23 | + | Avec l'inspecteur de projet, ajoutez un gestionnaire _OnPaint_ : | |
| 24 | 24 | ``` | |
| 25 | + | procedure TForm1.FormPaint(Sender: TObject); | |
| 26 | + | var image: TBGRABitmap; | |
| 27 | + | c: TBGRAPixel; | |
| 28 | + | begin | |
| 29 | + | image := TBGRABitmap.Create(ClientWidth, ClientHeight, clBtnFace); | |
| 30 | + | c := clWindowText; | |
| 31 | + | ||
| 32 | + | image.RectangleAntialias(80,80,300,200, c, 50); | |
| 33 | + | ||
| 34 | + | image.Draw(Canvas,0,0,True); | |
| 35 | + | image.free; | |
| 36 | + | end; | |
| 37 | + | ``` | |
| 25 | 38 | ||
| 26 | 39 | ### Exécution du programme | |
| 27 | 40 | ||
| 28 | - | ||
| 41 | + | Vous devriez obtenir un rectangle avec un pinceau noir épais : | |
| 29 | 42 | ||
| 30 | - | ||
| 31 | - | ||
| 32 | - | ||
| 33 | - | ||
| 43 | + | [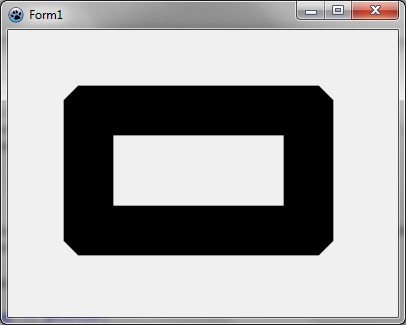](</File:BGRATutorial6a.png>) | |
| 34 | 44 | ||
| 35 | 45 | ### Changer le style de jointures | |
| 36 | 46 | ||
| 37 | - | ||
| 38 | - | ||
| 39 | - | ||
| 40 | - | ||
| 47 | + | Si vous voulez des coins ronds, vous pouvez spécifier : | |
| 41 | 48 | ``` | |
| 49 | + | image.JoinStyle := pjsRound; | |
| 50 | + | ``` | |
| 42 | 51 | ||
| 43 | 52 | ### Exécution du programme | |
| 44 | 53 | ||
| 45 | - | ||
| 54 | + | Le programme devrait dessiner à présent un rectangle avec des coins arrondis : | |
| 46 | 55 | ||
| 47 | - | ||
| 48 | - | ||
| 49 | - | ||
| 50 | - | ||
| 56 | + | [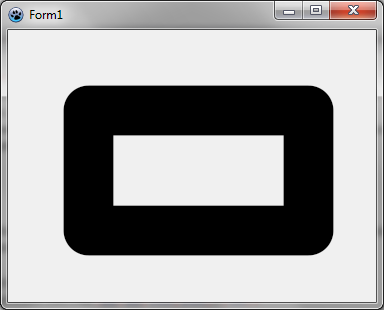](</File:BGRATutorial6b.png>) | |
| 51 | 57 | ||
| 52 | 58 | ### Mélanger les styles de jointures | |
| 53 | 59 | ||
| 54 | - | ||
| 55 | - | ||
| 56 | - | ||
| 57 | - | ||
| 60 | + | Vous pouvez mélanger les styles de jointures comme ceci : | |
| 58 | 61 | ``` | |
| 62 | + | image.FillRoundRectAntialias(80,80,300,200, 20,20, c, [rrTopRightSquare,rrBottomLeftSquare]); | |
| 63 | + | ``` | |
| 59 | 64 | ||
| 60 | - | ||
| 65 | + | Cette fonction utilise des coins ronds par défaut, mais vous pouvez les remplacer par des coins carrés ou en biseau. Vous devriez obtenir l'image suivante : | |
| 61 | 66 | ||
| 62 | - | ||
| 63 | - | ||
| 64 | - | ||
| 65 | - | ||
| 67 | + | [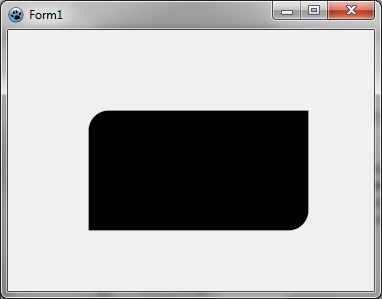](</File:BGRATutorial6e.png>) | |
| 66 | 68 | ||
| 67 | 69 | ### Changer le style de ligne | |
| 68 | 70 | ||
| 69 | - | ||
| 70 | - | ||
| 71 | - | ||
| 72 | - | ||
| 73 | - | ||
| 74 | - | ||
| 71 | + | Vous pouvez dessiner une ligne en pointillés comme cela : | |
| 75 | 72 | ``` | |
| 73 | + | image.JoinStyle := pjsBevel; | |
| 74 | + | image.PenStyle := psDot; | |
| 75 | + | image.DrawPolyLineAntialias([PointF(40,200), PointF(120,100), PointF(170,140), PointF(250,60)],c,10); | |
| 76 | + | ``` | |
| 76 | 77 | ||
| 77 | - | ||
| 78 | + | Notez que l'extrémité de la ligne est arrondie. | |
| 78 | 79 | ||
| 79 | - | ||
| 80 | - | ||
| 81 | - | ||
| 82 | - | ||
| 80 | + | [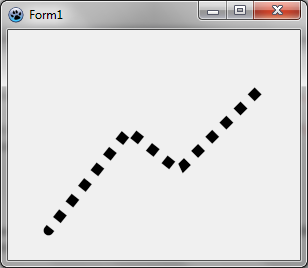](</File:Tutorial6c.png>) | |
| 83 | 81 | ||
| 84 | 82 | ### Changer les extrémités des lignes | |
| 85 | 83 | ||
| 86 | - | ||
| 87 | - | ||
| 88 | - | ||
| 89 | - | ||
| 90 | - | ||
| 91 | - | ||
| 92 | - | ||
| 84 | + | Vous pouvez dessiner une polyligne avec des extrémités carrées comme cela : | |
| 93 | 85 | ``` | |
| 86 | + | image.JoinStyle := pjsBevel; | |
| 87 | + | image.LineCap := pecSquare; | |
| 88 | + | image.PenStyle := psSolid; | |
| 89 | + | image.DrawPolyLineAntialias([PointF(40,200), PointF(120,100), PointF(170,140), PointF(250,60)],c,10); | |
| 90 | + | ``` | |
| 94 | 91 | ||
| 95 | - | ||
| 96 | - | ||
| 97 | - | ||
| 98 | - | ||
| 92 | + | [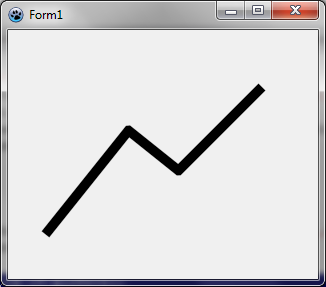](</File:BGRATutorial6d.png>) | |
| 99 | 93 | ||
| 100 | 94 | ### Dessin d'une ligne ouverte | |
| 101 | 95 | ||
| 102 | - | ||
| 103 | - | ||
| 104 | - | ||
| 105 | - | ||
| 96 | + | Vous pouvez dessiner une ligne qui est ouverte, c'est-à-dire que la fin de la ligne est arrondie à l'intérieur. | |
| 106 | 97 | ``` | |
| 107 | - | ||
| 108 | - | ||
| 109 | - | ||
| 110 | - | ||
| 111 | - | ||
| 112 | - | ||
| 113 | - | ||
| 114 | - | ||
| 115 | - | ||
| 116 | - | ||
| 98 | + | image.DrawPolyLineAntialias([PointF(40,200), PointF(120,100), PointF(170,140), PointF(250,60)],c,10,False); | |
| 99 | + | ``` | |
| 117 | 100 | ||
| 118 | - | ||
| 119 | - | ||
| 120 | - | ||
| 101 | + | [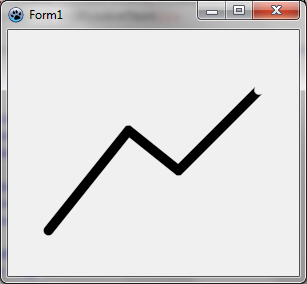](</File:BGRATutorial6f.png>) | |
| 121 | 102 | ||
| 122 | - | ||
| 123 | - | ||
| 124 | - | ||
| 103 | + | De cette façon, vous pouvez connecter des lignes les unes après les autres sans dessiner la jonction deux fois, ce qui est utile avec le dessin semi-transparent. Vous pouvez comparer comme cela : | |
| 125 | 104 | ``` | |
| 105 | + | c := BGRA(0,0,0,128); | |
| 106 | + | ||
| 107 | + | image.DrawLineAntialias(40,150, 120,50, c, 10); | |
| 108 | + | image.DrawLineAntialias(120,50, 170,90, c, 10); | |
| 109 | + | image.DrawLineAntialias(170,90, 250,10, c, 10); | |
| 110 | + | ||
| 111 | + | image.DrawLineAntialias(40,250, 120,150, c, 10, False); | |
| 112 | + | image.DrawLineAntialias(120,150, 170,190, c, 10, False); | |
| 113 | + | image.DrawLineAntialias(170,190, 250,110, c, 10, True); | |
| 114 | + | ``` | |
| 126 | 115 | ||
| 127 | - | ||
| 128 | - | ||
| 129 | - | ||
| 130 | - | ||
| 116 | + | [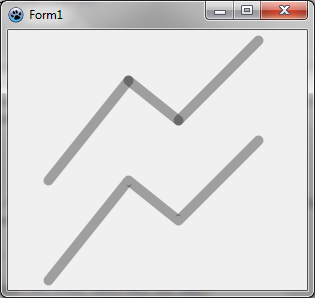](</File:Tutorial6g.png>) | |
| 131 | 117 | ||
| 132 | 118 | [[BGRABitmap tutorial 5/fr|Tutoriel précédent (couches et masques)]] [[BGRABitmap tutorial 7/fr|Tutoriel suivant (splines)]] | |
| 133 | 119 | ||
| 134 | 120 | --- | |
| 135 | - | ||
| 121 | + | *From the Free Pascal wiki, page "BGRABitmap tutorial 6/fr", as the Internet Archive kept it on 2024-09-06. Copyright stays with the author who wrote it, according to the old wiki's [[Licensing]] page. If you have concerns about this material, [message the admin](/wiki-contact).* |