

BGRABitmap tutorial 4: what changed
Revision 2 to 3. Removed lines have a minus sign; added lines have a plus sign.
| Old | New | Line | |
|---|---|---|---|
| 1 | 1 | This tutorial shows you how to access directly to pixels. See reference on [[TBGRABitmap class|direct pixel access]]. | |
| 2 | 2 | ||
| 3 | 3 | ## Create a new project | |
| 4 | 4 | ||
| 5 | 5 | Create a new project and add a reference to [[BGRABitmap]], the same way as in [[BGRABitmap tutorial|the first tutorial]]. | |
| 6 | 6 | ||
| 7 | 7 | ### Add a painting handler | |
| 8 | 8 | ||
| 9 | 9 | With the object inspector, add an OnPaint handler and write: | |
| 10 | 10 | ||
| 11 | 11 | ``` pascal | |
| 12 | 12 | procedure TForm1.FormPaint(Sender: TObject); | |
| 13 | 13 | var | |
| 14 | 14 | x, y: integer; | |
| 15 | 15 | p: PBGRAPixel; | |
| 16 | 16 | image: TBGRABitmap; | |
| 17 | 17 | begin | |
| 18 | 18 | image := TBGRABitmap.Create(ClientWidth, ClientHeight); | |
| 19 | 19 | ||
| 20 | 20 | for y := 0 to image.Height-1 do | |
| 21 | 21 | begin | |
| 22 | 22 | p := image.Scanline[y]; | |
| 23 | 23 | for x := 0 to image.Width-1 do | |
| 24 | 24 | begin | |
| 25 | 25 | p^.red := x * 256 div image.Width; | |
| 26 | 26 | p^.green := y * 256 div image.Height; | |
| 27 | 27 | p^.blue := 0; | |
| 28 | 28 | p^.alpha := 255; | |
| 29 | 29 | inc(p); | |
| 30 | 30 | end; | |
| 31 | 31 | end; | |
| 32 | 32 | image.InvalidateBitmap; // changed by direct access | |
| 33 | 33 | ||
| 34 | 34 | image.Draw(Canvas, 0, 0, True); | |
| 35 | 35 | image.free; | |
| 36 | 36 | end; | |
| 37 | 37 | ``` | |
| 38 | 38 | ||
| 39 | 39 | This procedure creates a bitmap of the same size as the available client space. Then the loops access directly to pixel data to render a bidimensional gradient. Finally the image is drawn and freed. | |
| 40 | 40 | ||
| 41 | 41 | To access to bitmap data, you can either use Data, if you do not mind the line order, or Scanline to access to a specific line. Within a line, pixels are ordered from left to right. Each component is defined. For example: | |
| 42 | 42 | ||
| 43 | 43 | ``` pascal | |
| 44 | 44 | p^.red := x*256 div image.Width; | |
| 45 | 45 | ``` | |
| 46 | 46 | ||
| 47 | 47 | Defines a red component varying from 0 to 255 from left to right. The maximum value image.Width is never reached by x, so the red component never reach 256. | |
| 48 | 48 | ||
| 49 | 49 | ### Run the program | |
| 50 | 50 | ||
| 51 | 51 | You should see a form with a gradient where corners are black, red, yellow and green. When you resize the form, the gradient is resized accordingly. | |
| 52 | 52 | ||
| 53 | 53 | 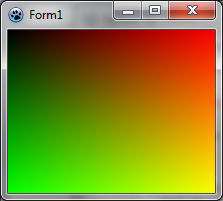 | |
| 54 | 54 | ||
| 55 | 55 | ## Using HSLA colorspace | |
| 56 | 56 | ||
| 57 | 57 | You can use hue, saturation, and lightness. To do this, declare a [[BGRABitmap Pixel types|THSLAPixel]]. It's values range from 0 to 65535. To convert it to standard RGB pixel, use HSLAToBGRA. | |
| 58 | 58 | ||
| 59 | 59 | ``` pascal | |
| 60 | 60 | procedure TForm1.FormPaint(Sender: TObject); | |
| 61 | 61 | var x,y: integer; | |
| 62 | 62 | p: PBGRAPixel; | |
| 63 | 63 | image: TBGRABitmap; | |
| 64 | 64 | hsla: THSLAPixel; | |
| 65 | 65 | begin | |
| 66 | 66 | image := TBGRABitmap.Create(ClientWidth,ClientHeight); | |
| 67 | 67 | hsla.lightness := 32768; | |
| 68 | 68 | hsla.alpha := 65535; | |
| 69 | 69 | for y := 0 to image.Height-1 do | |
| 70 | 70 | begin | |
| 71 | 71 | p := image.Scanline[y]; | |
| 72 | 72 | hsla.saturation := y*65536 div image.Height; | |
| 73 | 73 | for x := 0 to image.Width-1 do | |
| 74 | 74 | begin | |
| 75 | 75 | hsla.hue := x*65536 div image.Width; | |
| 76 | 76 | p^:= HSLAToBGRA(hsla); | |
| 77 | 77 | inc(p); | |
| 78 | 78 | end; | |
| 79 | 79 | end; | |
| 80 | 80 | image.InvalidateBitmap; // changed by direct access | |
| 81 | 81 | ||
| 82 | 82 | image.Draw(Canvas,0,0,True); | |
| 83 | 83 | image.free; | |
| 84 | 84 | end; | |
| 85 | 85 | ``` | |
| 86 | 86 | ||
| 87 | 87 | 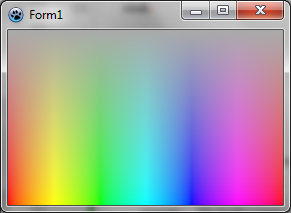 | |
| 88 | 88 | ||
| 89 | 89 | #### Color correction | |
| 90 | 90 | ||
| 91 | 91 | HSLA colors have gamma correction, but there are other possible corrections. For example, H means "hue". In the classical version of HSLA model, each range between primary colors (red/green/blue) is represented by 120 degrees, which equals 21845 colors in [[BGRABitmap Pixel types|THSLAPixel]]. However, we do not perceive the same differences of colors in these different ranges. The functions HtoG and GtoH apply or unapply a correction, where in the G hue, ranges are not of the same size. To get a corrected hue, write: | |
| 92 | 92 | ||
| 93 | 93 | ``` pascal | |
| 94 | 94 | hsla.hue := GtoH(x*65536 div image.Width); | |
| 95 | 95 | ``` | |
| 96 | 96 | ||
| 97 | 97 | Notice that the range of oranges is wider. Finally, in the HSLA model, the lightness L does not correspond to the perceived lightness. Instead of only correcting the hue, you can use GSBAToBGRA and BGRAToGSBA instead of HLSAToBGRA and BGRAToHSLA. The G here means that the hue is automatically corrected and the B means it's the perceived lightness (sometimes called Brightness) which is taken into account. So you don't need to call GtoH and HtoG explicitely. | |
| 98 | 98 | ||
| 99 | 99 | The code simple becomes: | |
| 100 | 100 | ||
| 101 | 101 | ``` pascal | |
| 102 | 102 | procedure TForm1.FormPaint(Sender: TObject); | |
| 103 | 103 | var x,y: integer; | |
| 104 | 104 | p: PBGRAPixel; | |
| 105 | 105 | image: TBGRABitmap; | |
| 106 | 106 | hsla: THSLAPixel; | |
| 107 | 107 | begin | |
| 108 | 108 | image := TBGRABitmap.Create(ClientWidth,ClientHeight); | |
| 109 | 109 | hsla.lightness := 32768; | |
| 110 | 110 | hsla.alpha := 65535; | |
| 111 | 111 | for y := 0 to image.Height-1 do | |
| 112 | 112 | begin | |
| 113 | 113 | p := image.Scanline[y]; | |
| 114 | 114 | hsla.saturation := y*65536 div image.Height; | |
| 115 | 115 | for x := 0 to image.Width-1 do | |
| 116 | 116 | begin | |
| 117 | 117 | hsla.hue := x*65536 div image.Width; | |
| 118 | 118 | p^:= GSBAToBGRA(hsla); | |
| 119 | 119 | inc(p); | |
| 120 | 120 | end; | |
| 121 | 121 | end; | |
| 122 | 122 | image.InvalidateBitmap; // changed by direct access | |
| 123 | 123 | ||
| 124 | 124 | image.Draw(Canvas,0,0,True); | |
| 125 | 125 | image.free; | |
| 126 | 126 | end; | |
| 127 | 127 | ``` | |
| 128 | 128 | ||
| 129 | 129 | Note that the THSLAPixel type is used, whatever the correction of the color model. | |
| 130 | 130 | ||
| 131 | 131 | ### Run the program | |
| 132 | 132 | ||
| 133 | 133 | With full color correction, the gradient is more progressive, and looks like what you would obtain with the Lab color model. | |
| 134 | 134 | ||
| 135 | 135 | 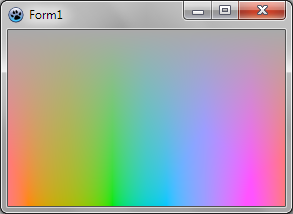 | |
| 136 | 136 | ||
| 137 | 137 | ## Using TXYZABitmap | |
| 138 | 138 | ||
| 139 | 139 | Instead of converting directly the values of pixels, it is possible to use a bitmap with another pixel format. Here is how to use the XYZA colorspace. | |
| 140 | 140 | ||
| 141 | 141 | The TXYZA type contains floating point values from 0 to 1. In the example, the Y value (lightness) is set to 0.5 while the X and Z values varies to express different hues. | |
| 142 | 142 | ||
| 143 | 143 | The X and Z channels can be greater than one depending on the illuminant and typically in daylight the Z value for the brightest white is slightly greater than 1. In theory the Y channel can be greater than one as well if it expresses a light source stronger than the illuminant, but that will saturate when rendering it on a screen. | |
| 144 | 144 | ||
| 145 | 145 | Also here the GetCanvasScaleFactor function (value 1 or greater) is used to determine if there is a Retina display for which the coordinates can be double the pixel size. So in this case, we need to prepare a bitmap that is twice as big and in the end draw it zoomed out. | |
| 146 | 146 | ||
| 147 | 147 | To render on screen, the bitmap needs to be drawn on a BGRA bitmap. | |
| 148 | 148 | ||
| 149 | 149 | ``` pascal | |
| 150 | 150 | uses BGRABitmap, BGRABitmapTypes, XYZABitmap; | |
| 151 | 151 | ||
| 152 | 152 | procedure TForm1.FormPaint(Sender: TObject); | |
| 153 | 153 | var x,y: integer; | |
| 154 | 154 | image: TBGRABitmap; | |
| 155 | 155 | xyzImage: TXYZABitmap; | |
| 156 | 156 | p: PXYZA; | |
| 157 | 157 | xyz: TXYZA; | |
| 158 | 158 | begin | |
| 159 | 159 | // create a bitmap with XYZA colorspace | |
| 160 | 160 | // and take into account the scale factor (for MacOS) | |
| 161 | 161 | xyzImage := TXYZABitmap.Create(round(ClientWidth * GetCanvasScaleFactor), | |
| 162 | 162 | round(ClientHeight * GetCanvasScaleFactor)); | |
| 163 | 163 | xyz.alpha := 1; | |
| 164 | 164 | xyz.Y := 0.5; | |
| 165 | 165 | for y := 0 to xyzImage.Height-1 do | |
| 166 | 166 | begin | |
| 167 | 167 | p := xyzImage.Scanline[y]; | |
| 168 | 168 | xyz.x := 0.35 + y/xyzImage.Height*0.3; | |
| 169 | 169 | for x := 0 to xyzImage.Width-1 do | |
| 170 | 170 | begin | |
| 171 | 171 | xyz.z := 0.15 + x/xyzImage.Width*0.5; | |
| 172 | 172 | p^:= xyz; | |
| 173 | 173 | inc(p); | |
| 174 | 174 | end; | |
| 175 | 175 | end; | |
| 176 | 176 | xyzImage.InvalidateBitmap; // changed by direct access | |
| 177 | 177 | ||
| 178 | 178 | // draw the XYZA bitmap on a BGRA bitmap for display | |
| 179 | 179 | image := TBGRABitmap.Create(xyzImage.Width, xyzImage.Height); | |
| 180 | 180 | image.PutImage(0,0, xyzImage, dmSet); | |
| 181 | 181 | // stretch (reduce) because of scale factor | |
| 182 | 182 | image.Draw(Canvas, rect(0,0,ClientWidth,ClientHeight), True); | |
| 183 | 183 | image.free; | |
| 184 | 184 | end; | |
| 185 | 185 | ``` | |
| 186 | 186 | ||
| 187 | - | ||
| 187 | + | 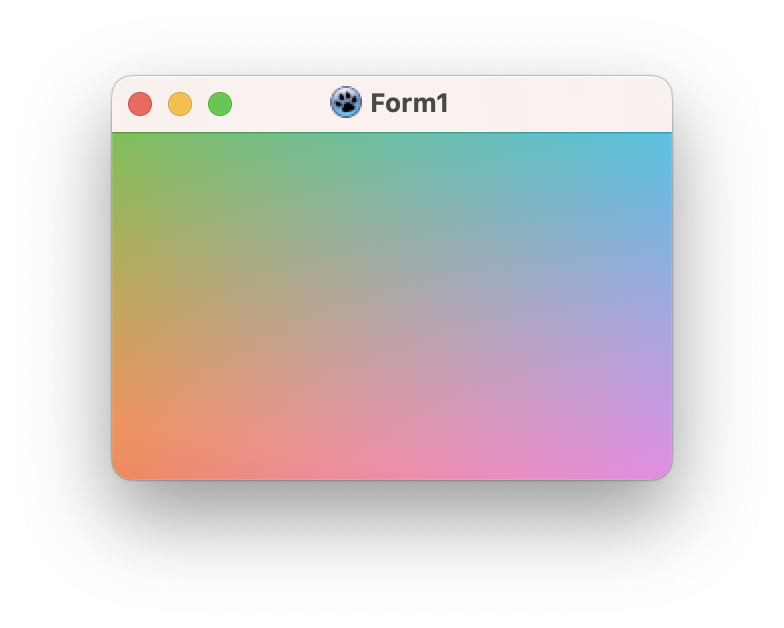 | |
| 188 | 188 | ||
| 189 | 189 | [[BGRABitmap tutorial 3|Previous tutorial (drawing with the mouse)]] \| [[BGRABitmap tutorial 5|Next tutorial (layers and masks)]] | |
| 190 | 190 | ||
| 191 | 191 | --- | |
| 192 | 192 | *From the Free Pascal wiki, page "BGRABitmap tutorial 4", as it stood on 2023-01-02 after a change by Circular, out of the wiki's dump of 2024-05-26. Copyright stays with the author who wrote it, according to the old wiki's [[Licensing]] page. If you have concerns about this material, [message the admin](/wiki-contact).* | |
| 193 | 193 | Category: BGRABitmap | |
| 194 | 194 | Category: Graphics |