

BGRABitmap tutorial 2/fr: what changed
Revision 1 to 2. Removed lines have a minus sign; added lines have a plus sign.
| Old | New | Line | |
|---|---|---|---|
| 1 | - | ||
| 1 | + | [[BGRABitmap tutorial/fr|**Accueil**]] | [[BGRABitmap tutorial 1/fr|**Tutoriel 1**]] | **Tutoriel 2** | [[BGRABitmap tutorial 3/fr|**Tutoriel 3**]] | [[BGRABitmap tutorial 4/fr|**Tutoriel 4**]] | [[BGRABitmap tutorial 5/fr|**Tutoriel 5**]] | [[BGRABitmap tutorial 6/fr|**Tutoriel 6**]] | [[BGRABitmap tutorial 7/fr|**Tutoriel 7**]] | [[BGRABitmap tutorial 8/fr|**Tutoriel 8**]] | [[BGRABitmap tutorial 9/fr|**Tutoriel 9**]] | [[BGRABitmap tutorial 10/fr|**Tutoriel 10**]] | [[BGRABitmap tutorial 11/fr|**Tutoriel 11**]] | [[BGRABitmap tutorial 12/fr|**Tutoriel 12**]] | [Edit](<http://wiki.lazarus.freepascal.org/index.php?title=Template:BGRABitmap_tutorial_index/fr&action=edit>) | |
| 2 | 2 | ||
| 3 | + | Ce tutoriel montre comment charger une image et la dessiner sur la fenêtre. | |
| 4 | + | ||
| 5 | + | ## Contents | |
| 6 | + | ||
| 7 | + | * 1 Création d'un nouveau projet | |
| 8 | + | * 2 Chargement de l'image | |
| 9 | + | * 3 Dessiner l'image | |
| 10 | + | * 4 Code | |
| 11 | + | * 5 Exécution du programme | |
| 12 | + | * 6 Centrer l'image | |
| 13 | + | * 7 Étirer une image | |
| 14 | + | ||
| 3 | 15 | ### Création d'un nouveau projet | |
| 4 | 16 | ||
| 5 | - | ||
| 17 | + | Créez un nouveau projet et ajoutez la référence à [[BGRABitmap]], de la même façon que dans [[BGRABitmap tutorial/fr|le premier tutoriel]]. | |
| 6 | 18 | ||
| 7 | 19 | ### Chargement de l'image | |
| 8 | 20 | ||
| 9 | - | ||
| 10 | - | ||
| 11 | - | ||
| 21 | + | Copiez une image dans le répertoire du projet. Supposons que son nom soit _image.png_. | |
| 12 | 22 | ||
| 13 | - | ||
| 14 | - | ||
| 15 | - | ||
| 16 | - | ||
| 17 | - | ||
| 18 | - | ||
| 19 | - | ||
| 20 | - | ||
| 23 | + | Ajoutez une variable privée à la fenêtre principale pour stocker l'image : | |
| 21 | 24 | ``` | |
| 22 | - | ||
| 23 | - | ||
| 25 | + | TForm1 = class(TForm) | |
| 26 | + | private | |
| 27 | + | { private declarations } | |
| 28 | + | image: TBGRABitmap; | |
| 29 | + | public | |
| 30 | + | { public declarations } | |
| 31 | + | end; | |
| 32 | + | ``` | |
| 24 | 33 | ||
| 25 | - | ||
| 34 | + | Programmez le chargement de l'image quand la fenêtre est créée. Pour cela, double-cliquez sur la fenêtre. Une procédure devrait apparaître dans l'éditeur de code. Ajoutez-y l'instruction de chargement : | |
| 35 | + | ``` | |
| 26 | 36 | procedure TForm1.FormCreate(Sender: TObject); | |
| 27 | - | ||
| 28 | - | ||
| 29 | - | ||
| 37 | + | begin | |
| 38 | + | image := TBGRABitmap.Create('image.png'); | |
| 39 | + | end; | |
| 30 | 40 | ``` | |
| 31 | 41 | ||
| 32 | 42 | ### Dessiner l'image | |
| 33 | 43 | ||
| 34 | - | ||
| 35 | - | ||
| 36 | - | ||
| 44 | + | Ajoutez un gestionnaire _OnPaint_. Pour cela, cliquez sur la fenêtre, allez dans l'inspecteur d'objet, dans l'onglet événement et double-cliquez sur la ligne _OnPaint_. Ensuite, ajoutez le code suivant : | |
| 45 | + | ``` | |
| 37 | 46 | procedure TForm1.FormPaint(Sender: TObject); | |
| 38 | - | ||
| 39 | - | ||
| 40 | - | ||
| 47 | + | begin | |
| 48 | + | image.Draw(Canvas,0,0,True); | |
| 49 | + | end; | |
| 41 | 50 | ``` | |
| 42 | 51 | ||
| 43 | - | ||
| 52 | + | Remarquez que le dernier paramètre est à _True_ , ce qui signifie opaque. Si vous voulez prendre en compte les pixels transparents, encodés dans le canal alpha, vous devez mettre _False_ à la place. Mais cela peut être lent de dessiner avec transparence sur un _Canvas_ standard, alors si la transparence n'est pas nécessaire, utilisez le dessin opaque seulement. | |
| 44 | 53 | ||
| 45 | 54 | ### Code | |
| 46 | 55 | ||
| 47 | - | ||
| 48 | - | ||
| 49 | - | ||
| 56 | + | Finalement, vous devriez avoir quelque chose comme cela : | |
| 57 | + | ``` | |
| 50 | 58 | unit UMain; | |
| 51 | - | ||
| 52 | - | ||
| 53 | - | ||
| 54 | - | ||
| 55 | - | ||
| 56 | - | ||
| 57 | - | ||
| 58 | - | ||
| 59 | - | ||
| 60 | - | ||
| 61 | - | ||
| 62 | - | ||
| 63 | - | ||
| 64 | - | ||
| 65 | - | ||
| 66 | - | ||
| 67 | - | ||
| 68 | - | ||
| 69 | - | ||
| 70 | - | ||
| 71 | - | ||
| 72 | - | ||
| 73 | - | ||
| 74 | - | ||
| 75 | - | ||
| 76 | - | ||
| 77 | - | ||
| 78 | - | ||
| 79 | - | ||
| 80 | - | ||
| 81 | - | ||
| 82 | - | ||
| 83 | - | ||
| 84 | - | ||
| 85 | - | ||
| 86 | - | ||
| 87 | - | ||
| 88 | - | ||
| 89 | - | ||
| 90 | - | ||
| 91 | - | ||
| 92 | - | ||
| 93 | - | ||
| 59 | + | ||
| 60 | + | {$mode objfpc}{$H+} | |
| 61 | + | ||
| 62 | + | interface | |
| 63 | + | ||
| 64 | + | uses | |
| 65 | + | Classes, SysUtils, FileUtil, LResources, Forms, Controls, Graphics, Dialogs, | |
| 66 | + | BGRABitmap, BGRABitmapTypes; | |
| 67 | + | ||
| 68 | + | type | |
| 69 | + | { TForm1 } | |
| 70 | + | ||
| 71 | + | TForm1 = class(TForm) | |
| 72 | + | procedure FormCreate(Sender: TObject); | |
| 73 | + | procedure FormPaint(Sender: TObject); | |
| 74 | + | private | |
| 75 | + | { private declarations } | |
| 76 | + | image: TBGRABitmap; | |
| 77 | + | public | |
| 78 | + | { public declarations } | |
| 79 | + | end; | |
| 80 | + | ||
| 81 | + | var | |
| 82 | + | Form1: TForm1; | |
| 83 | + | ||
| 84 | + | implementation | |
| 85 | + | ||
| 86 | + | { TForm1 } | |
| 87 | + | ||
| 88 | + | procedure TForm1.FormCreate(Sender: TObject); | |
| 89 | + | begin | |
| 90 | + | image := TBGRABitmap.Create('image.png'); | |
| 91 | + | end; | |
| 92 | + | ||
| 93 | + | procedure TForm1.FormPaint(Sender: TObject); | |
| 94 | + | begin | |
| 95 | + | image.Draw(Canvas,0,0,True); | |
| 96 | + | end; | |
| 97 | + | ||
| 98 | + | initialization | |
| 99 | + | {$I UMain.lrs} | |
| 100 | + | ||
| 101 | + | end. | |
| 94 | 102 | ``` | |
| 95 | 103 | ||
| 96 | 104 | ### Exécution du programme | |
| 97 | 105 | ||
| 98 | - | ||
| 106 | + | Vous devriez voir une fenêtre avec une image dessinée dedans au coin supérieur gauche. | |
| 99 | 107 | ||
| 100 | - | ||
| 101 | - | ||
| 102 | - | ||
| 103 | - | ||
| 108 | + | [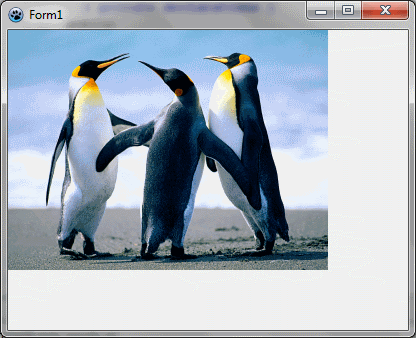](</File:BGRATutorial2.png>) | |
| 104 | 109 | ||
| 105 | 110 | ### Centrer l'image | |
| 106 | 111 | ||
| 107 | - | ||
| 108 | - | ||
| 109 | - | ||
| 112 | + | Vous pouvez centrer l'image sur la fenêtre. Pour cela, modifiez la procédure _FormPaint_ : | |
| 113 | + | ``` | |
| 110 | 114 | procedure TForm1.FormPaint(Sender: TObject); | |
| 111 | - | ||
| 112 | - | ||
| 113 | - | ||
| 114 | - | ||
| 115 | - | ||
| 116 | - | ||
| 117 | - | ||
| 118 | - | ||
| 119 | - | ||
| 120 | - | ||
| 121 | - | ||
| 115 | + | var ImagePos: TPoint; | |
| 116 | + | begin | |
| 117 | + | ImagePos := Point( (ClientWidth - Image.Width) div 2, | |
| 118 | + | (ClientHeight - Image.Height) div 2 ); | |
| 119 | + | ||
| 120 | + | // teste si la position est négative | |
| 121 | + | if ImagePos.X < 0 then ImagePos.X := 0; | |
| 122 | + | if ImagePos.Y < 0 then ImagePos.Y := 0; | |
| 123 | + | ||
| 124 | + | image.Draw(Canvas,ImagePos.X,ImagePos.Y,True); | |
| 125 | + | end; | |
| 122 | 126 | ``` | |
| 123 | 127 | ||
| 124 | - | ||
| 128 | + | Pour calculer la position, vous avez besoin de déterminer l'espace entre l'image et le bord gauche (coordonnée X) et l'espace entre l'image et le bord haut (coordonnée Y). L'expression _ClientWidth - Image.Width_ renvoie l'espace horizontal disponible, et on divise par 2 pour obtenir la marge gauche. | |
| 125 | 129 | ||
| 126 | - | ||
| 130 | + | Le résultat peut être négatif si l'image est plus grande que la largeur cliente. Dans ce cas, la marge est mise à zéro. | |
| 127 | 131 | ||
| 128 | - | ||
| 132 | + | Vous pouvez lancer le programme et voir si cela marche. Notez ce qu'il se passe si vous enlevez le test pour la position négative. | |
| 129 | 133 | ||
| 130 | 134 | ### Étirer une image | |
| 131 | 135 | ||
| 132 | - | ||
| 133 | - | ||
| 134 | - | ||
| 136 | + | Pour étirer une image, vous avez besoin de créer une image temporaire étirée : | |
| 137 | + | ``` | |
| 135 | 138 | procedure TForm1.FormPaint(Sender: TObject); | |
| 136 | - | ||
| 137 | - | ||
| 138 | - | ||
| 139 | - | ||
| 140 | - | ||
| 141 | - | ||
| 139 | + | var stretched: TBGRABitmap; | |
| 140 | + | begin | |
| 141 | + | stretched := image.Resample(ClientWidth, ClientHeight) as TBGRABitmap; | |
| 142 | + | stretched.Draw(Canvas,0,0,True); | |
| 143 | + | stretched.Free; | |
| 144 | + | end; | |
| 142 | 145 | ``` | |
| 143 | 146 | ||
| 144 | - | ||
| 145 | - | ||
| 146 | - | ||
| 147 | + | Par défaut, _Resample_ utilise un joli ré-échantillonnage, mais vous pouvez préciser si vous voulez un ré-échantillonnage simple à la place (plus rapide) : | |
| 148 | + | ``` | |
| 147 | 149 | stretched := image.Resample(ClientWidth, ClientHeight, rmSimpleStretch) as TBGRABitmap; | |
| 148 | 150 | ``` | |
| 149 | 151 | ||
| 150 | - | ||
| 151 | - | ||
| 152 | - | ||
| 152 | + | Vous pouvez choisir le filtre de ré-échantillonage en utilisant la propriété _ResampleFilter_ : | |
| 153 | + | ``` | |
| 153 | 154 | image.ResampleFilter := rfMitchell; | |
| 154 | - | ||
| 155 | + | stretched := image.Resample(ClientWidth, ClientHeight) as TBGRABitmap; | |
| 155 | 156 | ``` | |
| 156 | 157 | ||
| 157 | - | ||
| 158 | + | [[BGRABitmap tutorial 1/fr|Premier tutoriel]] | [[BGRABitmap tutorial 3/fr|Tutoriel suivant (dessiner avec la souris)]] | |
| 158 | 159 | ||
| 159 | 160 | --- | |
| 160 | - | ||
| 161 | + | *From the Free Pascal wiki, page "BGRABitmap tutorial 2/fr", as the Internet Archive kept it on 2023-09-24. Copyright stays with the author who wrote it, according to the old wiki's [[Licensing]] page. If you have concerns about this material, [message the admin](/wiki-contact).* |