

BGRABitmap tutorial 2/es: what changed
Revision 1 to 2. Removed lines have a minus sign; added lines have a plus sign.
| Old | New | Line | |
|---|---|---|---|
| 1 | - | ||
| 2 | - | ||
| 3 | - | ||
| 4 | - | ||
| 5 | - | ||
| 6 | - | ||
| 7 | - | ||
| 8 | - | ||
| 9 | - | ||
| 10 | - | ||
| 11 | - | ||
| 12 | - | ||
| 13 | - | ||
| 1 | + | Esta tutoría muestra como cargar una imágen y dibujarla en una forma. | |
| 14 | 2 | ||
| 15 | 3 | ### Crear un nuevo proyecto | |
| 16 | 4 | ||
| 17 | 5 | Crea un nuevo proyecto y agrega referencias a [[BGRABitmap]] de la misma forma que se explica en [[BGRABitmap tutorial/es|la primer tutoría.]] | |
| 18 | 6 | ||
| 19 | 7 | ### Carga el bitmap | |
| 20 | 8 | ||
| 21 | - | ||
| 9 | + | Copia una imagen al directorio de tu proyecto. Supongamos que su nombre es *image.png*. | |
| 22 | 10 | ||
| 23 | - | ||
| 24 | - | ||
| 25 | - | ||
| 26 | - | ||
| 27 | - | ||
| 28 | - | ||
| 29 | - | ||
| 30 | - | ||
| 31 | - | ||
| 32 | - | ||
| 11 | + | Agrega una variable privada a la forma principal para guardar la imágen: | |
| 33 | 12 | ||
| 34 | - | ||
| 13 | + | ``` pascal | |
| 14 | + | TForm1 = class(TForm) | |
| 15 | + | private | |
| 16 | + | { private declarations } | |
| 17 | + | image: TBGRABitmap; | |
| 18 | + | public | |
| 19 | + | { public declarations } | |
| 20 | + | end; | |
| 35 | 21 | ``` | |
| 22 | + | ||
| 23 | + | Carga la imágen cuando la forma es creada. Para hacer esto haz doble clic en la forma, un procedimiento debería aparecer en el editor de código. Agrega la instrucción de cargado : | |
| 24 | + | ||
| 25 | + | ``` pascal | |
| 36 | 26 | procedure TForm1.FormCreate(Sender: TObject); | |
| 37 | - | ||
| 38 | - | ||
| 39 | - | ||
| 27 | + | begin | |
| 28 | + | image := TBGRABitmap.Create('image.png'); | |
| 29 | + | end; | |
| 40 | 30 | ``` | |
| 41 | 31 | ||
| 42 | 32 | ### Dibuja el bitmap | |
| 43 | 33 | ||
| 44 | - | ||
| 45 | - | ||
| 34 | + | Añade un manejador OnPaint. Para hacer esto, selecciona la forma principal, luego ve al inspector de objetos, en la pestaña de eventos y haz doble clic en la linea OnPaint. Luego, agrega el código de dibujo : | |
| 35 | + | ||
| 36 | + | ``` pascal | |
| 46 | 37 | procedure TForm1.FormPaint(Sender: TObject); | |
| 47 | - | ||
| 48 | - | ||
| 49 | - | ||
| 38 | + | begin | |
| 39 | + | image.Draw(Canvas,0,0,True); | |
| 40 | + | end; | |
| 50 | 41 | ``` | |
| 51 | 42 | ||
| 52 | - | ||
| 43 | + | Fijate que el último parámetro está establecido en 'True' (verdadero) que sinifica opaco. Si quieres tomar los píxeles transparentes en cuenta, codificados en el canal alpha, debes usar 'False'. Pero puede ser lento usar dibujo transparente en un 'canvas' (papel) estándar, entonces si no es necesario usa dibujo opaco solamente. | |
| 53 | 44 | ||
| 54 | 45 | ### Código | |
| 55 | 46 | ||
| 56 | - | ||
| 57 | - | ||
| 47 | + | Finalmente deberías obtener algo como esto : | |
| 48 | + | ||
| 49 | + | ``` pascal | |
| 58 | 50 | unit UMain; | |
| 59 | - | ||
| 60 | - | ||
| 61 | - | ||
| 62 | - | ||
| 63 | - | ||
| 64 | - | ||
| 65 | - | ||
| 66 | - | ||
| 67 | - | ||
| 68 | - | ||
| 69 | - | ||
| 70 | - | ||
| 71 | - | ||
| 72 | - | ||
| 73 | - | ||
| 74 | - | ||
| 75 | - | ||
| 76 | - | ||
| 77 | - | ||
| 78 | - | ||
| 79 | - | ||
| 80 | - | ||
| 81 | - | ||
| 82 | - | ||
| 83 | - | ||
| 84 | - | ||
| 85 | - | ||
| 86 | - | ||
| 87 | - | ||
| 88 | - | ||
| 89 | - | ||
| 90 | - | ||
| 91 | - | ||
| 92 | - | ||
| 93 | - | ||
| 94 | - | ||
| 95 | - | ||
| 96 | - | ||
| 97 | - | ||
| 98 | - | ||
| 99 | - | ||
| 100 | - | ||
| 101 | - | ||
| 51 | + | ||
| 52 | + | {$mode objfpc}{$H+} | |
| 53 | + | ||
| 54 | + | interface | |
| 55 | + | ||
| 56 | + | uses | |
| 57 | + | Classes, SysUtils, FileUtil, LResources, Forms, Controls, Graphics, Dialogs, | |
| 58 | + | BGRABitmap, BGRABitmapTypes; | |
| 59 | + | ||
| 60 | + | type | |
| 61 | + | { TForm1 } | |
| 62 | + | ||
| 63 | + | TForm1 = class(TForm) | |
| 64 | + | procedure FormCreate(Sender: TObject); | |
| 65 | + | procedure FormPaint(Sender: TObject); | |
| 66 | + | private | |
| 67 | + | { private declarations } | |
| 68 | + | image: TBGRABitmap; | |
| 69 | + | public | |
| 70 | + | { public declarations } | |
| 71 | + | end; | |
| 72 | + | ||
| 73 | + | var | |
| 74 | + | Form1: TForm1; | |
| 75 | + | ||
| 76 | + | implementation | |
| 77 | + | ||
| 78 | + | { TForm1 } | |
| 79 | + | ||
| 80 | + | procedure TForm1.FormCreate(Sender: TObject); | |
| 81 | + | begin | |
| 82 | + | image := TBGRABitmap.Create('image.png'); | |
| 83 | + | end; | |
| 84 | + | ||
| 85 | + | procedure TForm1.FormPaint(Sender: TObject); | |
| 86 | + | begin | |
| 87 | + | image.Draw(Canvas,0,0,True); | |
| 88 | + | end; | |
| 89 | + | ||
| 90 | + | initialization | |
| 91 | + | {$I UMain.lrs} | |
| 92 | + | ||
| 93 | + | end. | |
| 102 | 94 | ``` | |
| 103 | 95 | ||
| 104 | 96 | ### Ejecuta el programa | |
| 105 | 97 | ||
| 106 | - | ||
| 98 | + | Deberías ver una forma con una imágen dibujada en ella en la esquina superior-izquierda. | |
| 107 | 99 | ||
| 108 | - | ||
| 100 | + | 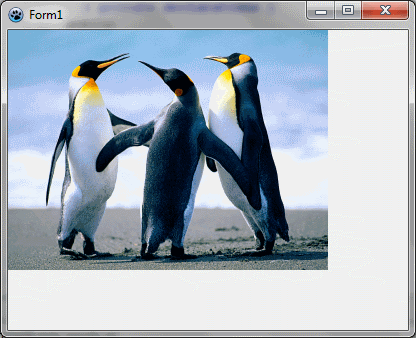 | |
| 109 | 101 | ||
| 110 | 102 | ### Centrar la imágen | |
| 111 | 103 | ||
| 112 | - | ||
| 113 | - | ||
| 104 | + | Quizás quieras centrar la imágen en la forma. Para hacer esto, modifica el procedimiento FormPaint : | |
| 105 | + | ||
| 106 | + | ``` pascal | |
| 114 | 107 | procedure TForm1.FormPaint(Sender: TObject); | |
| 115 | - | ||
| 116 | - | ||
| 117 | - | ||
| 118 | - | ||
| 119 | - | ||
| 120 | - | ||
| 121 | - | ||
| 122 | - | ||
| 123 | - | ||
| 124 | - | ||
| 125 | - | ||
| 108 | + | var ImagePos: TPoint; | |
| 109 | + | begin | |
| 110 | + | ImagePos := Point( (ClientWidth - Image.Width) div 2, | |
| 111 | + | (ClientHeight - Image.Height) div 2 ); | |
| 112 | + | ||
| 113 | + | // test de posición negativa | |
| 114 | + | if ImagePos.X < 0 then ImagePos.X := 0; | |
| 115 | + | if ImagePos.Y < 0 then ImagePos.Y := 0; | |
| 116 | + | ||
| 117 | + | image.Draw(Canvas,ImagePos.X,ImagePos.Y,True); | |
| 118 | + | end; | |
| 126 | 119 | ``` | |
| 127 | 120 | ||
| 128 | - | ||
| 121 | + | Para computar la posición, necesitamos calcular el espacio entre la imágen y el borde izquierdo (coordenada X) y el espacio entre la imágen y el borde superior (coordenada Y). La expresion ClientWidth - Image.Width regresa el espacio horizontal disponible, y si lo dividimos por dos obtenemos el margen izquierdo. | |
| 129 | 122 | ||
| 130 | - | ||
| 123 | + | El resultado puede ser negativo si la imágen es mas grande que el ancho del cliente. En este caso, el margen es establecido como cero. | |
| 131 | 124 | ||
| 132 | - | ||
| 125 | + | Puedes ejecutar el programa y ver si funciona. Fijate que sucede si removes el test de posición negativa. | |
| 133 | 126 | ||
| 134 | 127 | ### Estirar la imágen | |
| 135 | 128 | ||
| 136 | - | ||
| 137 | - | ||
| 129 | + | Para estirar la imágen, necesitamos crear una imágen temporalmente estirada : | |
| 130 | + | ||
| 131 | + | ``` pascal | |
| 138 | 132 | procedure TForm1.FormPaint(Sender: TObject); | |
| 139 | - | ||
| 140 | - | ||
| 141 | - | ||
| 142 | - | ||
| 143 | - | ||
| 144 | - | ||
| 133 | + | var stretched: TBGRABitmap; | |
| 134 | + | begin | |
| 135 | + | stretched := image.Resample(ClientWidth, ClientHeight) as TBGRABitmap; | |
| 136 | + | stretched.Draw(Canvas,0,0,True); | |
| 137 | + | stretched.Free; | |
| 138 | + | end; | |
| 145 | 139 | ``` | |
| 146 | 140 | ||
| 147 | - | ||
| 148 | - | ||
| 141 | + | Por defecto, esto usa el estiramiento fino, pero puedes precisar si quieres usar el estiramiento simple (mas rápido) : | |
| 142 | + | ||
| 143 | + | ``` pascal | |
| 149 | 144 | stretched := image.Resample(ClientWidth, ClientHeight, rmSimpleStretch) as TBGRABitmap; | |
| 150 | 145 | ``` | |
| 151 | 146 | ||
| 152 | - | ||
| 147 | + | [[BGRABitmap tutorial 1/es|Primer tutoría]] \| [[BGRABitmap tutorial 3/es|Siguiente tutoría (dibujando con el ratón)]] | |
| 153 | 148 | ||
| 154 | 149 | --- | |
| 155 | - | ||
| 150 | + | *From the Free Pascal wiki, page "BGRABitmap tutorial 2/es", as it stood on 2020-02-10 after a change by Trev, out of the wiki's dump of 2024-05-26. Copyright stays with the author who wrote it, according to the old wiki's [[Licensing]] page. If you have concerns about this material, [message the admin](/wiki-contact).* | |
| 151 | + | Category: Castellano | |
| 152 | + | Category: Español |