

BGRABitmap tutorial 15: what changed
Revision 1 to 2. Removed lines have a minus sign; added lines have a plus sign.
| Old | New | Line | |
|---|---|---|---|
| 1 | 1 | This tutorial shows how to render 3D objects using the TBGRAScene3D object. | |
| 2 | 2 | ||
| 3 | 3 | ## Scene object | |
| 4 | 4 | ||
| 5 | 5 | The scene object is in the BGRAScene3D unit. Here is a simple example: | |
| 6 | 6 | ||
| 7 | 7 | ``` pascal | |
| 8 | 8 | uses BGRAScene3D, BGRABitmap, BGRABitmapTypes; | |
| 9 | 9 | ||
| 10 | 10 | procedure TForm1.FormPaint(Sender: TObject); | |
| 11 | 11 | var | |
| 12 | 12 | scene: TBGRAScene3D; | |
| 13 | 13 | bmp: TBGRABitmap; | |
| 14 | 14 | base: array of IBGRAVertex3D; | |
| 15 | 15 | topV: IBGRAVertex3D; | |
| 16 | 16 | begin | |
| 17 | 17 | bmp := TBGRABitmap.Create(ClientWidth,ClientHeight,BGRABlack); | |
| 18 | 18 | ||
| 19 | 19 | scene := TBGRAScene3D.Create(bmp); | |
| 20 | 20 | //create a pyramid | |
| 21 | 21 | with scene.CreateObject(BGRA(255,240,128)) do | |
| 22 | 22 | begin | |
| 23 | 23 | //create vertices | |
| 24 | 24 | topV := MainPart.Add(0,-15,0); | |
| 25 | 25 | //pyramid base is in a clockwise order if we look at the pyramid from below | |
| 26 | 26 | base := MainPart.Add([-20,15,-20, 20,15,-20, 20,15,20, -20,15,20]); | |
| 27 | 27 | ||
| 28 | 28 | AddFace(base); | |
| 29 | 29 | //add four faces, the three vertices are in a clockwise order | |
| 30 | 30 | AddFace([base[0],topV,base[1]]); | |
| 31 | 31 | AddFace([base[1],topV,base[2]]); | |
| 32 | 32 | AddFace([base[2],topV,base[3]]); | |
| 33 | 33 | AddFace([base[3],topV,base[0]]); | |
| 34 | 34 | topV := nil; | |
| 35 | 35 | base := nil; | |
| 36 | 36 | end; | |
| 37 | 37 | scene.Render; | |
| 38 | 38 | scene.Free; | |
| 39 | 39 | ||
| 40 | 40 | bmp.Draw(Canvas,0,0); | |
| 41 | 41 | bmp.Free; | |
| 42 | 42 | end; | |
| 43 | 43 | ``` | |
| 44 | 44 | ||
| 45 | 45 | The scene object draws itself on a TBGRABitmap object. You can either pass the bitmap as a parameter when creating the object, as done here, or assign the Surface property afterwards. The scene is automatically centered in the bitmap. | |
| 46 | 46 | ||
| 47 | 47 | The scene object provides the CreateObject function, which returns an interface to the created object. Objects inside a scene are freed automatically when you free the scene. | |
| 48 | 48 | ||
| 49 | 49 | An object has a MainPart property which allows you to create and access vertices. Coordinates can be given as three single values, TPoint3D records, or an array of single values which length must be a multiple of 3. When you create a vertex, you receive an IBGRAVertex3D interface which can be used to create faces. You can add sub parts inside MainPart by using the CreatePart method. There can be nested subparts, each being rotated with its own matrix relative to the main part. | |
| 50 | 50 | ||
| 51 | 51 | The X axis points to the right, the Y axis points to bottom, and the Z axis points forward (behind the screen). It means that XY works the same way as in a bitmap, and there is a depth value. The faces must be in clockwise order to be visible. | |
| 52 | 52 | ||
| 53 | 53 | Here the color is set for the whole object when creating it, but you can set it individually for each face, or for each vertex. | |
| 54 | 54 | ||
| 55 | - | ||
| 56 | - | ||
| 57 | - | ||
| 58 | - | ||
| 55 | + | 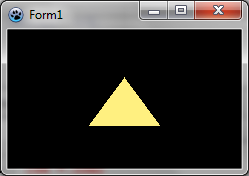 | |
| 59 | 56 | ||
| 60 | 57 | As you can see, the pyramid is viewed from one side, so we can only see one face. There is no lighting either. | |
| 61 | 58 | ||
| 62 | 59 | In the 'with' block, add the following lines: | |
| 63 | 60 | ||
| 64 | 61 | ``` pascal | |
| 65 | 62 | MainPart.Scale(1.3); | |
| 66 | 63 | MainPart.RotateYDeg(30); | |
| 67 | 64 | MainPart.RotateXDeg(20); | |
| 68 | 65 | MainPart.Translate(0,-5,0); | |
| 69 | 66 | ``` | |
| 70 | 67 | ||
| 71 | 68 | The first line makes the object a little bigger. Then two rotations are applied. The first is around the Y axis and the second around the X axis. To figure out the rotation sign, imagine you are looking in the direction of the axis. A positive value in degrees means a clockwise rotation, and a positive value in radians means an anti-clockwise rotation. | |
| 72 | 69 | ||
| 73 | 70 | Finally a vertical translation is applied to center the object. | |
| 74 | 71 | ||
| 75 | - | ||
| 76 | - | ||
| 77 | - | ||
| 78 | - | ||
| 72 | + | 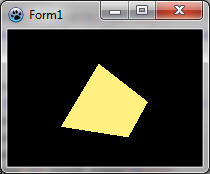 | |
| 79 | 73 | ||
| 80 | 74 | Now let's add some lighting: | |
| 81 | 75 | ||
| 82 | 76 | ``` pascal | |
| 83 | 77 | //set ambiant lightness to dark (1 is normal lightness, 2 is complete whiteness) | |
| 84 | 78 | scene.AmbiantLightness := 0.5; | |
| 85 | 79 | //add a directional light from top-left, maximum lightness will be 0.5 + 1 = 1.5 | |
| 86 | 80 | scene.AddDirectionalLight(Point3D(1,1,1), 1); | |
| 87 | 81 | ``` | |
| 88 | 82 | ||
| 89 | 83 | The example uses lightness values. 0 means black, 1 means unchanged color, and 2 means white. The directional takes a Point3D parameter to indicate the direction of the ray. It does not need to be normalized. | |
| 90 | 84 | ||
| 91 | - | ||
| 92 | - | ||
| 93 | - | ||
| 94 | - | ||
| 85 | + | 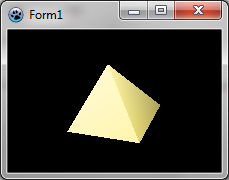 | |
| 95 | 86 | ||
| 96 | 87 | ## Deriving from TBGRAScene3D | |
| 97 | 88 | ||
| 98 | 89 | The scene code can be embedded in an object. Here is the previous example in a single unit: | |
| 99 | 90 | ||
| 100 | 91 | ``` pascal | |
| 101 | 92 | unit ex1; | |
| 102 | 93 | ||
| 103 | 94 | {$mode objfpc}{$H+} | |
| 104 | 95 | ||
| 105 | 96 | interface | |
| 106 | 97 | ||
| 107 | 98 | uses | |
| 108 | 99 | Classes, SysUtils, BGRAScene3D, BGRABitmapTypes; | |
| 109 | 100 | ||
| 110 | 101 | type | |
| 111 | 102 | ||
| 112 | 103 | { TExample1 } | |
| 113 | 104 | ||
| 114 | 105 | TExample1 = class(TBGRAScene3D) | |
| 115 | 106 | SandColor: TBGRAPixel; | |
| 116 | 107 | constructor Create; | |
| 117 | 108 | procedure Render; override; | |
| 118 | 109 | end; | |
| 119 | 110 | ||
| 120 | 111 | implementation | |
| 121 | 112 | ||
| 122 | 113 | { TExample1 } | |
| 123 | 114 | ||
| 124 | 115 | constructor TExample1.Create; | |
| 125 | 116 | var | |
| 126 | 117 | base: array of IBGRAVertex3D; | |
| 127 | 118 | top: IBGRAVertex3D; | |
| 128 | 119 | begin | |
| 129 | 120 | inherited Create; | |
| 130 | 121 | ||
| 131 | 122 | SandColor := BGRA(255,240,128); | |
| 132 | 123 | ||
| 133 | 124 | //create a pyramid | |
| 134 | 125 | with CreateObject(SandColor) do | |
| 135 | 126 | begin | |
| 136 | 127 | top := MainPart.Add(0,-15,0); | |
| 137 | 128 | //pyramid base is in a clockwise order if we look at the pyramid from below | |
| 138 | 129 | base := MainPart.Add([-20,15,-20, 20,15,-20, 20,15,20, -20,15,20]); | |
| 139 | 130 | AddFace(base); | |
| 140 | 131 | //add four faces, the three vertices are in a clockwise order | |
| 141 | 132 | AddFace([base[0],top,base[1]]); | |
| 142 | 133 | AddFace([base[1],top,base[2]]); | |
| 143 | 134 | AddFace([base[2],top,base[3]]); | |
| 144 | 135 | AddFace([base[3],top,base[0]]); | |
| 145 | 136 | ||
| 146 | 137 | MainPart.Scale(1.3); | |
| 147 | 138 | MainPart.RotateYDeg(30); | |
| 148 | 139 | MainPart.RotateXDeg(20); | |
| 149 | 140 | MainPart.Translate(0,-5,0); | |
| 150 | 141 | end; | |
| 151 | 142 | ||
| 152 | 143 | //set ambiant lightness to dark (1 is normal lightness, 2 is complete whiteness) | |
| 153 | 144 | AmbiantLightness := 0.5; | |
| 154 | 145 | //add a directional light from top-left, maximum lightness will be 0.5 + 1 = 1.5 | |
| 155 | 146 | AddDirectionalLight(Point3D(1,1,1),1); | |
| 156 | 147 | ||
| 157 | 148 | //we can have antialiasing because it is a simple scene | |
| 158 | 149 | Antialiasing := True; | |
| 159 | 150 | end; | |
| 160 | 151 | ||
| 161 | 152 | procedure TExample1.Render; | |
| 162 | 153 | begin | |
| 163 | 154 | //fill background | |
| 164 | 155 | Surface.GradientFill(0,0,Surface.Width,Surface.Height,SandColor,MergeBGRA(SandColor,BGRABlack), gtRadial,PointF(0,0),PointF(Surface.Width,Surface.Height),dmSet); | |
| 165 | 156 | ||
| 166 | 157 | inherited Render; | |
| 167 | 158 | end; | |
| 168 | 159 | ||
| 169 | 160 | end. | |
| 170 | 161 | ``` | |
| 171 | 162 | ||
| 172 | 163 | Now, to draw the scene, simply do: | |
| 173 | 164 | ||
| 174 | 165 | ``` pascal | |
| 175 | 166 | uses BGRABitmap, BGRABitmapTypes, BGRAScene3D, ex1; | |
| 176 | 167 | ||
| 177 | 168 | procedure TForm1.FormPaint(Sender: TObject); | |
| 178 | 169 | var | |
| 179 | 170 | bmp: TBGRABitmap; | |
| 180 | 171 | scene: TBGRAScene3D; | |
| 181 | 172 | begin | |
| 182 | 173 | bmp := TBGRABitmap.Create(ClientWidth,ClientHeight,BGRABlack); | |
| 183 | 174 | ||
| 184 | 175 | scene := TExample1.Create; | |
| 185 | 176 | scene.Surface := bmp; | |
| 186 | 177 | scene.Render; | |
| 187 | 178 | scene.Free; | |
| 188 | 179 | ||
| 189 | 180 | bmp.Draw(Canvas,0,0); | |
| 190 | 181 | bmp.Free; | |
| 191 | 182 | end; | |
| 192 | 183 | ``` | |
| 193 | 184 | ||
| 194 | 185 | By the way, antialiasing and a background have been added. Note that antialiasing works only for simple scenes. Complex scenes with texture and transparent colors may not render correctly. | |
| 195 | 186 | ||
| 196 | - | ||
| 197 | - | ||
| 198 | - | ||
| 199 | - | ||
| 187 | + | 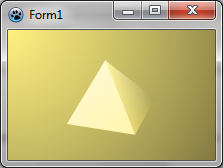 | |
| 200 | 188 | ||
| 201 | 189 | [[BGRABitmap tutorial 14|Previous tutorial (canvas 2D)]] \| [[BGRABitmap tutorial 16|Next tutorial (textures with 3D objects)]] | |
| 202 | 190 | ||
| 203 | 191 | --- | |
| 204 | 192 | *From the Free Pascal wiki, page "BGRABitmap tutorial 15", as it stood on 2020-01-05 after a change by Trev, out of the wiki's dump of 2024-05-26. Copyright stays with the author who wrote it, according to the old wiki's [[Licensing]] page. If you have concerns about this material, [message the admin](/wiki-contact).* | |
| 205 | 193 | Category: BGRABitmap | |
| 206 | 194 | Category: Graphics |