

BGRABitmap tutorial 12/fr: what changed
Revision 0 to 1. Removed lines have a minus sign; added lines have a plus sign.
Title: BGRABitmap tutorial 12/fr
| Old | New | Line | |
|---|---|---|---|
| 1 | + | [[BGRABitmap tutorial/fr|**Accueil**]] | [[BGRABitmap tutorial 1/fr|**Tutoriel 1**]] | [[BGRABitmap tutorial 2/fr|**Tutoriel 2**]] | [[BGRABitmap tutorial 3/fr|**Tutoriel 3**]] | [[BGRABitmap tutorial 4/fr|**Tutoriel 4**]] | [[BGRABitmap tutorial 5/fr|**Tutoriel 5**]] | [[BGRABitmap tutorial 6/fr|**Tutoriel 6**]] | [[BGRABitmap tutorial 7/fr|**Tutoriel 7**]] | [[BGRABitmap tutorial 8/fr|**Tutoriel 8**]] | [[BGRABitmap tutorial 9/fr|**Tutoriel 9**]] | [[BGRABitmap tutorial 10/fr|**Tutoriel 10**]] | [[BGRABitmap tutorial 11/fr|**Tutoriel 11**]] | **Tutoriel 12** | [Edit](<http://wiki.lazarus.freepascal.org/index.php?title=Template:BGRABitmap_tutorial_index/fr&action=edit>) | |
| 2 | + | ||
| 3 | + | Ce tutoriel montre comment utiliser les fonctions texte par défaut. Pour les fonctions avancées, voir les [[BGRABitmap tutorial Font rendering/fr|moteurs de rendu]]. | |
| 4 | + | ||
| 5 | + | ## Contents | |
| 6 | + | ||
| 7 | + | * 1 Texte simple | |
| 8 | + | * 1.1 Utiliser l'alignement | |
| 9 | + | * 2 Rotation de texte | |
| 10 | + | * 3 Texte avec retour à la ligne | |
| 11 | + | * 4 Texte avec une ombre | |
| 12 | + | * 5 Texte avec dégradé | |
| 13 | + | ||
| 14 | + | ### Texte simple | |
| 15 | + | ||
| 16 | + | Vous pouvez dessiner un texte simple comme cela : | |
| 17 | + | ``` | |
| 18 | + | procedure TForm1.FormPaint(Sender: TObject); | |
| 19 | + | var | |
| 20 | + | image: TBGRABitmap; | |
| 21 | + | c: TBGRAPixel; | |
| 22 | + | begin | |
| 23 | + | image := TBGRABitmap.Create(ClientWidth,ClientHeight, ColorToBGRA(ColorToRGB(clBtnFace)) ); | |
| 24 | + | c := ColorToBGRA(ColorToRGB(clBtnText)); //retrieve default text color | |
| 25 | + | ||
| 26 | + | image.FontHeight := 30; | |
| 27 | + | image.FontAntialias := true; | |
| 28 | + | image.FontStyle := [fsBold]; | |
| 29 | + | image.TextOut(ClientWidth-5,5,'Hello world',c,); | |
| 30 | + | image.SetPixel(5,5,c); | |
| 31 | + | ||
| 32 | + | image.Draw(Canvas,0,0,True); | |
| 33 | + | image.free; | |
| 34 | + | end; | |
| 35 | + | ``` | |
| 36 | + | ||
| 37 | + | Ici, la taille de police est de 30 pixels, avec anticrénelage. Utiliser l'anticrénelage pour le texte est plus lent mais plus joli. | |
| 38 | + | ||
| 39 | + | Le coin en haut à gauche du texte est aux coordonnées (5,5). Cette origine est montrée avec un _SetPixel_. | |
| 40 | + | ||
| 41 | + | [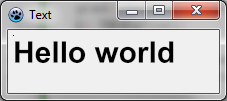](</File:BGRATutorial12a.png>) | |
| 42 | + | ||
| 43 | + | #### Utiliser l'alignement | |
| 44 | + | ||
| 45 | + | Remplacez les _TextOut_ et _SetPixel_ par : | |
| 46 | + | ``` | |
| 47 | + | image.TextOut(ClientWidth-5,5,'Hello world',c,taRightJustify); | |
| 48 | + | image.SetPixel(ClientWidth-5,5,c); | |
| 49 | + | ``` | |
| 50 | + | ||
| 51 | + | Maintenant, l'origine est sur le côté droit de la fenêtre, et le texte est aligné sur la droite. | |
| 52 | + | ||
| 53 | + | [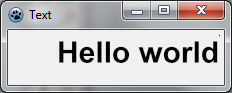](</File:BGRATutorial12b.png>) | |
| 54 | + | ||
| 55 | + | ### Rotation de texte | |
| 56 | + | ||
| 57 | + | Il est aussi facile de dessiner du texte en rotation. Pour cela, utilisez _TextOutAngle_ ou bien la propriété _FontOrientation_ : | |
| 58 | + | ``` | |
| 59 | + | image.TextOutAngle(30,5,-450,'Hello world',c, taLeftJustify); | |
| 60 | + | image.SetPixel(30,5,c); | |
| 61 | + | ``` | |
| 62 | + | ||
| 63 | + | L'angle est en dixièmes de degrés et les valeurs positives sont dans le sens inverse des aiguilles d'une montre. Ceci est une convention pour être compatible avec la propriété _Orientation_ de l'objet _Font_ du canevas standard. | |
| 64 | + | ||
| 65 | + | [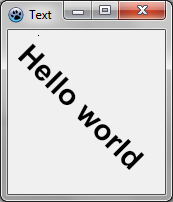](</File:BGRATutorial12c.png>) | |
| 66 | + | ||
| 67 | + | Remarquez à présent où est l'origine du texte (le pixel ajouté). | |
| 68 | + | ||
| 69 | + | ### Texte avec retour à la ligne | |
| 70 | + | ||
| 71 | + | Il y a une version facile à utiliser de _TextRect_ : | |
| 72 | + | ``` | |
| 73 | + | image.TextRect(rect(5,5,ClientWidth-5,ClientHeight-5),'This is a text that should be word wrapped',taCenter,tlCenter,c); | |
| 74 | + | image.Rectangle(rect(5,5,ClientWidth-5,ClientHeight-5),c,dmSet); | |
| 75 | + | ``` | |
| 76 | + | ||
| 77 | + | Les paramètres sont : | |
| 78 | + | ||
| 79 | + | * le rectangle englobant (il y a un clipping) ; | |
| 80 | + | * le texte ; | |
| 81 | + | * l'alignement horizontal ; | |
| 82 | + | * l'alignement vertical ; | |
| 83 | + | * la couleur. | |
| 84 | + | ||
| 85 | + | [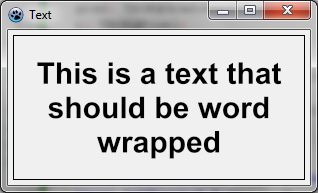](</File:BGRATutorial12d.png>) | |
| 86 | + | ||
| 87 | + | ### Texte avec une ombre | |
| 88 | + | ||
| 89 | + | Vous pouvez dessiner un texte avec une ombre floue avec _TextShadow_ de l'unité _BGRAGradients_ : | |
| 90 | + | ``` | |
| 91 | + | var | |
| 92 | + | image,txt: TBGRABitmap; | |
| 93 | + | grad: TBGRAGradientScanner; | |
| 94 | + | c: TBGRAPixel; | |
| 95 | + | begin | |
| 96 | + | image := TBGRABitmap.Create(ClientWidth,ClientHeight, ColorToBGRA(ColorToRGB(clBtnFace)) ); | |
| 97 | + | c := ColorToBGRA(ColorToRGB(clBtnText)); | |
| 98 | + | ||
| 99 | + | txt := TextShadow(ClientWidth,ClientHeight,'Hello world',30,c,BGRABlack,5,5,5); | |
| 100 | + | image.PutImage(0,0,txt,dmDrawWithTransparency); | |
| 101 | + | txt.Free; | |
| 102 | + | ||
| 103 | + | image.Draw(Canvas,0,0,True); | |
| 104 | + | image.free; | |
| 105 | + | end; | |
| 106 | + | ``` | |
| 107 | + | ||
| 108 | + | La procédure _TextShadow_ crée une image qui contient le texte avec une ombre. Les paramètres sont : | |
| 109 | + | ||
| 110 | + | * la taille de l'image ; | |
| 111 | + | * le texte ; | |
| 112 | + | * la hauteur de la police ; | |
| 113 | + | * la couleur ; | |
| 114 | + | * la couleur de l'ombre ; | |
| 115 | + | * le décalage et le rayon de flou de l'ombre. | |
| 116 | + | ||
| 117 | + | N'oubliez pas de libérer l'image après utilisation. | |
| 118 | + | ||
| 119 | + | [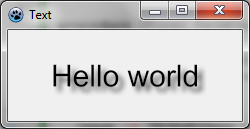](</File:BGRATutorial12e.png>) | |
| 120 | + | ||
| 121 | + | ### Texte avec dégradé | |
| 122 | + | ||
| 123 | + | Comme les autres fonctions, vous pouvez passer en paramètre un dégradé ou une texture pour remplir le texte. Voici un exemple : | |
| 124 | + | ``` | |
| 125 | + | uses BGRAGradientScanner; | |
| 126 | + | ||
| 127 | + | var | |
| 128 | + | image: TBGRABitmap; | |
| 129 | + | grad: TBGRAGradientScanner; | |
| 130 | + | begin | |
| 131 | + | image := TBGRABitmap.Create(ClientWidth,ClientHeight, ColorToBGRA(ColorToRGB(clBtnFace)) ); | |
| 132 | + | ||
| 133 | + | grad := TBGRAGradientScanner.Create(BGRA(255,255,0),BGRA(255,0,0),gtLinear,PointF(0,0),PointF(0,35),True,True); | |
| 134 | + | image.FontHeight := 30; | |
| 135 | + | image.FontAntialias := true; | |
| 136 | + | image.FontStyle := [fsBold]; | |
| 137 | + | image.TextOut(6,6,'Hello world',BGRABlack); //draw a black border | |
| 138 | + | image.TextOut(5,5,'Hello world',grad); //draw gradient text | |
| 139 | + | grad.free; | |
| 140 | + | ||
| 141 | + | image.Draw(Canvas,0,0,True); | |
| 142 | + | image.free; | |
| 143 | + | end; | |
| 144 | + | ``` | |
| 145 | + | ||
| 146 | + | En premier lieu, un dégradé sinusoïdal horizontal est créé, de couleurs jaune et rouge. Il est ensuite utilisé comme texture. | |
| 147 | + | ||
| 148 | + | [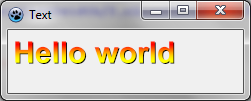](</File:BGRATutorial12f.png>) | |
| 149 | + | ||
| 150 | + | [[BGRABitmap tutorial 11/fr|Tutoriel précédent (combiner les transformations)]] | |
| 151 | + | ||
| 152 | + | --- | |
| 153 | + | *From the Free Pascal wiki, page "BGRABitmap tutorial 12/fr", as the Internet Archive kept it on 2025-03-20. Copyright stays with the author who wrote it, according to the old wiki's [[Licensing]] page. If you have concerns about this material, [message the admin](/wiki-contact).* |