

BGRABitmap tutorial 10: what changed
Revision 1 to 2. Removed lines have a minus sign; added lines have a plus sign.
| Old | New | Line | |
|---|---|---|---|
| 1 | 1 | This tutorial shows how to use texture mapping. A sample project can be found in [[BGRABitmap AggPas]]. | |
| 2 | 2 | ||
| 3 | 3 | ### Create a new project | |
| 4 | 4 | ||
| 5 | 5 | Create a new project and add a reference to [[BGRABitmap]], the same way as in [[BGRABitmap tutorial|the first tutorial]]. | |
| 6 | 6 | ||
| 7 | 7 | ### Using no particular mapping | |
| 8 | 8 | ||
| 9 | 9 | Let's see what happens if we draw a polygon with a texture using default mapping: | |
| 10 | 10 | ||
| 11 | 11 | ``` pascal | |
| 12 | 12 | procedure TForm1.FormPaint(Sender: TObject); | |
| 13 | 13 | var image: TBGRABitmap; | |
| 14 | 14 | tex: TBGRABitmap; | |
| 15 | 15 | begin | |
| 16 | 16 | //black background | |
| 17 | 17 | image := TBGRABitmap.Create(ClientWidth,ClientHeight, BGRABlack ); | |
| 18 | 18 | ||
| 19 | 19 | tex:= TBGRABitmap.Create('image.png'); //load a bitmap | |
| 20 | 20 | image.FillPolyAntialias( [PointF(110,10), PointF(250,10), PointF(350,160), PointF(10,160)], tex); | |
| 21 | 21 | tex.Free; | |
| 22 | 22 | ||
| 23 | 23 | image.Draw(Canvas,0,0,True); //draw on the screen | |
| 24 | 24 | image.free; | |
| 25 | 25 | end; | |
| 26 | 26 | ``` | |
| 27 | 27 | ||
| 28 | 28 | ### Run the program | |
| 29 | 29 | ||
| 30 | 30 | You should obtain something like this: | |
| 31 | 31 | ||
| 32 | - | ||
| 33 | - | ||
| 34 | - | ||
| 35 | - | ||
| 32 | + | 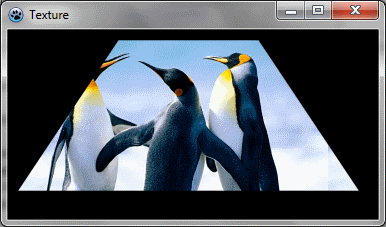 | |
| 36 | 33 | ||
| 37 | 34 | As you can see the image is not deformed. | |
| 38 | 35 | ||
| 39 | 36 | ### Affine transformation | |
| 40 | 37 | ||
| 41 | 38 | We can apply an affine transformation like this: | |
| 42 | 39 | ||
| 43 | 40 | ``` pascal | |
| 44 | 41 | uses BGRABitmap, BGRABitmapTypes, BGRATransform; | |
| 45 | 42 | ||
| 46 | 43 | procedure TForm1.PaintImage; | |
| 47 | 44 | var image: TBGRABitmap; | |
| 48 | 45 | tex: TBGRABitmap; | |
| 49 | 46 | affine: TBGRAAffineBitmapTransform; | |
| 50 | 47 | ||
| 51 | 48 | begin | |
| 52 | 49 | //black background | |
| 53 | 50 | image := TBGRABitmap.Create(ClientWidth,ClientHeight, BGRABlack ); | |
| 54 | 51 | ||
| 55 | 52 | tex:= TBGRABitmap.Create('image.png'); //load a bitmap | |
| 56 | 53 | ||
| 57 | 54 | //create a rotation of 45° | |
| 58 | 55 | affine := TBGRAAffineBitmapTransform.Create(tex,True); | |
| 59 | 56 | affine.RotateDeg(45); | |
| 60 | 57 | ||
| 61 | 58 | //use this transformation as parameter instead of tex | |
| 62 | 59 | image.FillPolyAntialias( [PointF(110,10), PointF(250,10), PointF(350,160), PointF(10,160)], affine); | |
| 63 | 60 | ||
| 64 | 61 | affine.Free; | |
| 65 | 62 | tex.Free; | |
| 66 | 63 | ||
| 67 | 64 | image.Draw(Canvas,0,0,True); //draw on the screen | |
| 68 | 65 | image.free; | |
| 69 | 66 | end; | |
| 70 | 67 | ``` | |
| 71 | 68 | ||
| 72 | 69 | ### Run the program | |
| 73 | 70 | ||
| 74 | 71 | You should obtain a rotated picture in the polygon: | |
| 75 | 72 | ||
| 76 | - | ||
| 77 | - | ||
| 78 | - | ||
| 79 | - | ||
| 73 | + | 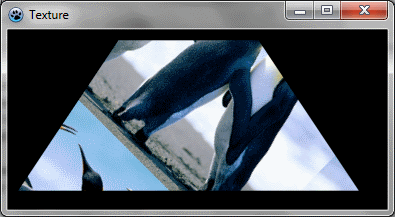 | |
| 80 | 74 | ||
| 81 | 75 | ### Texture mapping | |
| 82 | 76 | ||
| 83 | 77 | Now, if we want the texture to be aligned with the polygon border, we can use texture mapping. | |
| 84 | 78 | ||
| 85 | 79 | #### Linear mapping | |
| 86 | 80 | ||
| 87 | 81 | Linear mapping stretched the image linearly along the borders. To do this: | |
| 88 | 82 | ||
| 89 | 83 | ``` pascal | |
| 90 | 84 | procedure TForm1.PaintImage; | |
| 91 | 85 | var image: TBGRABitmap; | |
| 92 | 86 | tex: TBGRABitmap; | |
| 93 | 87 | begin | |
| 94 | 88 | image := TBGRABitmap.Create(ClientWidth,ClientHeight, BGRABlack ); | |
| 95 | 89 | ||
| 96 | 90 | tex:= TBGRABitmap.Create('image.png'); | |
| 97 | 91 | image.FillPolyLinearMapping( [PointF(110,10), PointF(250,10), PointF(350,160), PointF(10,160)], tex, | |
| 98 | 92 | [PointF(0,0), PointF(tex.width-1,0), PointF(tex.Width-1,tex.Height-1), PointF(0,tex.Height-1)], true); | |
| 99 | 93 | tex.Free; | |
| 100 | 94 | ||
| 101 | 95 | image.Draw(Canvas,0,0,True); | |
| 102 | 96 | image.free; | |
| 103 | 97 | end; | |
| 104 | 98 | ``` | |
| 105 | 99 | ||
| 106 | 100 | To do the mapping, we use FillPolyLinearMapping. Some new parameters appear. Texture coordinates define, for each point of the polygon, the location in the texture. Interpolation option is used for best quality. | |
| 107 | 101 | ||
| 108 | 102 | #### Run the program | |
| 109 | 103 | ||
| 110 | 104 | Now the texture is deformed according to the polygonal shape. | |
| 111 | 105 | ||
| 112 | - | ||
| 113 | - | ||
| 114 | - | ||
| 115 | - | ||
| 106 | + | 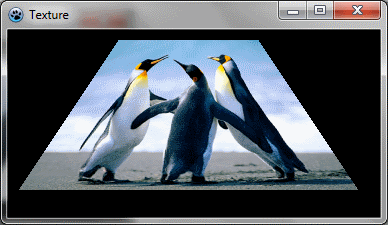 | |
| 116 | 107 | ||
| 117 | 108 | #### Perspective mapping | |
| 118 | 109 | ||
| 119 | 110 | The perspective mapping allow to change the depth of each point. | |
| 120 | 111 | ||
| 121 | 112 | ``` pascal | |
| 122 | 113 | procedure TForm1.PaintImage; | |
| 123 | 114 | var image: TBGRABitmap; | |
| 124 | 115 | tex: TBGRABitmap; | |
| 125 | 116 | begin | |
| 126 | 117 | image := TBGRABitmap.Create(ClientWidth,ClientHeight, BGRABlack ); | |
| 127 | 118 | ||
| 128 | 119 | tex:= TBGRABitmap.Create('image.png'); | |
| 129 | 120 | image.FillPolyPerspectiveMapping( [PointF(110,10), PointF(250,10), PointF(350,160), PointF(10,160)], | |
| 130 | 121 | [75, 75, 50, 50], | |
| 131 | 122 | tex, [PointF(0,0), PointF(tex.width-1,0), PointF(tex.Width-1,tex.Height-1), PointF(0,tex.Height-1)], true); | |
| 132 | 123 | tex.Free; | |
| 133 | 124 | ||
| 134 | 125 | image.Draw(Canvas,0,0,True); | |
| 135 | 126 | image.free; | |
| 136 | 127 | end; | |
| 137 | 128 | ``` | |
| 138 | 129 | ||
| 139 | 130 | Here the depth is 75 for the top of the polygon and 50 for the bottom of the polygon. It means that the bottom is closer to the observer, as if it were horizontal, like a floor. | |
| 140 | 131 | ||
| 141 | 132 | #### Run the program | |
| 142 | 133 | ||
| 143 | 134 | Now it seems that it is a 3D polygon: | |
| 144 | 135 | ||
| 145 | - | ||
| 146 | - | ||
| 147 | - | ||
| 148 | - | ||
| 136 | + | 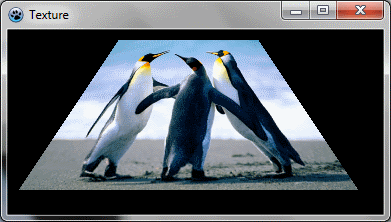 | |
| 149 | 137 | ||
| 150 | 138 | ### Conclusion | |
| 151 | 139 | ||
| 152 | 140 | Using these techniques, it is possible to deform an image, like in LazPaint tool "grid deformation", or to render 3D objects with textures, like in tests 19-21 of testbgrafunc (also in LazPaint archive). | |
| 153 | 141 | ||
| 154 | 142 | [[BGRABitmap tutorial 9|Previous tutorial (phong shading)]] [[BGRABitmap tutorial 11|Next tutorial (combining transformations)]] | |
| 155 | 143 | ||
| 156 | 144 | --- | |
| 157 | 145 | *From the Free Pascal wiki, page "BGRABitmap tutorial 10", as it stood on 2023-05-20 after a change by Circular, out of the wiki's dump of 2024-05-26. Copyright stays with the author who wrote it, according to the old wiki's [[Licensing]] page. If you have concerns about this material, [message the admin](/wiki-contact).* | |
| 158 | 146 | Category: BGRABitmap | |
| 159 | 147 | Category: Graphics |