

BGRABitmap tutorial 10/fr: what changed
Revision 1 to 2. Removed lines have a minus sign; added lines have a plus sign.
| Old | New | Line | |
|---|---|---|---|
| 1 | 1 | Ce tutoriel montre comment utiliser le plaquage de texture. | |
| 2 | 2 | ||
| 3 | 3 | ### Création d'un nouveau projet | |
| 4 | 4 | ||
| 5 | 5 | Créez un nouveau projet et ajoutez la référence à [[BGRABitmap]], de la même façon que dans [[BGRABitmap tutorial/fr|le premier tutoriel]]. | |
| 6 | 6 | ||
| 7 | 7 | ### Sans placage particulier | |
| 8 | 8 | ||
| 9 | 9 | Regardez ce qu'il arrive si on dessine un polygone avec une texture en utilisant le placage par défaut : | |
| 10 | 10 | ||
| 11 | 11 | ``` pascal | |
| 12 | 12 | procedure TForm1.FormPaint(Sender: TObject); | |
| 13 | 13 | var image: TBGRABitmap; | |
| 14 | 14 | tex: TBGRABitmap; | |
| 15 | 15 | begin | |
| 16 | 16 | //fond noir | |
| 17 | 17 | image := TBGRABitmap.Create(ClientWidth,ClientHeight, BGRABlack ); | |
| 18 | 18 | ||
| 19 | 19 | tex:= TBGRABitmap.Create('image.png'); //charge un image | |
| 20 | 20 | image.FillPolyAntialias( [PointF(110,10), PointF(250,10), PointF(350,160), PointF(10,160)], tex); | |
| 21 | 21 | tex.Free; | |
| 22 | 22 | ||
| 23 | 23 | image.Draw(Canvas,0,0,True); //dessine à l'écran | |
| 24 | 24 | image.free; | |
| 25 | 25 | end; | |
| 26 | 26 | ``` | |
| 27 | 27 | ||
| 28 | 28 | ### Exécution du programme | |
| 29 | 29 | ||
| 30 | 30 | Vous devriez obtenir quelque chose comme cela : | |
| 31 | 31 | ||
| 32 | - | ||
| 33 | - | ||
| 34 | - | ||
| 35 | - | ||
| 32 | + | 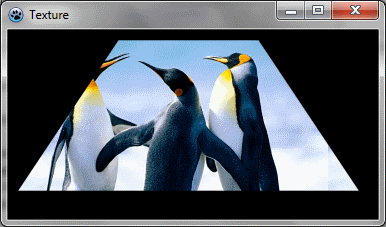 | |
| 36 | 33 | ||
| 37 | 34 | Comme vous pouvez le voir, l'image n'est pas déformée. | |
| 38 | 35 | ||
| 39 | 36 | ### Transformation affine | |
| 40 | 37 | ||
| 41 | 38 | Vous pouvez appliquer une transformation affine comme cela : | |
| 42 | 39 | ||
| 43 | 40 | ``` pascal | |
| 44 | 41 | procedure TForm1.PaintImage; | |
| 45 | 42 | var image: TBGRABitmap; | |
| 46 | 43 | tex: TBGRABitmap; | |
| 47 | 44 | affine: TBGRAAffineBitmapTransform; | |
| 48 | 45 | ||
| 49 | 46 | begin | |
| 50 | 47 | //fond noir | |
| 51 | 48 | image := TBGRABitmap.Create(ClientWidth,ClientHeight, BGRABlack ); | |
| 52 | 49 | ||
| 53 | 50 | tex:= TBGRABitmap.Create('image.png'); //charge une image | |
| 54 | 51 | ||
| 55 | 52 | //création d'une rotation de 45° | |
| 56 | 53 | affine := TBGRAAffineBitmapTransform.Create(tex,True); | |
| 57 | 54 | affine.RotateDeg(45); | |
| 58 | 55 | ||
| 59 | 56 | //utiliser cette transformation comme paramètre à la place de tex | |
| 60 | 57 | image.FillPolyAntialias( [PointF(110,10), PointF(250,10), PointF(350,160), PointF(10,160)], affine); | |
| 61 | 58 | ||
| 62 | 59 | affine.Free; | |
| 63 | 60 | tex.Free; | |
| 64 | 61 | ||
| 65 | 62 | image.Draw(Canvas,0,0,True); //dessin à l'écran | |
| 66 | 63 | image.free; | |
| 67 | 64 | end; | |
| 68 | 65 | ``` | |
| 69 | 66 | ||
| 70 | 67 | ### Exécution du programme | |
| 71 | 68 | ||
| 72 | 69 | Vous devriez obtenir une image tournée à l'intérieur du polygone : | |
| 73 | 70 | ||
| 74 | - | ||
| 75 | - | ||
| 76 | - | ||
| 77 | - | ||
| 71 | + | 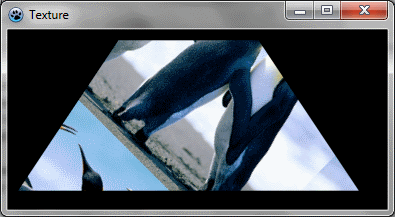 | |
| 78 | 72 | ||
| 79 | 73 | ### Placage de texture | |
| 80 | 74 | ||
| 81 | 75 | Maintenant, si vous voulez que la texture soit alignée avec les bords du polygone, vous pouvez utiliser le placage de texture. | |
| 82 | 76 | ||
| 83 | 77 | #### Placage linéaire | |
| 84 | 78 | ||
| 85 | 79 | Le placage linéaire étire l'image le long des bords. Pour faire cela : | |
| 86 | 80 | ||
| 87 | 81 | ``` pascal | |
| 88 | 82 | procedure TForm1.PaintImage; | |
| 89 | 83 | var image: TBGRABitmap; | |
| 90 | 84 | tex: TBGRABitmap; | |
| 91 | 85 | begin | |
| 92 | 86 | image := TBGRABitmap.Create(ClientWidth,ClientHeight, BGRABlack ); | |
| 93 | 87 | ||
| 94 | 88 | tex:= TBGRABitmap.Create('image.png'); | |
| 95 | 89 | image.FillPolyLinearMapping( [PointF(110,10), PointF(250,10), PointF(350,160), PointF(10,160)], tex, | |
| 96 | 90 | [PointF(0,0), PointF(tex.width-1,0), PointF(tex.Width-1,tex.Height-1), PointF(0,tex.Height-1)], true); | |
| 97 | 91 | tex.Free; | |
| 98 | 92 | ||
| 99 | 93 | image.Draw(Canvas,0,0,True); | |
| 100 | 94 | image.free; | |
| 101 | 95 | end; | |
| 102 | 96 | ``` | |
| 103 | 97 | ||
| 104 | 98 | Pour faire le placage, vous utilisez *FillPolyLinearMapping*. De nouveaux paramètres sont apparus. Les coordonnées de la texture définissent, pour chaque sommet du polygone, la position dans la texture. L'option d'interpolation est utilisée pour une meilleure qualité. | |
| 105 | 99 | ||
| 106 | 100 | #### Exécution du programme | |
| 107 | 101 | ||
| 108 | 102 | À présent, la texture est déformée selon la forme polygonale : | |
| 109 | 103 | ||
| 110 | - | ||
| 111 | - | ||
| 112 | - | ||
| 113 | - | ||
| 104 | + | 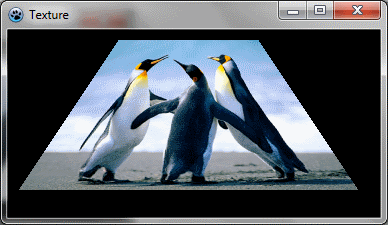 | |
| 114 | 105 | ||
| 115 | 106 | #### Placage avec perspective | |
| 116 | 107 | ||
| 117 | 108 | Le placage avec perspective permet de définir pour chaque point sa profondeur. | |
| 118 | 109 | ||
| 119 | 110 | ``` pascal | |
| 120 | 111 | procedure TForm1.PaintImage; | |
| 121 | 112 | var image: TBGRABitmap; | |
| 122 | 113 | tex: TBGRABitmap; | |
| 123 | 114 | begin | |
| 124 | 115 | image := TBGRABitmap.Create(ClientWidth,ClientHeight, BGRABlack ); | |
| 125 | 116 | ||
| 126 | 117 | tex:= TBGRABitmap.Create('image.png'); | |
| 127 | 118 | image.FillPolyPerspectiveMapping( [PointF(110,10), PointF(250,10), PointF(350,160), PointF(10,160)], | |
| 128 | 119 | [75, 75, 50, 50], | |
| 129 | 120 | tex, [PointF(0,0), PointF(tex.width-1,0), PointF(tex.Width-1,tex.Height-1), PointF(0,tex.Height-1)], true); | |
| 130 | 121 | tex.Free; | |
| 131 | 122 | ||
| 132 | 123 | image.Draw(Canvas,0,0,True); | |
| 133 | 124 | image.free; | |
| 134 | 125 | end; | |
| 135 | 126 | ``` | |
| 136 | 127 | ||
| 137 | 128 | Ici, la profondeur est de 75 pour le haut du polygone et de 50 pour le bas. Cela signifie que le bas est plus proche de l'observateur, comme s'il était horizontal, à la manière d'un plancher. | |
| 138 | 129 | ||
| 139 | 130 | #### Exécution du programme | |
| 140 | 131 | ||
| 141 | 132 | Maintenant, on a l'impression que c'est un polygone en 3D : | |
| 142 | 133 | ||
| 143 | - | ||
| 144 | - | ||
| 145 | - | ||
| 146 | - | ||
| 134 | + | 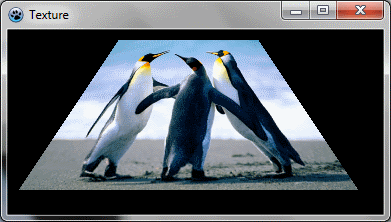 | |
| 147 | 135 | ||
| 148 | 136 | ### Conclusion | |
| 149 | 137 | ||
| 150 | 138 | Avec ces techniques, il est possible de déformer une image, comme dans l'outil "grille de déformation" de LazPaint, ou pour dessiner des objets en 3D avec textures, comme dans les tests 19-21 de *testbgrafunc* (aussi dans l'archive de LazPaint). | |
| 151 | 139 | ||
| 152 | 140 | [[BGRABitmap tutorial 9/fr|Tutoriel précédent (éclairage de phong)]] \| [[BGRABitmap tutorial 11/fr|Tutoriel suivant (combiner les transformations)]] | |
| 153 | 141 | ||
| 154 | 142 | --- | |
| 155 | 143 | *From the Free Pascal wiki, page "BGRABitmap tutorial 10/fr", as it stood on 2020-02-09 after a change by Trev, out of the wiki's dump of 2024-05-26. Copyright stays with the author who wrote it, according to the old wiki's [[Licensing]] page. If you have concerns about this material, [message the admin](/wiki-contact).* |