

BGRABitmap tutorial 10/es: what changed
Revision 1 to 2. Removed lines have a minus sign; added lines have a plus sign.
| Old | New | Line | |
|---|---|---|---|
| 1 | 1 | Esta tutoría muestra como usar mapeo de texturas. | |
| 2 | 2 | ||
| 3 | 3 | ### Crear un nuevo proyecto | |
| 4 | 4 | ||
| 5 | 5 | Crea un nuevo proyecto y añade referencia a [[BGRABitmap]], de la misma forma que en [[BGRABitmap tutorial/es|la primer tutoría]]. | |
| 6 | 6 | ||
| 7 | 7 | ### Usando mapeo no particular | |
| 8 | 8 | ||
| 9 | 9 | Veamos que pasa cuando dibujamos un polígono con una textura usando el mapeo predeterminado : | |
| 10 | 10 | ||
| 11 | 11 | ``` pascal | |
| 12 | 12 | procedure TForm1.FormPaint(Sender: TObject); | |
| 13 | 13 | var image: TBGRABitmap; | |
| 14 | 14 | tex: TBGRABitmap; | |
| 15 | 15 | begin | |
| 16 | 16 | //black background | |
| 17 | 17 | image := TBGRABitmap.Create(ClientWidth,ClientHeight, BGRABlack ); | |
| 18 | 18 | ||
| 19 | 19 | tex:= TBGRABitmap.Create('image.png'); //cargar un bitmap | |
| 20 | 20 | image.FillPolyAntialias( [PointF(110,10), PointF(250,10), PointF(350,160), PointF(10,160)], tex); | |
| 21 | 21 | tex.Free; | |
| 22 | 22 | ||
| 23 | 23 | image.Draw(Canvas,0,0,True); //dibujar en la pantalla | |
| 24 | 24 | image.free; | |
| 25 | 25 | end; | |
| 26 | 26 | ``` | |
| 27 | 27 | ||
| 28 | 28 | ### Ejecuta el programa | |
| 29 | 29 | ||
| 30 | 30 | Deberías obtener algo parecido a esto : | |
| 31 | 31 | ||
| 32 | - | ||
| 33 | - | ||
| 34 | - | ||
| 35 | - | ||
| 32 | + | 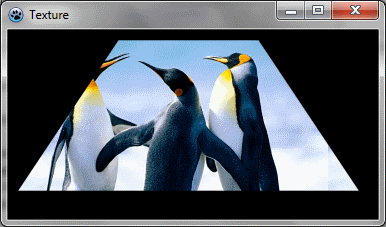 | |
| 36 | 33 | ||
| 37 | 34 | Como puedes ver la imágen no es deformada. | |
| 38 | 35 | ||
| 39 | 36 | ### Transformación afín | |
| 40 | 37 | ||
| 41 | 38 | Podemos aplicar transformación afín como esta : | |
| 42 | 39 | ||
| 43 | 40 | ``` pascal | |
| 44 | 41 | uses BGRABitmap, BGRABitmapTypes, BGRATransform; | |
| 45 | 42 | ||
| 46 | 43 | procedure TForm1.PaintImage; | |
| 47 | 44 | var image: TBGRABitmap; | |
| 48 | 45 | tex: TBGRABitmap; | |
| 49 | 46 | affine: TBGRAAffineBitmapTransform; | |
| 50 | 47 | ||
| 51 | 48 | begin | |
| 52 | 49 | //fondo negro | |
| 53 | 50 | image := TBGRABitmap.Create(ClientWidth,ClientHeight, BGRABlack ); | |
| 54 | 51 | ||
| 55 | 52 | tex:= TBGRABitmap.Create('image.png'); //load a bitmap | |
| 56 | 53 | ||
| 57 | 54 | //crear rotación de 45° | |
| 58 | 55 | affine := TBGRAAffineBitmapTransform.Create(tex,True); | |
| 59 | 56 | affine.RotateDeg(45); | |
| 60 | 57 | ||
| 61 | 58 | //usar esta transformación como parámetro en vez de tex | |
| 62 | 59 | image.FillPolyAntialias( [PointF(110,10), PointF(250,10), PointF(350,160), PointF(10,160)], affine); | |
| 63 | 60 | ||
| 64 | 61 | affine.Free; | |
| 65 | 62 | tex.Free; | |
| 66 | 63 | ||
| 67 | 64 | image.Draw(Canvas,0,0,True); //dibujar en la pantalla | |
| 68 | 65 | image.free; | |
| 69 | 66 | end; | |
| 70 | 67 | ``` | |
| 71 | 68 | ||
| 72 | 69 | ### Ejecutar el programa | |
| 73 | 70 | ||
| 74 | 71 | Deberías obtener una imágen rotada en el polígono : | |
| 75 | 72 | ||
| 76 | - | ||
| 77 | - | ||
| 78 | - | ||
| 79 | - | ||
| 73 | + | 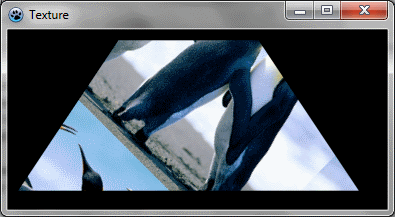 | |
| 80 | 74 | ||
| 81 | 75 | ### Mapeo de texturas | |
| 82 | 76 | ||
| 83 | 77 | Ahora, si queremos que la textura sea alineada con el borde del polígono, podemos usar mapeo de texturas. | |
| 84 | 78 | ||
| 85 | 79 | #### Mapeo linear | |
| 86 | 80 | ||
| 87 | 81 | Mapeo linear ajusta la imágen linearmente a traves de los bordes. Para hacer esto : | |
| 88 | 82 | ||
| 89 | 83 | ``` pascal | |
| 90 | 84 | procedure TForm1.PaintImage; | |
| 91 | 85 | var image: TBGRABitmap; | |
| 92 | 86 | tex: TBGRABitmap; | |
| 93 | 87 | begin | |
| 94 | 88 | image := TBGRABitmap.Create(ClientWidth,ClientHeight, BGRABlack ); | |
| 95 | 89 | ||
| 96 | 90 | tex:= TBGRABitmap.Create('image.png'); | |
| 97 | 91 | image.FillPolyLinearMapping( [PointF(110,10), PointF(250,10), PointF(350,160), PointF(10,160)], tex, | |
| 98 | 92 | [PointF(0,0), PointF(tex.width-1,0), PointF(tex.Width-1,tex.Height-1), PointF(0,tex.Height-1)], true); | |
| 99 | 93 | tex.Free; | |
| 100 | 94 | ||
| 101 | 95 | image.Draw(Canvas,0,0,True); | |
| 102 | 96 | image.free; | |
| 103 | 97 | end; | |
| 104 | 98 | ``` | |
| 105 | 99 | ||
| 106 | 100 | Para hacer el mapeo, usamos FillPolyLinearMapping. Algunos nuevos parámetros aparecen. Las coordenadas de la textura definen, para cada punto del polígono, la posición en la textura. La opción de interpolación es usada para mejor calidad. | |
| 107 | 101 | ||
| 108 | 102 | #### Ejecuta el programa | |
| 109 | 103 | ||
| 110 | 104 | Ahora la textura es deformada de acuerdo a la figura poligonal. | |
| 111 | 105 | ||
| 112 | - | ||
| 113 | - | ||
| 114 | - | ||
| 115 | - | ||
| 106 | + | 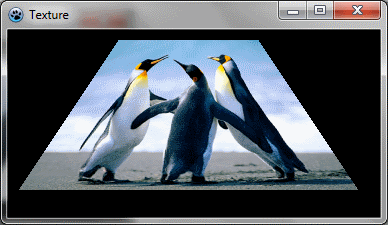 | |
| 116 | 107 | ||
| 117 | 108 | #### Mapeo de perspectiva | |
| 118 | 109 | ||
| 119 | 110 | El mapeo de perspectiva permita cambiar la profundidad de cada punto. | |
| 120 | 111 | ||
| 121 | 112 | ``` pascal | |
| 122 | 113 | procedure TForm1.PaintImage; | |
| 123 | 114 | var image: TBGRABitmap; | |
| 124 | 115 | tex: TBGRABitmap; | |
| 125 | 116 | begin | |
| 126 | 117 | image := TBGRABitmap.Create(ClientWidth,ClientHeight, BGRABlack ); | |
| 127 | 118 | ||
| 128 | 119 | tex:= TBGRABitmap.Create('image.png'); | |
| 129 | 120 | image.FillPolyPerspectiveMapping( [PointF(110,10), PointF(250,10), PointF(350,160), PointF(10,160)], | |
| 130 | 121 | [75, 75, 50, 50], | |
| 131 | 122 | tex, [PointF(0,0), PointF(tex.width-1,0), PointF(tex.Width-1,tex.Height-1), PointF(0,tex.Height-1)], true); | |
| 132 | 123 | tex.Free; | |
| 133 | 124 | ||
| 134 | 125 | image.Draw(Canvas,0,0,True); | |
| 135 | 126 | image.free; | |
| 136 | 127 | end; | |
| 137 | 128 | ``` | |
| 138 | 129 | ||
| 139 | 130 | Aquí la profundidad es 75 para la parte superior del polígono y 50 para la parte inferior del polígono. Esto significa que la parte inferior está mas cerca del observador, como si fuera horizontal, como un suelo. | |
| 140 | 131 | ||
| 141 | 132 | #### Ejecuta el programa | |
| 142 | 133 | ||
| 143 | 134 | Ahora parece que esto es un polígono 3D : | |
| 144 | 135 | ||
| 145 | - | ||
| 146 | - | ||
| 147 | - | ||
| 148 | - | ||
| 136 | + | 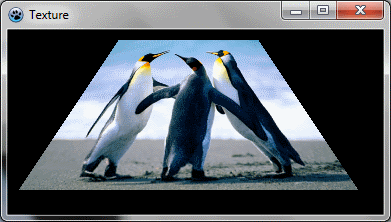 | |
| 149 | 137 | ||
| 150 | 138 | ### Conclusion | |
| 151 | 139 | ||
| 152 | 140 | Usando estas técnicas, es posible deformar una imágen, como en la herramienta de LazPaint "grid deformation", o para renderizar objetos 3D con texturas, como en los test 19-21 de testbgrafunc (también en el archivo de LazPaint). | |
| 153 | 141 | ||
| 154 | 142 | [[BGRABitmap tutorial 9/es|Tutoría anterior (phong shading y texturas)]] \| [[BGRABitmap tutorial 11/es|Siguiente tutoría (combinando transformaciones)]] | |
| 155 | 143 | ||
| 156 | 144 | --- | |
| 157 | 145 | *From the Free Pascal wiki, page "BGRABitmap tutorial 10/es", as it stood on 2020-02-09 after a change by Trev, out of the wiki's dump of 2024-05-26. Copyright stays with the author who wrote it, according to the old wiki's [[Licensing]] page. If you have concerns about this material, [message the admin](/wiki-contact).* | |
| 158 | 146 | Category: Castellano | |
| 159 | 147 | Category: Español |